How to Add About Me Widget on WordPress [Visual Guide]

Want to enhance the connection with your website visitors and simultaneously boost your SEO? Wondering how adding more about yourself on your website can help you achieve these goals? Then, this article is a must-read. Join me as I guide you through the process of adding an “About Me” widget on WordPress.
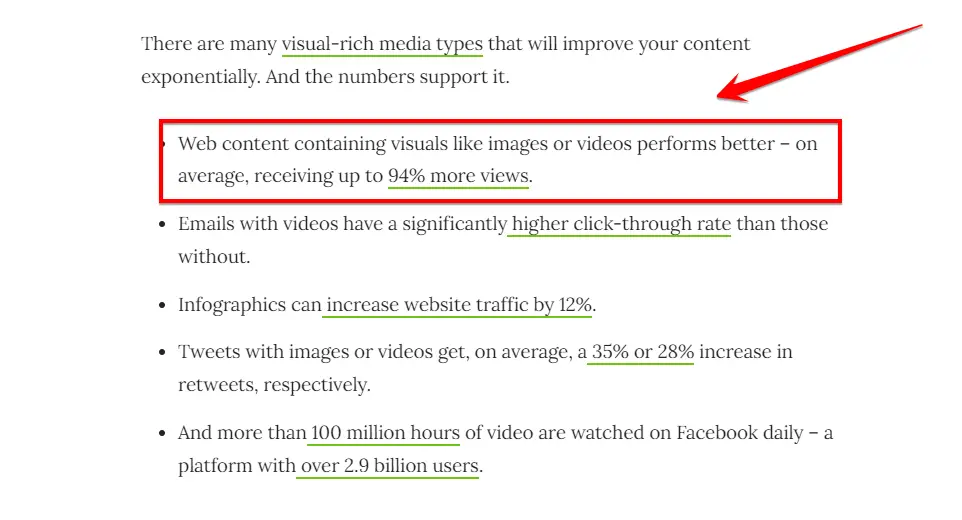
Did you know that according to Search Engine Journal, web content with visual elements can attract up to 94% more views on average? This insight underscores the significance of an “About Me” widget, which seamlessly blends text and visuals to enhance your WordPress site’s allure and drive more traffic.
In this article, you will learn:
- How to add the ‘About Me’ widget in WordPress
- Benefits of having an ‘About Me’ widget on your site
- Tips to make your ‘About Me’ widget more effective
Are you prepared to interact with your audience and make your website more welcoming? Let’s explore WordPress widgets and discover how to improve your site by adding an attractive about me section using a WordPress widget.
Table of Contents
First things first, in case you’re not very familiar with it, an “About Me” widget is a feature that allows you to display text and images about yourself on your website. It can help create a personal touch with your audience, making them feel more welcome.
As a WordPress user myself, I know how tricky plugins and customization can be at times.
In this quick tutorial, I will guide you through the process I used to add the widget to my own site. With helpful screenshots showing the method, you’ll be able to set up an attention-grabbing About Me box tailored to your brand in no time.
Whether you’re new to WordPress or have been using it for years, you may have wondered about including an “About Me” section without coding new templates. Let’s dive in!
Please Wait!
Well, I’m here to show you the two approaches that have worked well for me. I’m sure they will work great for you too! All that’s needed is a widget-ready WordPress theme. In just a few minutes, you can insert a nice bio, photo, and other details you want visitors to see.
Now that we’ve set the stage, let’s finally dive in! 😂
Method 1: Add an About Me Widget Without a Plugin
The standard Text widget built into WordPress works well for adding simple text and image content like an About Me. This method is good for WordPress beginners who don’t want to use plugins.
Let’s walk through a complete step-by-step process of using the Text widget to add an About Me from start to finish.
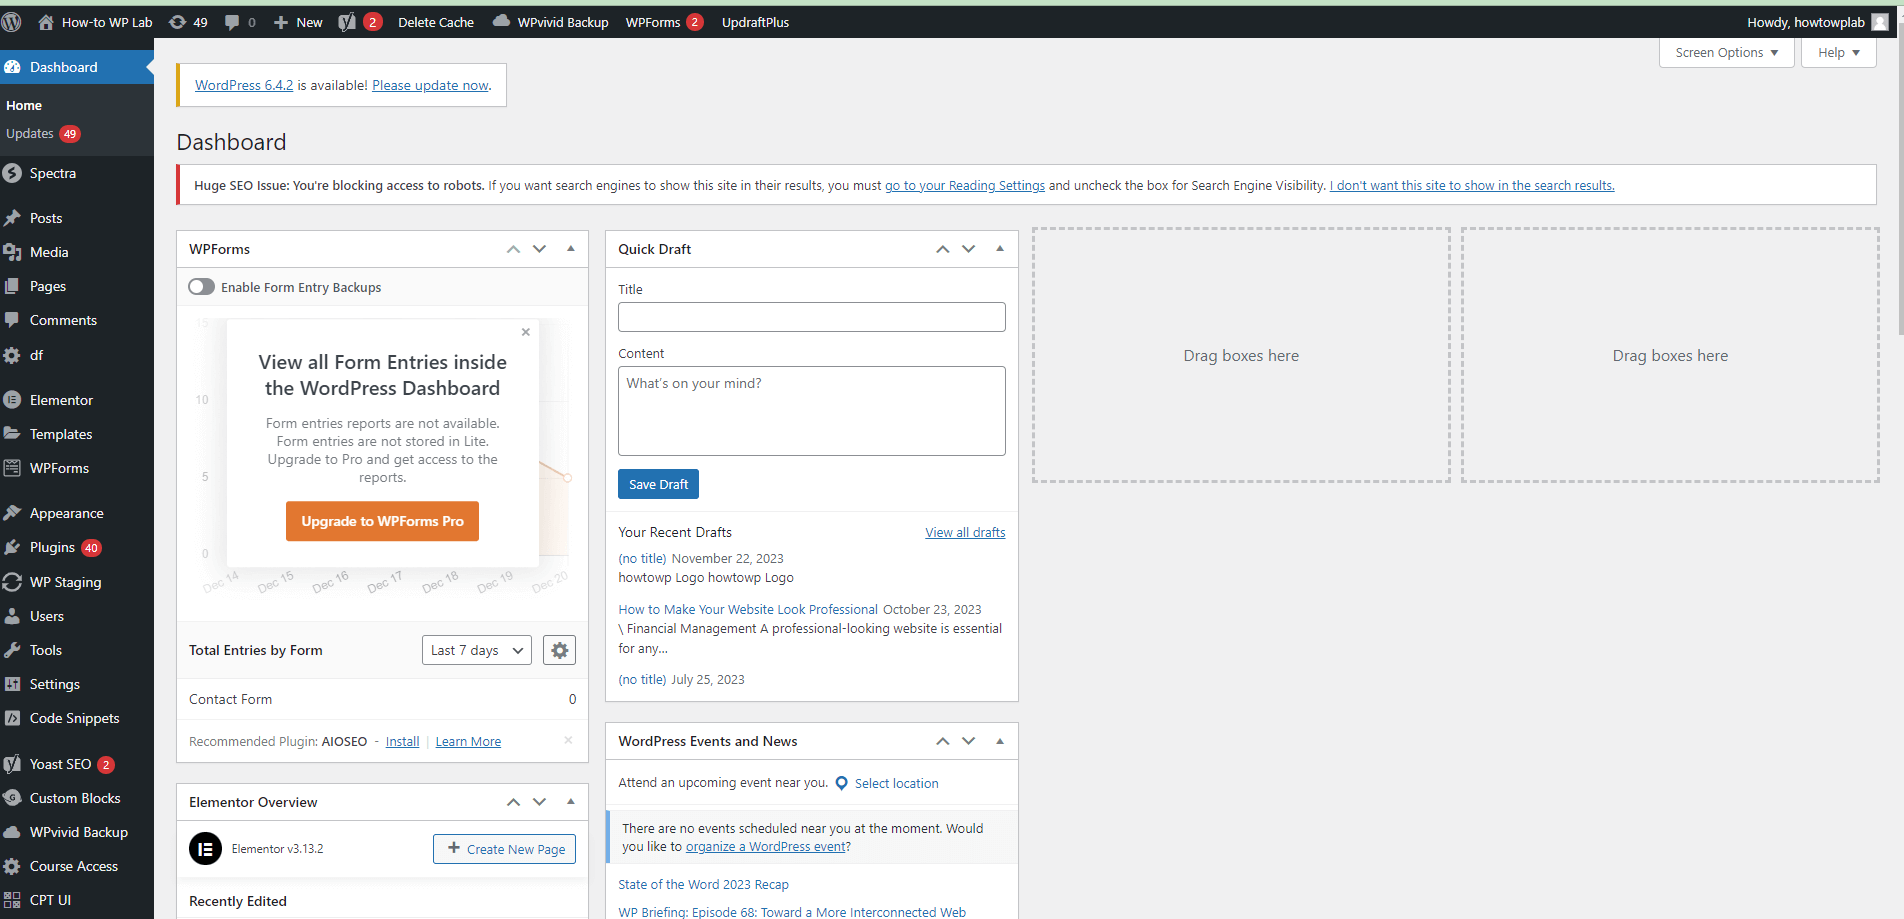
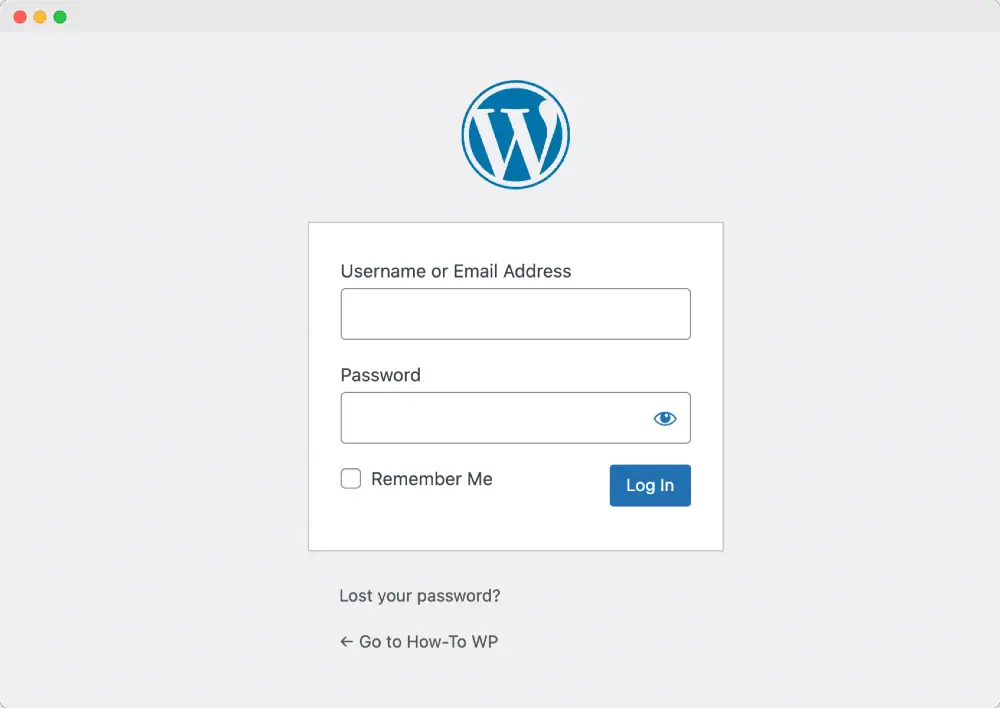
Step 1: Log in to your WordPress site and access the “Dashboard” interface.
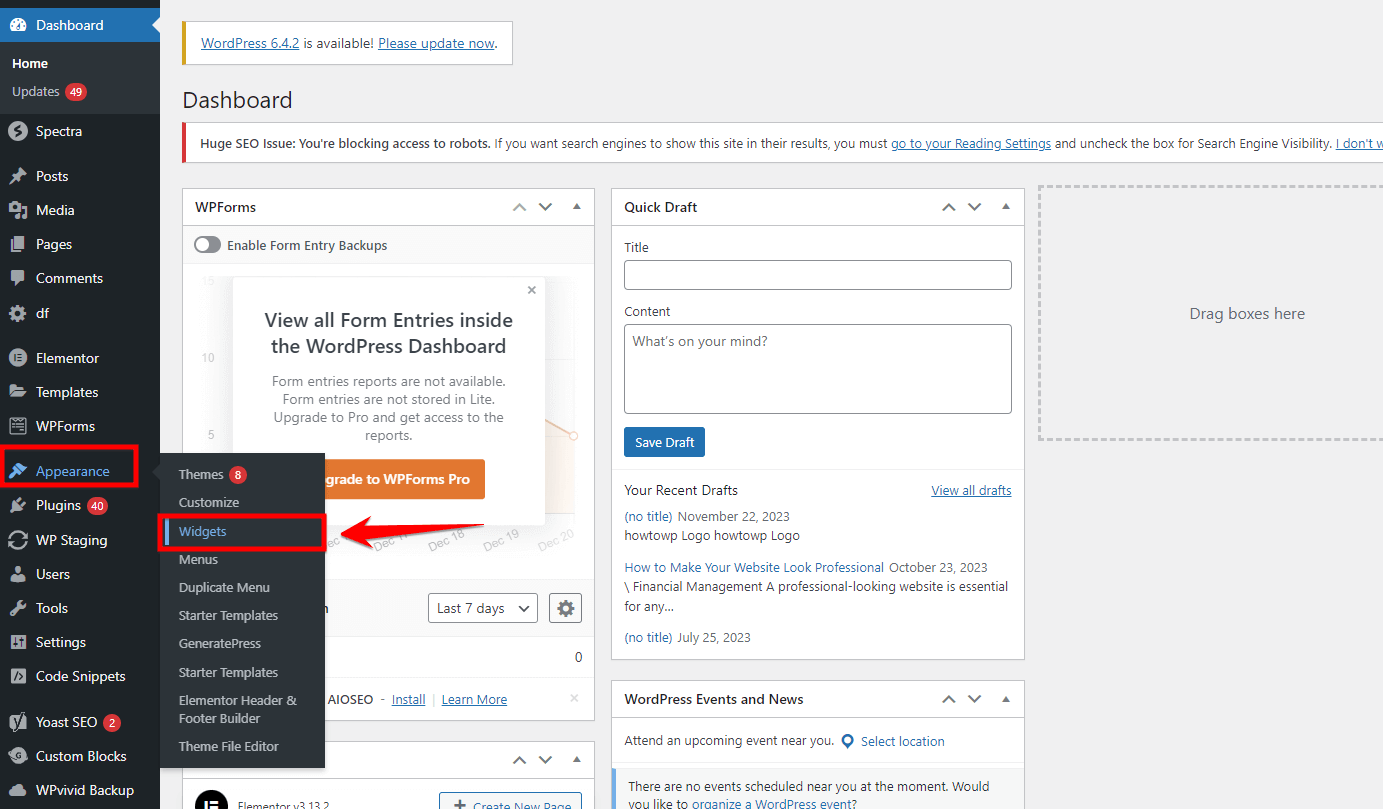
Step 2: Navigate to the “Appearance” section and select “Widgets” from the menu.
Step 3: Go to the widget page, where you’ll find a “+” sign. Click on this “+” button found under the section called the “right sidebar”. After that, look for an icon that looks like “π”. Once you spot it, add a paragraph block and simply click on it.
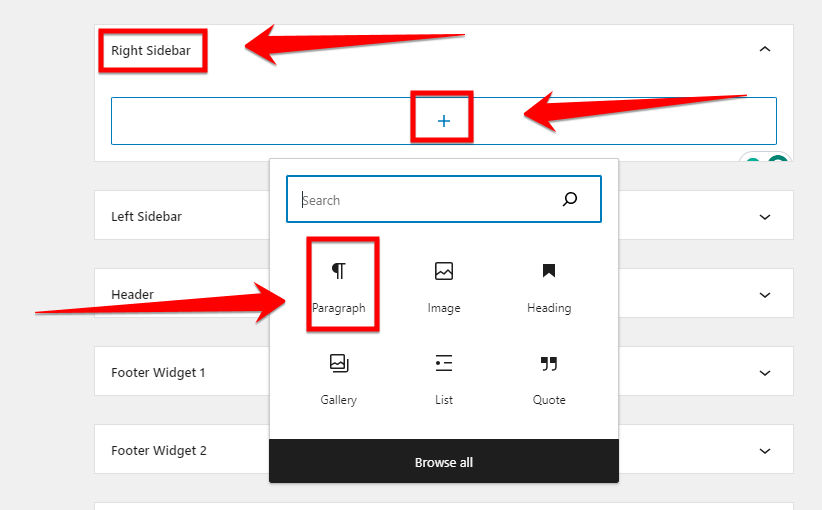
Note: You can also drag and drop the Text widget into the desired widget area, such as the sidebar or footer.
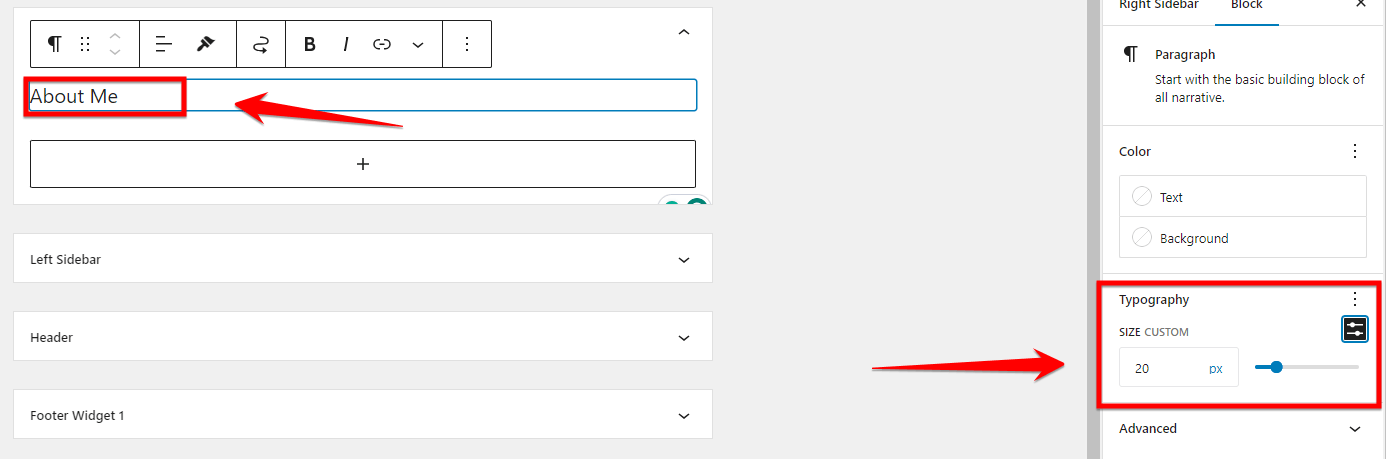
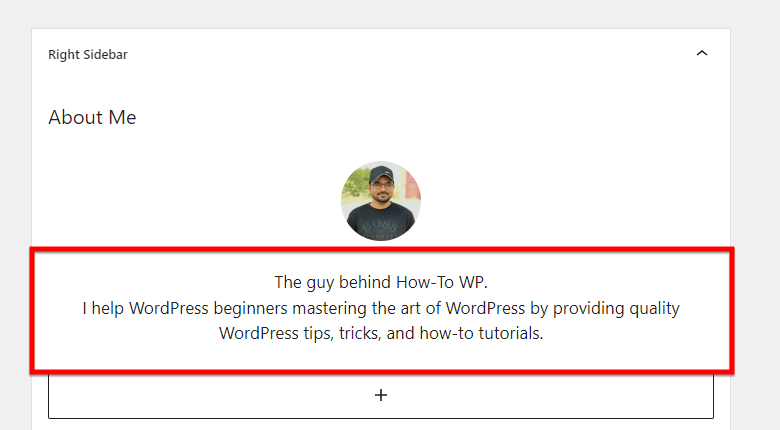
Step 4: In the settings for the “Text “Paragraph” widget, provide an appropriate title for your “About Me” section. Furthermore, click on the block section and find the “Typography” section in order to adjust the font size. When you find it, alter the font size to “20”.
Note: Add the desired text content, introduce yourself, and provide any relevant information you wish to share.
Step 5: Afterwards, click the “+” sign again and seek the “Image” block. Proceed to select the block.
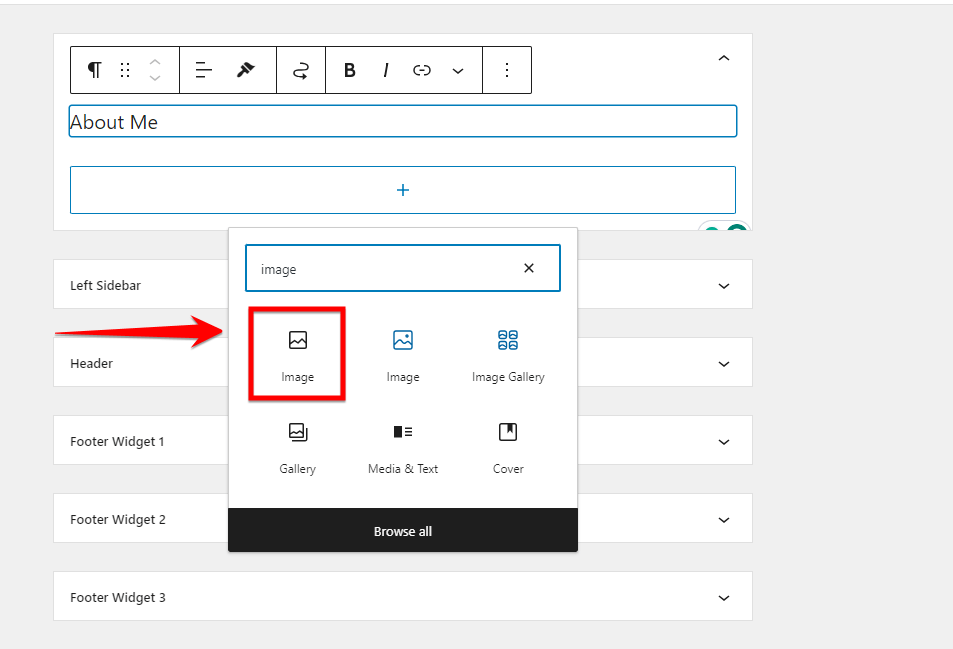
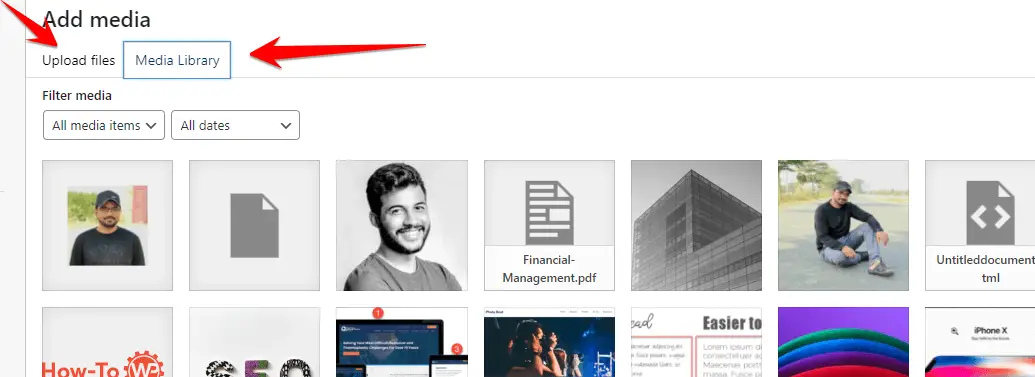
Step 6: Upon selecting the “Image” block, you will find three options labeled “Upload,” “Media Library,” and “Insert from URL”
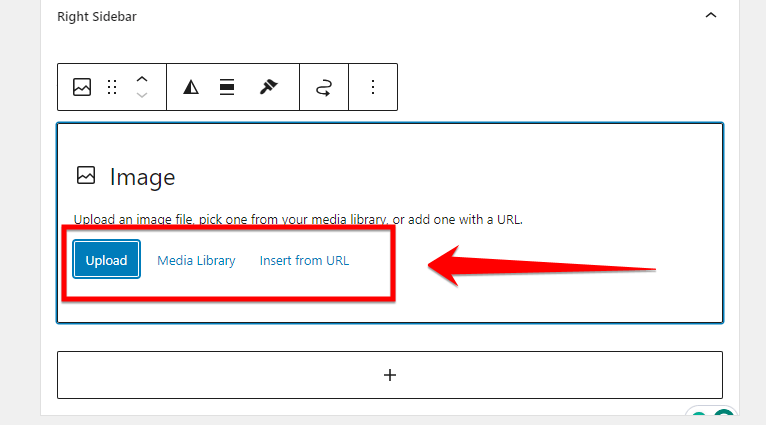
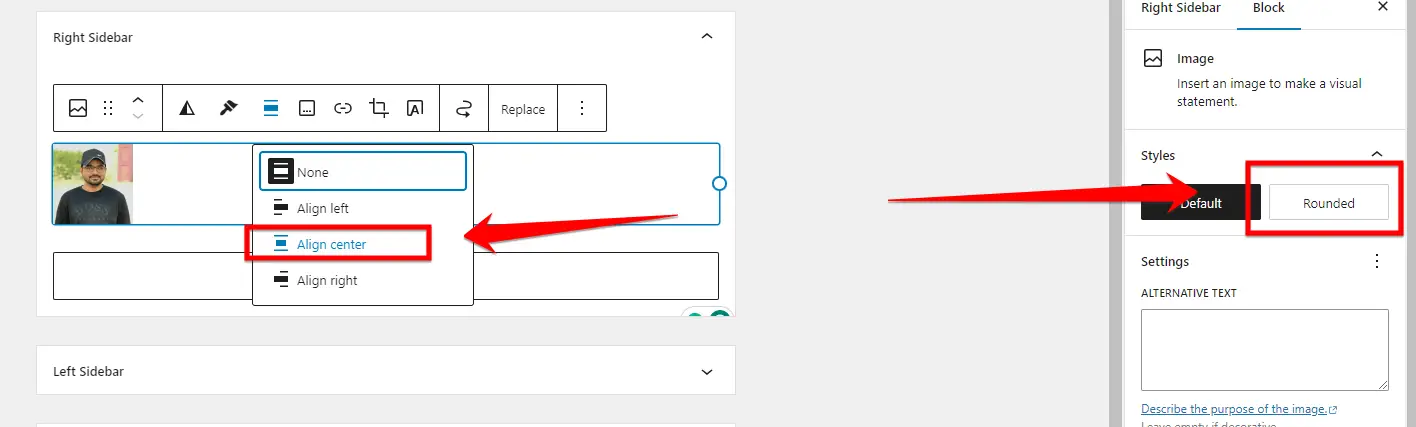
Step 7: Click the “Upload” option and choose any desired image. Once you have selected the image, adjust the alignment by clicking on “Align center” and make the image rounded.
Step 8: To proceed with the second-to-last step, click on the “+” sign once more and add a “paragraph” block. In this block, you can write a description about yourself or anything you wish to showcase in the “About Me” widget.
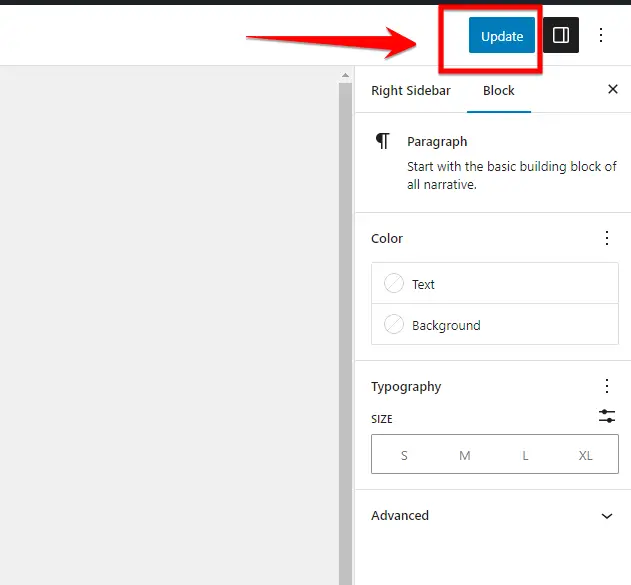
Step 9: Once you have added and formatted the content to your liking, click on the “Update” button to save the changes.
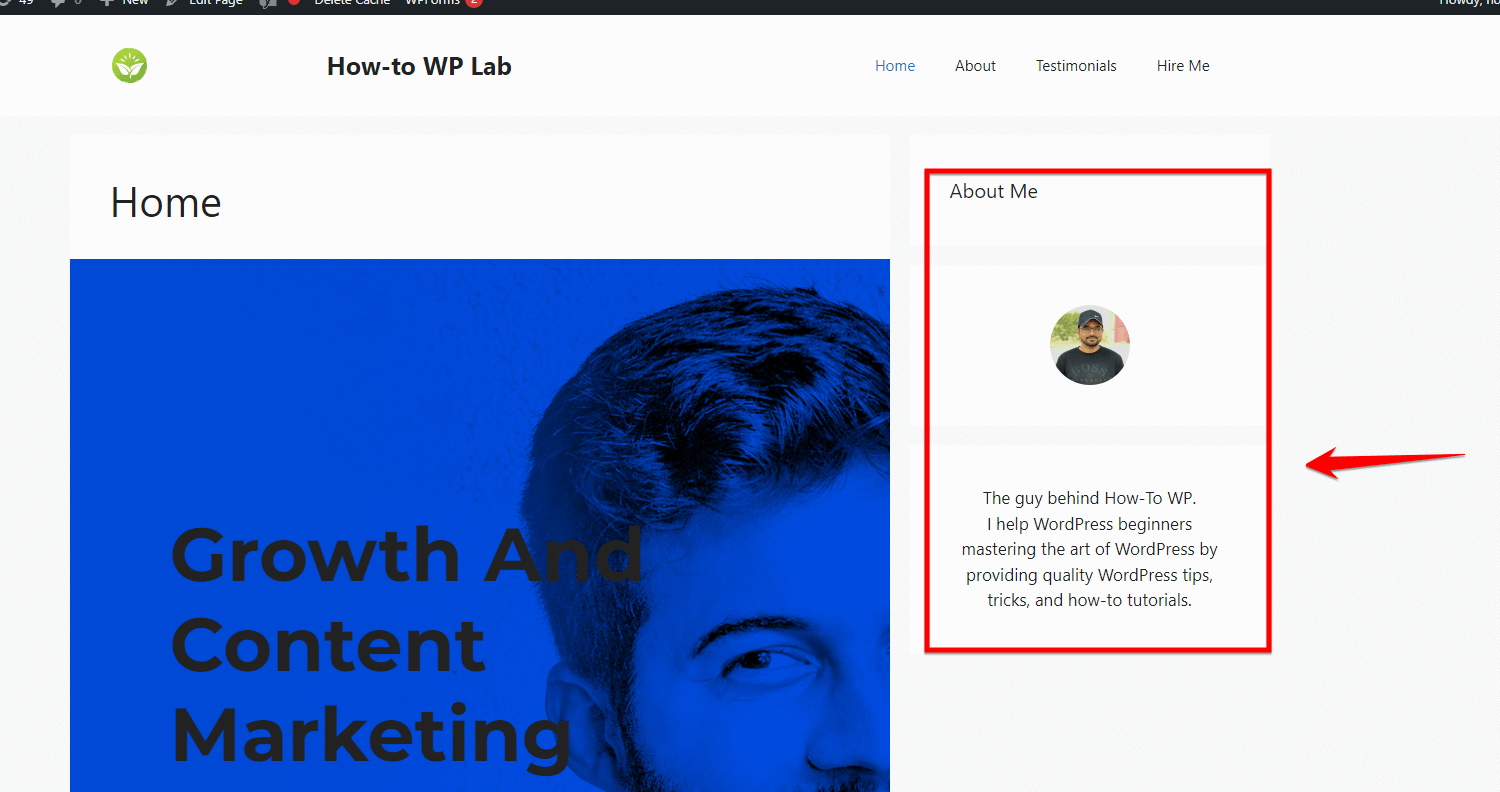
Step 10: Preview your website to see how the “About Me” widget appears in the chosen widget area.
Pros
- No plugins required
- Simple and easy process
- Text widget comes built into WordPress
Cons
- Less customization options
Please Note: I’m just going to be straight with you – this is the method I recommend. Why? Because who really wants to install yet another plugin that will slow down your site and introduce security vulnerabilities when WordPress already has all you need built-in?
The Text widget gets the job done to create a simple, nice-looking About Me without any plugin bloat. Take the easy route that requires zero extra plugins. Your site will load faster, your visitors will be happier, and you can rest easy, avoiding unnecessary plugins.
Trust me, for a basic About Me, keep it simple and stick with the built-in Text widget.
Now, let’s dive into method 2 as an alternative approach.
Method 2: Add an About Me Widget on WordPress With a Plugin
If you want additional customization for your About Me widget, using a dedicated plugin provides more advanced features and options beyond the basic WordPress Text widget. But it requires installing an extra plugin.
This method is ideal for intermediate/advanced WordPress users who are comfortable with installing plugins and desiring more robust tools for customizing their About Me section.
Let’s walk through the process of using the plugin to add an enhanced About Me widget in the WordPress sidebar.
Step 1: Log in to the “WordPress dashboard” for the site you want to modify. You can access the dashboard by accessing the website’s login page and entering your login credentials.
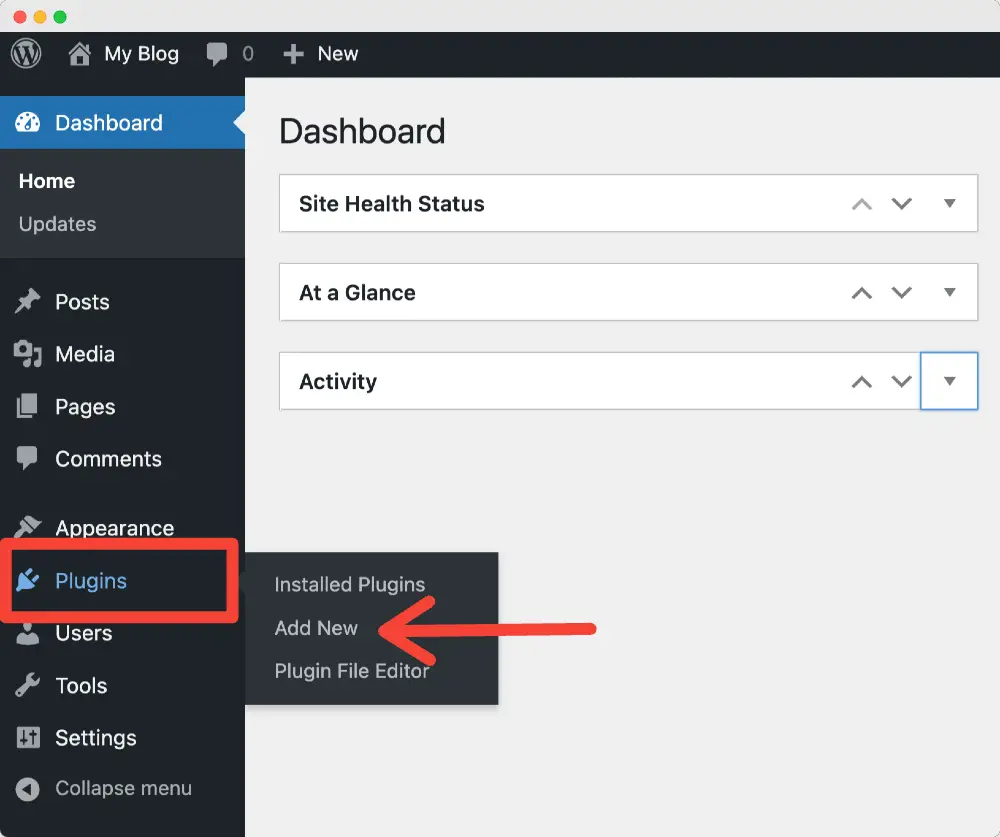
Step 2: Go to the “Plugins” section in the left-hand menu. On this page, you can see a list of all the plugins that are installed on the website at the moment.
Step 3: Click the “Add New” button to search for a new plugin. You will be redirected to a page where you can search for new plugins to install.
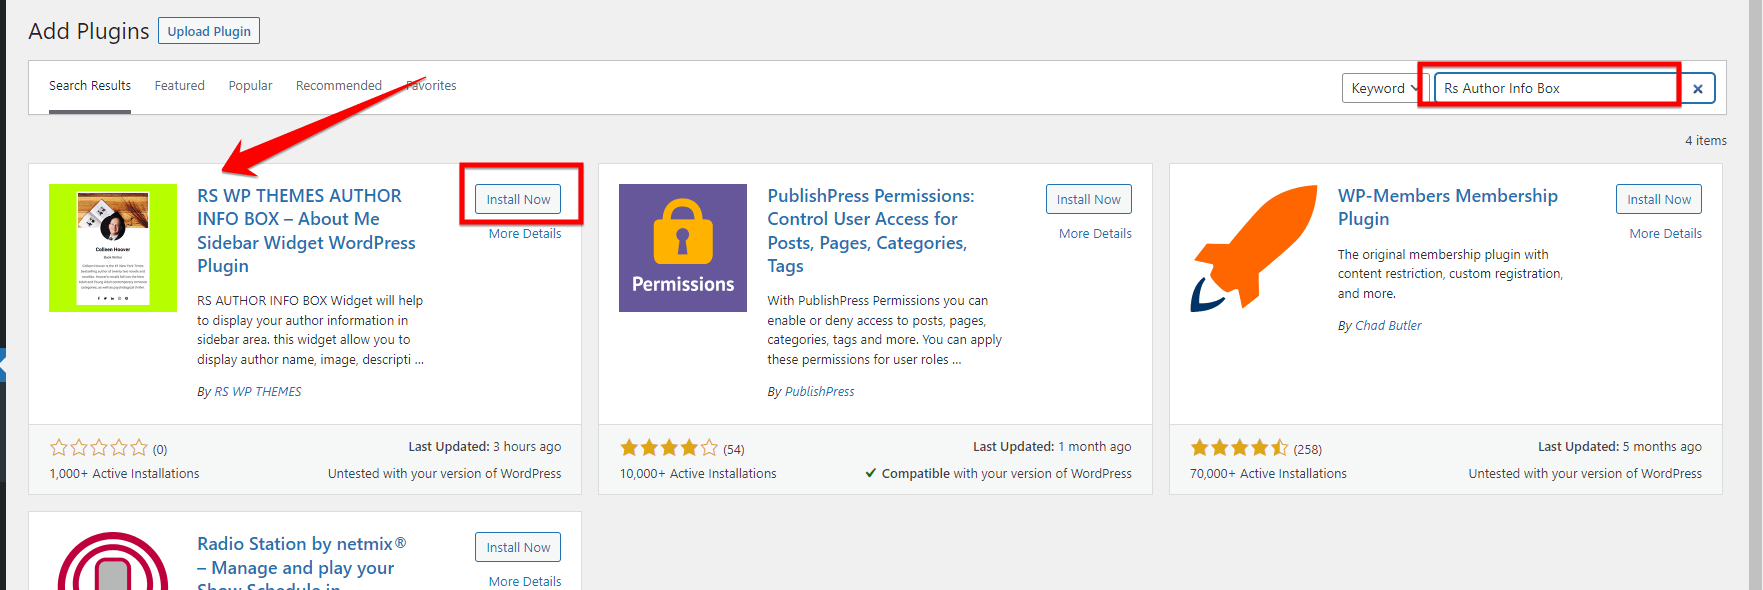
Step 4: In the “Add Plugins” page, enter “Rs Author Info Box” in the search box. Look for the plugin named “RS WP THEMES AUTHOR INFO BOX By RS WP THEMES” and click on the “Install Now” button. Wait for a few seconds until the plugin is successfully installed.
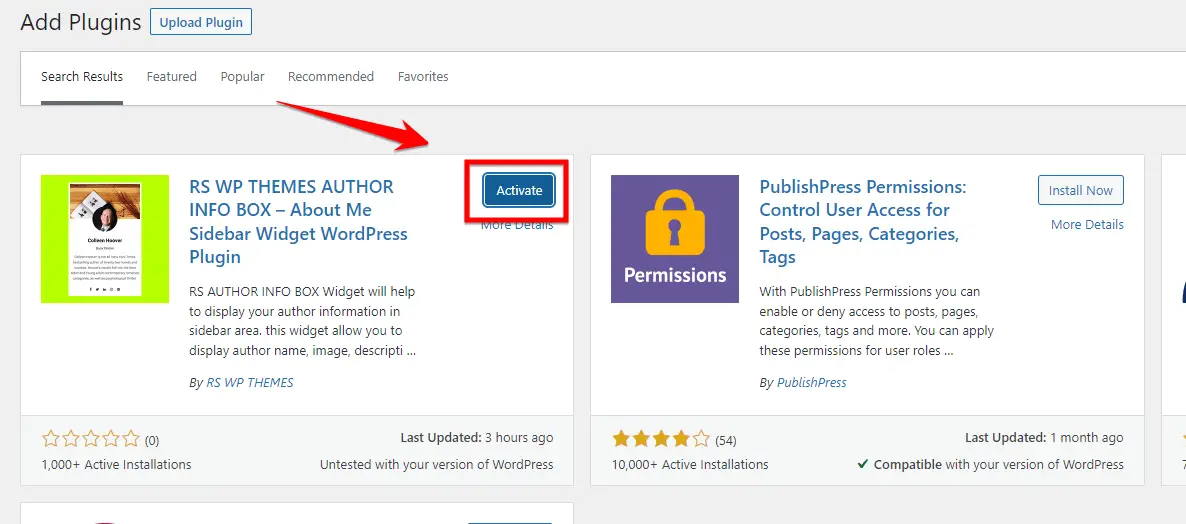
Step 5: Once the installation is complete, click on the “Activate” button.
Step 6: In the “Appearance” section, select “Widgets” from the menu.
Note: If you’re using the Gutenberg editor on your WordPress website, please don’t scroll down on the widgets page to look for the widget “[RSWPTHEMES] Rs Author Info Box”. It won’t be visible there. Instead, refer to the steps below to continue.
Step 7: For users of the Gutenberg widget editor, begin by selecting the “+” sign. Then, proceed to search for the widget titled “RS Author Info Box”.
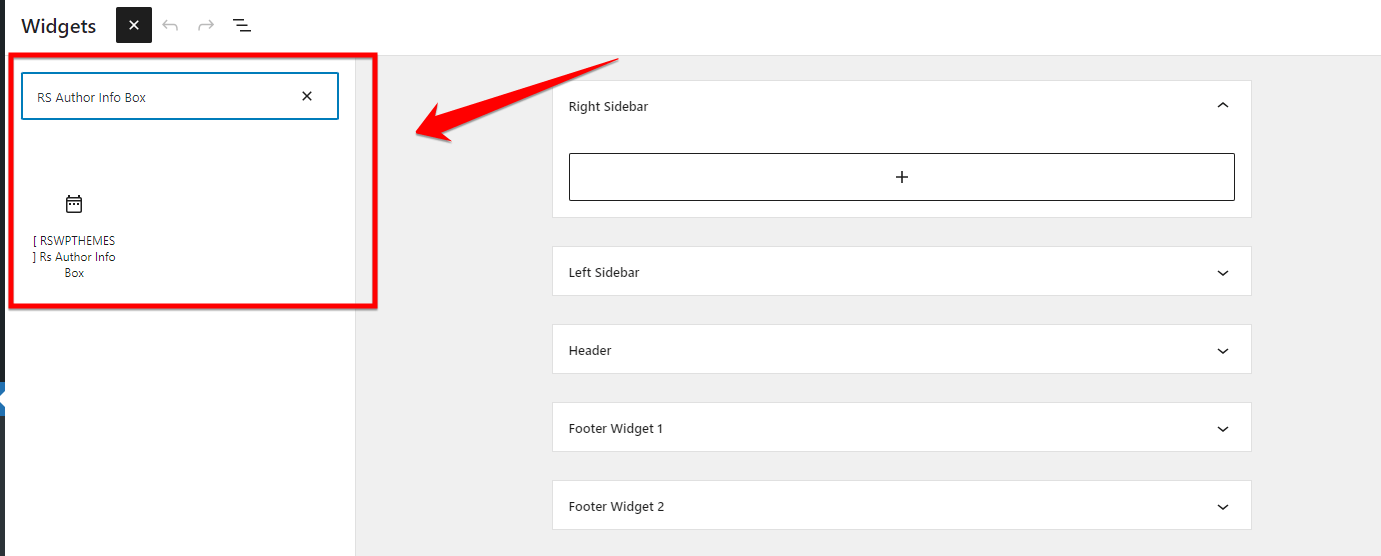
Note: The fields of the RS Author Info Box widget are consistent, regardless of whether you are using the Classic Editor or the Gutenberg Widget Editor.
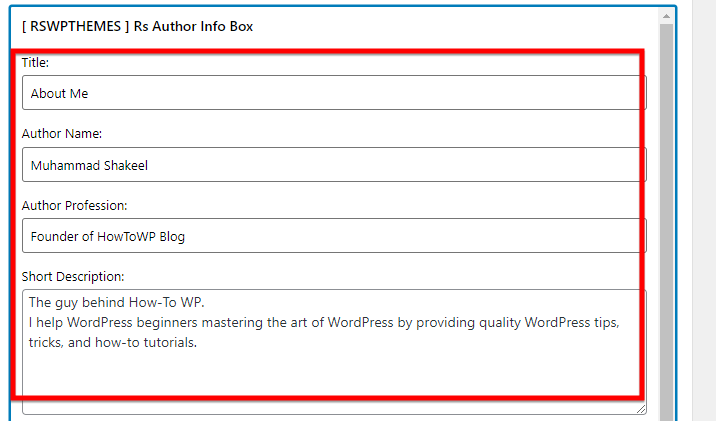
Step 8: Now is the moment to include your author information on the website. Provide the required details in the widget fields for “Title,” “Author Name,” “Author Profession,” and “Short Description”.
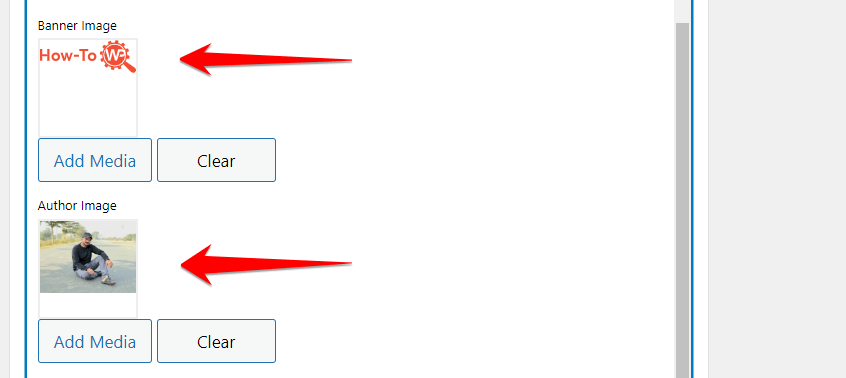
Step 9: To proceed, you will need to add a banner image and an author image. To add a banner image, click on the “Add Media” option.
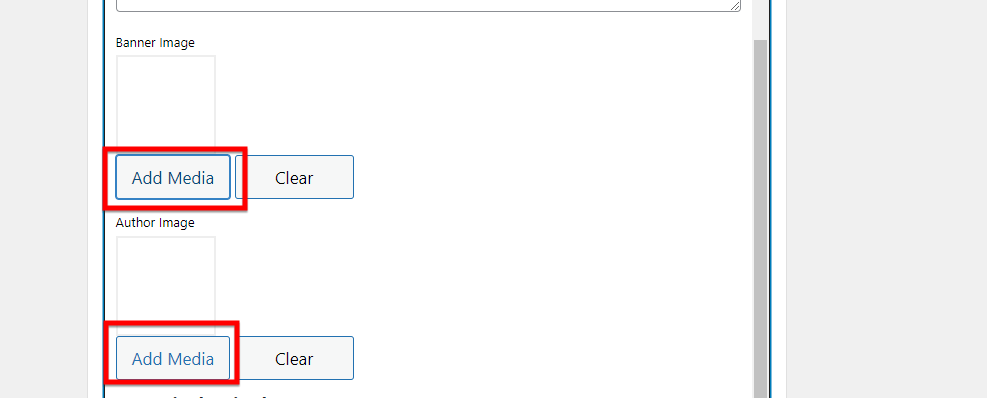
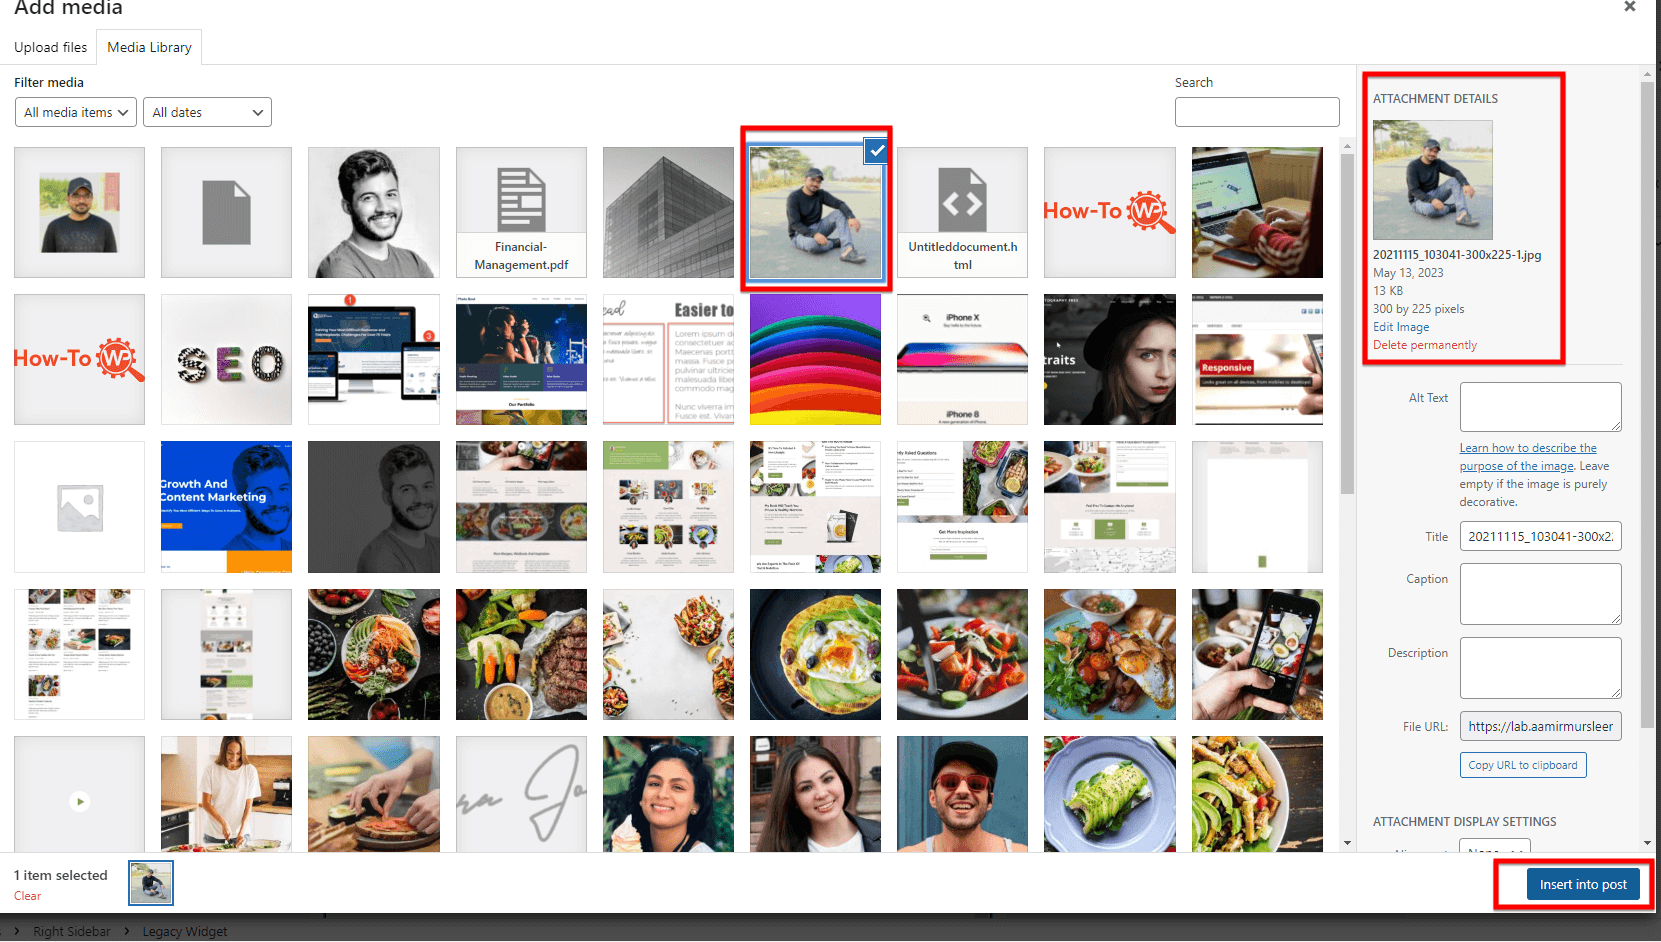
Step 10: After clicking on the “Add Media” option, you will be redirected to the Media Library page. Here, you have the option to select any image you prefer from the library.
Alternatively, you can choose to upload a new image by clicking on the “Upload File” option.
Step 11: After selecting the desired image, click on the “Insert into post” button.

Note: To add the “Author Image” to the widget, follow a similar process as in steps 10 and 11. Repeat the steps of selecting an image from the media library and clicking on the “Insert into post” button.
Pro Tip: In this section, you can see the pictures you have uploaded, like your banner picture and author picture. I mistakenly forgot to include image descriptions. Remember to include them.
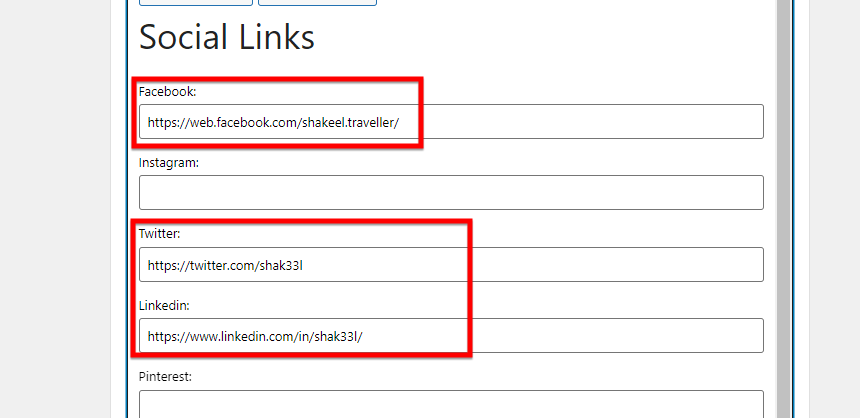
Step 12: Add your social links, such as Facebook, Instagram, Twitter, LinkedIn, Pinterest, and any other platforms you prefer.
Step 12: After you have entered all the necessary information, remember to click on the “Update” button in order for the changes to be visible on the preview page.
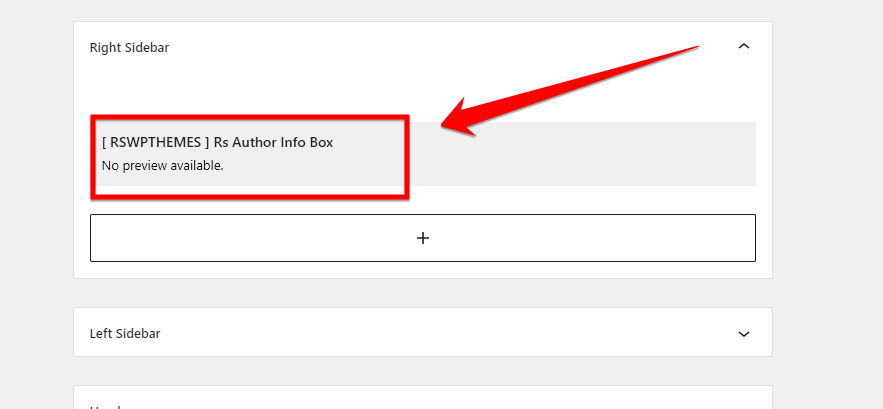
Step 13: Now, visit the webpage where the right sidebar is enabled, and you will see the “About Me” widget added to your WordPress site.
Pros
- Easy customization
- Increased engagement
- Enhances credibility and trust
Con
- Plugin compatibility issues or potential for technical glitches
After conducting thorough research, I’ve carefully considered both methods for adding an About Me widget. Although method 2 allows for more customization options through plugins, it’s important to note potential drawbacks.
Using a plugin for the About Me widget may have limited support and conflicts with other elements on your website. It can also increase the risk of performance issues and security vulnerabilities. That’s why I recommend method 1 – utilizing the built-in Text widget.
As long as you choose method 1, the About Me section is still clean and efficient while still providing a streamlined and secure user experience. This approach maintains the stability of your website, keeping your visitors engaged and satisfied.
Benefits of Having an About Me Widget on Your Site
Adding an About Me widget to your website can bring numerous benefits that significantly impact your online presence and engage your audience.
Here, I will guide you through the advantages of adding an About Me widget and explain how it can build trust, enhance personal branding, and increase visitor engagement.
1. Building Trust
An About Me widget enables visitors to learn more about you and the person behind the website and builds trust as they become familiar with your background, experiences, and expertise. By sharing valuable insights into your journey and showcasing your qualifications, you establish a connection and credibility with your audience.
With this level of transparency, visitors are likelier to trust the information you provide on your website, fostering a strong sense of trustworthiness.
When visitors can relate to your story and see your expertise, they feel reassured that they are interacting with a genuine and knowledgeable person. The information shared in your About Me section helps to humanize your website and builds a bridge between you and your visitors.
You will be more likely to engage potential clients, customers, or readers if you present yourself as approachable and trustworthy.
2. Enhancing Personal Branding
With an About Me widget, you have the opportunity to showcase your personal brand and leave a lasting impression on your visitors. By highlighting your unique qualities, achievements, and skills, you differentiate yourself from the competition and stand out in the minds of your audience.
This personal branding not only adds a human touch to your website but also allows visitors to understand your value proposition and what sets you apart.
Within the About Me section, you can express your personality, values, and the principles that guide your work. This helps visitors connect with you on a deeper level and develop an emotional bond.
People often prefer doing business with individuals they trust and resonate with. An authentic and compelling About Me widget can help shape a strong personal brand that attracts your target audience and fosters long-term relationships.
3. Increasing Engagement
When visitors find your About Me widget exciting and relatable, they are more likely to engage with your content and explore other areas of your website. Sharing your story, your passion for the subject matter, and relevant anecdotes can captivate your audience’s attention and inspire them to delve deeper into your website.
Besides providing information about yourself, the About Me widget can be a launchpad to showcase your expertise and knowledge. You can incorporate links to your best articles, projects, or portfolios, encouraging visitors to explore further.
This increased engagement leads to more time spent on your site, giving you the opportunity to showcase your expertise and establish a meaningful relationship with your visitors.
By offering a glimpse into your journey and expertise, an exciting and well-crafted About Me widget can pique curiosity and encourage visitors to interact with other website areas.
Tips to Make Your About Me WordPress Widget More Effective
If you want to enhance the effectiveness of your About Me widget on WordPress, there are a few simple tips you can follow:
Tip 1: Keep it Concise
When writing your bio for the About Me widget, it is essential to keep it concise. Instead of providing a lengthy autobiography, focus on capturing the essence of who you really are and what you offer.
Be mindful of your website’s purpose and highlight the most important details that align with it. By keeping it concise, you ensure that visitors can quickly grasp your key attributes and understand how they relate to your website’s content.
Tip 2: Use a Professional Photo
Including a professional photo of yourself can significantly enhance the effectiveness of your About Me widget. People are visual creatures, and having a photo adds a personal touch to your website. It also helps to build authenticity and trust with your audience.
Choose a high-quality photo that represents you in a professional manner. Having a visual representation of yourself allows visitors to put a face to your website, making it more relatable and engaging.
If you have social media profiles that are relevant to your website or personal brand, consider adding social media icons or links in the About Me widget. By integrating your social media presence, you give visitors an opportunity to connect with you on various platforms.
You can use this tip not only to expand your social reach but also to allow people to engage with your content beyond your website. Ensure that the social media profiles you link are updated and consistent with your overall branding.
Tip 4: Showcase Achievements and Expertise
Another way to make your About Me widget more effective is by showcasing your achievements and expertise. If you have relevant qualifications, certifications, or awards, mention them briefly in your bio.
Highlight any notable experiences or successes that demonstrate your authority in your field. By doing so, you establish credibility and increase your visitors’ confidence in your abilities.
Tip 5: Include a Call to Action
Don’t forget to include a call to action in your About Me widget. After sharing key information about yourself, guide visitors toward the next step you want them to take. This could encourage them to explore your website further, subscribe to your newsletter, or contact you for collaborations or inquiries.
By providing a clear call to action, you direct your audience’s attention and encourage further engagement.
Summary
To wrap things up, adding an About Me widget on WordPress can be a game-changer for your website. Widgets are an excellent feature to infuse vitality into your site and boost visitor engagement.
By using widgets, you can place them in various widget areas and customize their appearance to match your website’s design. Whether you choose to use pre-installed widgets, install additional ones through plugins, or code your own using the Widgets API, there are endless possibilities to create an engaging user experience.
Make sure to strategically place your About Me widget where it is easily visible to your visitors. Personalize it with a captivating image and a concise introduction that showcases your expertise and personality.
Now it’s your turn! Experiment with different widgets, explore their functionalities and find the perfect combination of widgets that best aligns with your website’s goals and your audience’s needs.
Share your experiences and tell me how About Me WordPress widgets have transformed your site and branding. 🌟
FAQs
A sidebar widget in WordPress is a small block of content or functionality that can be added to the sidebar area of a WordPress website. These widgets are often used to display additional information or perform specific tasks, such as showing recent posts, a search bar, social media links, or categories. WordPress provides a set of default widgets, and you can also install and activate additional widgets through plugins.
To customize the side menu in WordPress, you can follow these steps:
Step 1: Log in to your WordPress admin dashboard.
Step 2: Go to Appearance > Widgets.
Step 3: Find the “Navigation Menu” widget and drag it to the sidebar section where you want to display the menu.
Step 4: Click on the widget to configure its settings. You can select the menu you want to display, set the title, and choose the display options.
Save the changes, and the side menu will be customized based on your settings.
To add sidebar widgets to WP Elementor, you can follow these steps:
Step 1: Install and activate the Elementor plugin on your WordPress site.
Step 2: Edit the page or post where you want to add the sidebar widget using Elementor.
Step 3: In the Elementor editor, locate the “Elements” panel on the left-hand side.
Step 4: Search for the “Sidebar” widget in the Elements panel and drag it to the desired section of your page.
Step 5: Customize the content and appearance of the sidebar widget using the Elementor settings and options.
Step 6: Save your changes and publish the page or post. The sidebar widget will now be visible on your site.
In WordPress terminology, a sidebar is an area on a website’s layout often located next to the main content where widgets can be placed. A widget, on the other hand, is a small module or tool that displays specific content or performs a specific function within the sidebar area or any other widget-ready section of a WordPress theme.
To summarize, a sidebar is the designated area where widgets are placed, while widgets are the individual components that display content or functionality within the sidebar or other widget-ready areas of a WordPress theme.
To style sidebar widgets in WordPress, you can use CSS. Here’s how you can do it:
Step 1: Determine the CSS class or ID associated with the sidebar widget you want to style. You can inspect the element using your browser’s built-in developer tools to identify the target class or ID.
Step 2: In your WordPress admin dashboard, go to Appearance > Customize.
Step 3: Click on the “Additional CSS” or “Custom CSS” option.
Step 4: Add CSS rules targeting the class or ID of the sidebar widget you want to style. For example, to change the font color, you can use the following CSS rule: .sidebar-widget { color: #000000; }
Step 5: Preview the changes and click “Publish” to apply the style to your sidebar widget.