How to Remove index.php from URL in WordPress [An In-Depth Guide]

When managing a WordPress site, you may occasionally notice the term ‘index.php’ showing up in your URL. This unexpected addition can be a minor annoyance and detract from the sleek, professional appearance you’ve designed for your website.
But, beyond aesthetics, it can also impact your Search Engine Optimization (SEO) efforts, making it harder for your site to rank well on search engines.
In this article, you will learn:
- Precautions before making changes
- Top 2 methods to remove index php from URL WordPress
- Why removing ‘index.php’ from your URL is beneficial
- Troubleshooting common issues
Whether you’re a seasoned WordPress user or a newbie, you can spruce up your URL like a pro by the end of this guide.
So, buckle up and let’s dive in!
Table of Contents
Unmasking ‘index.php’: What Is It and Why Does It Matter?
Before we dive deeper into the ‘how’ of removing “WordPress index.php,” let’s take a moment to understand the ‘what’ and the ‘why.’ After all, to solve a problem, you need to understand it first, right?
In the world of web development, ‘index.php’ is kind of a big deal. It’s the default file that’s loaded when a client browser requests your website and doesn’t specify a particular file. Think of it like the director of a movie—it might not be visible on screen, but it’s the one calling the shots behind the scenes.
For example, let’s say someone types your website’s URL into their browser, like ‘www.yourwebsite.com.’ The server that hosts your website will first look for an ‘index’ file to serve up. In the case of a WordPress website, that’s usually ‘index.php.’
So, even though the person just typed in ‘www.yourwebsite.com,’ what they’re actually getting is ‘www.yourwebsite.com/index.php.’
Now, you might wonder, “If ‘index.php’ is so important, why would I want to remove it from my URL?” Good question. While ‘index.php’ is crucial to the functioning of your website, having it visible in your URL can be better. It can make your URL longer and more complex, which could be better for SEO or user experience.
In the following sections, I’ll walk you through how to remove ‘index.php’ from your URL, making it cleaner, simpler, and more SEO-friendly. So, stick with me, and let’s make your URL the best it can be!
Top 2 Methods to Remove Index Php from URL WordPress
Sometimes in life, and especially in tech, we encounter little hurdles that, although seemingly insignificant, can actually make a big difference. The pesky ‘index.php’ in your WordPress URL is one such hurdle.
But don’t worry, I’ve got you covered. Here are the top two methods to banish ‘index.php’ from your WordPress URL and reclaim your site’s clean, professional look.
Method 1: Setting Permalink Structure Manually
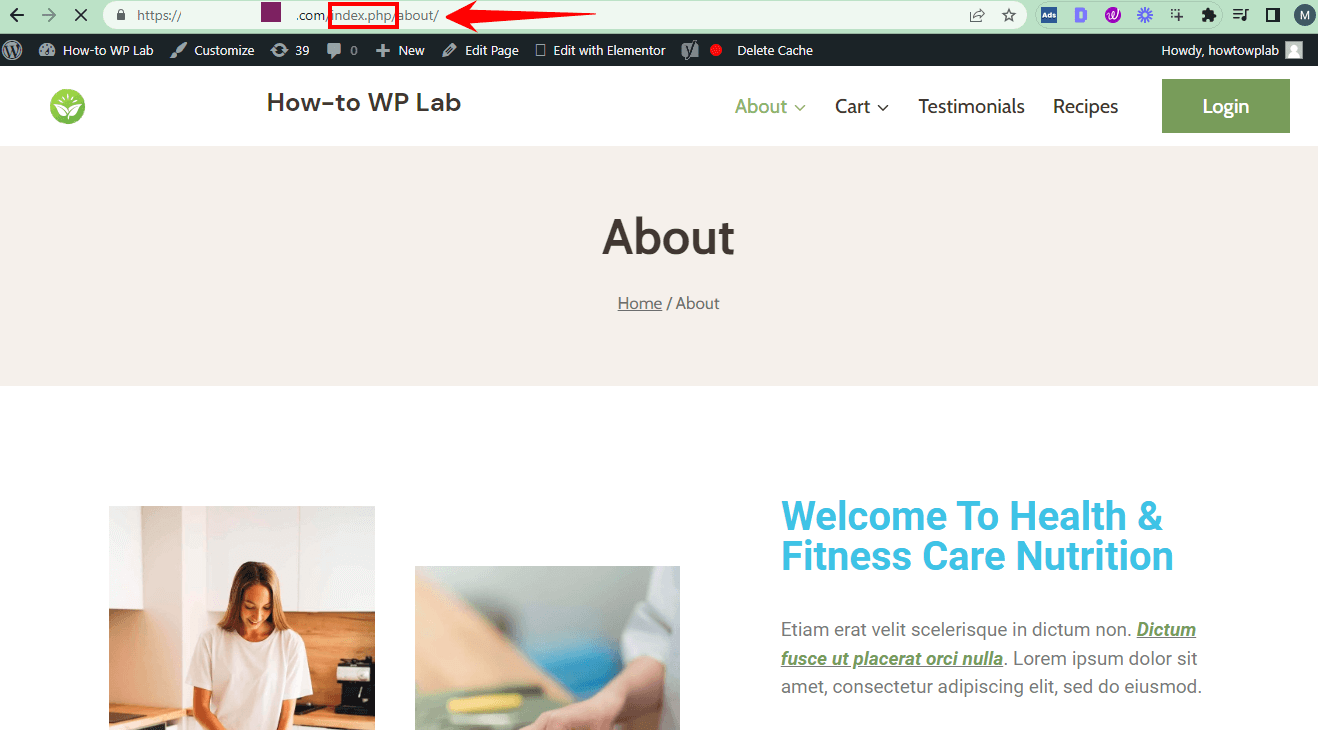
The first method involves a bit of detective work. It’s like we’re in a tech-themed detective novel, and our suspect is the infamous ‘index.php’. The first place we’re going to search is your permalink structure.
If default WordPress index.php pops up in your URL, your WordPress permalink structure may be configured incorrectly.
So, let’s dive into your WordPress settings and see if we can fix that. Here’s how:
- Open your “web browse” This could be any browser you prefer, such as Google Chrome, Mozilla Firefox, Safari, etc. Make sure you have a stable internet connection.
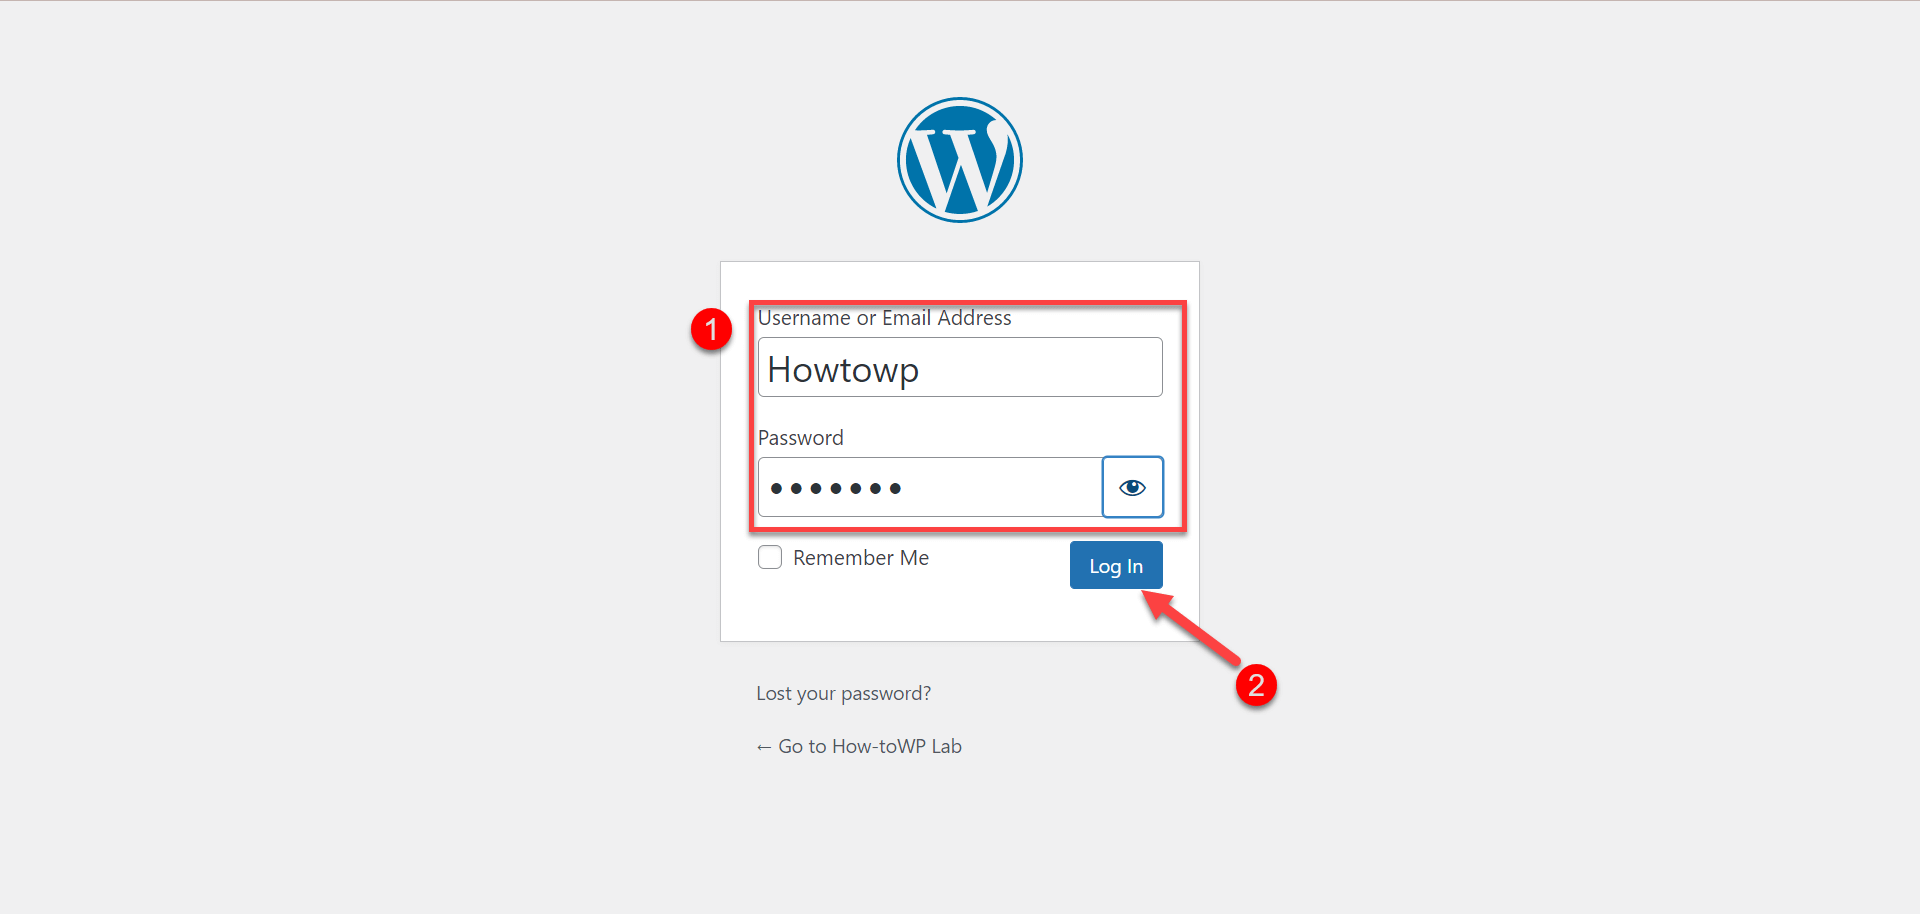
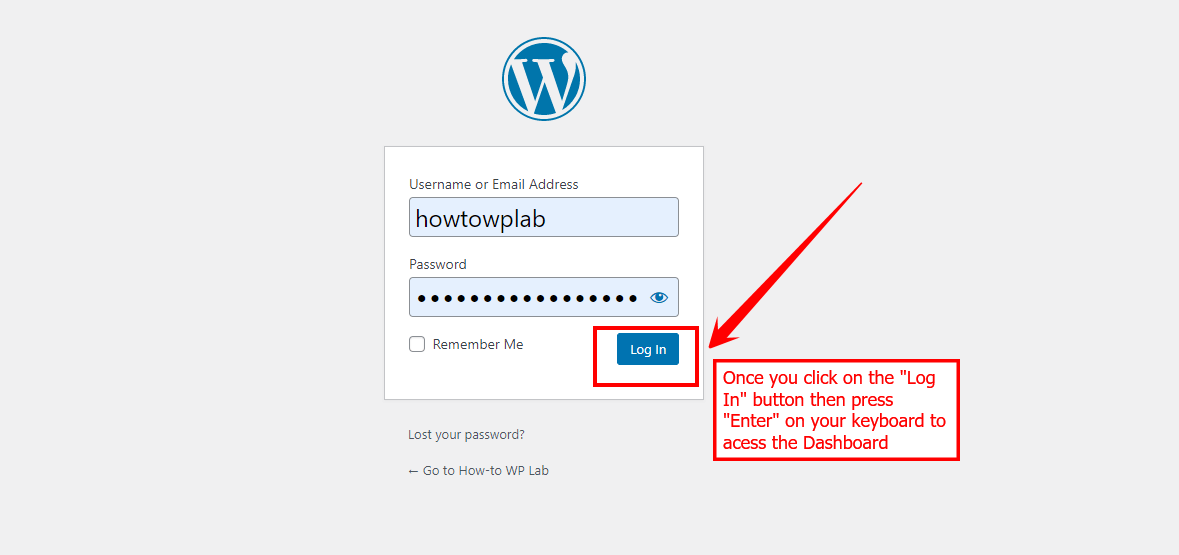
- Log into your “WordPress dashboard” by entering your username and password in the respective fields and clicking on the “Log In” button.
- Once you’re logged in, you’ll be taken to the WordPress dashboard. This is the main administration area of your website.
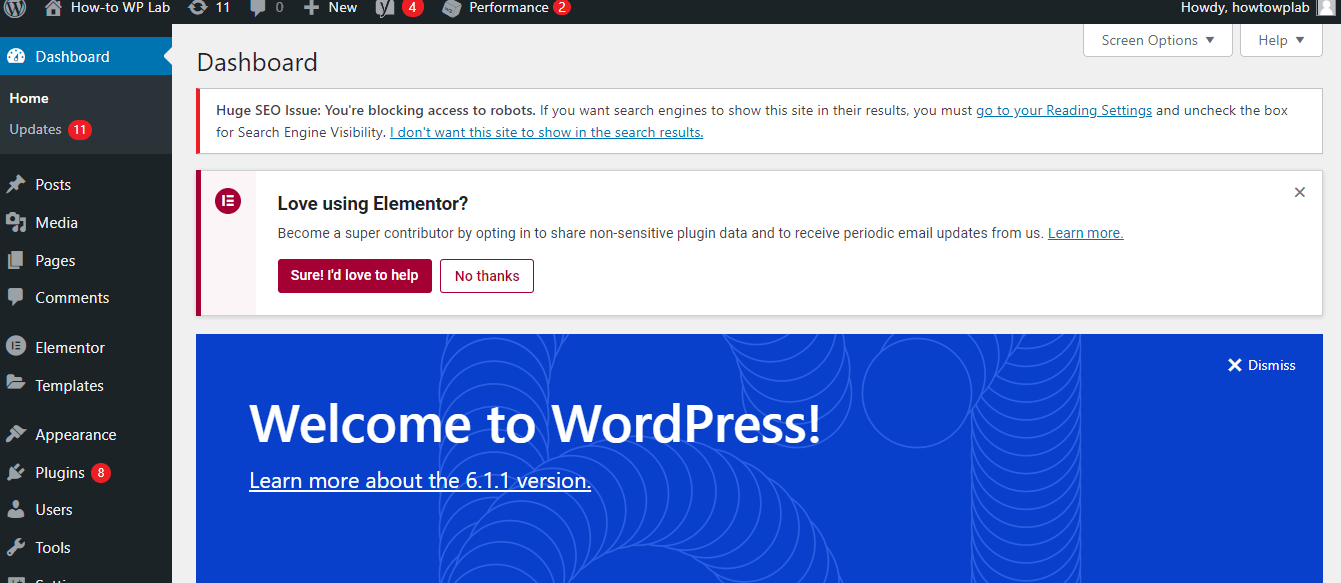
- Look for “Settings” on the left-hand side of the Dashboard. It’s usually towards the bottom of the menu.
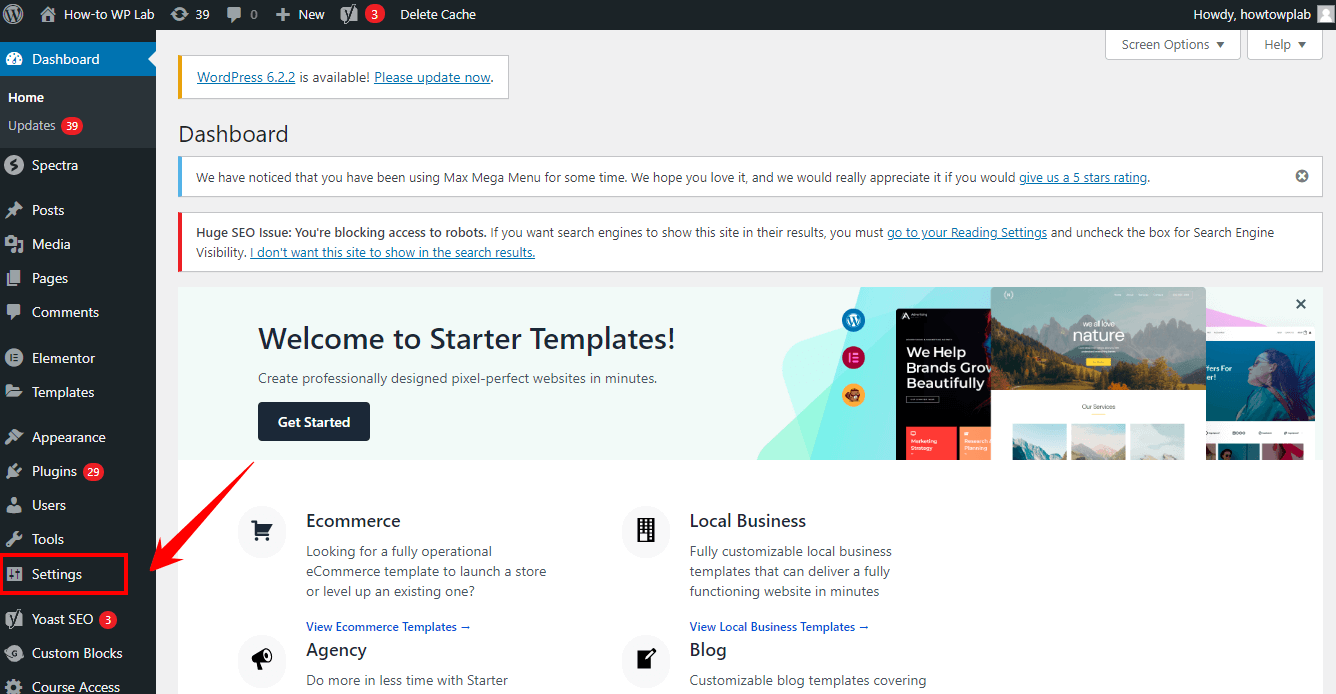
- A submenu will appear once you hover over or click on “Settings.”
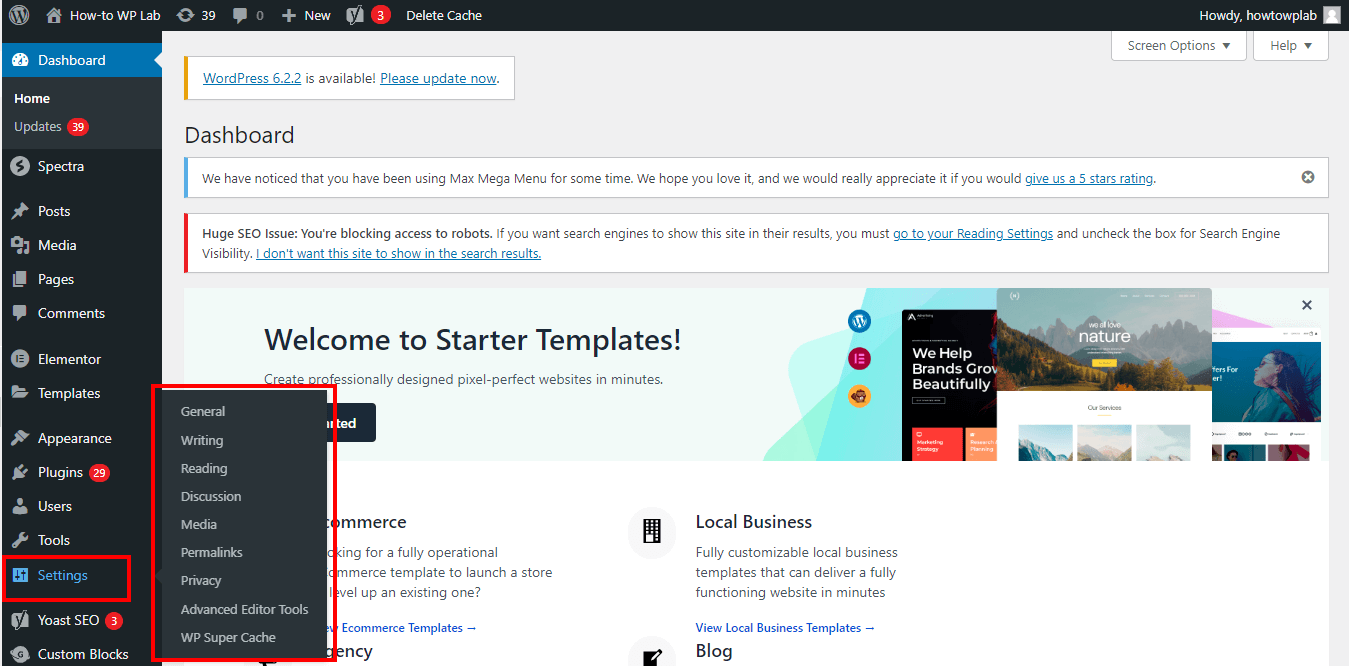
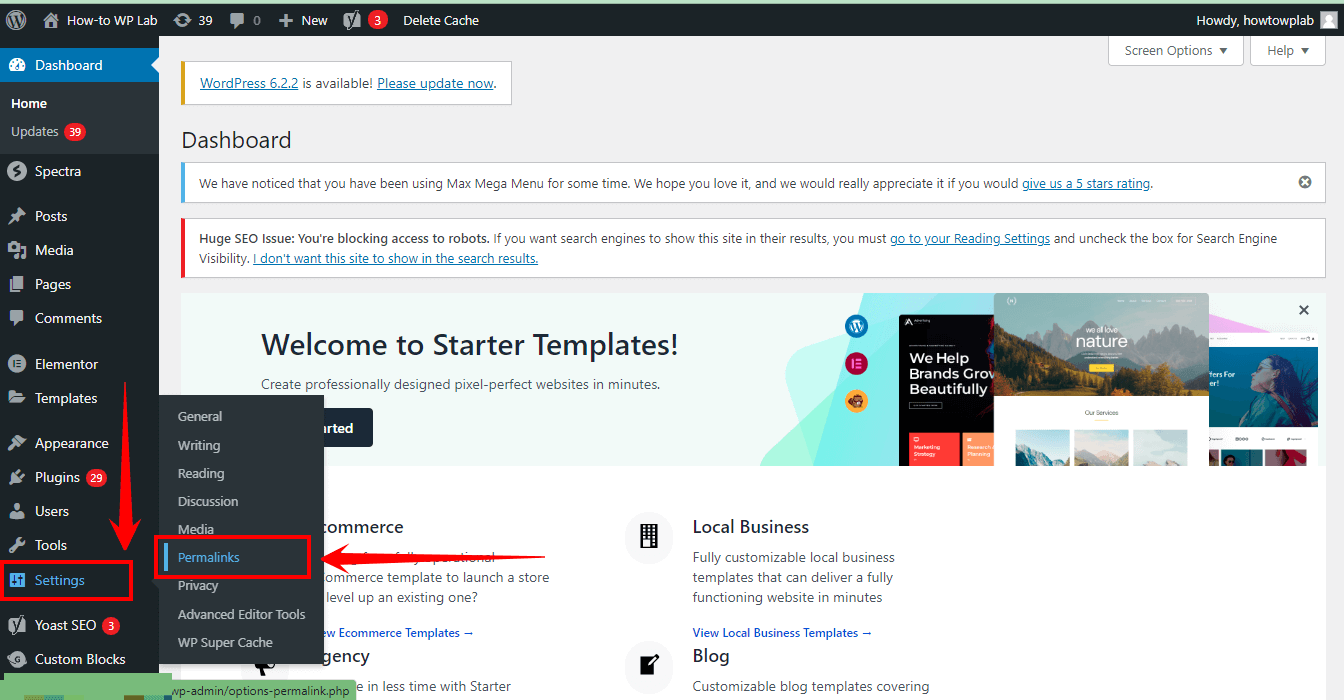
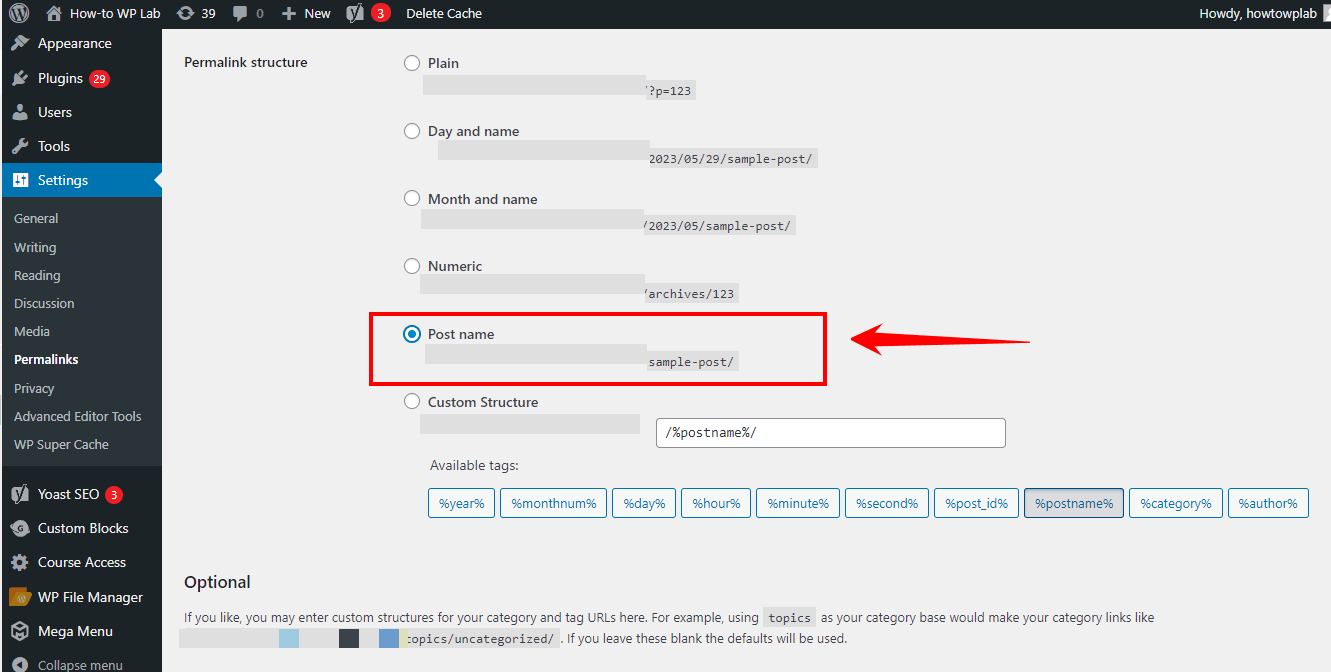
- In the submenu, look for the ‘Permalinks’ option. Click on it to open the ‘Permalinks’ page.
- Find the “Common Settings” section in the Permalinks settings page. There, you will see several options for how your permalinks are structured.
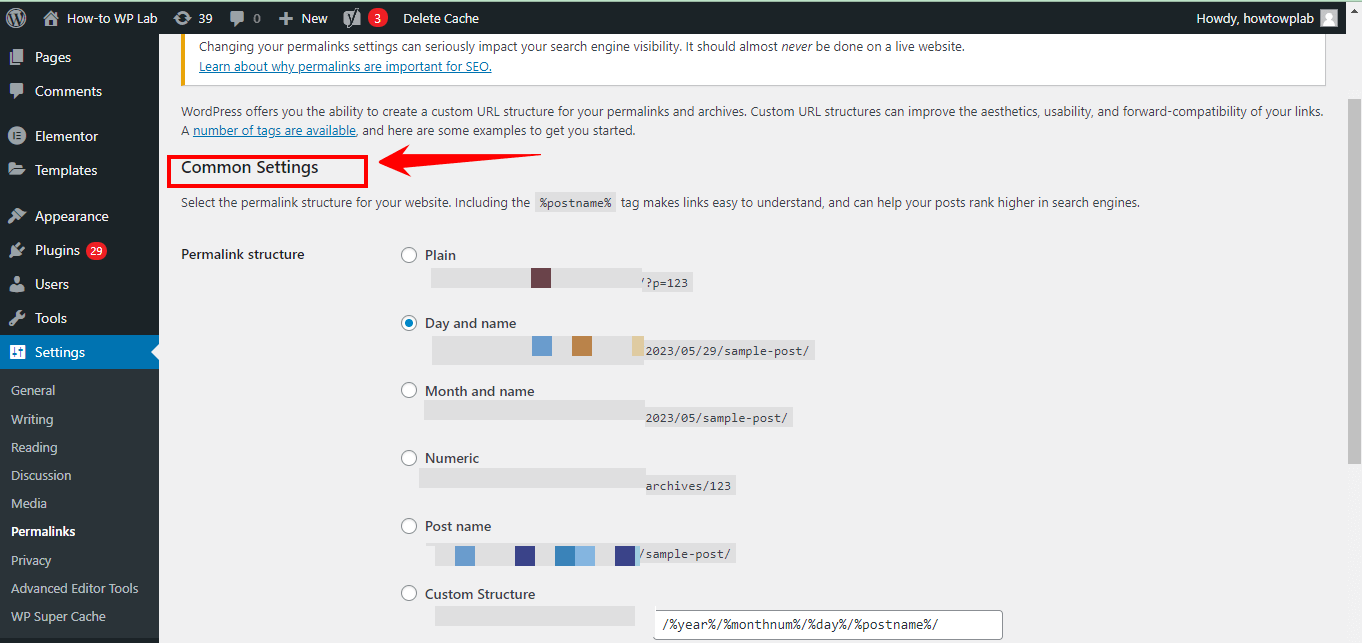
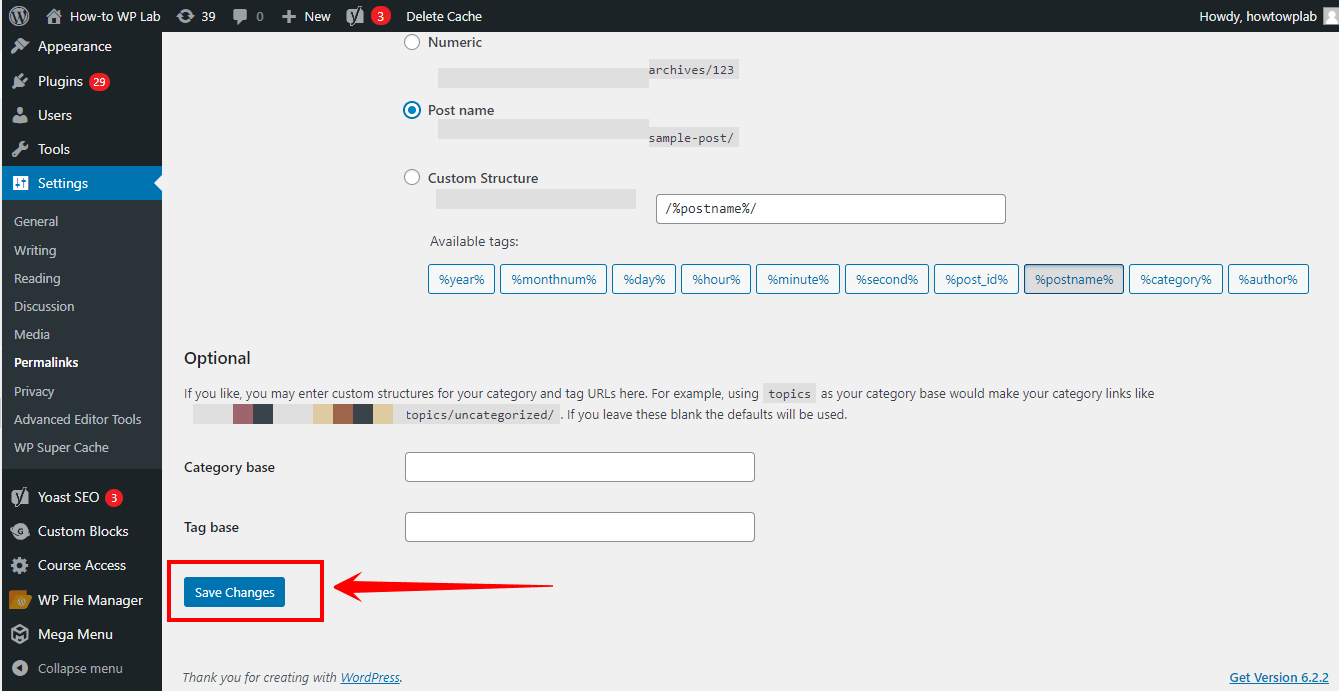
- Among the various options, click on the radio button next to “Post name.” This will change your permalink structure to include the post name.
- Scroll down to the bottom of the page and click on the “Save Changes” button. This will apply to the changes you’ve made.
- You can confirm your changes were successful by opening a post on your site and checking the URL. It should now include the post name.
A Pro Tip: After making these changes, check your website and your URLs. If ‘index.php’ is still playing hide-and-seek, you may need to flush your rewrite rules. Simply revisit the ‘Permalinks’ settings page and click ‘Save Changes’ again. Think of it as giving your site a little shake to get everything into place.
Method 2: Adding Modified Code to htaccess File
If the first method didn’t lead to ‘index.php’s’ capture, it’s time to bring out the big guns. Our next method involves rolling up our sleeves and diving into the ‘.htaccess’ file.
This configuration file is used by Apache-based web servers that can control the directory in which it resides and all the subdirectories underneath it.
Here’s how to modify your ‘.htaccess’ file:
- The first step is to log in to your hosting account. This is where all your website’s files are stored, and you can access the “.htaccess” file.
- After logging in, look for the control panel, often called “cPanel”. Click on it to access the files related to your website.
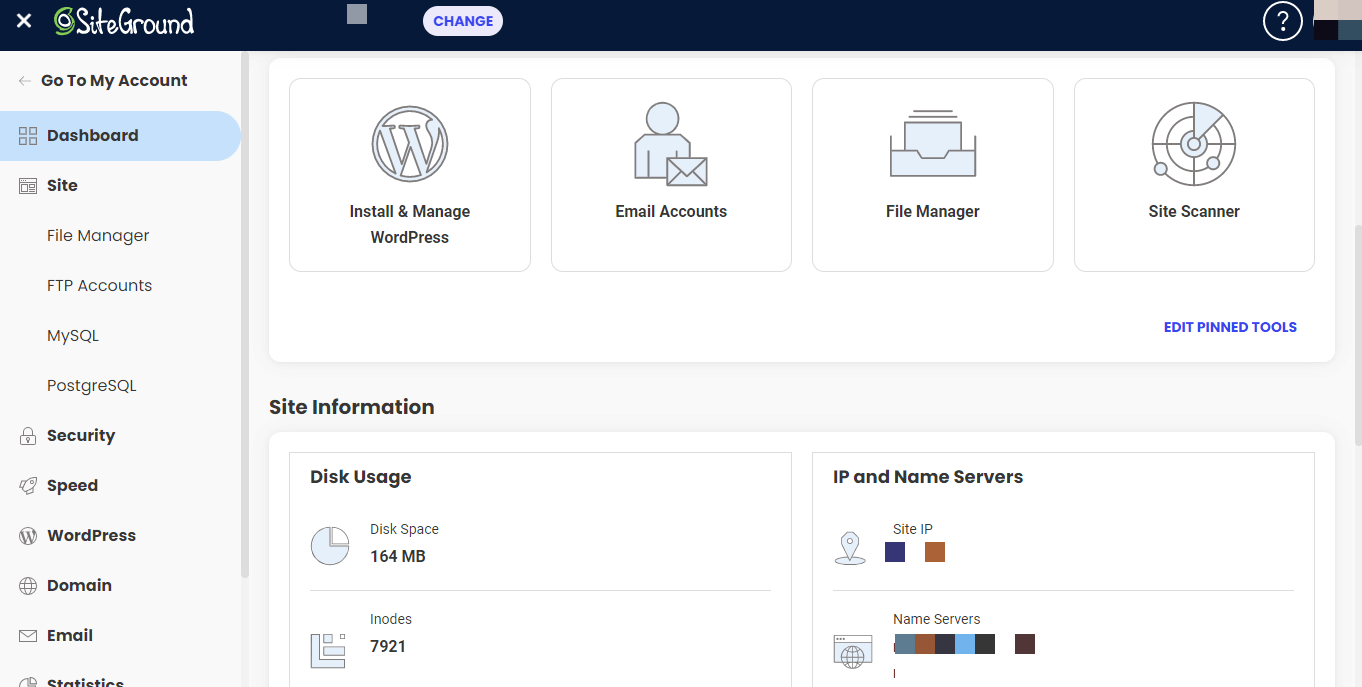
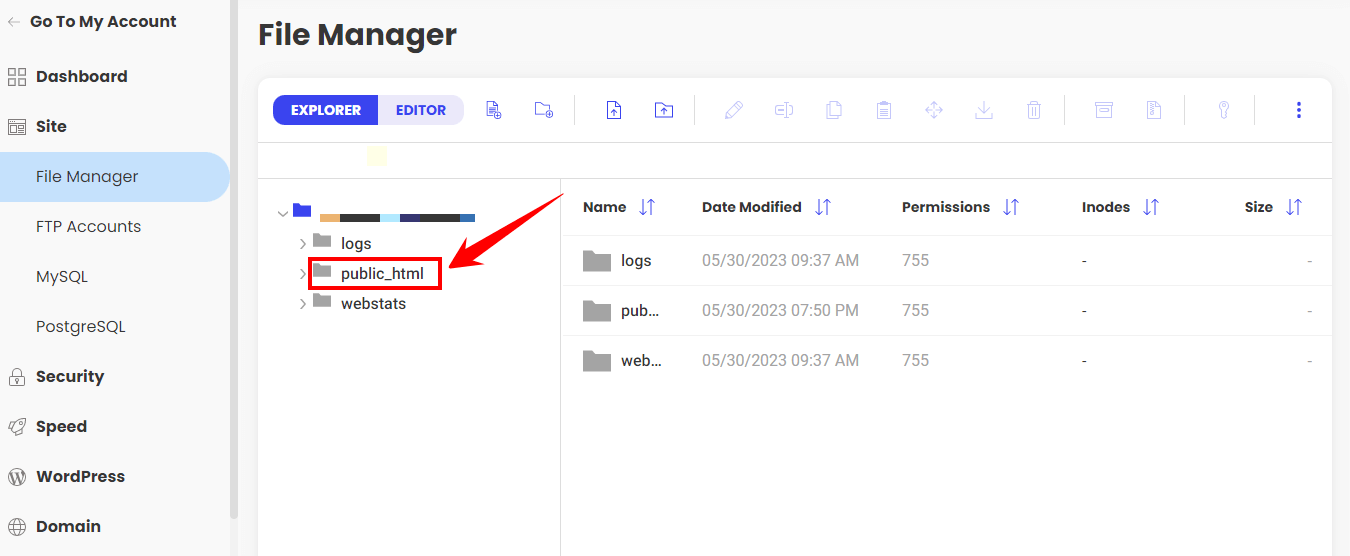
- Inside the cPanel, look for the “File Manager” option and click on it. This will open a list of all the files and directories related to your website.

Note: You can also access to a file manager with the WordPress dashboard. Here’s how:
- First things first, log into your “WordPress dashboard.”
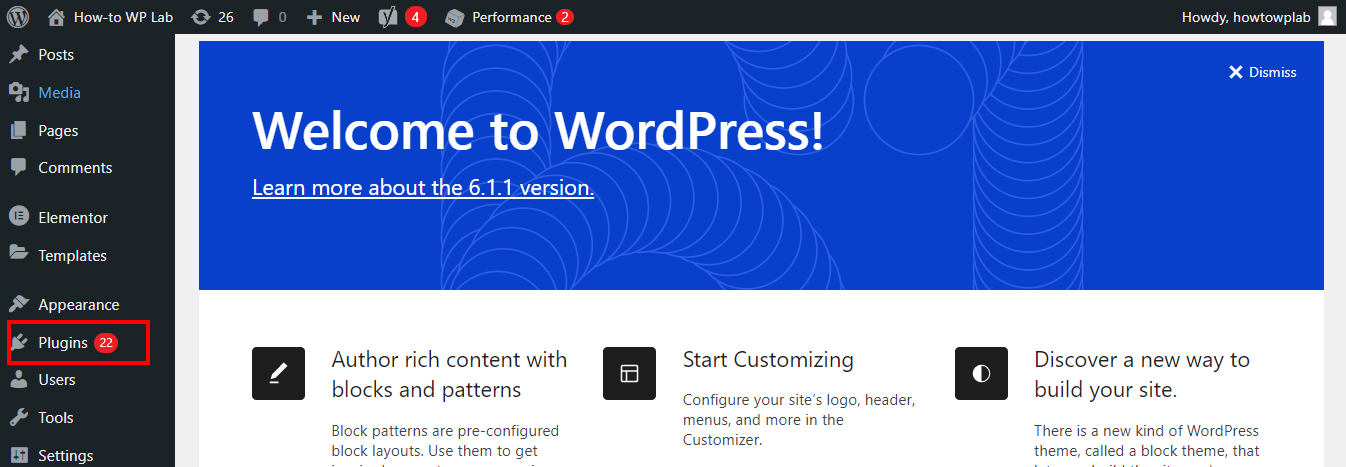
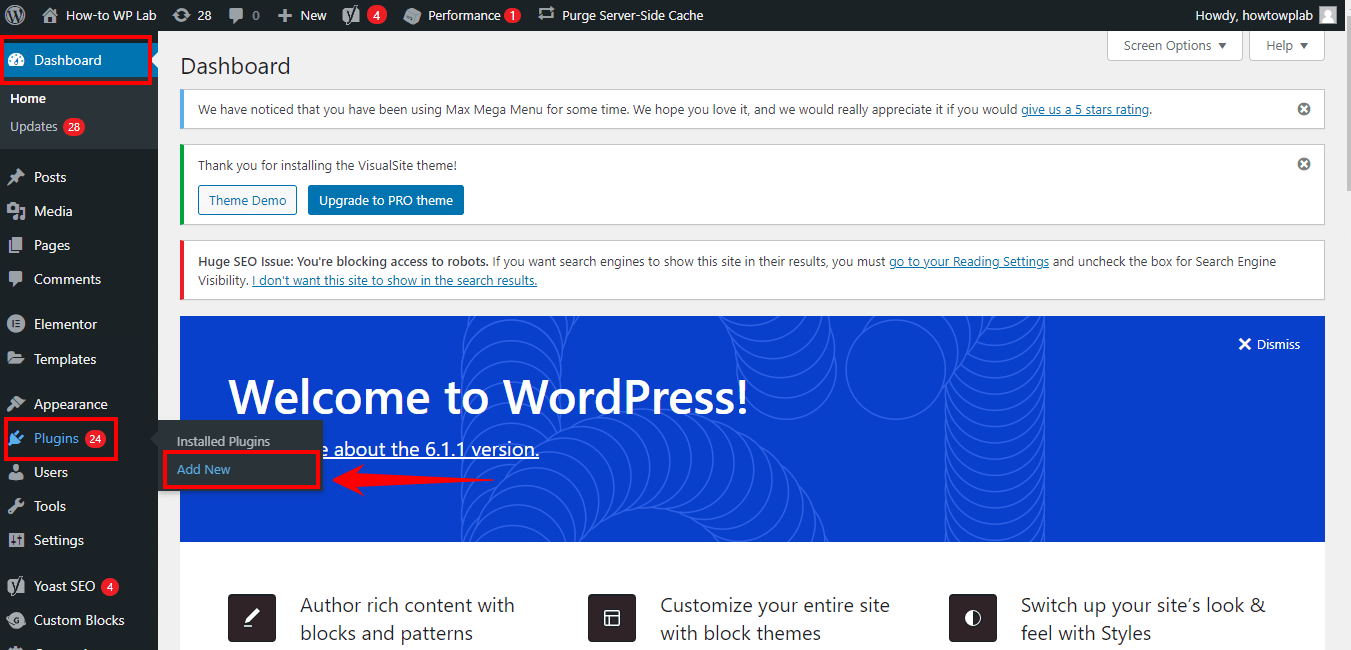
- Once you’re in your dashboard, navigate to the “Plugins” section. You’ll find it on the left-hand side of your screen.
- Within the “Plugins” section, you’ll see a button at the top that says “Add New.” Click on it to go to the plugin area.
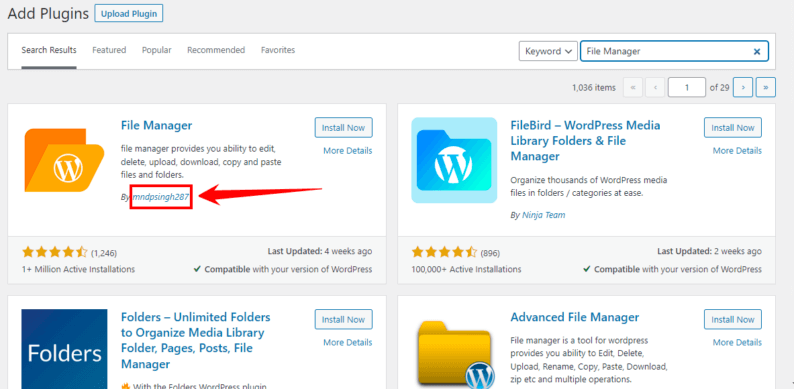
- In the plugin section, there’s a search bar on the right-hand side. Type “File Manager” into this search bar and hit enter.
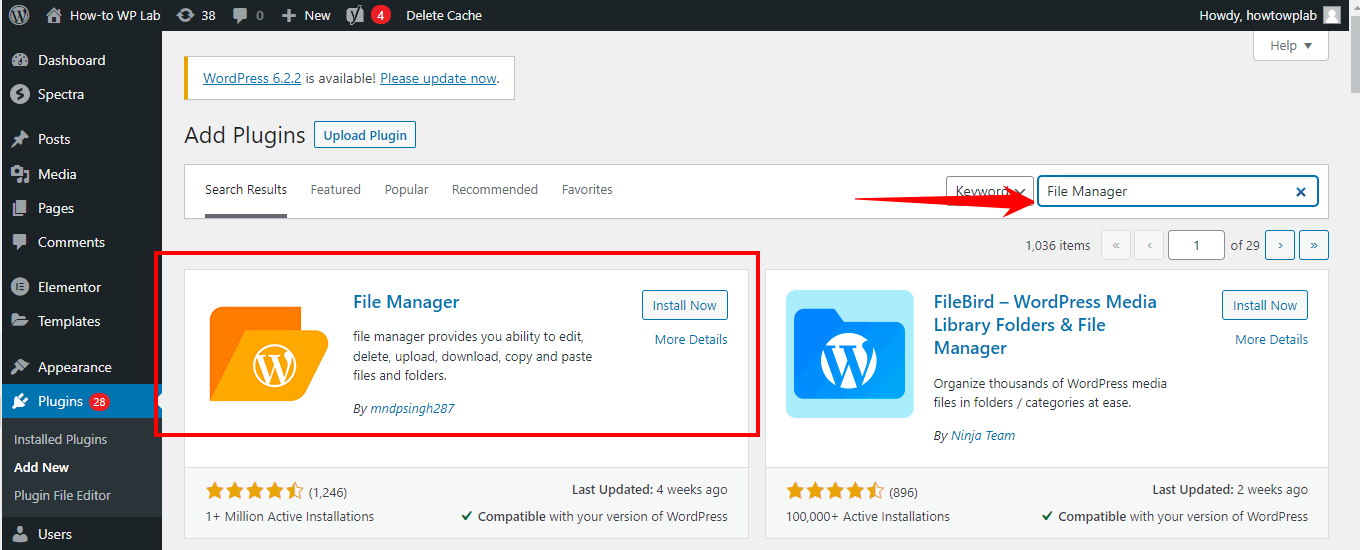
- You’ll see a list of plugins that match your search. Look for a “File Manager” plugin developed by ‘mndpsingh287’. This is a popular, highly-rated file manager plugin that’s easy to use.
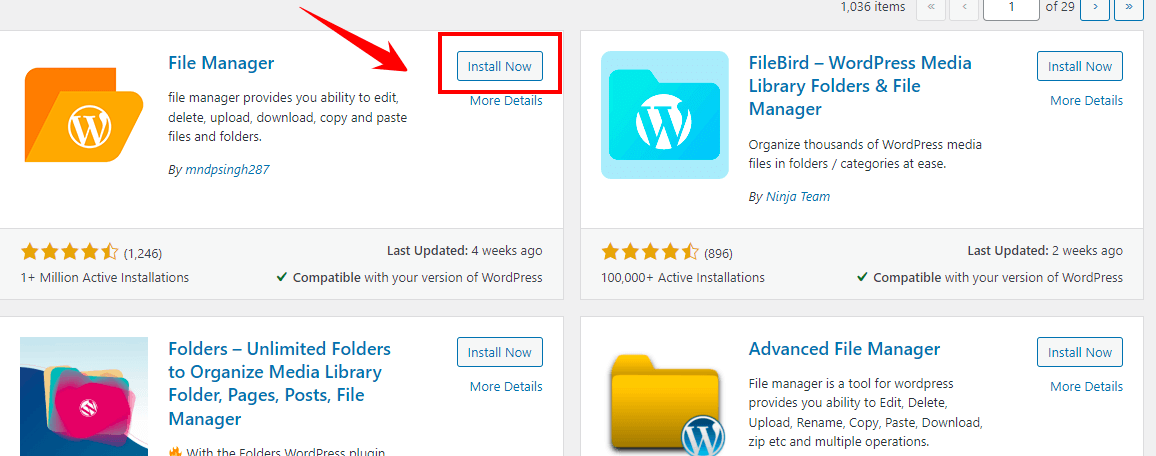
- Once you’ve found the “File Manager” plugin, click on the “Install Now” button that’s right next to it. WordPress will now download and install the plugin for you.
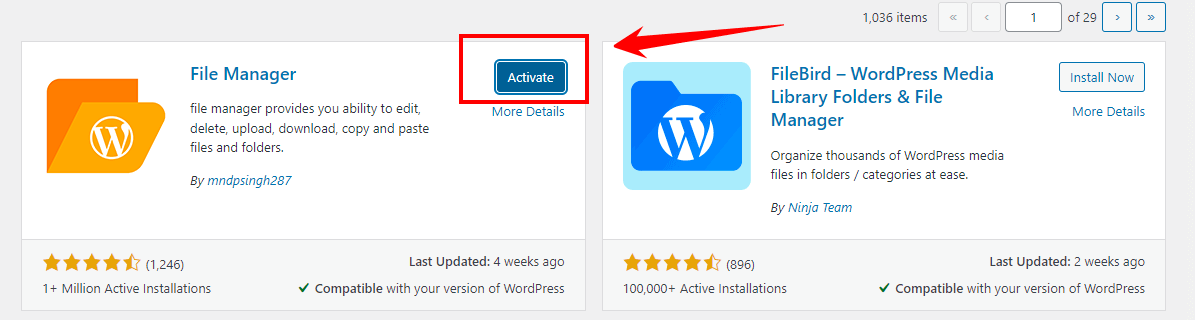
- After installing the plugin, the ‘Install Now’ button will change to “Activate.” Click on it to activate the plugin.
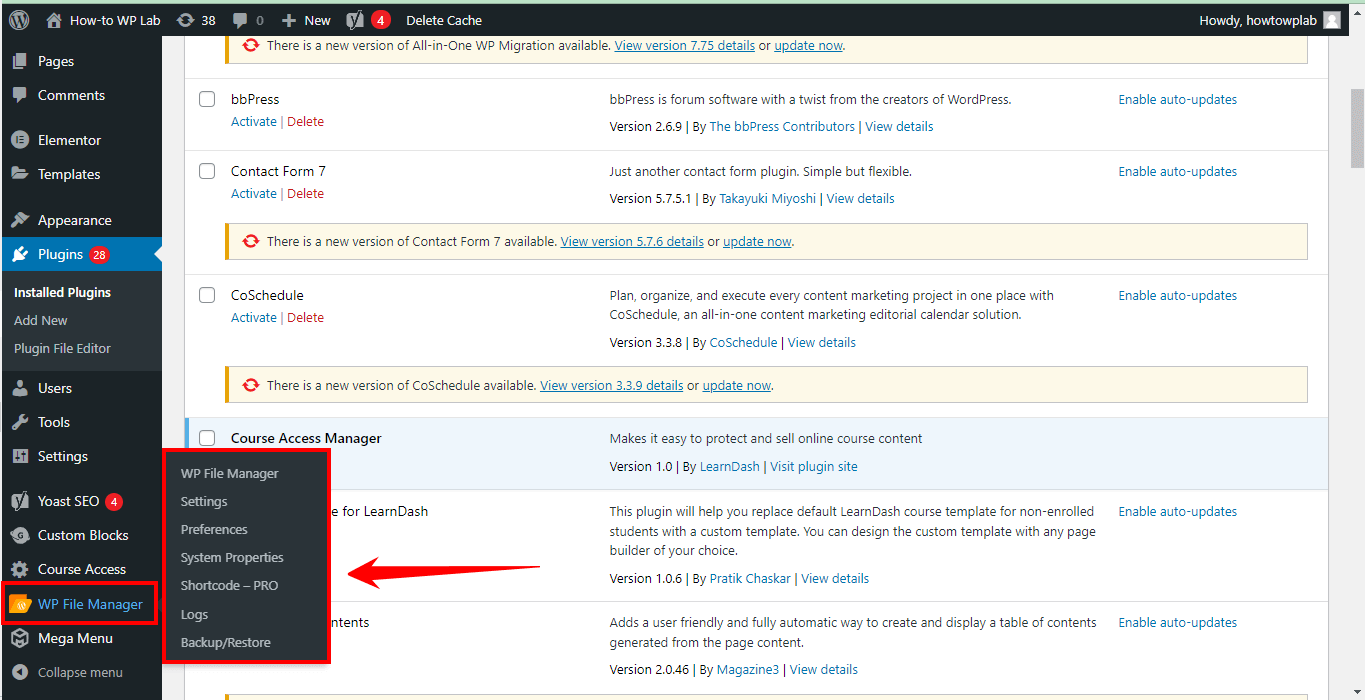
- Once activated, you can access the “File Manager” from your WordPress dashboard. Go to the left-hand side of your screen, and you should see a new option that says “WP File Manager”. Click on it to open the file manager and access your site’s files.
- In the “File Manager,” navigate to the root directory of your website. This is usually labeled as “public_html,” but it could also be under your domain name.
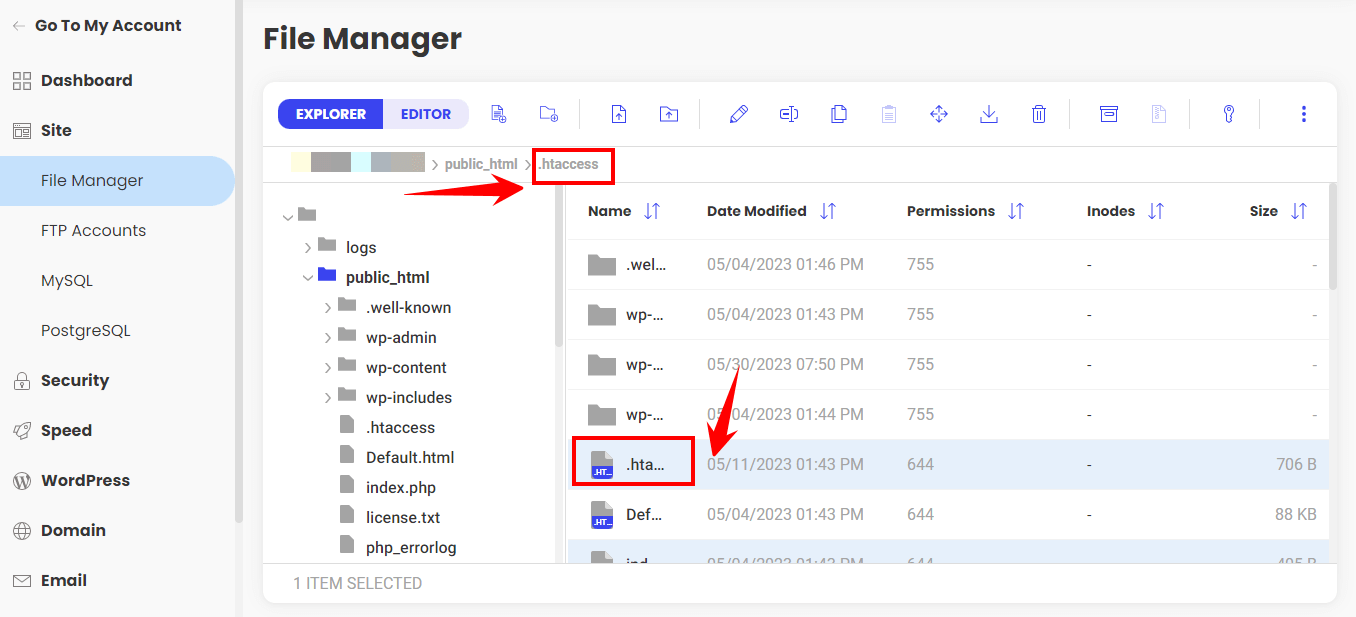
Note: By default, the ‘.htaccess’ file is hidden. To see it, you’ll need to enable the viewing of hidden files. Look for the “Settings” option in your “File Manager,” and check the option that says ‘Show Hidden Files (dotfiles).’
- After enabling the viewing of hidden files, look for the “.htaccess” file in the list of files in your root directory.
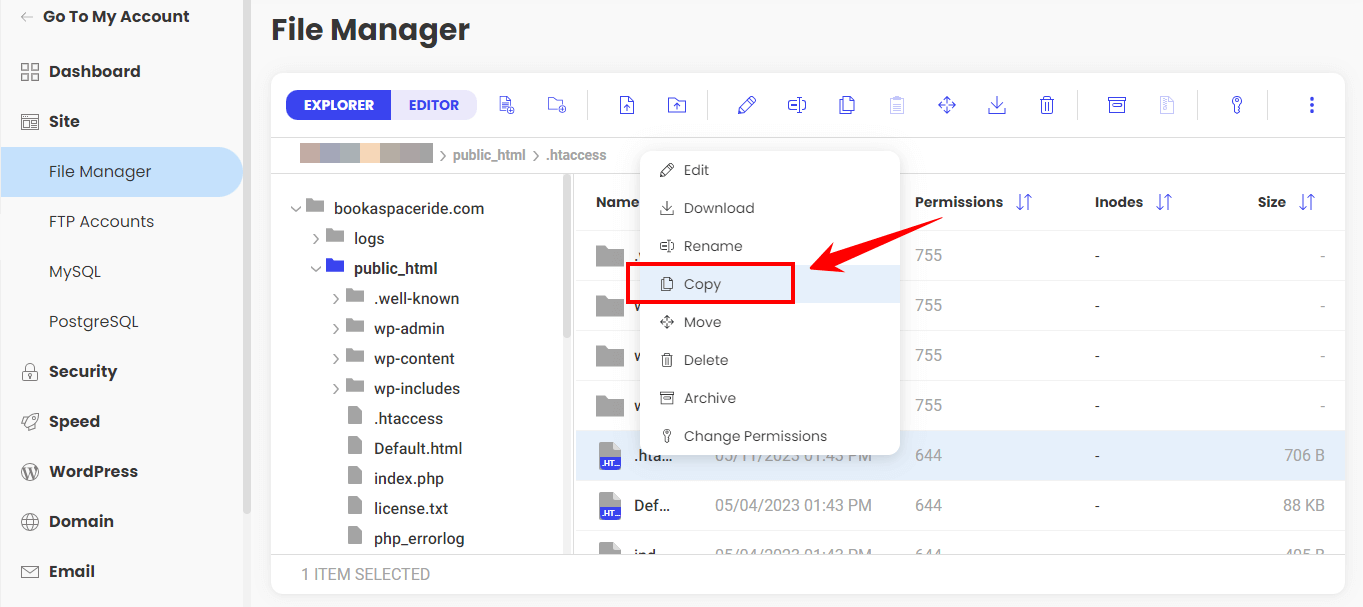
A Pro Tip: Before you make any changes, you must backup the “.htaccess” file. To do this, right-click on the file, select “Copy,” and paste it into a safe location. To avoid confusion, you can rename this copy to something like ‘.htaccess_backup’.
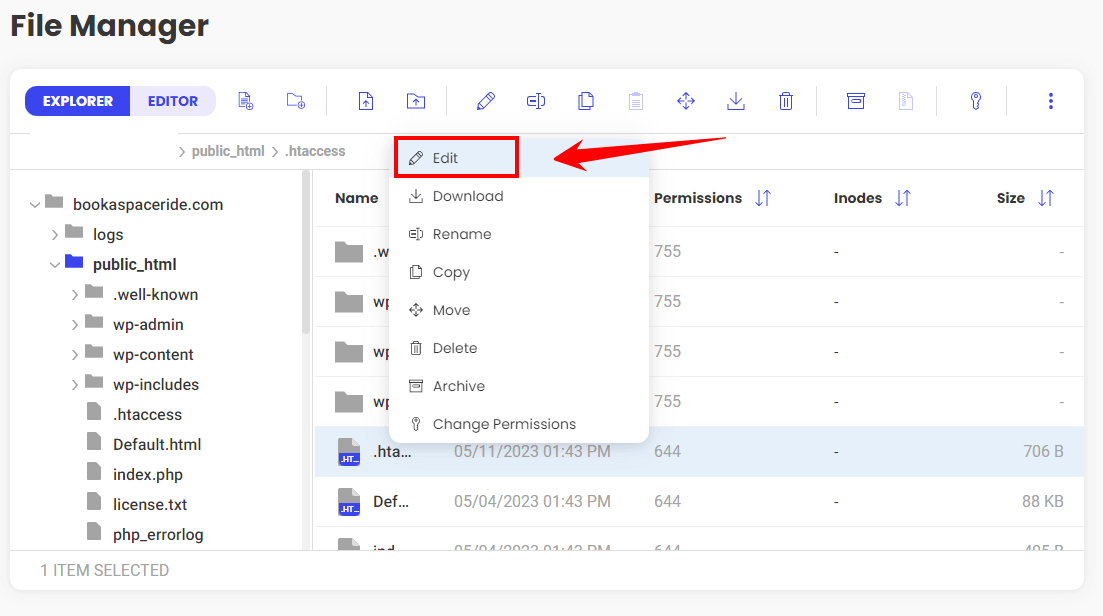
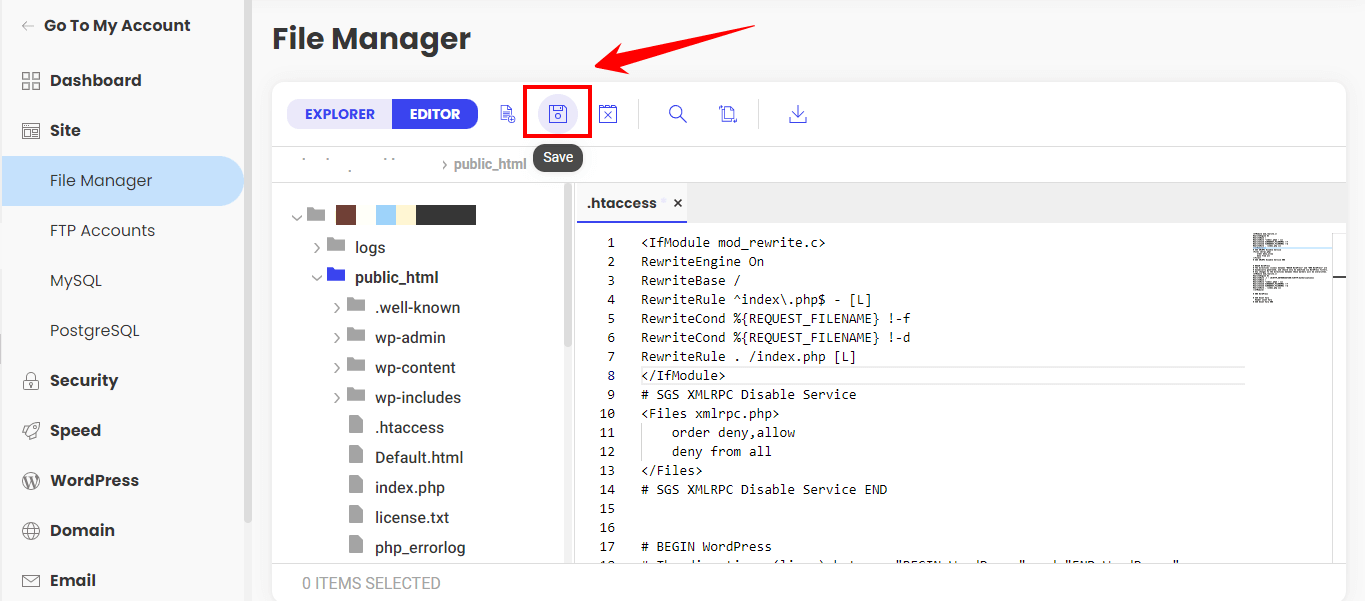
- Now that you have a backup, you can proceed to edit the “.htaccess” file. Right-click on the file and select “Edit” to open the file editor.
- In the file editor, you’ll need to add the following code at the beginning of the “.htaccess” file:
<IfModule mod_rewrite.c>
RewriteEngine On
RewriteBase /
RewriteRule ^index\.php$ - [L]
RewriteCond %{REQUEST_FILENAME} !-f
RewriteCond %{REQUEST_FILENAME} !-d
RewriteRule . /index.php [L]
</IfModule>
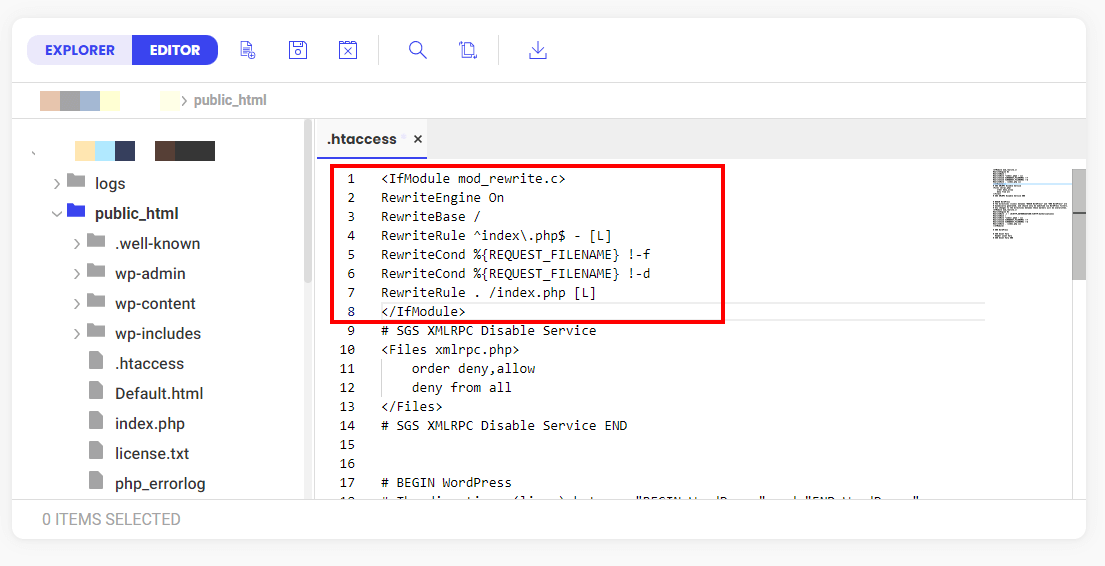
Note: This code tells your server to rewrite URLs that include ‘index.php’, effectively removing it from the URL.
- If your website has tight security, you might also need to add this code to your ‘.htaccess’ file:
<IfModule mod_rewrite.c>
RewriteEngine On
RewriteCond %{THE_REQUEST} ^[A-Z]{3,9}\ /.*index\.php\ HTTP/
RewriteRule ^(.*)index\.php$ /$1 [R=301,L]
</IfModule>
Note: This code will ensure that the server correctly redirects URLs even if ‘index.php’ is included in the request.
- After adding these codes, save your changes and check your URLs.
- If you’re still seeing “index.php” in your URLs or experiencing any issues, refer to the troubleshooting section of this article for help.
- That’s it! These steps should help you remove “index.php” from your WordPress URL by modifying the “.htaccess” file.
- Remember, the ‘.htaccess’ file is a powerful file that controls how your server responds to certain conditions. As such, it’s vital to keep it secure. Avoid giving out access to it, and always keep a backup before making changes.
Precautions Before Making Changes
Before you dive into modifying your website, treating the process with the same care and caution you would apply to any significant project is important.
In our experience, a good offense is the best defense against potential issues. Here are some critical steps to take before changing your WordPress site.
The Importance of Backing Up Your Site
Imagine this: you’ve just made some changes to your site, and suddenly, your once new homepage is unrecognizable, or worse, inaccessible. It’s every website owner’s worst nightmare, and it can happen if you don’t take the necessary precautions before making changes.
A backup is a complete copy of your website’s files and database, saved at a specific point in time. Backing up your site is like insurance. You hope you’ll never need it, but you’ll be glad you have it if something does go wrong.
If anything goes awry while removing ‘index.php’ from your URL or any other modification, remove PHP from the URL, a backup allows you to restore your site to its previous state.
How to Backup Your WordPress Site
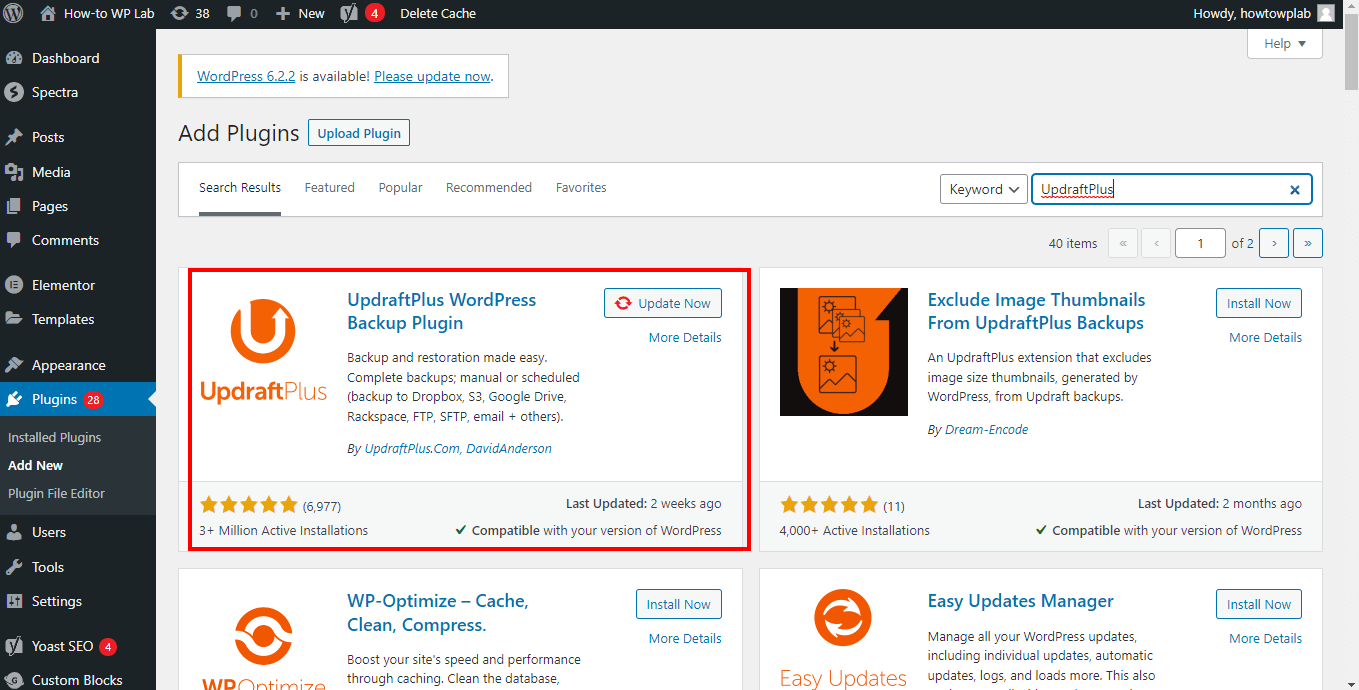
So how do you create this crucial safety net? You’ve got a few options. One of the easiest ways to back up your WordPress site is to use a plugin. Backup plugins like UpdraftPlus or BackupBuddy can handle the process for you automatically, creating regular backups and storing them in a safe location. These plugins are easy to use and require little technical knowledge.
Alternatively, you can choose to manually back up your site via your hosting provider’s cPanel or equivalent control panel. This method can be a bit more complex and time-consuming, but it gives you total control over what you’re backing up and where it’s stored.
Warning About Potential Issues During the Process
While the process of removing ‘index.php’ from your URL is generally safe, it’s not completely without risk. You might encounter temporary issues, such as 404 errors, which occur when a webpage can’t be found.
Additionally, changes to your website’s structure can sometimes cause unexpected results in its appearance or functionality. Don’t let this deter you, though. Remember, with a full backup in place, and you can always restore your site if necessary. Plus, by following the steps outlined in this guide, you’ll be well-equipped to handle any issues that arise.
And, of course, don’t hesitate to seek help from a professional or your hosting provider’s support team when in doubt.
Why Removing ‘index.php’ from Your URL is Beneficial
Picture this: you’re at a networking event, and someone asks for your website. You start rattling off your URL, but when you get to the ‘/index.php’ part, you see a puzzled expression cross their face. That’s when you realize: ‘index.php’ is cramping your style.
Removing ‘index.php’ from your URL isn’t just about style, though. It has real, tangible benefits for your website and your brand. Let’s unpack those benefits a bit.
Improves SEO
SEO, or Search Engine Optimization, is like the secret sauce of the internet. It’s all about making your site appealing to search engines like Google, thereby increasing your visibility in search results. And as you may have guessed, your URL plays a big role in this.
Search engines like Google love clean, easy-to-understand URLs. They’re like the well-organized, neatly labeled files in a filing cabinet that make it super easy for search engines to understand what your page is about.
So, by removing ‘index.php’, you’re improving your site’s SEO and increasing your chances of getting noticed by search engines.
Enhances User Experience
Next up, we’ve got user experience, or UX for short. UX is all about how people interact with your website. And in this fast-paced digital world, people prefer things that are simple and easy to understand.
URLs with ‘index.php’ can be confusing to users. It’s like an extra piece of information that they didn’t ask for and don’t know what to do with.
By removing ‘index.php’, you’re simplifying your URLs and making them easier for users to understand and remember. It’s a small change, but it can make a big difference in how people perceive and interact with your site.
Gives a Cleaner, More Professional Look
Finally, let’s talk aesthetics. We all know the saying, “Don’t judge a book by its cover,” but the reality is, people do judge websites by their URLs.
A URL with ‘index.php’ can come off as messy and unprofessional. It’s like showing up to a business meeting in a wrinkled suit. On the other hand, a clean, ‘index.php’-free URL gives off a professional vibe. It tells users (and search engines) that you mean business.
So there you have it. Removing ‘index.php’ from your URL improves your SEO, enhances user experience, and gives your site a more professional look. It’s a small change with big benefits. So why not give it a shot? You’ve got nothing to lose and everything to gain.
Troubleshooting Common Issues
Just like any journey, the path to a squeaky-clean, ‘index.php’-free URL may have a few bumps along the way. Don’t worry, though—I’ve got the roadmap to navigate through the most common issues you might encounter. Let’s take a look.
What to Do if You Get a 404 Error
A 404 error is like the ‘Missing’ poster of the internet. It shows up when a webpage can’t be found. If you see a 404 error after removing ‘index.php’ from your URL, don’t panic. The page isn’t really missing—it’s just a little lost.
First, try flushing your permalinks. This can often resolve 404 errors. Go back to your WordPress dashboard’s ‘Permalinks’ settings page, and click ‘Save Changes’ again.
If that doesn’t work, it’s possible that your ‘.htaccess’ file is not writable. Check the file’s permissions and make sure that your WordPress installation can write to it. If you’re unsure how to do this, your hosting provider can help.
How to Revert Changes if Something Goes Wrong
If you’ve followed the steps to remove ‘index.php’ from your URL, but things just don’t seem right, remember there’s no shame in a do-over. That’s why we took a backup before starting, remember?
To restore your site from a backup, you can use the method provided by your backup plugin, or the restoration process available through your hosting provider’s cPanel or equivalent.
Restoring your site will revert it back to how it was when the backup was taken, effectively undoing any changes you’ve made.
Tips for Checking with Your Hosting Provider if Problems Persist
If you’ve tried the above solutions and you’re still encountering issues, it might be time to call in the cavalry—your hosting provider’s support team.
Your hosting provider’s support team is like the tech equivalent of a superhero team. They have the tools and the know-how to tackle most website issues.
So, if problems persist after you’ve attempted to remove ‘index.php’ from your URL, don’t hesitate to contact them for help.
Wrapping Up
So, here we are at the end of our journey. It’s been quite an adventure, hasn’t it? I’ve walked you through the reasons why ‘index.php’ might be lurking in your URL, the benefits of removing it, and the step-by-step methods to make that happen.
Along the way, we’ve dived into your WordPress settings, tinkered with your permalinks, and even added some modified code to your ‘.htaccess’ file. And you’ve done an amazing job! It’s been a hands-on, learning-as-we-go experience.
Remember, the goal here is not just about removing ‘index.php’ from your URL. It’s about improving your SEO, enhancing your user experience, and giving your website a cleaner, more professional look.
Essentially, it’s about creating a better, more effective online presence for yourself or your brand. And every step you take in that direction is a victory.
So, give yourself a pat on the back. You’ve learned something new, and you’ve made a positive change to your website. And if you’ve run into any issues along the way, remember that it’s all part of the process.
Don’t hesitate to ask for help from a fellow WordPress user, a forum, or your hosting provider.


Thank you!!