How to Unpublish a WordPress Page [4 Visual Methods]
Have you ever felt stuck because you wanted to hide one of your website pages but didn’t know how? This is just like when you want to remove a poster from your wall – you need to know how. Learning to unpublish a WordPress page is a skill that comes in handy in such situations.
Sometimes, you might have a webpage that’s under construction or contains old information that needs some revising. Whatever the cause, being able to unpublish a page can save you from misunderstandings and awkward situations. It’s like having a secret spot where your webpage can stay until it’s completely ready for the audience.
Sounds hard? No need to stress, it’s actually quite simple.
In this article, you’ll learn:
- Why would you need to unpublish a WordPress page
- Different ways to unpublish a page in WordPress
- What happens after unpublishing a page
So if you’re a WordPress newbie or just need a friendly refresher, this article has you covered. In a few easy steps, you’ll be a pro at managing what the public sees on your website.
💡 Bonus Insight: In addition to this guide, I will give you a helpful checklist of things to do after unpublishing a page. This checklist includes redirecting links and cleaning up orphan images so you have a complete strategy to tie up loose ends and avoid any issues.
Now, let’s get started.
Table of Contents
Why Would You Need to Unpublish a WordPress Page
Before you delete anything, think about unpublishing instead. Unpublishing can actually fix a bunch of common website problems pretty easily.
How? Well, unpublishing keeps the page in WordPress, where you can still work on it, but it makes it so visitors can’t see the page anymore.
Pretty cool, huh?
I’ve got six really good reasons you’d want to use unpublishing on your pages rather than deleting. From getting rid of old info to making changes way easier, unpublishing has some nice benefits.
And it only takes a quick click! Read on to see why you should give unpublishing a try. I bet you’ll be excited to use it once you know what it can do for your website and save you time too.
- Outdated Content: If you have a page with content that is no longer accurate or relevant, unpublishing it can prevent search engines from indexing that outdated content. This helps avoid confusing visitors or diminishing your site’s authority around certain topics.
- Duplicate Content: If you accidentally created a page that substantially duplicates content from another page on your site, unpublishing the duplicate can help prevent search engines from penalizing you for thin or duplicated content.
- Sensitive Information: If a published page unintentionally includes sensitive business information, private customer data, or other content that should not have been made public, unpublishing the page can quickly remove access while you update the content.
- Page Under Construction: Unpublishing a page that you are still building out or making major edits to can prevent visitors from encountering a poor experience with an incomplete or chaotic page.
- Temporary Promotion Or Event: If you created a page to promote a time-sensitive sale, coupon code, or event, unpublishing the finished page once the promotion ends can avoid confusion.
- Moving To A New URL: If you are migrating a page to a new URL, unpublishing the old URL once the new page is ready can facilitate a clean transition for search engines and visitors.
You just learned a bunch of great reasons to unpublish WordPress pages instead of deleting them. But how do you actually unpublish a page? Doing it is super easy!
Stay with me as I walk you through the step-by-step process.
4 Ways to Unpublish a WordPress Page
When it comes to unpublishing a WordPress page, there are a few ways you can do it. Whether you want to hide the page or get rid of it completely temporarily, it’s important to know your options.
I will explain 4 simple and popular ways to unpublish a page. For each method, I will also give you the advantages and disadvantages so you can decide which one works best for you.
Let’s start with the first method.
Way 1: Unpublish a Single WordPress Page
Unpublishing just one page on your WordPress site is simple and fast. This method is perfect if you have only one page you need to take off your site for a while.
Maybe you’re updating it or just want to hide it temporarily. I’ll show you step-by-step how to do this quickly, so you don’t have to worry about people seeing your page while you work on it.
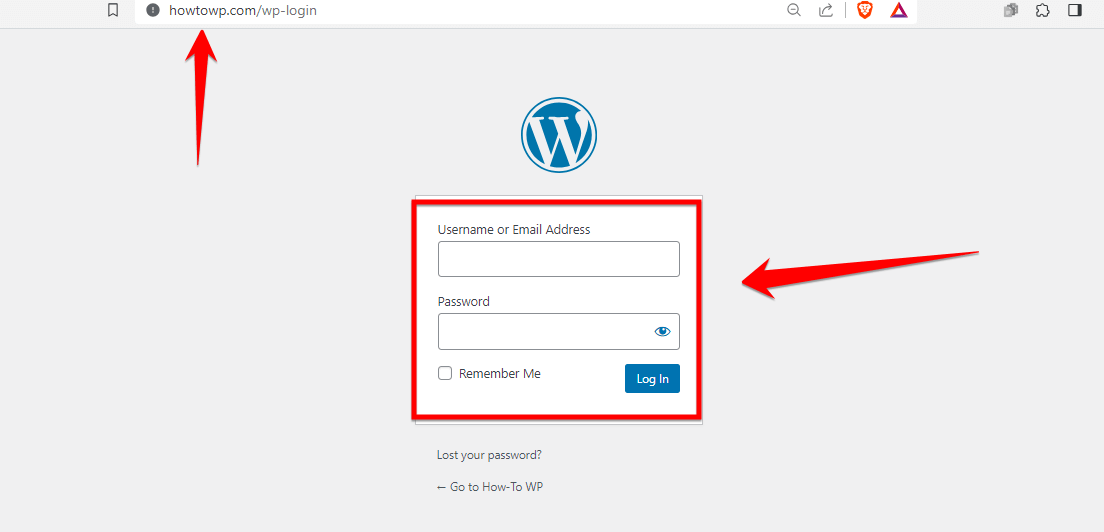
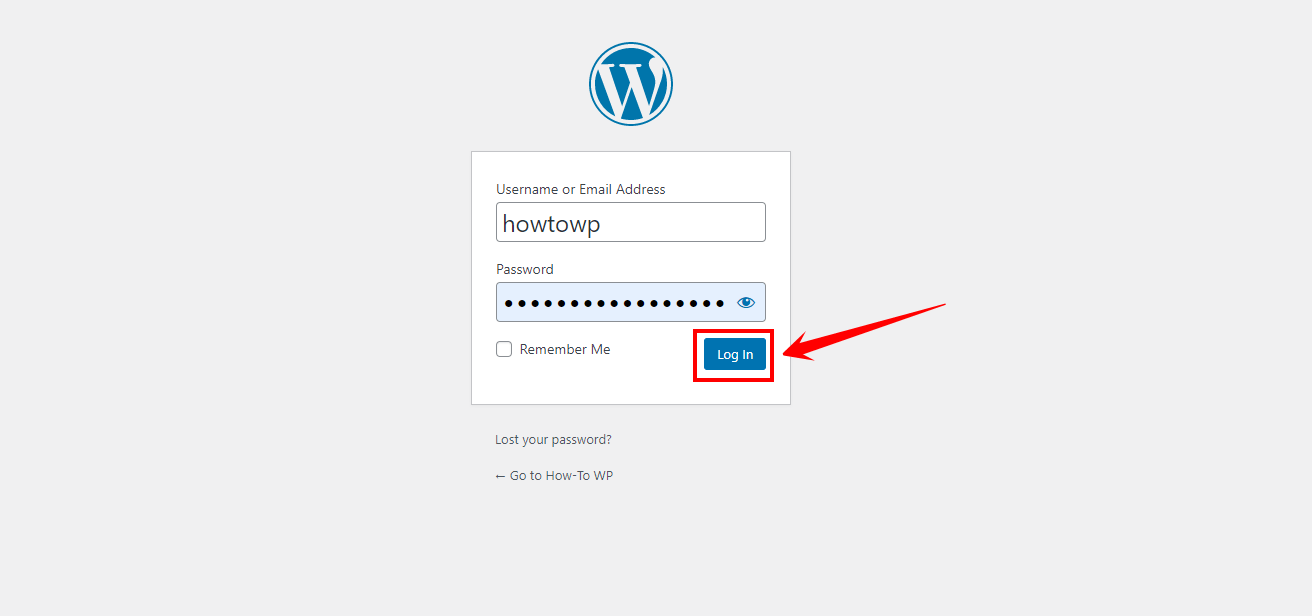
Step 1: Log in to your WordPress admin dashboard by entering your username and password.
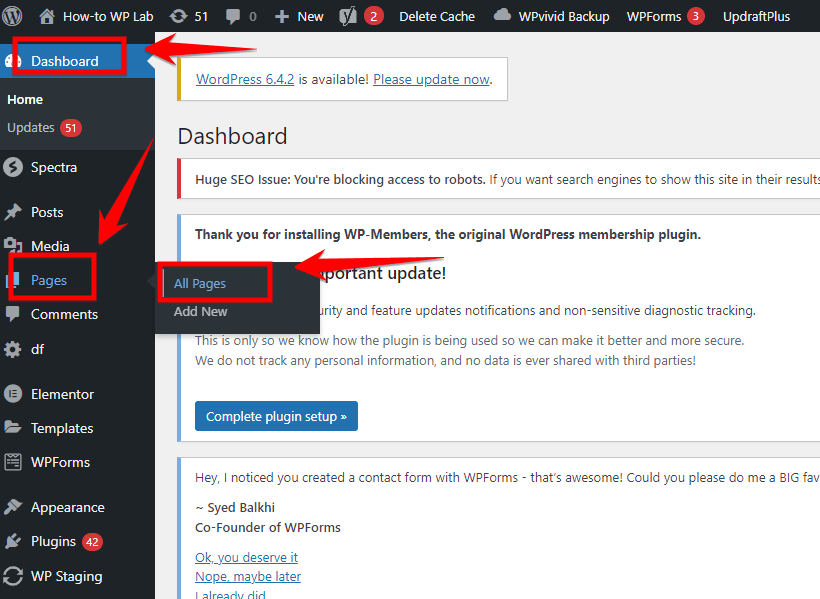
Step 2: On the dashboard, find and click on the “Pages” option. Then select “All Pages” from the menu that appears.
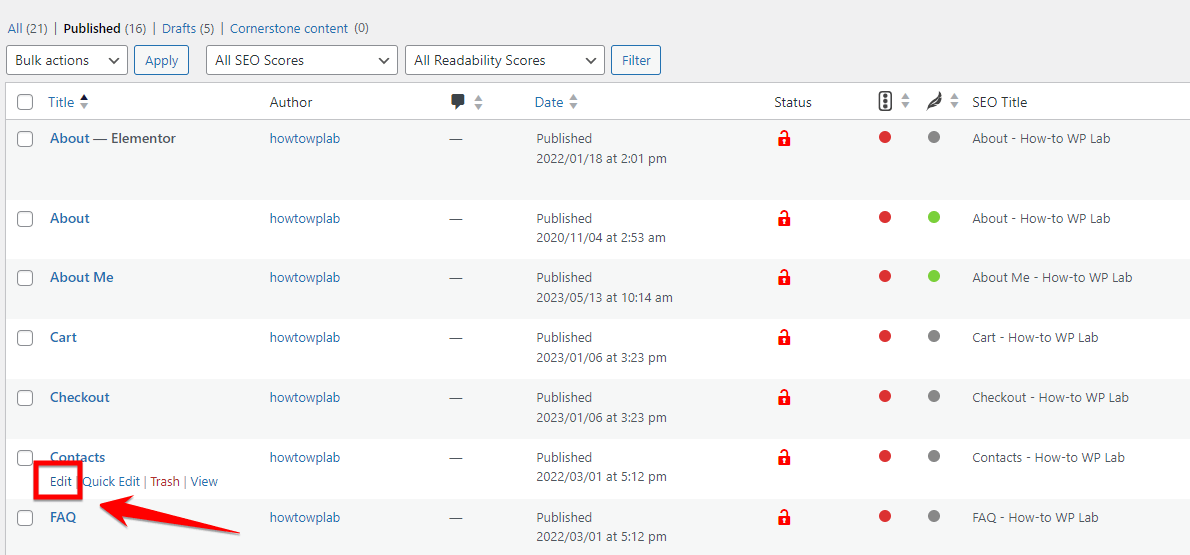
Step 3: Look for the specific page you want to unpublish. Hover your cursor over it, and you’ll see an “Edit” link. Click on that link.
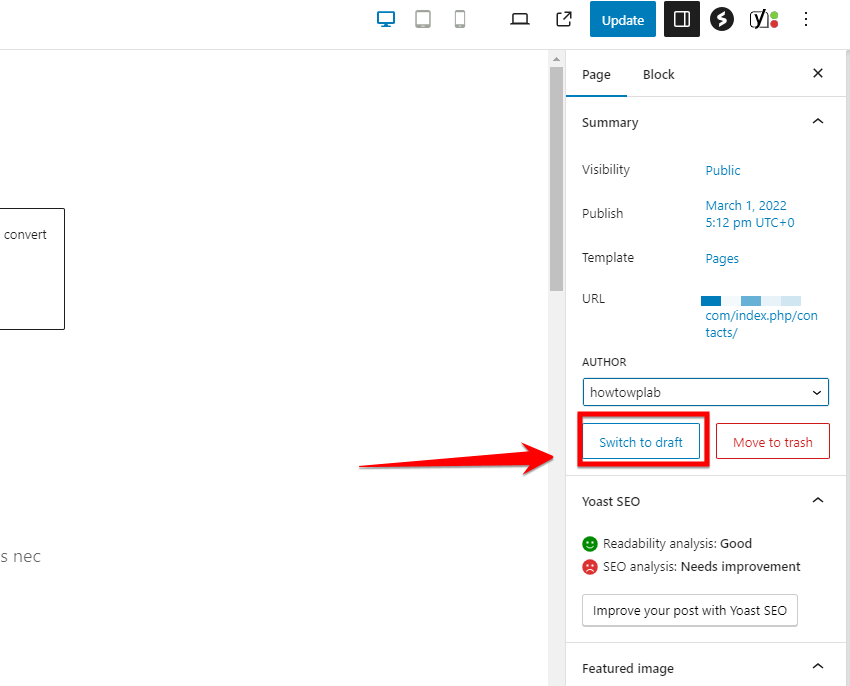
Step 4: After clicking “Edit,” you’ll see a screen where you can make changes to the page. Look for the option that says “Switch to draft” and then click on it.
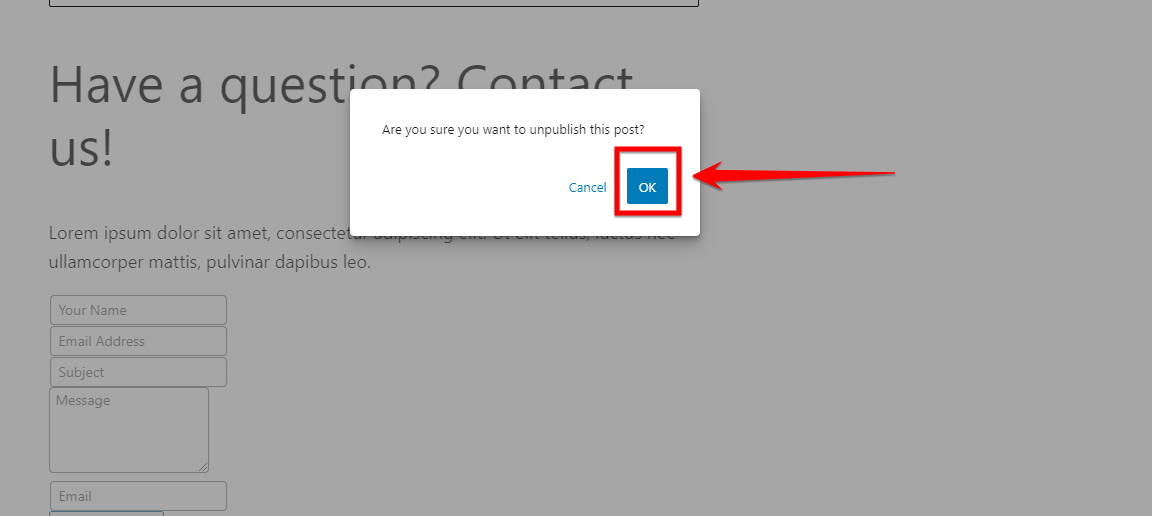
Step 5: A confirmation popup will appear asking, “Are you sure you want to unpublish this post?”. Click the “OK” button to say “yes.”
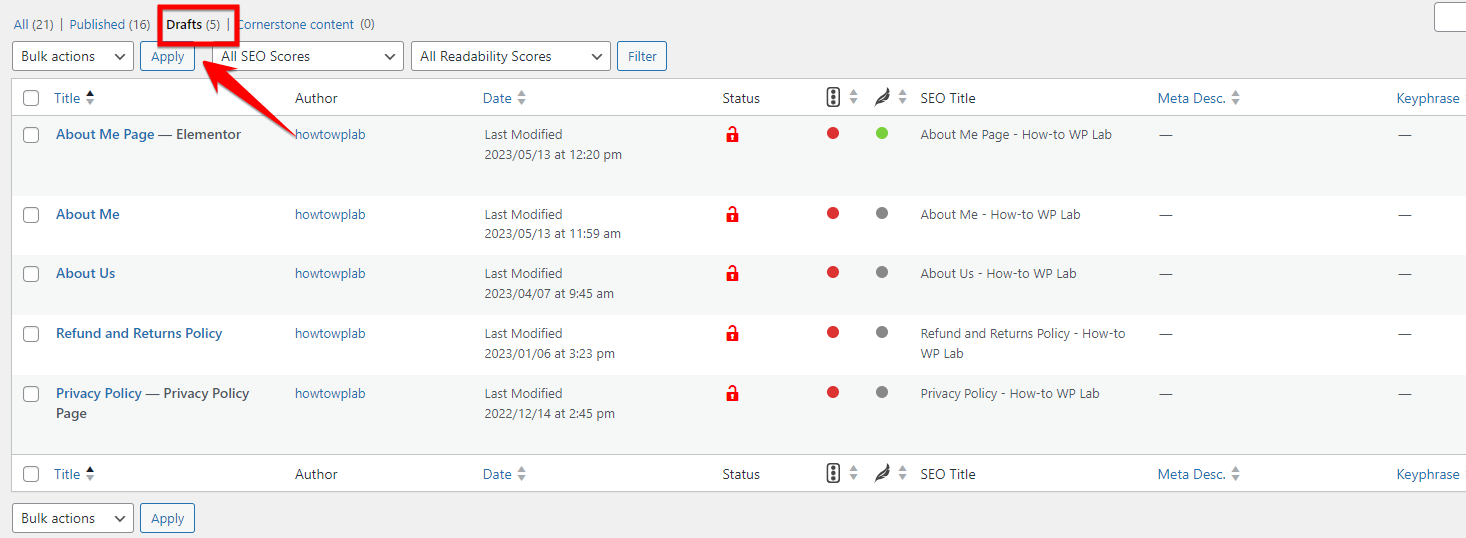
Great job! Well done! You’ve made some changes to your page, and now it is called a “Draft.” This means that it’s not available anymore for people to see on the internet. If someone tries to visit its web address, they will see an error message called “404.”
Note: As I mentioned above, when you switch a page to draft status, it won’t be visible to the public, but you can still access and work on it from the backend. To make sure, go back to the “All Pages” section and click on “Drafts” to see your unpublished page.
Pro Tip: If you no longer need a page or if it’s outdated, you can easily get rid of it by deleting it. It’s just like throwing away a paper you no longer need. Follow these simple steps to delete a page.
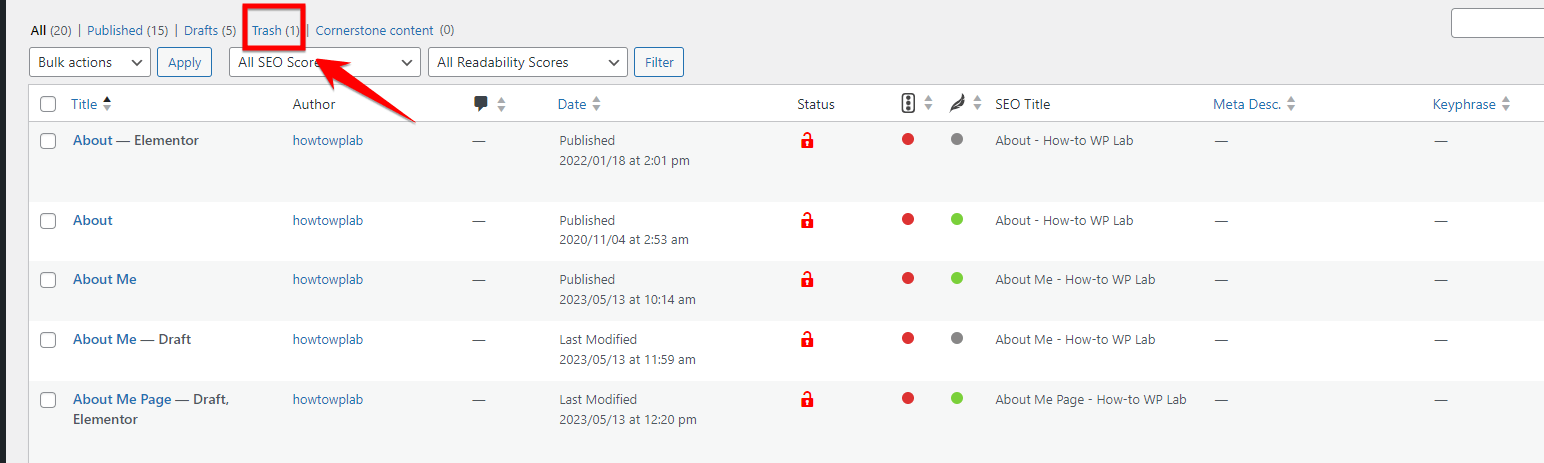
Step 6: Inside the page editor’s menu, look for the “Move to trash” button and then click on it. This action will send the page to the trash, like when you throw something away.

Note: WordPress keeps your deleted pages in the trash for 30 days. So, if you’ve thrown a page away by mistake, you’ve got some time to get it back.

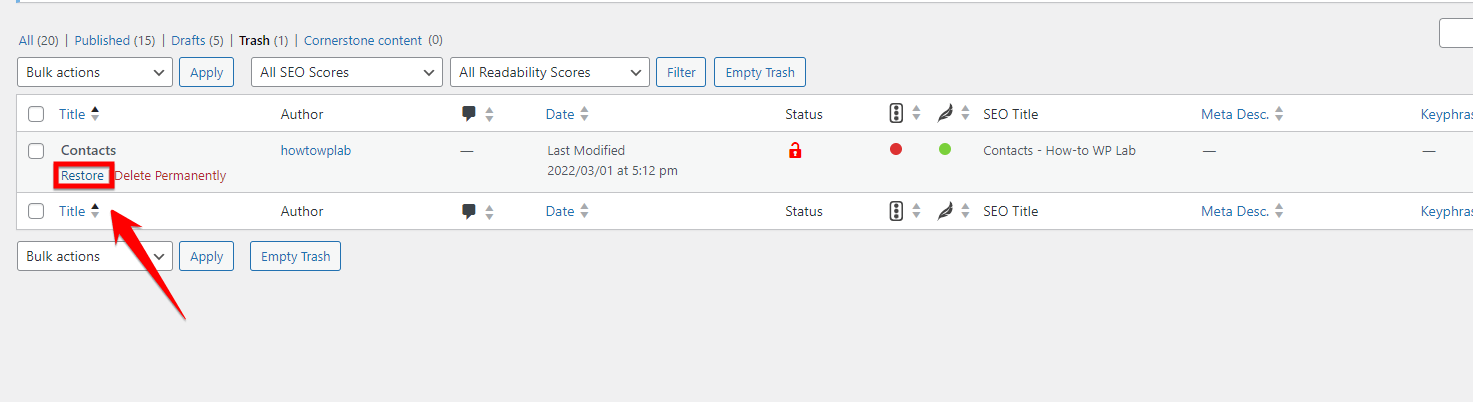
Step 7: Go to your WordPress dashboard. Then click on “Pages”, and next, click on “All Pages”. Here, you’ll see a link that says “Trash”. Click on this to see all the pages you’ve thrown away.
Step 8: Now, find the page you want to restore. Next to it, there’s a link that says “Restore”. Click on this, and your page will come back from the trash.
Pros:
- Easy to use: Switching a page to draft status is simple and doesn’t require advanced technical knowledge. Anyone can follow the easy steps to unpublish a page.
- Can be undone: If you change your mind later, you can easily publish the page again. This flexibility allows you to make adjustments and bring back the page whenever you want.
- Organization: By keeping unpublished pages as drafts, you can maintain a structured approach to managing your website’s content and easily locate them when needed.
Cons:
- Limited privacy: Although the page is unpublished, it can still be accessed by users who have the appropriate permissions and are logged into the website. If you require complete privacy for the page, this method might not provide the level of confidentiality needed.
Way 2: Unpublishing Multiple Pages Using Bulk Actions
If you’ve got more than one page you want to hide on your WordPress site, there’s a fast way to do it. With bulk actions, you can unpublish lots of pages all at once! It’s a real time-saver. I’ll guide you through each step so you can get it done quickly and easily.
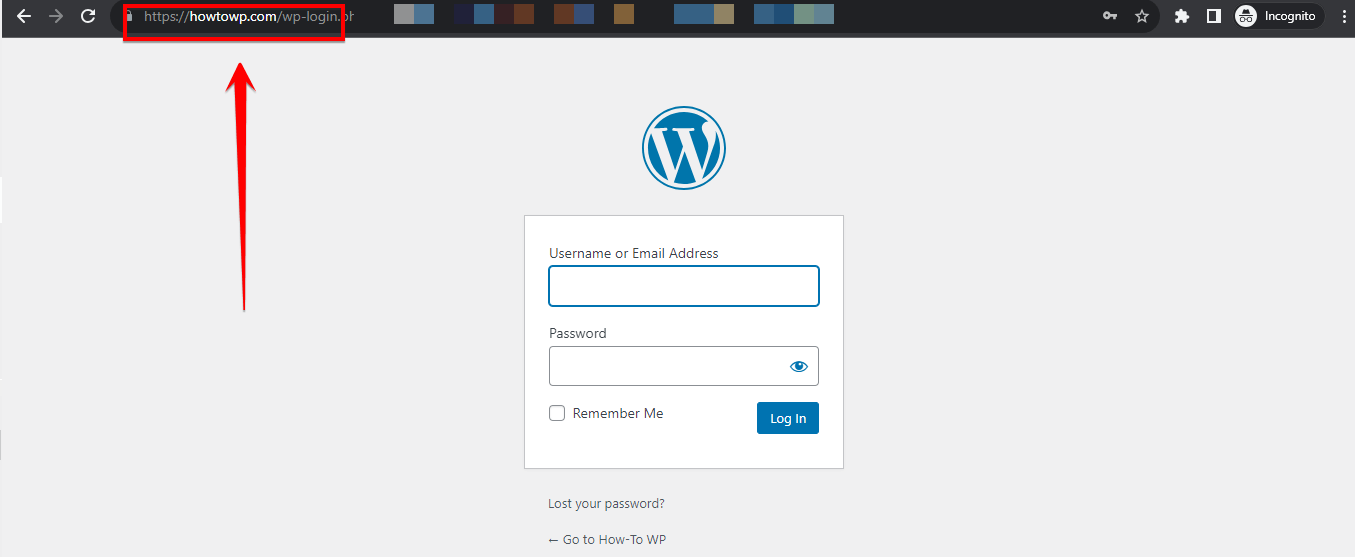
Step 1: Open your preferred web browser and go to your WordPress login page.
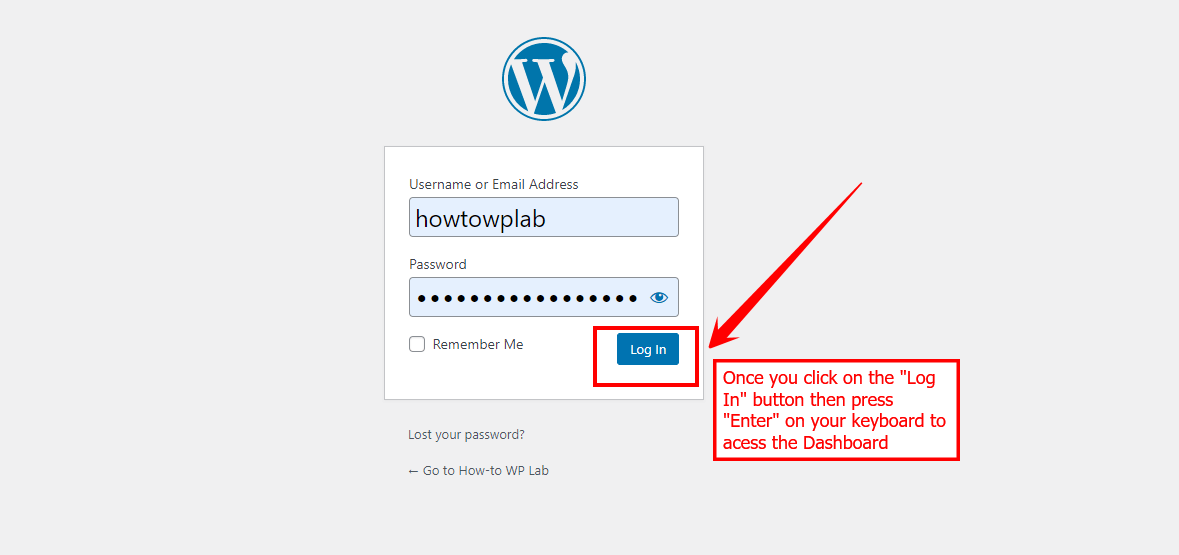
Step 2: Enter your username and password in the login form, then click the “Log In” button to access your WordPress dashboard.
Step 3: Once logged in, navigate to the “Pages” section. You can find it in the left-hand menu.
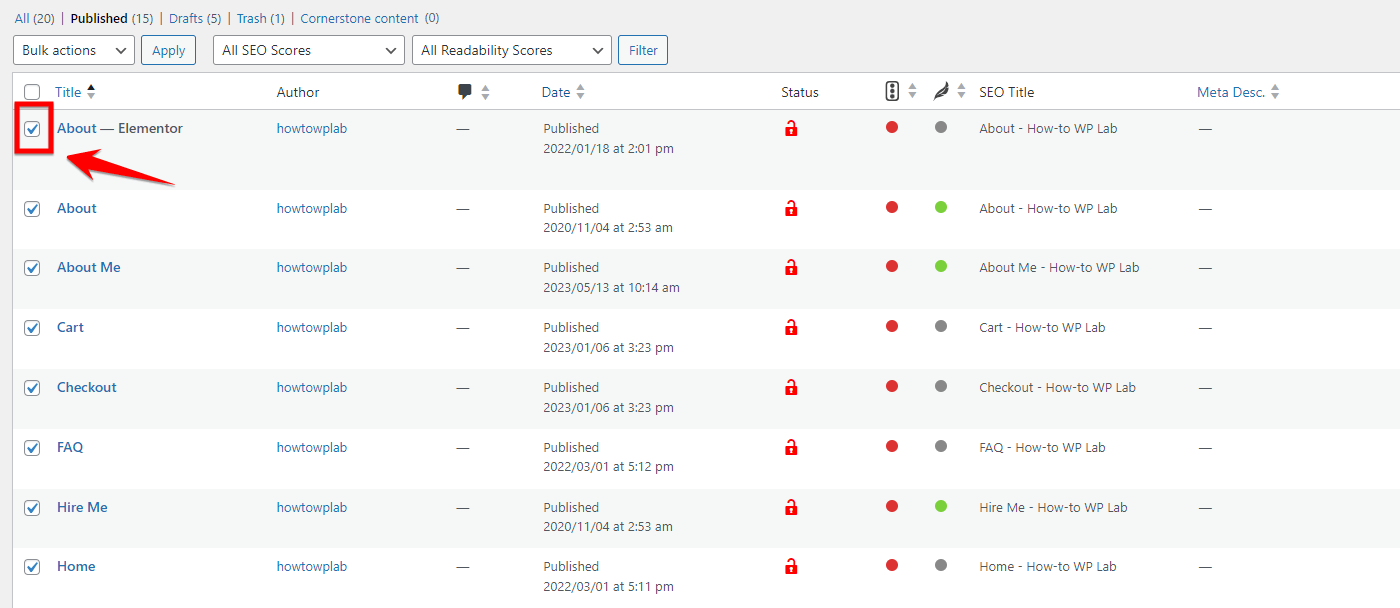
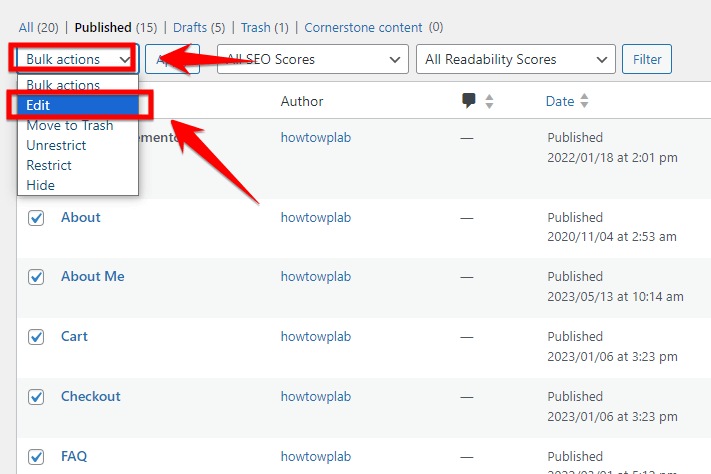
Step 4: By default, you will see a list of all the pages on your WordPress site. To select multiple pages for unpublishing, you can either use the checkboxes next to each page or use the “Bulk Actions” feature.
Step 5: After selecting the desired pages, locate the “Bulk Actions” dropdown menu, usually found above or below the list of pages. Click on it and select the “Edit” option.
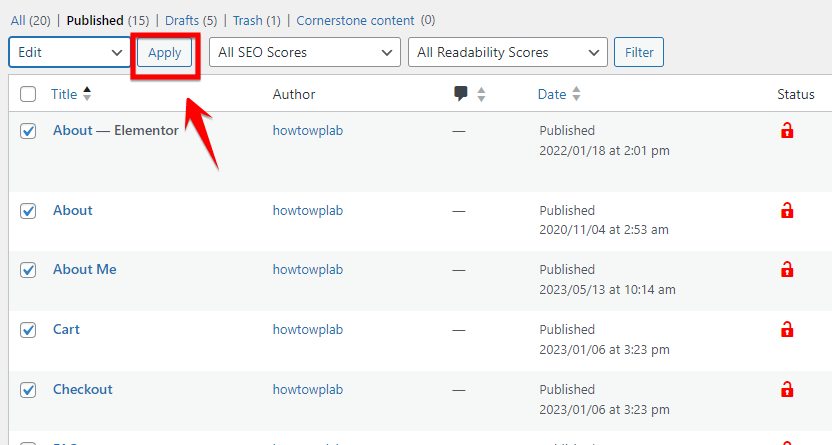
Step 6: Once you select “Edit,” click the “Apply” button next to the dropdown menu. This will bring up a new section where you can edit the selected pages.
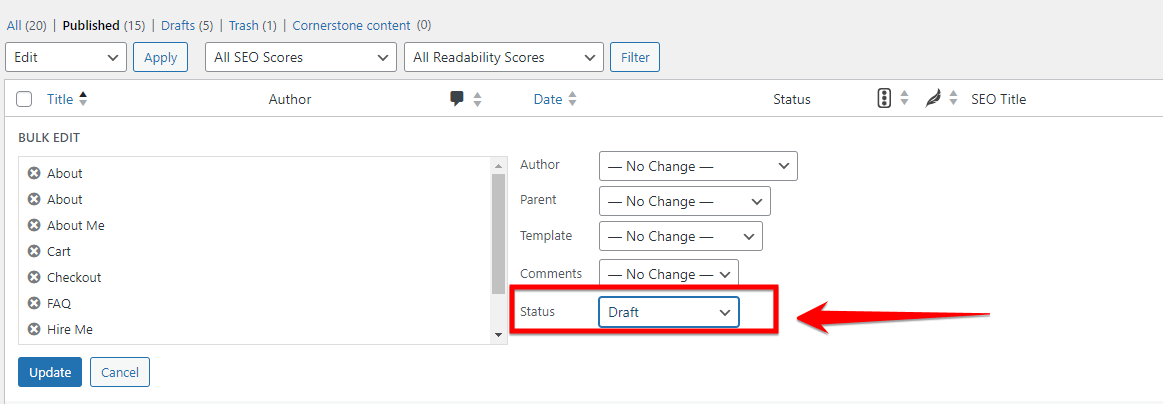
Step 7: Look for the “Status” option within the editable section. By default, it is set to “Published.” Change the status to “Draft” or “Pending Review” to effectively unpublish the selected pages.
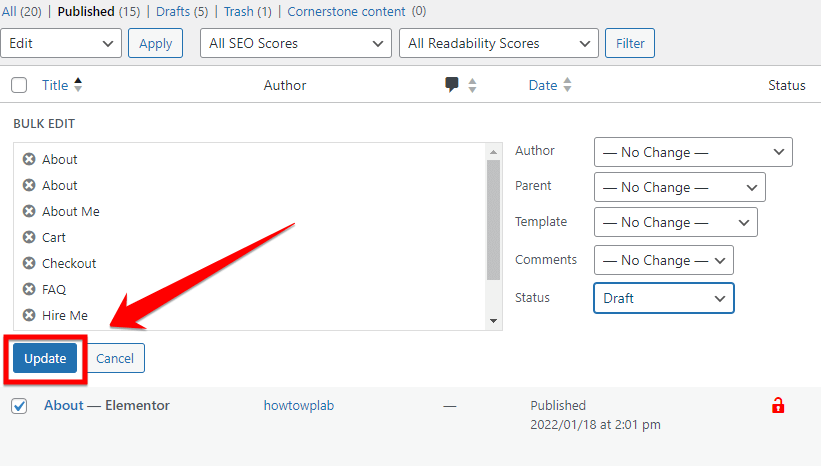
Step 8: After changing the status, click the “Update” button to save the changes and unpublish the selected pages.
Step 9: You will see a success message confirming the page’s status change. You can now go back to the “Pages” section to verify that the selected pages are no longer published.
Note: Make sure to double-check your changes to ensure they are applied correctly. Also, these steps apply to the default WordPress page editor. If you are using a page builder or a custom plugin for page management, the process might be slightly different.
Pro Tip: Instead of manually selecting checkboxes, you can use the search and filter options above the list of pages to narrow down the selection. This can be helpful if you have a large number of pages and only need to unpublish specific ones.
Pros:
- Saves time: Unpublishing multiple pages at once helps you get things done faster by updating the status of many pages together instead of one by one.
- Easy to use: WordPress has a simple way to manage pages, and with the bulk editing feature, you can unpublish multiple pages easily, even if you’re not too familiar with technical stuff.
- Flexible: Unpublishing pages in bulk is handy when you want to temporarily remove content or make changes to your website’s organization. It gives you the freedom to manage your site more efficiently.
Cons:
- Risk of mistakes: While bulk editing is convenient, there’s a chance you might accidentally unpublish important pages that you didn’t mean to change. So be careful and check your choices before making any updates.
Way 3: Make a WordPress Page Private
Sometimes, you might want to keep a page on your WordPress site but not let everyone see it. Making a page private is a great way to do this.
Only particular people you choose can view private pages. This way is ideal for pages meant for just a few eyes, like special announcements or personal notes. Let’s walk through how to make a page private together.
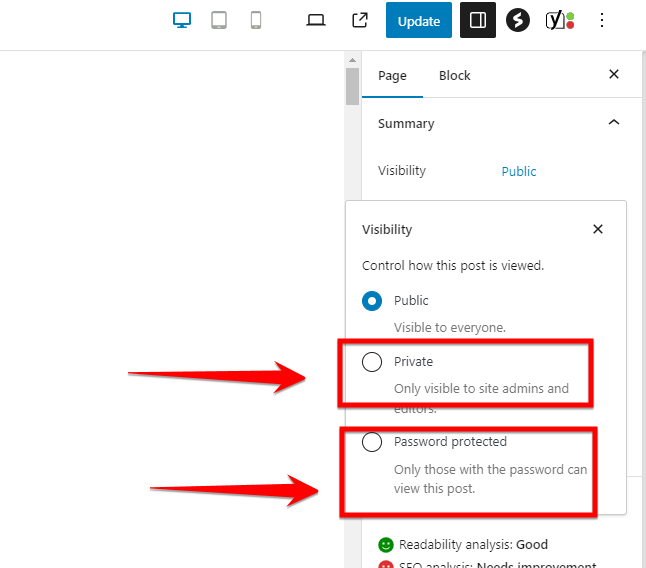
Step 1: Choose the page you want to hide. Find the page you want to make private or password-protected from the list and click on its name to open it for editing.
Step 2: Change the page’s visibility settings. On the right side of the editing screen, you’ll see some options. Look for the one that says “Visibility” and click on the link next to it that says “Public”.

Step 3: Select the privacy option you want. When you click on “Public”, a dropdown menu will appear. Choose either “Private” or “Password protected”.
- “Private” means the page will only be visible to users who are logged in and have the right permissions.
- “Password protected” means users will need to enter a password to access the page.
Step 4: Save your changes. Click on the button that says “Update” to save the changes you made to the page’s visibility settings.
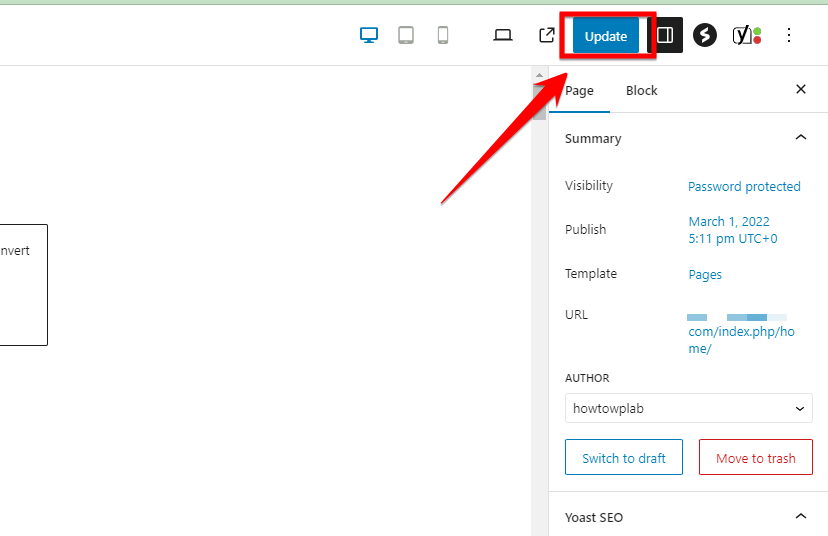
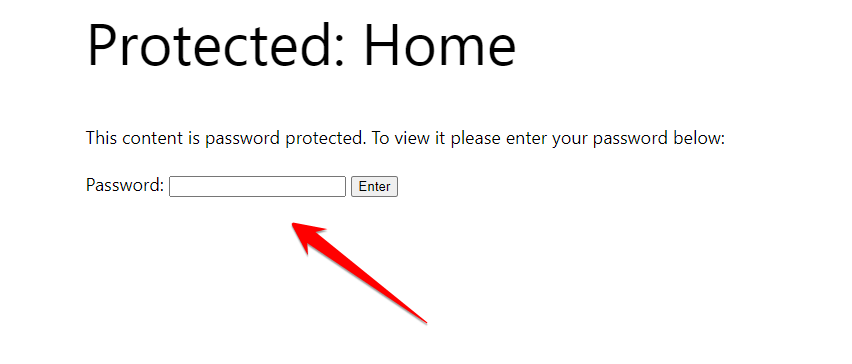
Step 5: Check if the page is hidden. Visit your website as a regular visitor without logging in. Make sure the page you made private or password-protected is no longer accessible to the public. If you chose the password protection option, try entering the correct password to see if you can access the page.
Well done! You have successfully hidden a WordPress page by making it private or password-protected.
Pros:
- More Privacy: By making a page private or password-protected, you can keep the information on it hidden from anyone who isn’t supposed to see it.
- Controlled Access: You can decide who gets to see the page and who doesn’t. This is useful when you only want certain people or groups to have access, like members of a club or customers with special privileges.
- Easy to Do: You can make a page private or password-protected directly from your WordPress dashboard without needing extra tools or complicated settings.
Con:
- Less Visibility: When a page is private or password-protected, it won’t be visible to everyone. This means it might not get as much attention or visitors as a public page would.
Way 4: Unpublish a WordPress Page Using a PPWP Plugin
If you’re looking for a more advanced way to unpublish pages, the PPWP plugin is your friend. This plugin gives you more control and options for hiding your pages. It’s super useful if you want to get a bit more technical and have more power over who sees your pages and when.
I’ll break down the steps to make it easy for you to use this cool tool.
Step 1: Enter your username and password, then click the “Log In” button to access your WordPress dashboard.
Step 2: On the left side of the dashboard, find and click on “Plugins.” This will take you to the Plugins section.
Step 3: In the Plugins section, click on the “Add New” button at the top of the page. You will see a page where you can search for plugins.
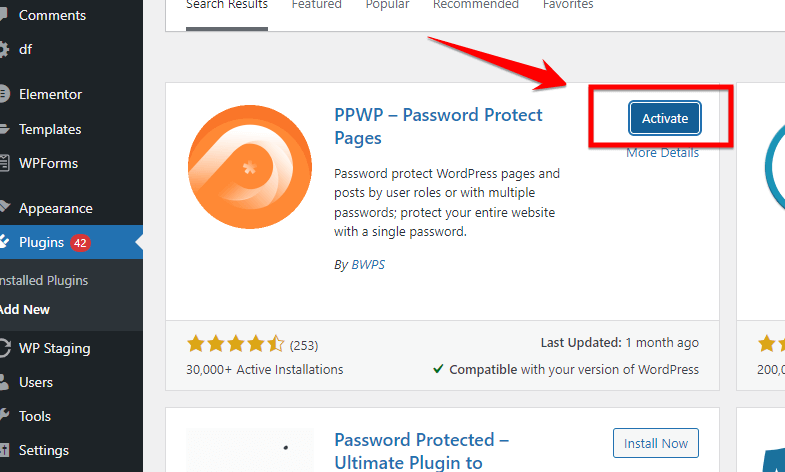
Step 4: In the search box on the right side, type the name of the plugin you want to install, like “PPWP – Password Protect WordPress Page,” and press Enter.
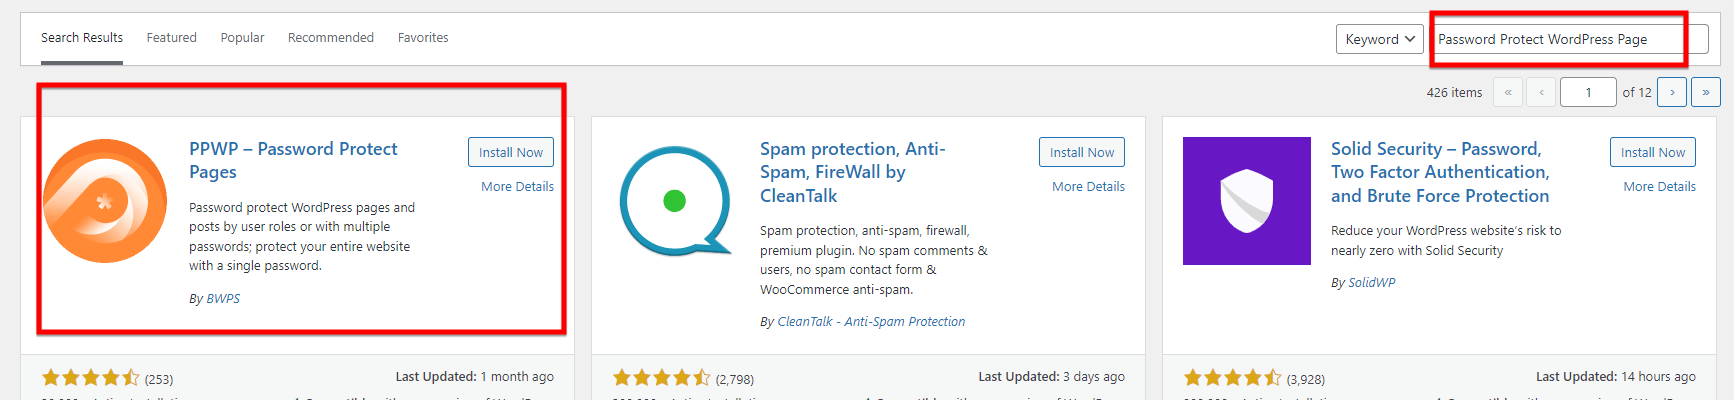
Step 5: A list of plugins will appear. Find the one you want and click the “Install Now” button next to it.
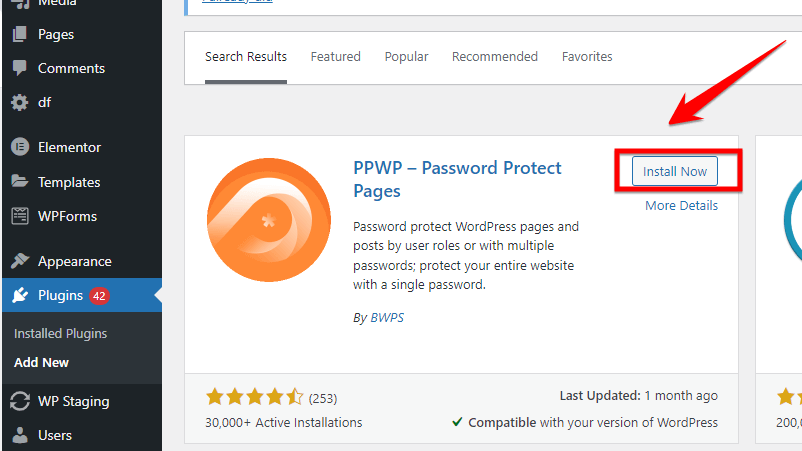
Step 6: Wait for the plugin to finish installing, and then click on the “Activate” button to make it active on your website.
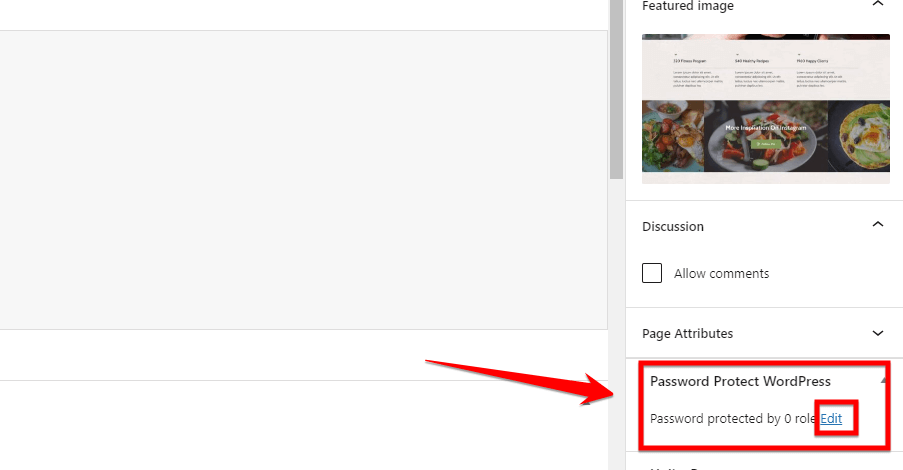
Step 7: After activating the plugin, go to the page you want to protect with a password. To do this, click on “Pages” on the left side, depending on what type of content you want to protect.
Step 9: Search for and click on the “Edit” option to make changes to the page you want to protect. When you click on it, a new screen will appear where you can edit the content on that page.
Step 10: In the editing screen, find the plugin’s settings. It may have a section called “Password Protect WordPress” or something similar. Click on it.
Step 11: Inside the password protection settings, you will see two options: “Role” and “Password.”
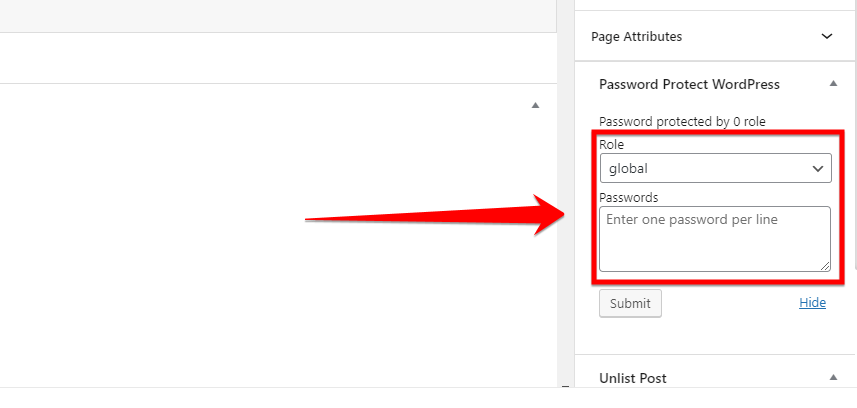
Step 12: Choose a role from the “Role” drop-down list. This decides which users will need to enter a password to access the page. Pick the role that matches the level of access you want to allow.
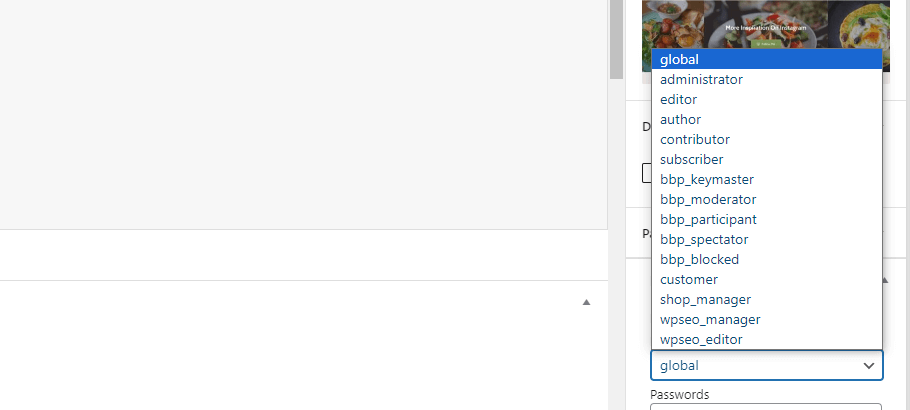
Step 13: Enter the desired password(s) into the “Password” field. You can set one password or multiple passwords based on what you need.
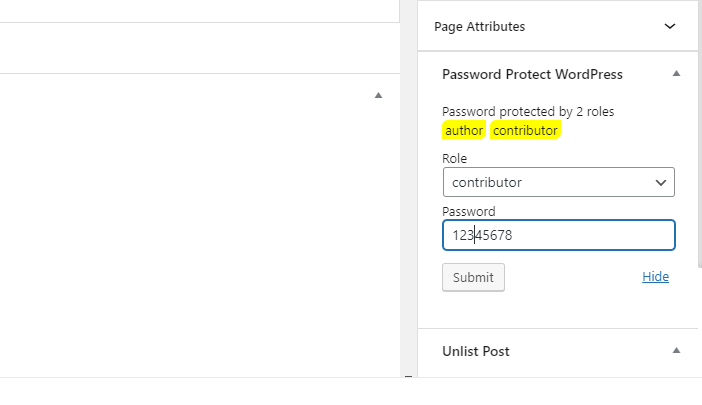
Step 14: Once you have chosen a role and entered the password(s), click on the “Submit” button to save the password protection settings.
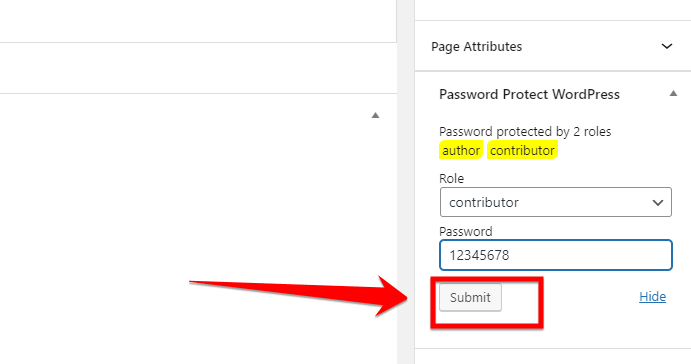
Step 15: Congratulations! You have now successfully protected the selected page with a password using the “Password Protect WordPress” plugin.
Pros:
- Increased Security: Password-protecting your WordPress pages adds extra security by allowing only users with the correct password to access the content, keeping it safe from unauthorized individuals.
- Flexible Access Control: With the PPWP plugin, you can set different passwords for different types of users, such as subscribers or editors. This gives you control over who can view specific content on your website.
- Easy to Use: The plugin provides a simple interface within WordPress, making it easy for anyone to password-protect their pages without needing advanced technical knowledge.
Con:
- Potential User Inconvenience: Adding a password requirement may discourage some users from accessing the protected pages, potentially reducing overall user engagement with your website.
What Happens After Unpublishing a Page
Unpublishing a page means removing it from public view on your website. Here is an overview of what happens when you unpublish a page:
1: The Page is No Longer Publicly Accessible
Once a page is unpublished, it cannot be accessed by regular visitors to your site. If someone tries to navigate to the URL of the unpublished page, they will typically get a 404 “Page Not Found” error.
The actual page content still exists on your site but is no longer visible to the public. Search engines also cannot access the content on an unpublished page (more details below).
2: The Page is Removed from Search Engine Indexes
Search engines like Google regularly crawl your site to index new and updated content. When you unpublish a page, search engines will eventually discover that the page returns a 404 status.
When this happens, the page that hasn’t been published will be removed from search engine results pages (SERPs). This means that it won’t appear anymore when people search for similar keywords or backlinks.
Typically it takes a few days to a few weeks for search engines to fully deindex an unpublished page and related links. But the page will stop returning in results much sooner.
3: Any Backlinks are Disavowed
If other sites had backlinks pointing to the unpublished page, those links are essentially “disavowed” since they now lead to a dead URL.
This means the backlinks stop passing link equity, which can impact your site’s search rankings (especially if the unpublished page has a lot of quality backlinks).
Essentially, unpublishing means any SEO value from that page and its backlinks is now gone from a search perspective.
4: Site Traffic Can be Affected
If the unpublished page had been attracting significant organic traffic, unpublishing means you lose out on those visitors and any conversions they may have generated.
Your overall site metrics, like visitors, views, leads, etc., can take a hit, especially if the page contributed a sizable chunk in the past.
Things You Have to Do After You Unpublish a Page
Remember, as I promised you that I would share a complete checklist, so here you go. When you unpublish a page on your website, there are several important follow-up actions you should take to ensure a smooth transition.
1: Redirect Visitors
One of the first things you’ll want to do is set up a redirect so visitors who try to access the now-unpublished page will get sent to another relevant page on your site. This helps retain visitors and prevents them from getting error messages.
You can create a 301 permanent redirect, which passes on link equity and signals to search engines that the new page is the definitive location. Use your CMS or web host’s tools to create the redirect rule.
2: Update Internal Links
Next, find any pages on your site linking internally to the unpublished page and update those links. This is important for site navigation and prevents leading visitors to dead-ends.
Use a site crawler tool to discover all problem links that need updating. Replace each link pointing to the unpublished page with the most relevant alternative page on your site.
3: Manage Search Engine Listings
The unpublished page likely appears in search engine listings, so you’ll want to remove it to avoid sending visitors to error pages.
If you have a Google Search Console account connected, check for “soft 404” errors. Go through Google Search Console to purge the page from results or take down the listing.
You can also use the noindex meta tag to tell search engines not to display the unpublished page in the results.
4: Inform Stakeholders
Let any people involved with your website, like writers, designers, managers, or clients, know that the page was unpublished and why. Provide them alternatives like the page it now redirects to or a new page that replaced it.
Explain what happens if they try to access the old page. Having open conversations prevents confusion and ensures stakeholders can update any documents, links, or habits related to the now-deleted page. Keeping stakeholders in the loop is courteous and prevents potential errors on their end.
And yes,
Indeed, I am grateful for your time and commitment throughout this endeavor.
Summary
Now that you know how to unpublish WordPress pages, you can better control what visitors see on your site. For example, you can hide old or seasonal pages while keeping them saved to put back later.
Unpublishing also works well with WordPress’s options to save page drafts privately before publishing them live. Together, these tools allow you full control to manage which pages go public and which get unpublished or kept as drafts.
So, in simple terms, WordPress gives you all you need to show or hide pages however you like. What do you find most helpful for managing your page visibility?
Put your thoughts in the comments! Even if you’re still learning, be proud you now know how to unpublish. This will help your website going forward.
FAQs
How do I temporarily hide a page in WordPress?
You can easily hide a page in WordPress without deleting it by changing its status from Published to Draft. Go to Pages > All Pages, click Edit on the page you want to hide, then under Page Attributes, change the Visibility from Public to Draft and update the page. The page will no longer show on your site while in Draft status but remains safely in your WordPress admin.
Can you hide a page in WordPress without deleting it?
Yes, WordPress allows you to hide pages without removing them completely. Simply edit the page, change its visibility status from Published to Draft or Pending Review under the Page Attributes box, and update it. This will unpublish the page, making it hidden from public view but still saved as part of your site’s content for future use.
How do I not publish a page on WordPress?
When editing a page in the WordPress admin, there is a “Visibility: Public” setting under “Page Attributes.” Change this from Public to Draft or Pending Review instead. Pages set as Draft or Pending Review will not be published on your live site. Use this to work on pages before you are ready to make them visible to visitors.
How do I unpublish my WordPress site until it is ready?
The easiest way to unpublish an entire WordPress site until you are ready to launch is through Plugins. Install the “Maintenance” or “Coming Soon” plugins, activate them, and configure settings. They will display a temporary page for visitors instead of allowing access to your unpublished site pages and posts. Disable the plugin once your site is complete and ready to go live.


