How to Fix WordPress Updating Failed/Publishing Failed Error
Is your WordPress site giving you a headache with “Updating Failed” or “Publishing Failed” errors every time you try to post something new? I know how annoying it is to put so much work into a blog post only to hit a bump at the very end.
No worries, though. I’m here to guide you through getting everything sorted easily and quickly.
Many people and businesses choose WordPress for its simplicity and ability to let them share their ideas through beautiful websites. But, like anything tech-related, it sometimes runs into snags that keep your content from going live.
These errors might seem big, but they’re actually not too tough to fix.
In this article, I will guide you through the following:
- Different ways to fix the WordPress “Updating Failed” or “Publishing Failed” errors
- Why do “Updating Failed” or “Publishing Failed” occur in WordPress
- Tips to prevent future “Updating Failed” issues in WordPress
Don’t let these glitches stop you from sharing your content with the world. Let’s dive in and get your WordPress posts out there without a hitch!
Table of Contents
- Understanding the Updating Failed/Publishing Failed Error
- 7 Steps to Fix the WordPress Updating Failed or Publishing Failed Errors
- Why Do “Update Failed” or “Publish Failed” Errors Happen in WordPress
- Tips to Prevent Future “Updating Failed” Issues in WordPress
- Where to Get Support If All Else Fails
- FAQs
Understanding the Updating Failed/Publishing Failed Error
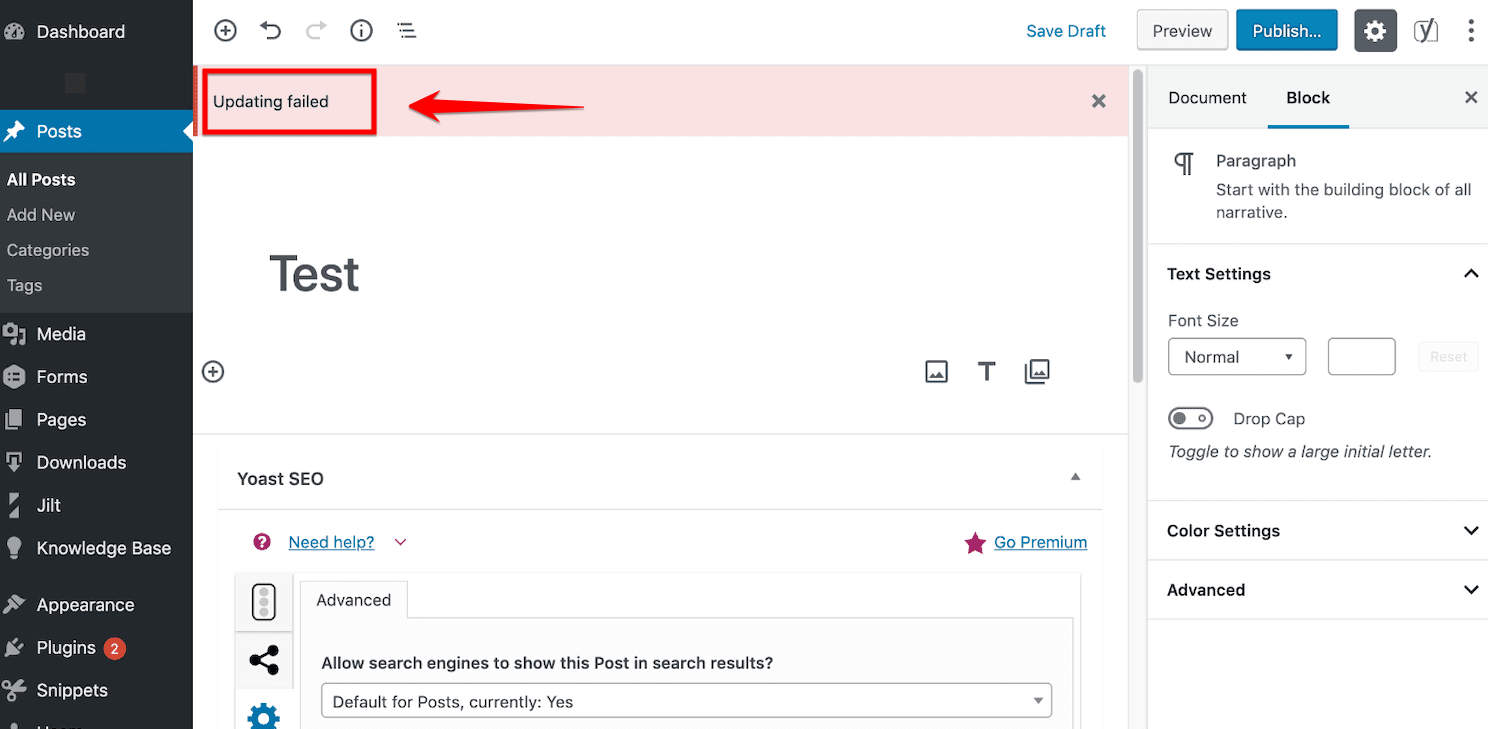
Before we dive into the solutions, let’s understand what we’re dealing with. Sometimes when you try to put a new post on your WordPress site and press the blue “Publish” button, you might see a message that says “Publishing Failed.” This means WordPress couldn’t put your new post up on the website.
A “Publishing Failed” message pops up right after you try to publish something.It’s like trying to send a message but it won’t go through.

Then, there’s another error you might see called “Updating Failed.” This happens when you’re trying to change something on a post or page you already have on your site, but WordPress can’t save your changes.
You get an “Updating Failed” message when you try to save your edits. Imagine trying to fix a drawing, but your pen won’t work.
These problems can be really annoying, especially if you need to share something new or fix something important on your site. But don’t worry; I’ll help you figure out how to fix them so you can keep your website up-to-date and share your posts without any trouble.
7 Steps to Fix the WordPress Updating Failed or Publishing Failed Errors
Now that you have a good understanding of what the “Updating Failed” and “Publishing Failed” errors mean, it’s time to learn how to address them. When you grasp these errors, it becomes easier to fix them properly.
Don’t worry, I’m here to help! I’ll walk you through 7 simple steps to resolve these errors. With each step, I’ll provide clear screenshots to guide you through the process.
Before diving into the solutions, let’s focus on solving the problem right away. Many websites tend to list the causes first, requiring you to scroll down to find the actual fixes. I want to save you that time.
We’ll cover the causes later because understanding them is important too, but for now, let’s concentrate on the solutions. This way, you can find what you need faster.
Without further ado, let’s begin with the following solutions to fix the updating/publishing errors and improve your overall WordPress experience with greater smoothness.
Step 1: Check Internet Connection
Having a reliable internet connection is critical when tackling WordPress “Updating or Publishing” issues. Before proceeding with troubleshooting, your first step should be confirming the stability of your network connection.
Begin by checking if you can access other websites and online services from your device. This simple test can help identify whether the problem is specific to WordPress or a broader connectivity issue. Restarting your router or modem can often resolve intermittent network problems and create a fresh connection.

If you’re using Wi-Fi, consider switching to a wired connection for improved reliability. Wired connections typically offer a more consistent network performance, potentially alleviating updating or publishing failures on WordPress. Stay vigilant regarding any local network outages that may be affecting your internet connection.
By making sure your internet is solid, you’re getting ready to tackle and fix those WordPress “Update or Publishing Failed” problems.
Step 2: Clear Browser Cache
Another common solution to address WordPress updating or publishing failures is to clear your browser cache. When your browser cache is filled with temporary files and data, it can sometimes cause conflicts or errors when trying to update or publish content on WordPress.
To clear your browser cache, you can follow these simple steps:
- Begin by launching your preferred web browser on your computer or device.

- To access the settings menu, typically denoted by icons like “three dots”, lines, or a gear symbol, navigate to the upper-right corner of the browser window. Click on this icon to unveil a dropdown menu containing various options.
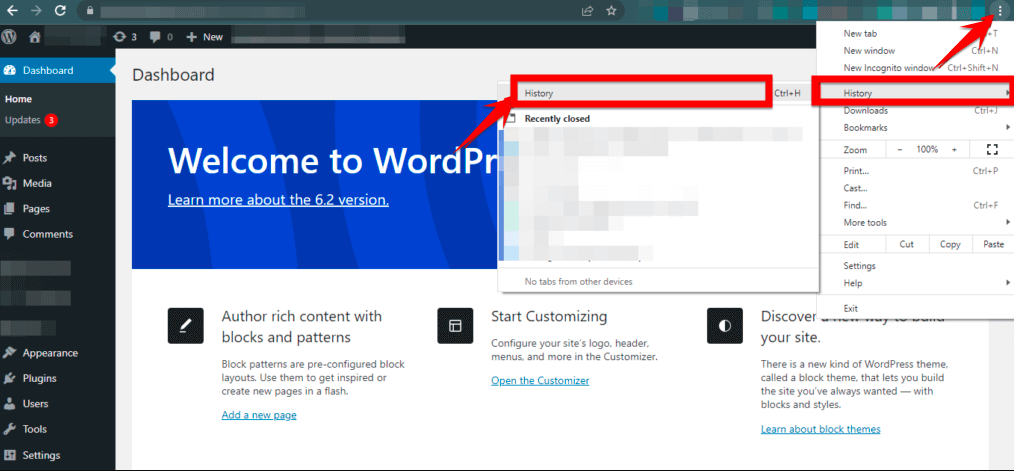
- Specifically for Chrome users, delve into the settings menu to seek out the “clear browsing data” option. You can usually find this function within the privacy settings section or directly within the browsing history area.
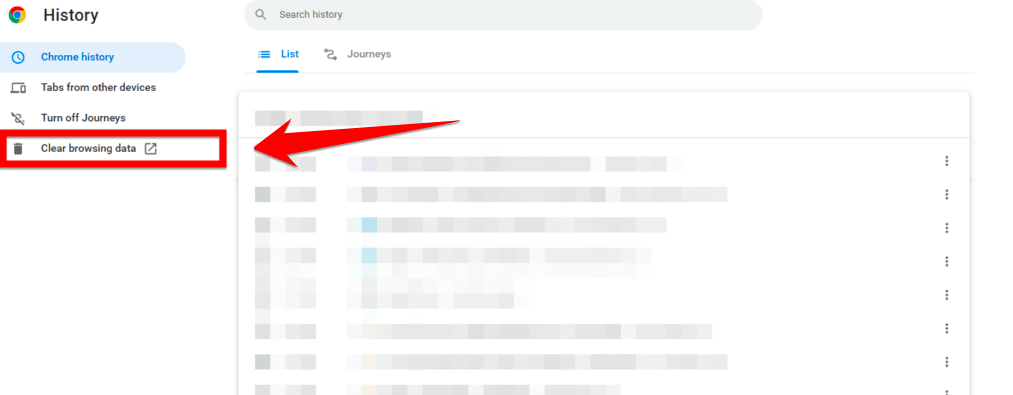
- Upon selecting “clear browsing data,” a new window will pop up, presenting you with different data deletion options. Choose the “Time Range” you desire, offering flexibility from clearing data for the past hour to wiping out information from all your browsing history.

- Customize your cache clearing further by specifying the exact type of data you wish to eliminate. You can opt to clear “cookies”, “browsing history”, “cached images and files”, or a combination of these, allowing for tailored management of your browser data.

- With your preferences set, finalize the process by clicking on the “Clear data” button. Proceed by confirming your choice if prompted, ensuring that the selected data is promptly removed from your browser cache.

By clearing your browser cache, you are effectively removing any stored data that might be causing conflicts with WordPress updates or publishing. This action ensures that your browser fetches fresh content from WordPress, potentially resolving any issues related to outdated cache files.
Step 3: Use the WordPress Site Health Tool
When you’ve ensured your internet connection and cleared your browser cache, the next step to troubleshoot WordPress “Updating Failed” or “Publishing Failed” errors involves checking the REST API status using the WordPress Site Health tool.
The REST API plays a vital role in facilitating communication between WordPress and various applications, making it crucial for seamless operations.
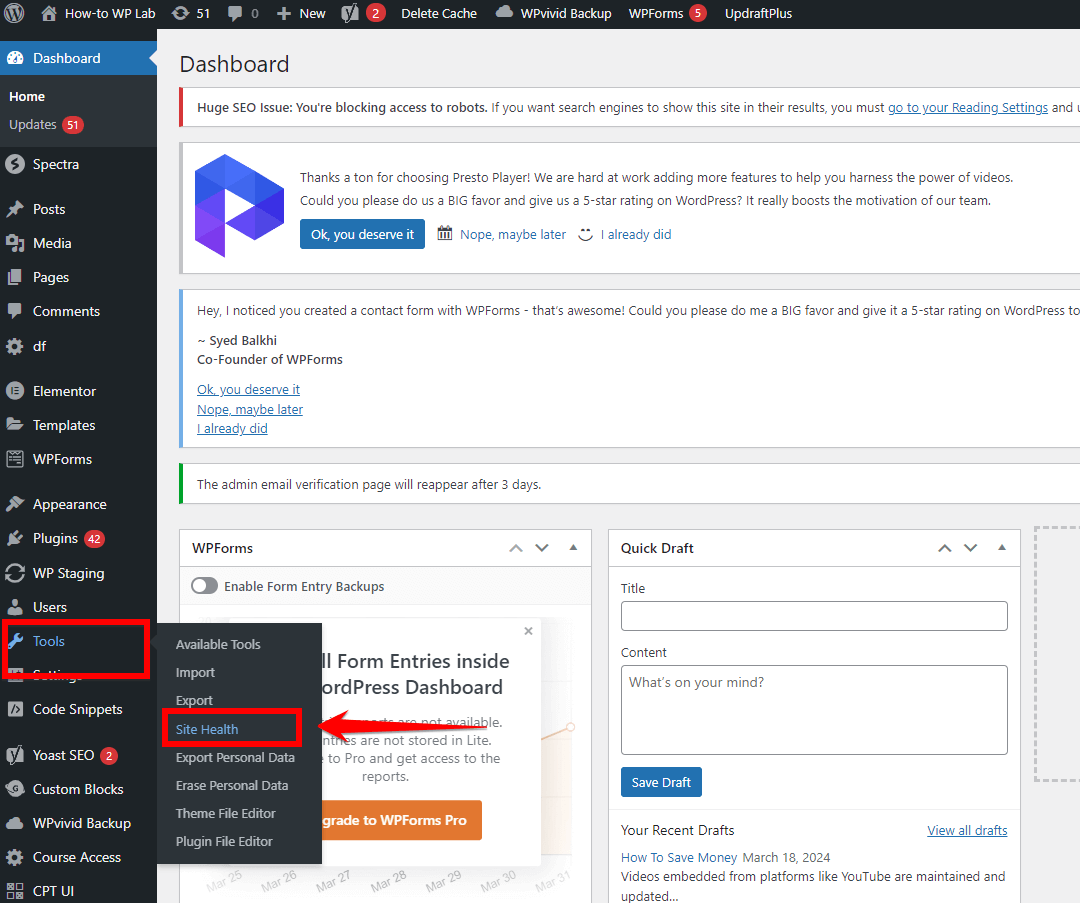
- Access your WordPress dashboard and navigate to the “Site Health” section. You can typically find this under the “Tools” menu.
- Once in the Health tool, explore the available various tabs and reports. Pay close attention to any critical issues or recommendations highlighted.

- Look for the “REST API” section within the Info tab. This section provides insights into the status of the API and alerts you to any potential issues.

- If the WordPress Site Health tool indicates an error or displays an “unexpected result” regarding the REST API status, it is crucial to address and resolve this issue promptly.

Note: Alongside the status, the Site Health tool provides valuable debugging information. If the REST API call returns an error, consider investigating the involvement of any third-party services that might be triggering the problem.
If you encounter any concerns or errors regarding the REST API status, consider exploring the provided recommendations or seeking assistance from your hosting provider or a WordPress developer to address the issues effectively.
Regularly monitor your site’s health using this tool to stay proactive in addressing any emerging issues and ensuring smooth updates and publishing experiences on WordPress.
Step 4: Check WordPress and Database URL Settings
When dealing with WordPress errors like “Updating Failed” or “Publishing Failed,” it’s essential to investigate the WordPress and database URL settings as they can often be the root cause. In this step, we will analyze and rectify potential issues arising from misconfigured WordPress and database URLs.
To resolve this, you’ll need to access your WordPress database and dashboard to verify and update the URL settings. Follow these step-by-step instructions to get your site back on track:
First, let’s dive into the database:
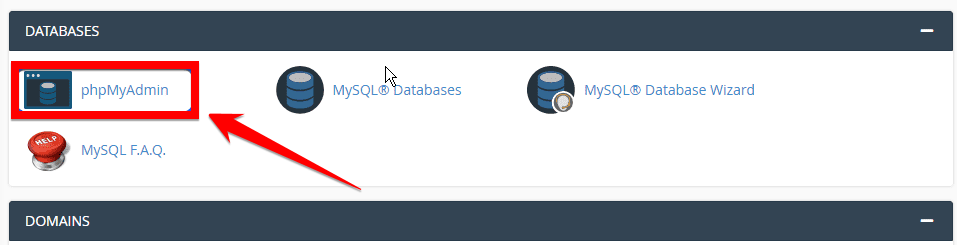
- Log in to your cPanel account provided by your web hosting provider.

- Look for the “Databases” section in cPanel and find the phpMyAdmin tool. Click on it to open phpMyAdmin, which is a tool for managing MySQL databases.
- In phpMyAdmin, you’ll see a list of databases on the left sidebar. Click on the database that corresponds to your WordPress site.

- In the list of tables under the selected database, locate the table named wp_options (or similar if your WordPress database uses a different prefix).

- Look for the rows with option_name fields of siteurl and home. Click on the pencil icon to edit them, then replace the existing URL with the new URL of your WordPress site.

- After updating the URLs, make sure to save the changes by clicking on the “Go” button. PHPMyAdmin will automatically update the database with the new setting.

Now, let’s head over to the WordPress dashboard to ensure consistency:
- Navigate to the “Settings” tab in the sidebar of your WordPress admin dashboard and select “General” from the dropdown menu.

- In the “General” settings section, scroll down to find the “WordPress Address (URL)” and “Site Address (URL)” fields.

Note: Ensure that you double-check the “WordPress Address (URL)” and “Site Address (URL)” fields to make sure they show the right domain name for your website. If these URLs are not accurate, it might lead to errors. Specifically, if they are set to use HTTP instead of HTTPS, this could be why you’re facing issues.

- To troubleshoot SSL issues, try removing “http” from the URL and site address fields. If you’re still facing problems, leaving the “WordPress Address (URL)” and “Site Address (URL)” fields blank might help resolve the SSL concern.

- After making any necessary adjustments to the fields, ensure to find the “Save Changes” button at the bottom of the page. Click on it to save your updated settings.

If your website is secured with an SSL certificate, it’s advisable to use HTTPS to ensure a secure browsing experience for your visitors. Update your URLs to reflect the HTTPS protocol where necessary.
By modifying the WordPress Address (URL) setting in both the database and the WordPress dashboard, you’re ensuring that your site’s configuration is consistent across the board. This consistency is key to resolving the “WordPress Updating Failed” and “Publishing Failed” errors.
Once you’ve verified and modified the URL settings in both the database and dashboard, it’s time to put your changes to the test:
- Select “All Posts” from the “Posts” menu and click on a post to access the post editor.

- Make any necessary changes to the post and click the “Update” button.

- If the errors have been successfully resolved, you should be able to update the post without encountering any issues.

Remember, whenever you’re making changes to your WordPress database or settings, it’s crucial to proceed with caution. Always backup your database and files before embarking on any troubleshooting adventures.
If you find yourself unsure about the process or encountering any roadblocks, don’t hesitate to reach out to a qualified WordPress developer or your hosting provider’s support team for assistance.
Step 5: Increase PHP Memory Limit
If you’ve followed the previous steps and are still encountering the “WordPress Updating Failed” or “Publishing Failed” error, it may be due to insufficient PHP memory.
WordPress requires a certain amount of memory to perform various tasks, including updating and publishing content. By increasing the PHP memory limit, you can provide WordPress with more resources to complete these processes successfully.
To increase the PHP limits and resolve the issue, follow these steps:
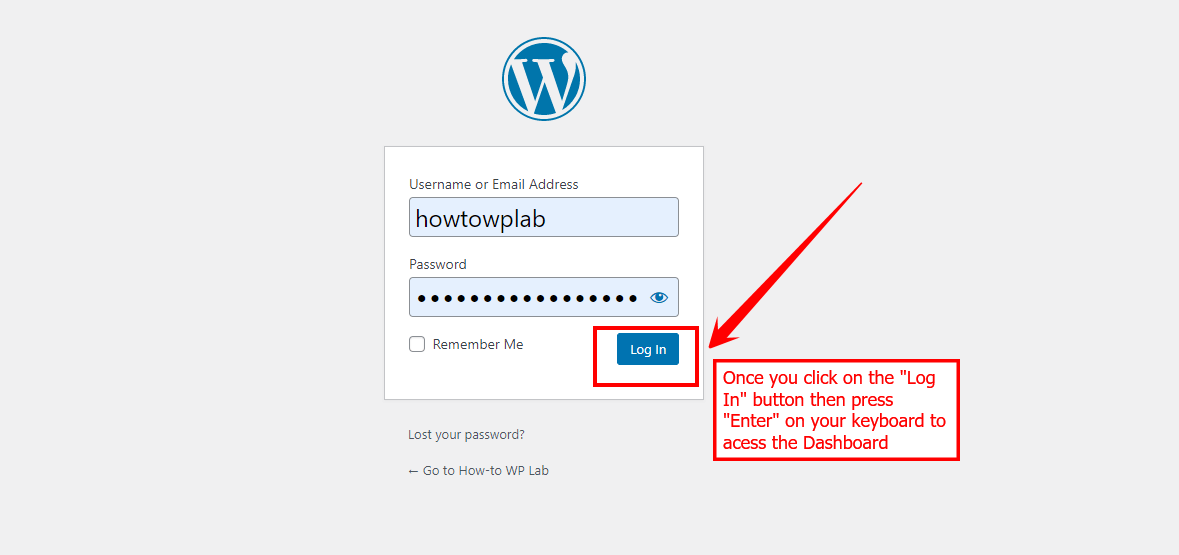
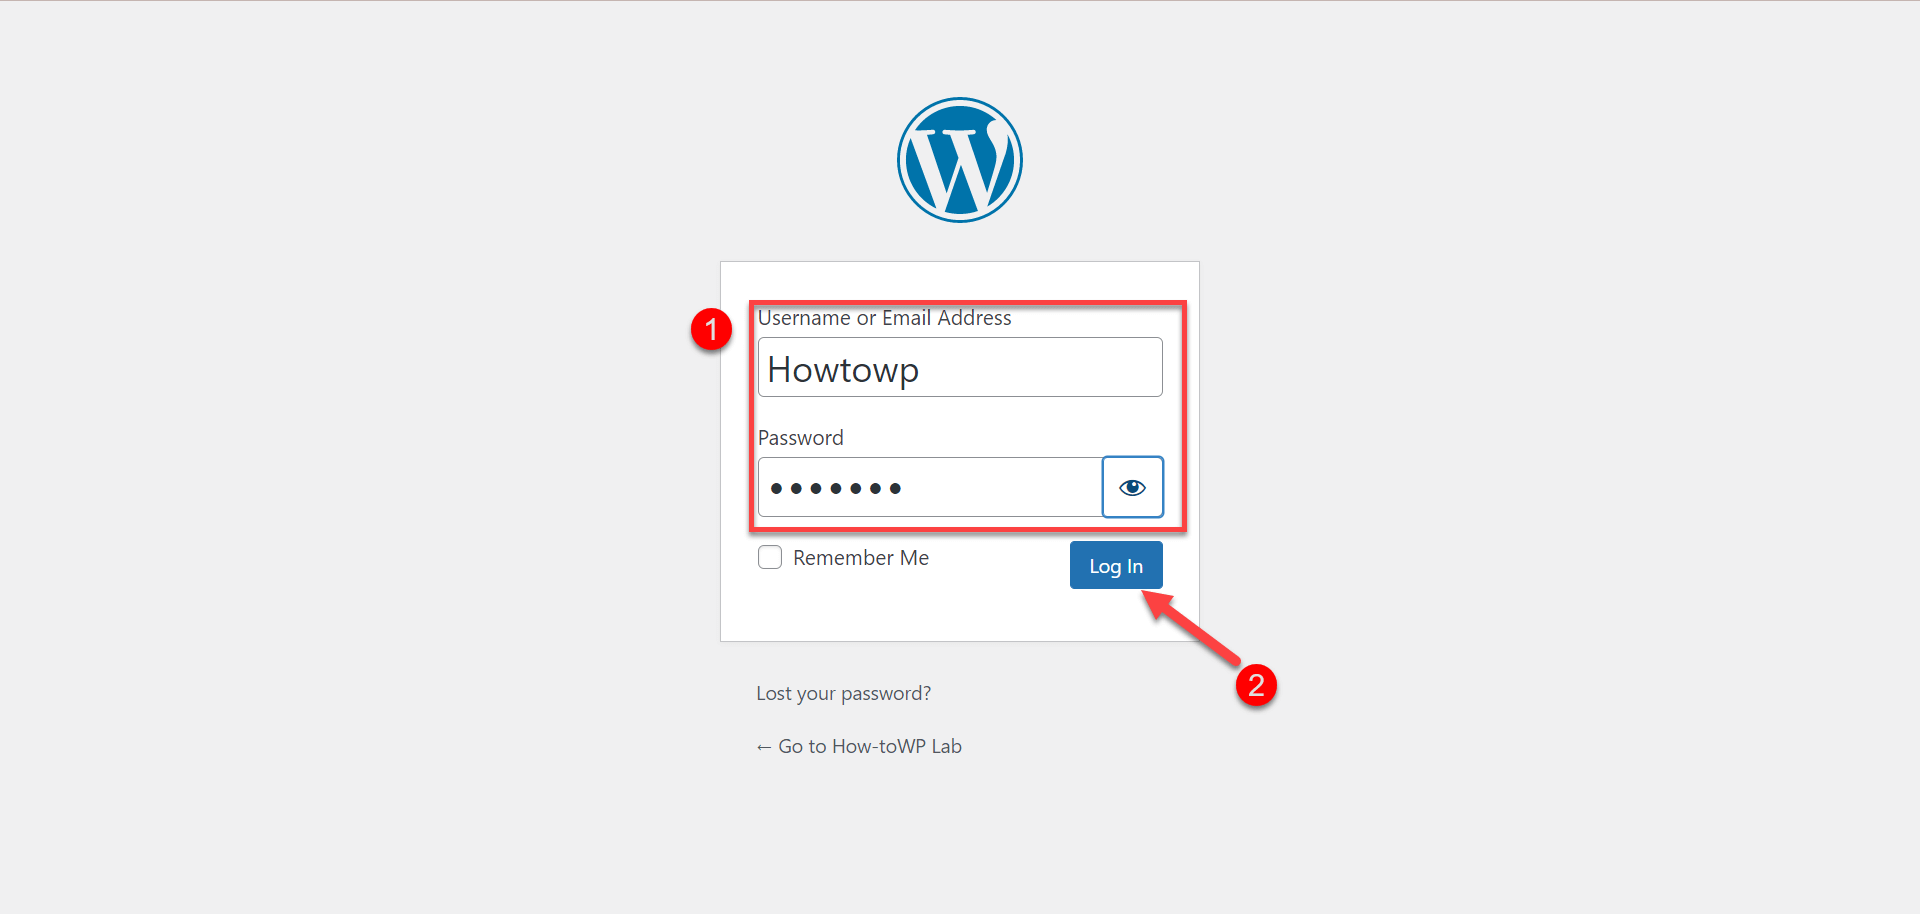
- Open your web browser, go to your WordPress website’s login page, and enter your username and password to access the WordPress dashboard.
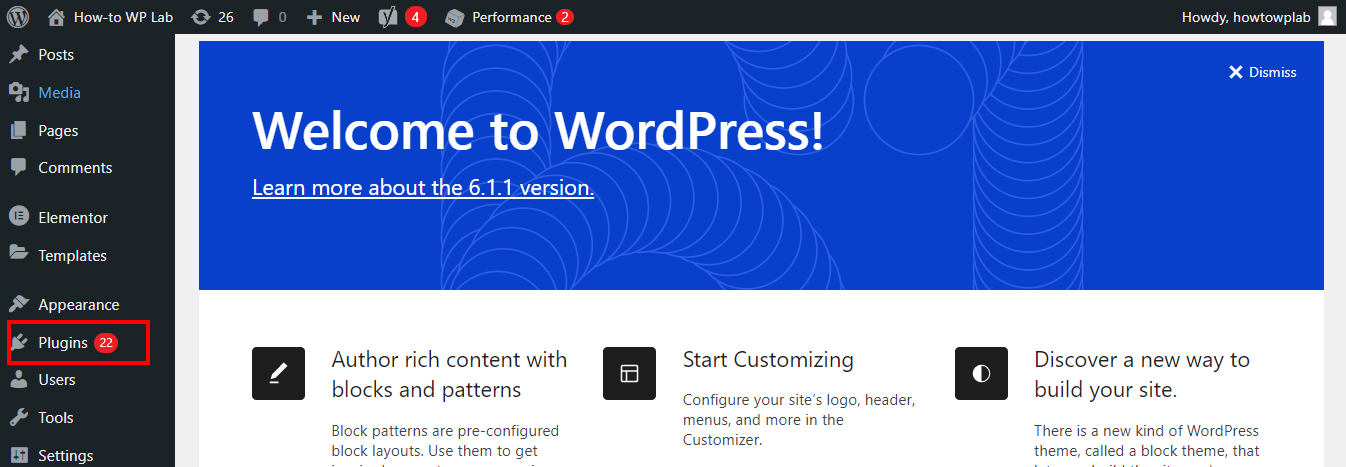
- Once you’re logged in, locate the “Tools” section in the left-hand sidebar of your WordPress dashboard. Click on it to expand the menu, and then click on the “Site Health” option.
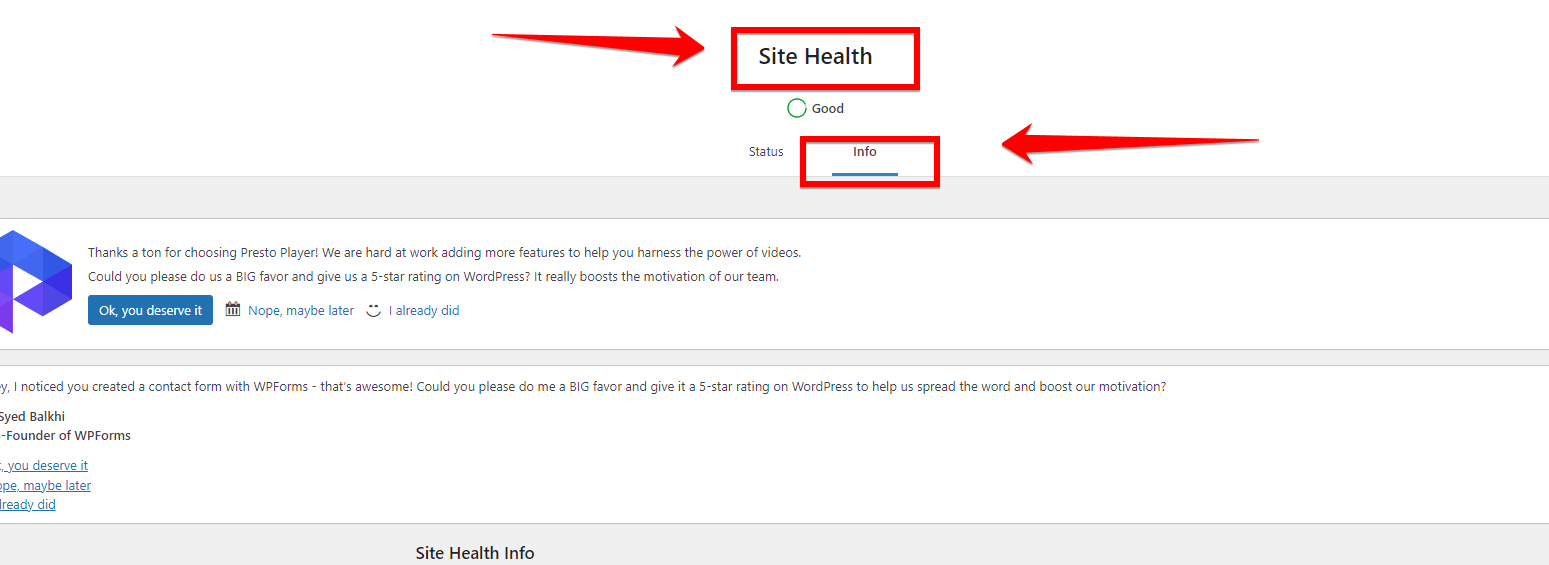
- Within the “Site Health” page, click on the “Info” tab to view detailed information about your WordPress installation.
- In the “Info” section, look for the “Server” option and click on it to expand the server-related details.

- Locate the “PHP Memory Limit” entry within the “Server” section and take note of the current value. In this example, we will increase it to 2048M.

Note: By default, WordPress sets the PHP memory limit to 40MB. If your website requires more memory to function properly, you may need to increase this limit. To modify the PHP memory limit, we need to edit the wp-config.php file. There are three common methods to access and modify this file: using cPanel, FTP, or a plugin.
In this scenario, we will use the free “File Manager” plugin method, which is a convenient way to edit the file directly from the WordPress dashboard.
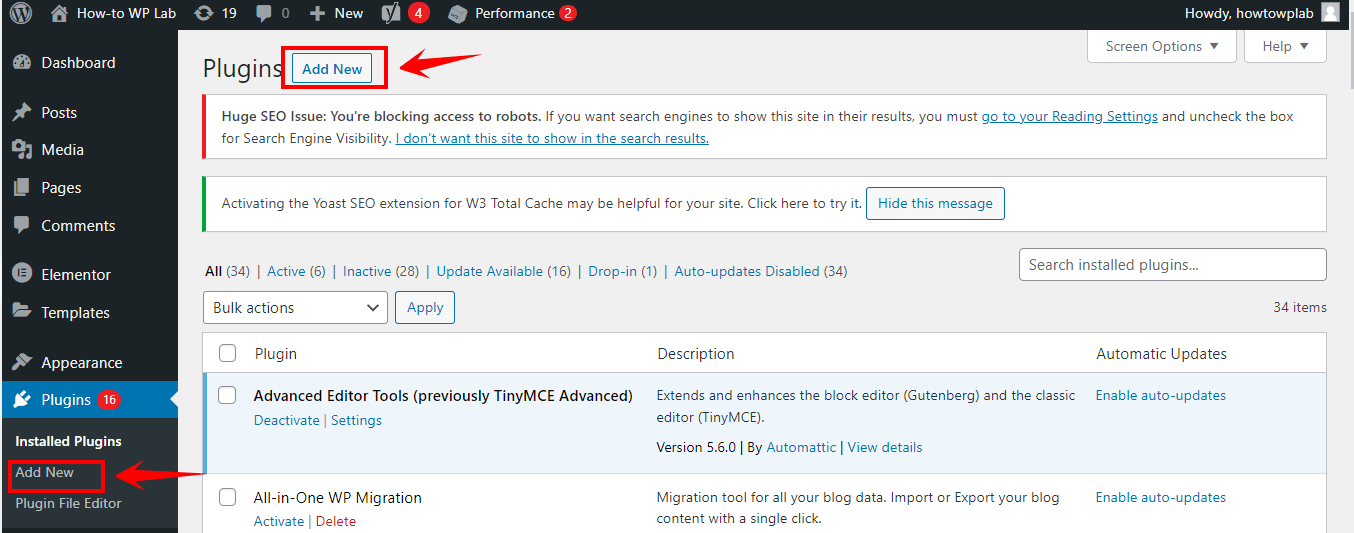
- Go to the “Plugins” section in your WordPress dashboard and click on the “Add New” button.
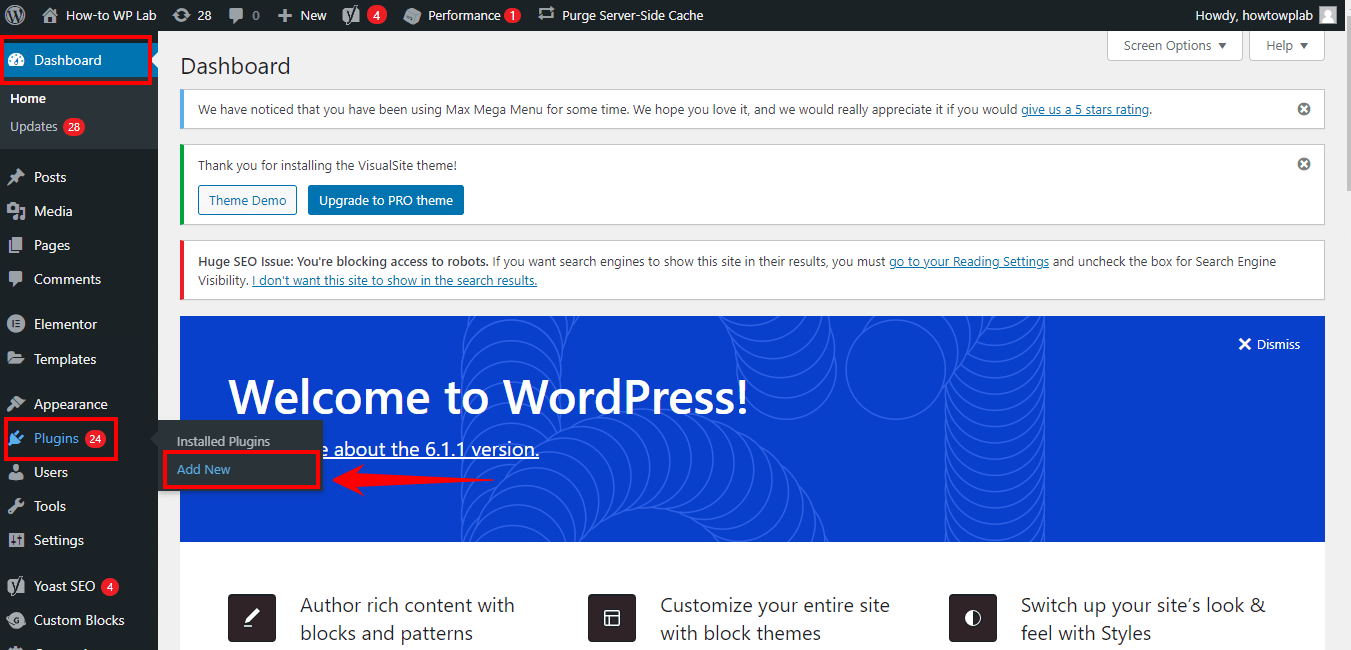
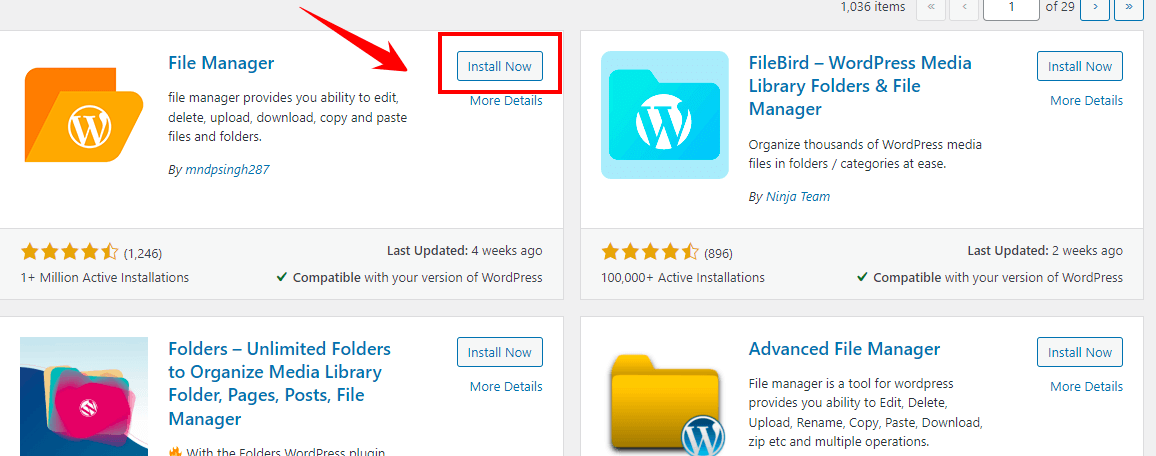
- In the search field, type “File Manager” and press Enter. Look for the “File Manager” plugin by “mndpsingh287” and click on the “Install Now” button.
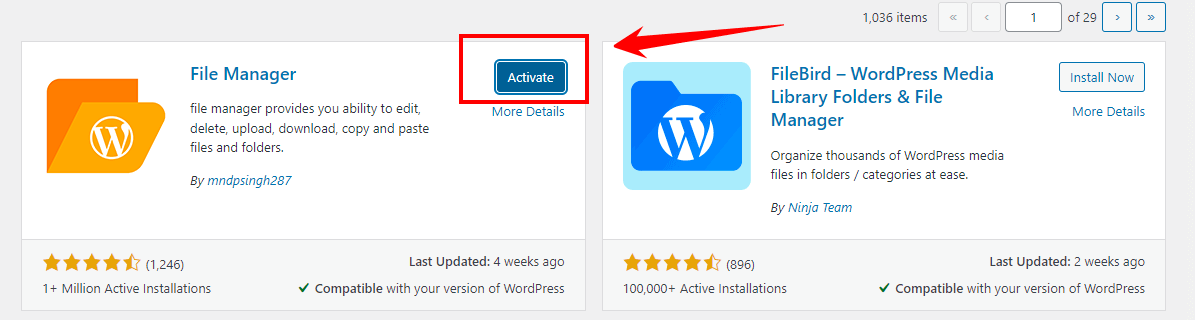
- After the installation is complete, click on the “Activate” button to activate the plugin.
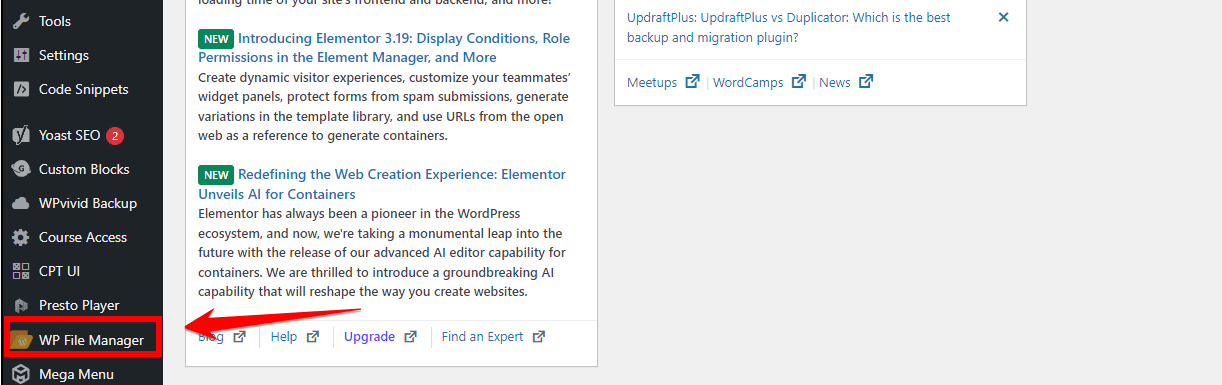
- Once the File Manager plugin is activated, you’ll find a new “WP File Manager” option in your WordPress dashboard sidebar. Click on it to open the File Manager plugin’s dashboard.
- Inside the File Manager plugin’s dashboard, you’ll see a list of all your website’s files and directories. Scroll down until you find the “wp-config.php” file, which is usually located in the root directory of your WordPress installation.

- Right-click on the wp-config.php file and select “Code Editor” from the context menu. This will open the file in a code editor within the File Manager plugin.
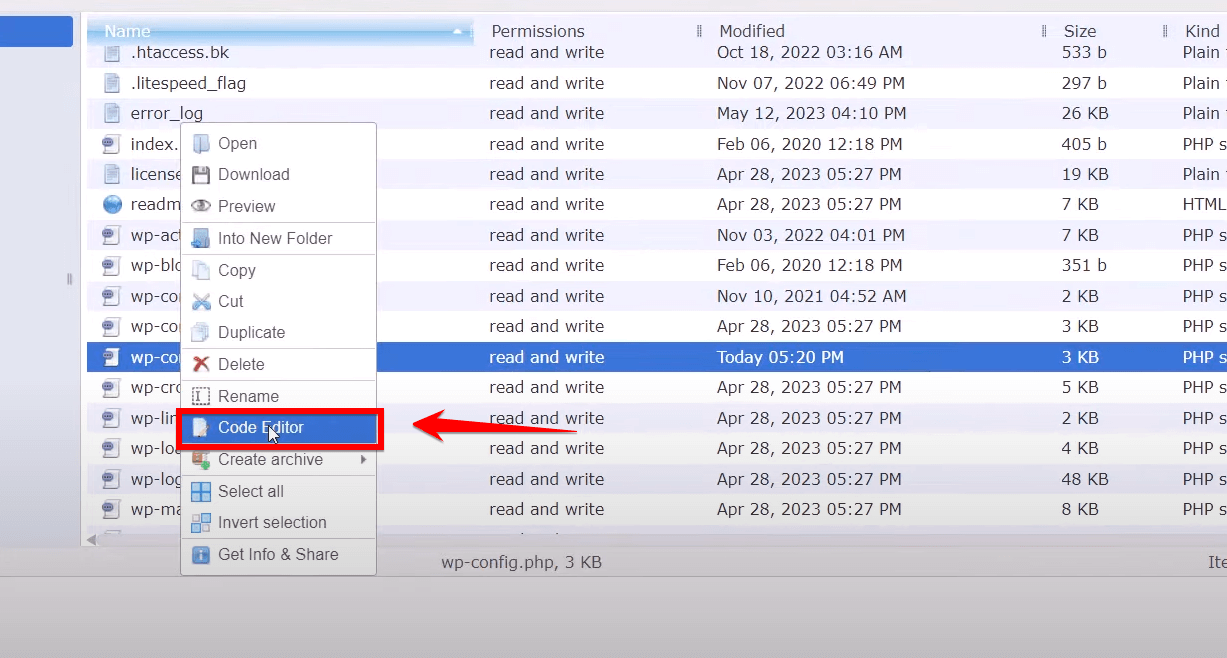
- In the code editor, scroll down to the bottom of the file until you find the line that says /* That’s all, stop editing! Happy publishing. */. Just above that line, add the following code:
define('WP_MEMORY_LIMIT', '2048M');

Note: You can adjust the value (‘2048M’) according to your specific requirements.
- After adding the code, click on the “Save” button in the top-right corner of the code editor to save the changes you made to the wp-config.php file.

- Return to the “Site Health” page under the “Tools” section. Go to the “Info” tab, expand the “Server” section, and verify that the “PHP Memory Limit” entry now displays the increased value you specified.

By following these detailed steps, you can increase the PHP memory limit in WordPress using the File Manager plugin. This should help resolve the “WordPress Updating Failed” or “Publishing Failed” error that occurs due to insufficient memory.
Keep in mind that the appropriate memory limit value may vary depending on your website’s needs and your hosting environment’s limitations. If you encounter any issues or have specific requirements, it’s always a good idea to consult with your hosting provider for further assistance.
Step 6: Temporarily Disable Plugins and Switch to the Default Theme
If you’ve followed the previous steps and are still encountering the “Updating Failed” or “Publishing Failed” error in WordPress, the next course of action is to temporarily disable your plugins and switch to the default theme.
This can help identify if a specific plugin or your current theme is causing the issue. Here’s how you can do it:
Plugins are a powerful way to extend the functionality of your WordPress site, but sometimes, they can conflict with each other or with your theme, causing issues. By temporarily disabling all plugins, you can determine if a plugin is the source of the problem.
- Log in to your WordPress dashboard and navigate to the “Plugins” section in the left-hand menu.
- Click on “Installed Plugins” to view all the plugins currently active on your website.

- At the top of the plugins list, click on the “Plugin” checkbox to select all plugins.
- From the “Bulk Actions” dropdown menu, select “Deactivate” and then click on the “Apply” button.

Note: WordPress will now deactivate all your plugins. This process may take a few moments, depending on the number of plugins you have installed.
- After the deactivation process is complete, you will see a success message confirming that all plugins have been deactivated.

With all plugins disabled, your WordPress site will now be running only on core functionality and the active theme.
In some cases, these errors can be caused by a theme compatibility issue. By switching to the default WordPress theme, you can rule out any theme-specific problems and determine if your custom theme is the culprit.
- Go to the “Appearance” section in the left-hand menu and click on “Themes” to view your installed themes.

- Look for the default WordPress theme, which is usually named “Twenty Twenty-One” or the latest default theme version.

- Hover over the default theme and click on the “Activate” button to switch to this theme.

Note: WordPress will now apply the default theme to your website. This may take a few moments.
- Once the theme activation is complete, visit your website’s front end to ensure that the default theme is properly applied.

Your WordPress site should now be running on the default theme, with all plugins deactivated. This clean slate allows you to test if the “Updating Failed” or “Publishing Failed” error still occurs.
With your plugins disabled and the default theme active, you can now test your WordPress site to identify the source of the errors. This process involves systematically reactivating plugins and switching back to your original theme to pinpoint the exact cause of the issue.
- Reactivate your plugins one by one, each time checking if the error reappears.
- If you find the problematic plugin, consider updating it, finding an alternative, or reaching out to the plugin developer for support.
- If the issue persists even with all plugins disabled, switch back to your original theme and check if the problem is resolved.
- If the error occurs with your theme, consider updating the theme, reaching out to the theme developer for support, or switching to a different theme.
After completing these steps, you should have a clear understanding of whether a plugin or theme is causing the “Updating Failed” or “Publishing Failed” error on your WordPress site.
If you’ve identified the problematic plugin or theme but are unsure how to resolve the issue, don’t hesitate to seek help from the WordPress community, plugin or theme developers, or a professional WordPress developer.
Step 7: Use the Classic Editor Plugin
Sometimes, the newest tools have problems. The new WordPress editor (called Gutenberg) might give you trouble like “Updating Failed” or “Publishing Failed.” Going back to the old editor, the Classic Editor, can be a quick fix.
It’s simpler and doesn’t use the REST API much. This means you can keep working on your posts without those annoying errors. But remember, this is just for a little bit, not forever.
To start using the Classic Editor, all you need to do is add a special plugin to your WordPress site. This plugin is called the “Classic Editor” plugin. Here’s how you can do it:
- First, you need to get into your WordPress site. That means typing your username and password to open your dashboard.
- Next, you want to add a new tool to your site. Click on “Plugins” on the left side, then press “Add New” at the top.
- In the search box, write “Classic Editor”. It’s like looking for a lost toy in a toy box. Once you find it, click “Install Now” on the Classic Editor.

- After it’s installed, you need to click “Activate” to start using it. This is like turning on a new toy so you can play with it.

Now, when you go to write or update a post, it’ll open in the Classic Editor. You should be able to update and publish your work without running into those annoying errors.
Using the Classic Editor is a great workaround because it’s simpler and doesn’t use the parts of WordPress that might be causing your problems. It’s like using an older, simpler tool that still works perfectly for what you need.
And don’t worry, you can switch back to the Gutenberg editor anytime you want, once everything else is sorted out.
Why Do “Update Failed” or “Publish Failed” Errors Happen in WordPress
There are a few common reasons why you may encounter “Update Failed” or “Publish Failed” errors when trying to publish or update content in WordPress:
1: Outdated Plugins or Themes
One of the main culprits behind publishing errors in WordPress websites is having outdated or antiquated plugins or themes. Problems can arise because not all plugins or themes are backward compatible.
Therefore, an older plugin or theme might not function correctly with newer versions of WordPress core. If they haven’t been updated in a while, there may arise compatibility issues with the latest WordPress updates, which, in turn, could lead to publishing errors.
To rectify this problem:
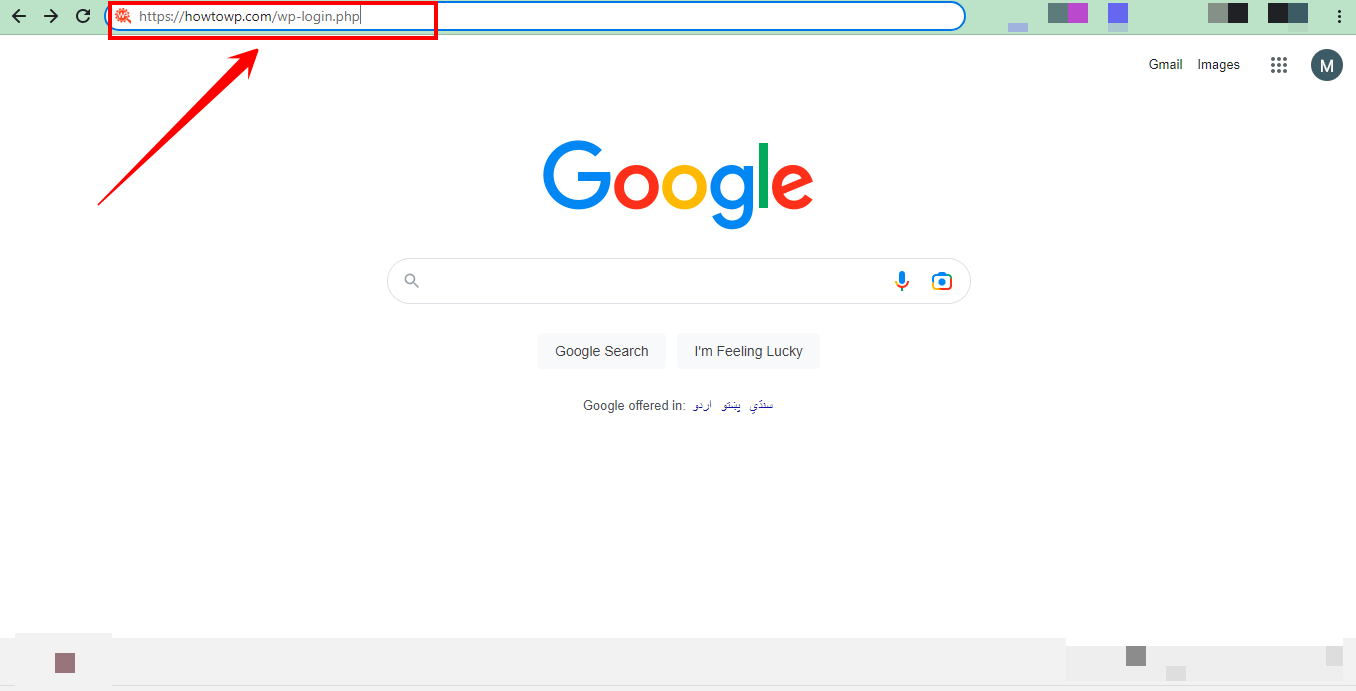
- Start by logging in to your WordPress dashboard. This is usually accessed by entering your website URL followed by “/wp-admin”.
- Once you’re in your dashboard, navigate to the plugins section by clicking on the “Plugins” section on the left toolbar, and then select “Installed Plugins”.
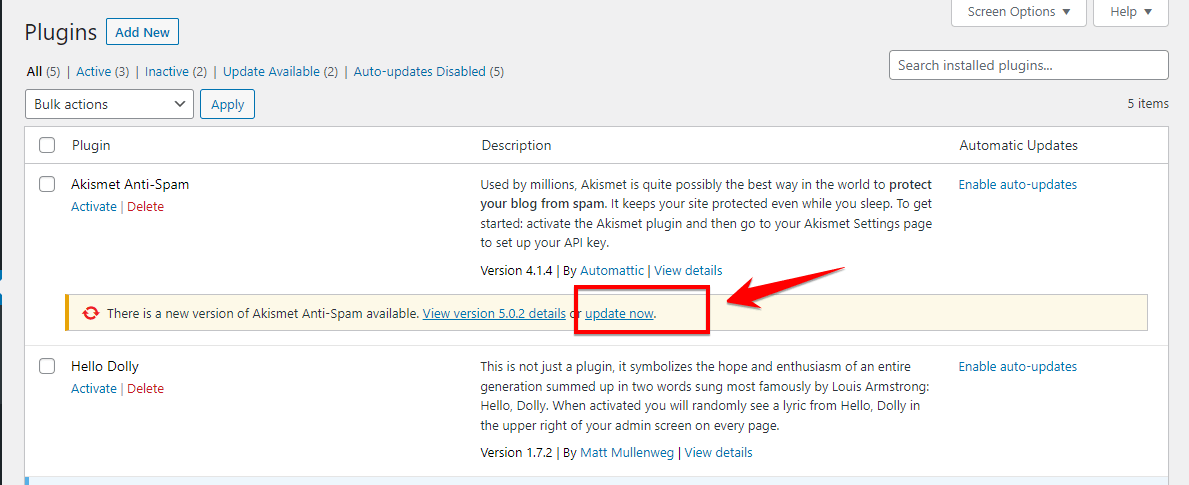
- Check all of your installed plugins for any updates. These should be clearly marked with a notification. If a plugin update is available, there will be a link under the plugin name, which says “update now”.

- Click on “update now” to initiate the plugin update process. Don’t overlook this step. Even a plugin that may not seem directly related to publishing or posting blogs can potentially cause issues when outdated.
- Similarly, browse to the “Appearance” section on the left toolbar, then select “Themes”.
- Your active theme will be displayed at the top, with other available themes listed below. If an update is available for your active theme, it will be highlighted. When this is the case, click on “Update now” to proceed with the necessary update.

Executing these steps will ensure that your specific WordPress site’s plugins and themes are up-to-date. This improves the general functionality of your website while reducing the chances of encountering publishing errors.
Keep in mind that outdated plugins and themes do not only contribute to publishing errors but may also pose security risks to your website.
Consequently, it is advisable to persistently update and routinely check your WordPress site to manage a smooth-running website.
2: Exceeding Server Resource Limits
Shared hosting means your WordPress site shares a server with other sites. The hosting company puts limits on things to make sure no one site uses too many resources.
Three common limits they set are:
- Max upload size – How big a photo or file can be uploaded. Like 10 MB. If you try to upload a 20 MB photo, error!
- Memory limit – How much system memory one site can use. If your page uses too much memory, it is an error!
- Max execution time – How long a site task can run. If publishing a post takes longer than 30 seconds, it is an error!
When you try to publish in WordPress, it does things like upload images or videos, save data, and generate thumbnails. That uses resources.
If your post has huge files or complex things that hit those limits, the publish will fail with an error.
You need to ask your hosting company to raise the limits higher for your site. Say, “Please increase my max upload size to 50 MB,” or “Please raise the memory limit to 256 MB”.
That will allow WordPress to use more resources to publish bigger posts. Then the errors should stop happening!
3: File Ownership or Permissions
WordPress saves all your website data and files in folders on your web server. It needs to be able to read, save, and change files to publish new posts and updates.
But sometimes, the folder and file permissions are set incorrectly, so WordPress can’t edit what it needs to. This can happen in a few ways:
Incorrect Owner
All the WordPress files should be owned by the user account that runs the WordPress software (often called www-data or apache). If some files get owned by other users, WordPress won’t have access to change them.
Wrong File Permissions
WordPress folders need permissions like 755 or 775. The 7 means the owner can read/write/edit. The 5 or 7 means the public can only read, not edit. If permissions are set incorrectly to something too strict, like 700, WordPress won’t be able to update files and will fail.
Incorrect wp-content Permissions
Inside WordPress is a wp-content folder with all your uploaded media, plugins, and themes.
If wp-content has owner or permissions problems, WordPress can’t update it, causing publish to fail.
Using FTP or your hosting control panel, you can check all the WordPress files and folder ownership and permissions. Make sure they are set according to WordPress recommendations.
4: Database Corruption and Errors
WordPress needs the MySQL database to do its job. The database helps WordPress write new content and make changes to existing content. If something bad happens to the database, even basic things on WordPress might stop working.
Here are some signs that tell us there might be a problem with the database:
- Having trouble updating or publishing things (especially if it happens a lot)
- Noticing new errors or things not working as they should on your website
- The website not look right, with the layout or design being messed up
- Not being able to get into the pages where administrators log in
- Seeing error messages from the database
To be sure if the database is messed up, we have to look at the data stored in MySQL. Problems with getting information from certain parts of the database or missing connections between things in the database can cause WordPress to have trouble updating or publishing.
To fix this, we can try using a healthy copy of the database if we have one. If not, we need to repair the database carefully. But be cautious! If we try to fix a messed up database the wrong way, it could get even worse. It’s better to seek help from someone who knows a lot about MySQL databases if we think the problem is serious enough to stop WordPress from working.
Tips to Prevent Future “Updating Failed” Issues in WordPress
We’ve walked through how to fix those pesky “Updating Failed” or “Publishing Failed” errors in WordPress. Now, as we wrap up our guide, I want to share some golden rules with you.
Following these tips will help keep your WordPress site running smoothly and reduce the chances of running into these errors in the future.
- Backup Your Website: Before performing any updates, it’s critical to have a recent backup of your WordPress site. This way, if an update fails and causes issues, you can easily restore your site to its previous working state. Regular backups provide an extra layer of protection and peace of mind.
- Update Regularly: Keeping your WordPress core, themes, and plugins updated is vital to ensuring a secure and stable website. Updates often include bug fixes, security patches, and improved functionality. By staying up to date, you minimize the chances of encountering compatibility conflicts or vulnerabilities that can lead to updating failures.
- Check System Requirements: Before updating any components, verify that your server environment meets the minimum requirements for the latest WordPress version, themes, and plugins. This includes the PHP version, database compatibility, and other server settings. Inadequate system requirements can cause issues during the update process.
- Use Reliable Themes and Plugins: Opt for well-established themes and plugins from reputable developers. These typically receive consistent updates, ensuring compatibility with the latest WordPress version. Themes and plugins with positive reviews and strong user bases indicate stability and reduced chances of encountering updating failures.
- Deactivate Caching and Optimization Plugins: Caching and optimization plugins can sometimes interfere with the updating process. Before conducting updates, temporarily disable any caching plugins, as well as optimization plugins that minify or combine files. Once the updates are completed, you can reactivate these plugins.
- Enable Debugging Mode: WordPress provides a built-in debugging feature that can help identify issues when updates fail. By enabling debugging mode, you’ll receive detailed error messages instead of a generic “Updating Failed” notification. It allows you or your developer to pinpoint the exact cause of the problem and find a solution more efficiently.
By following these tips, you can help keep your WordPress site happy and free from errors.
Where to Get Support If All Else Fails
If you’ve tried the above steps and are still experiencing issues with WordPress “Updating or Publishing failed” errors, don’t worry. There are several places you can turn to for additional support:
The WordPress support forums are a great resource for getting help from the WordPress community. You can search for threads related to your issue or create a new post describing your problem. Many experienced WordPress users and developers regularly contribute to these forums, offering advice and solutions.

If you prefer a more interactive and social approach to getting support, consider joining the WordPress Help and Tutorials by How-To WP Facebook group. In this group, you can post your question or issue and get help from a community of WordPress enthusiasts.

If you require more immediate or personalized assistance, you might consider reaching out to professional WordPress support services. Many web development companies and freelancers offer support services for a fee. They can provide one-on-one support, troubleshoot your specific issue, and offer customized solutions tailored to your needs.
Remember, when seeking support, it’s essential to provide as much detail as possible about your problem, including any error messages, the steps you’ve already taken, and relevant information about your WordPress setup (e.g., hosting provider, theme, plugins). This will help others better understand your situation and provide more accurate and helpful advice.
FAQs
Why is my WordPress update not publishing?
There could be several reasons why your WordPress update is not publishing:
Insufficient permissions: Ensure that the WordPress files and folders have the correct permissions for the web server to write to them.
Plugin or theme conflicts: Deactivate all plugins and switch to a default theme to rule out any conflicts.
Corrupted files: Replace the WordPress core files with a fresh download from the official WordPress website.
Caching issues: Clear your browser cache and any caching plugins you may have installed.
How do you fix an automated WordPress update that has failed to complete?
If an automated WordPress update has failed to complete, you can try manually updating WordPress by downloading the latest version from WordPress.org and replacing the core files. Make sure to back up your site before proceeding with the update.
How do I fix WordPress plugin installation failed?
To fix a WordPress plugin installation failure, you can try deactivating all other plugins and then reattempt the installation. Also, make sure the plugin is compatible with your version of WordPress.
How to fix your WordPress site after a plugin update goes wrong?
If a plugin update goes wrong and affects your WordPress site, you can access your site via FTP, deactivate the misbehaving plugin by renaming its folder in the “wp-content/plugins” directory, and then contact the plugin developer for assistance.


