How to Upload an HTML File to WordPress in 2023 [Easy Guide]

Need to upload an HTML file to WordPress? Here’s how to do it without errors.
Using WordPress to build websites is common for many, including myself. But occasionally, there’s an HTML file that needs to be added. Maybe it’s a special page you’ve crafted or a unique design for a specific part of your site.
I’ll admit that sometimes, adding an HTML file to WordPress can be a little challenging. If it’s not done correctly, you might come across messages like “file type not allowed” or even “Error 404.”
I know what you’re thinking about it, but don’t panic. In this article, You will learn:
- Precautions to take before uploading an HTML page
- Top 3 effective methods to upload an HTML file to WordPress
- Top 3 reasons to upload HTML files to WordPress
I’ll also provide some troubleshooting solutions in case you run into any trouble.
Ready to dive in? Let’s kick off with the precautions you should take before starting the upload process.
Table of Contents
Precautions To Take Before You Upload An HTML Page
When it comes to uploading an HTML file to your WordPress site, it’s crucial to take necessary precautions to ensure the process is smooth and risk-free. These safety measures ensure that your site’s data remains intact and you don’t encounter unexpected errors or loss of content.
1: Take a Backup of Your Site
The backbone of any website precaution is to maintain an updated backup. Before making any modifications, especially significant ones like uploading an HTML file, it’s always wise to have a recent backup at hand. This way, in case of any unexpected occurrences, you can restore your site back to its original state.
UpdraftPlus is a popular backup solution amongst several others, such as VaultPress and BackupBuddy. Given its ease of use and reliability, I’ll guide you through the process of creating a backup using the “UpdraftPlus” plugin:
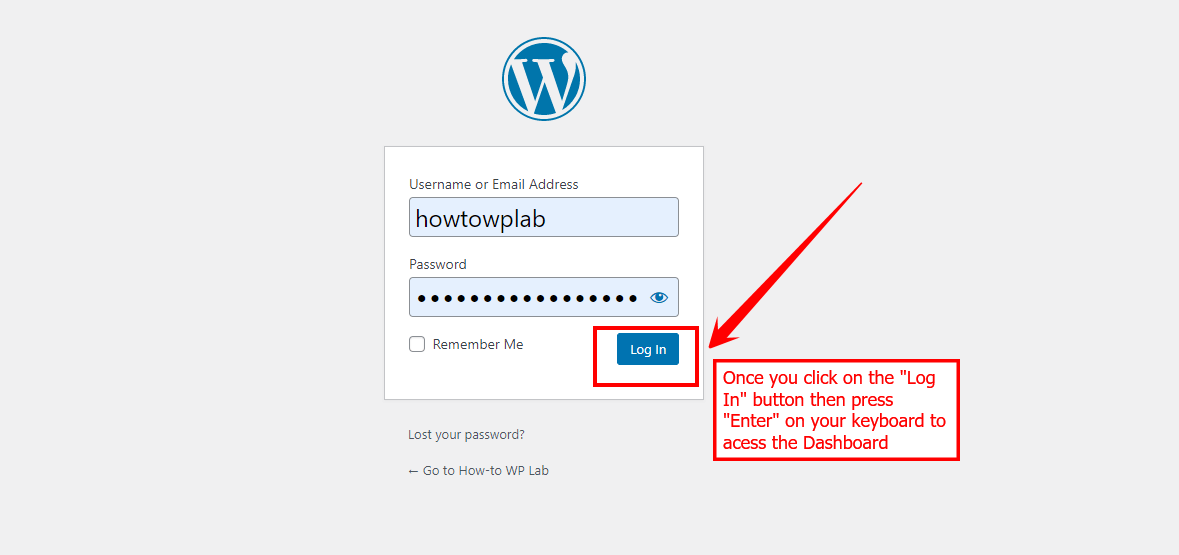
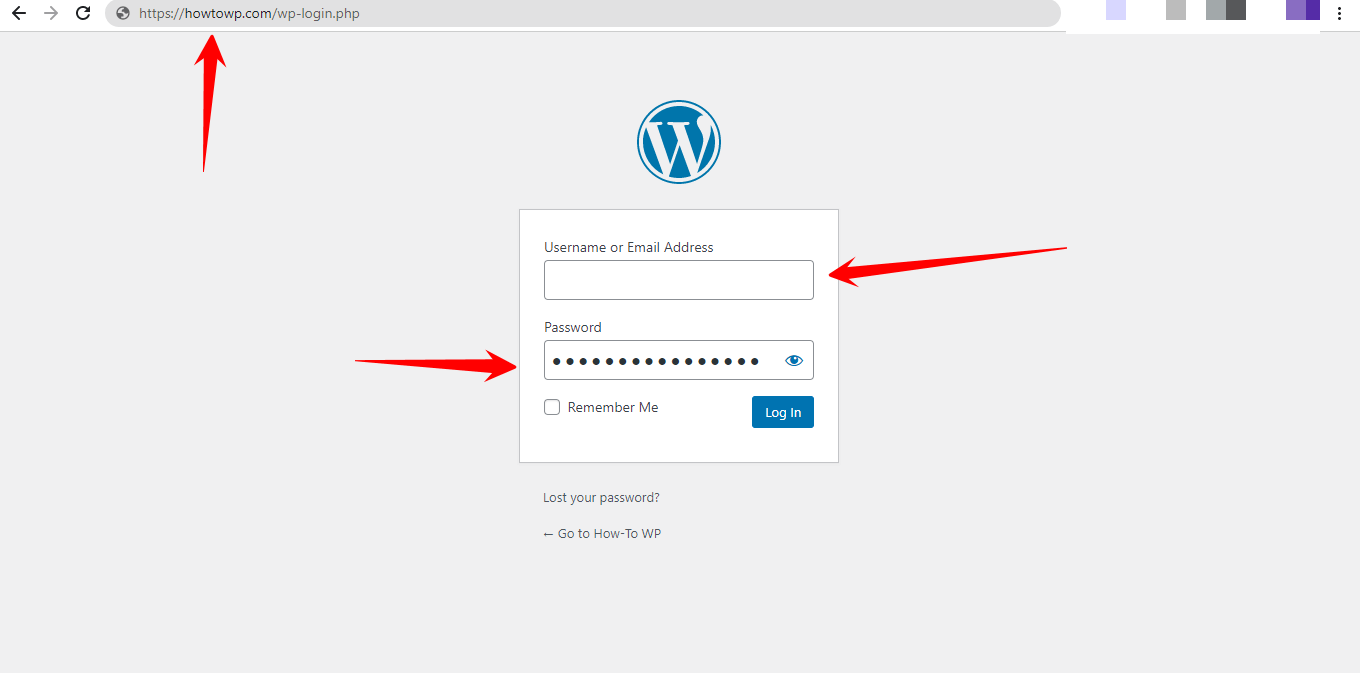
Step 1: To log in to your WordPress dashboard, go to your WordPress website’s admin URL (usually yourwebsite.com/wp-admin) and enter your login credentials.
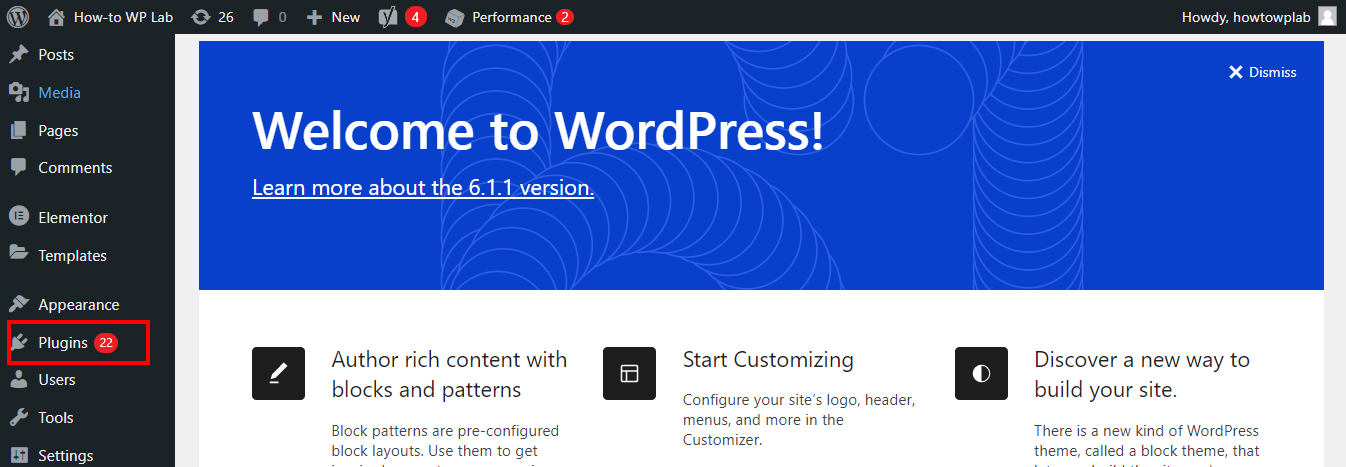
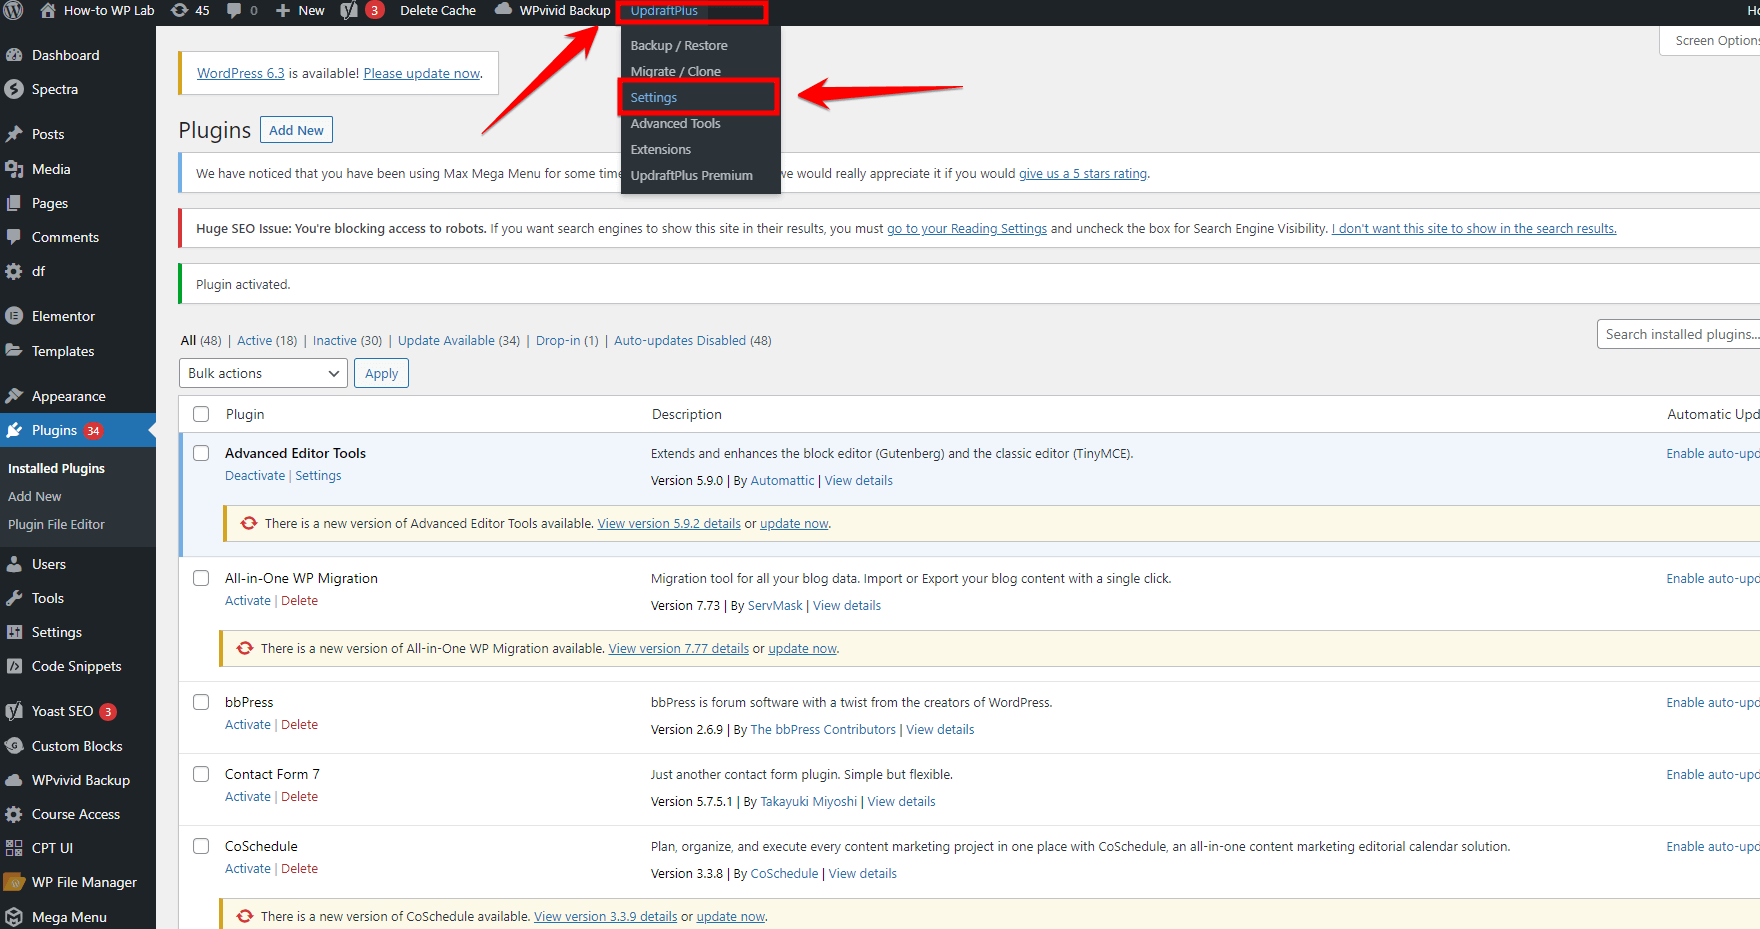
Step 2: Select the “Plugins” option in the left-hand menu.
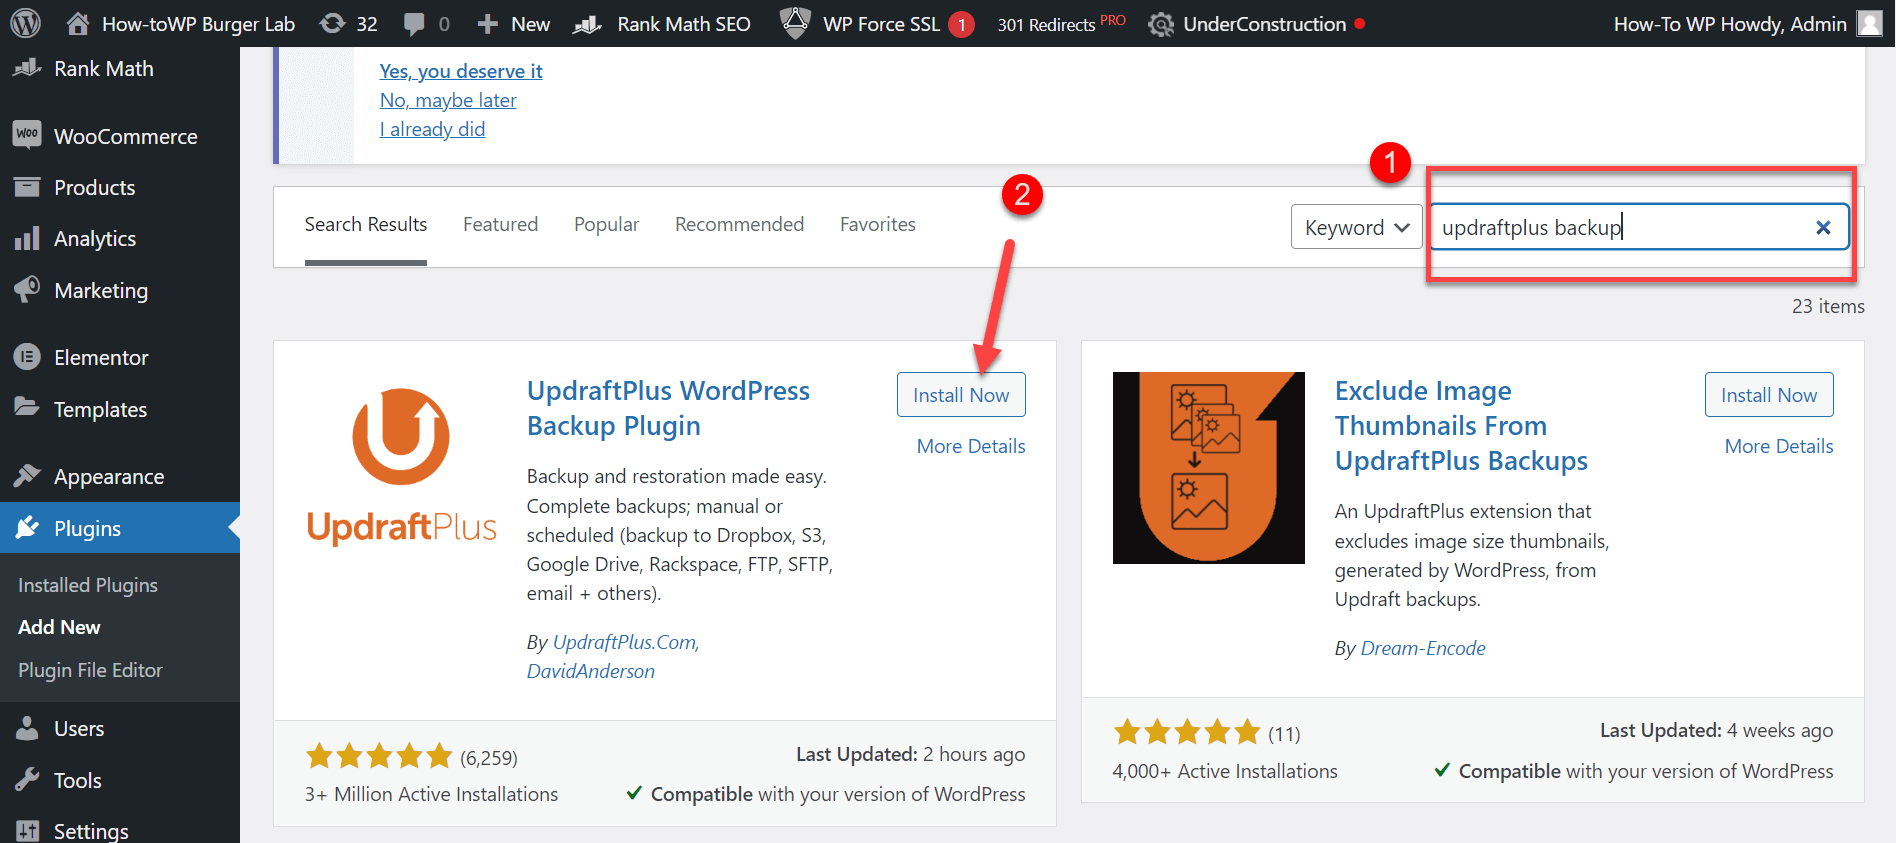
Step 3: Click on “Add New” and search for “UpdraftPlus.” Install and turn it on.
Step 4: After turning it on, go back to the main menu and find UpdraftPlus settings.
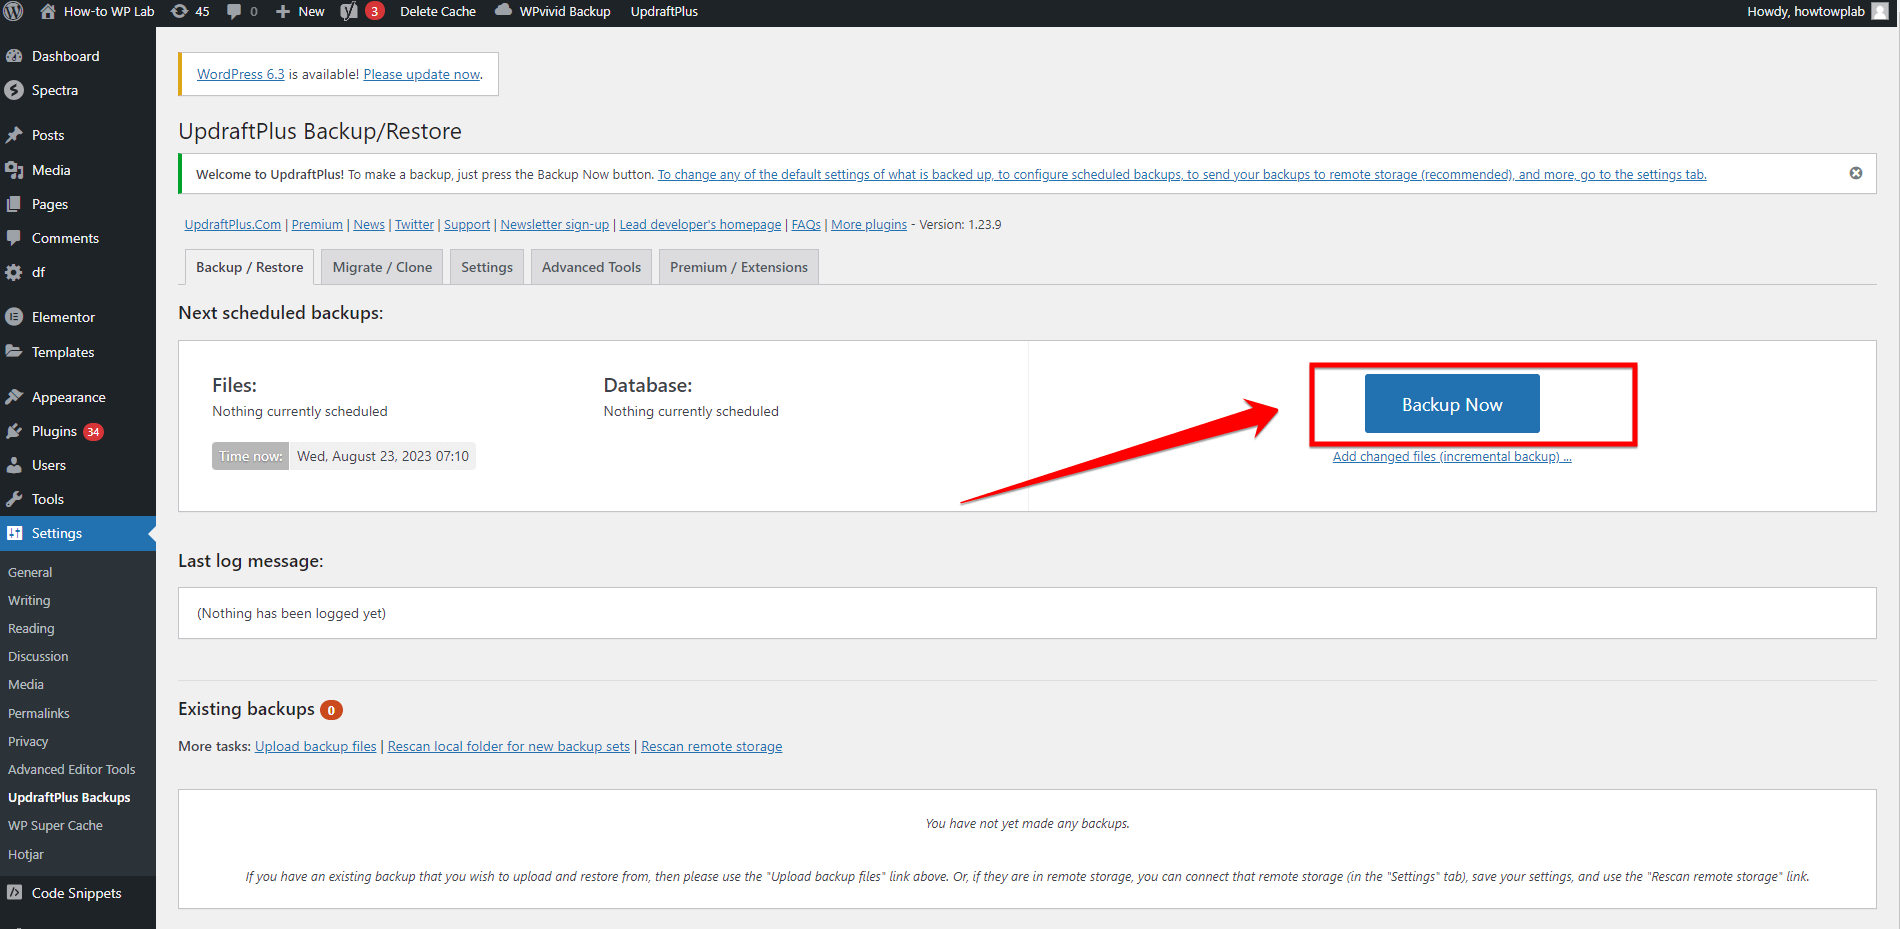
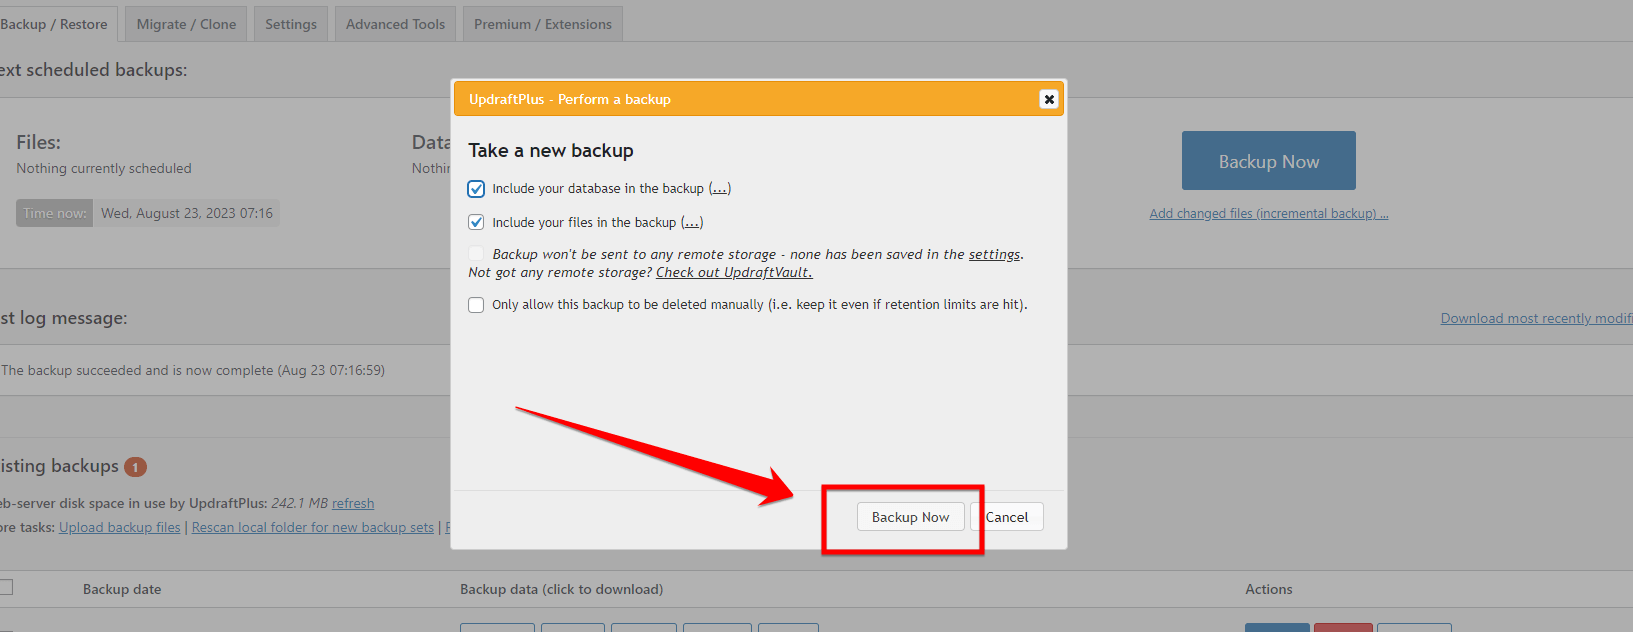
Step 5: On the UpdraftPlus page, click the big blue button that says “Backup Now.”
Step 6: A small window will pop up. Here, make sure you check options like “Include your database” and “Include your files” if you want to save them.
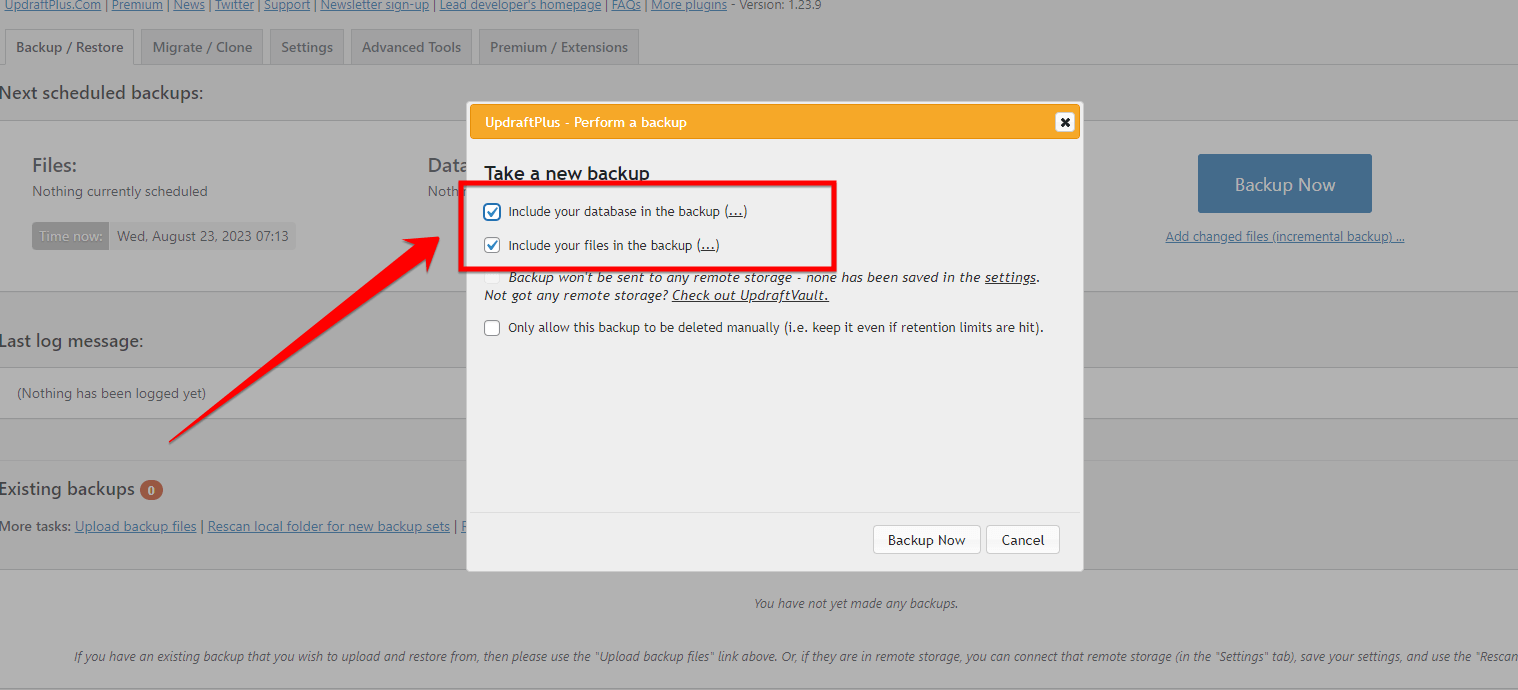
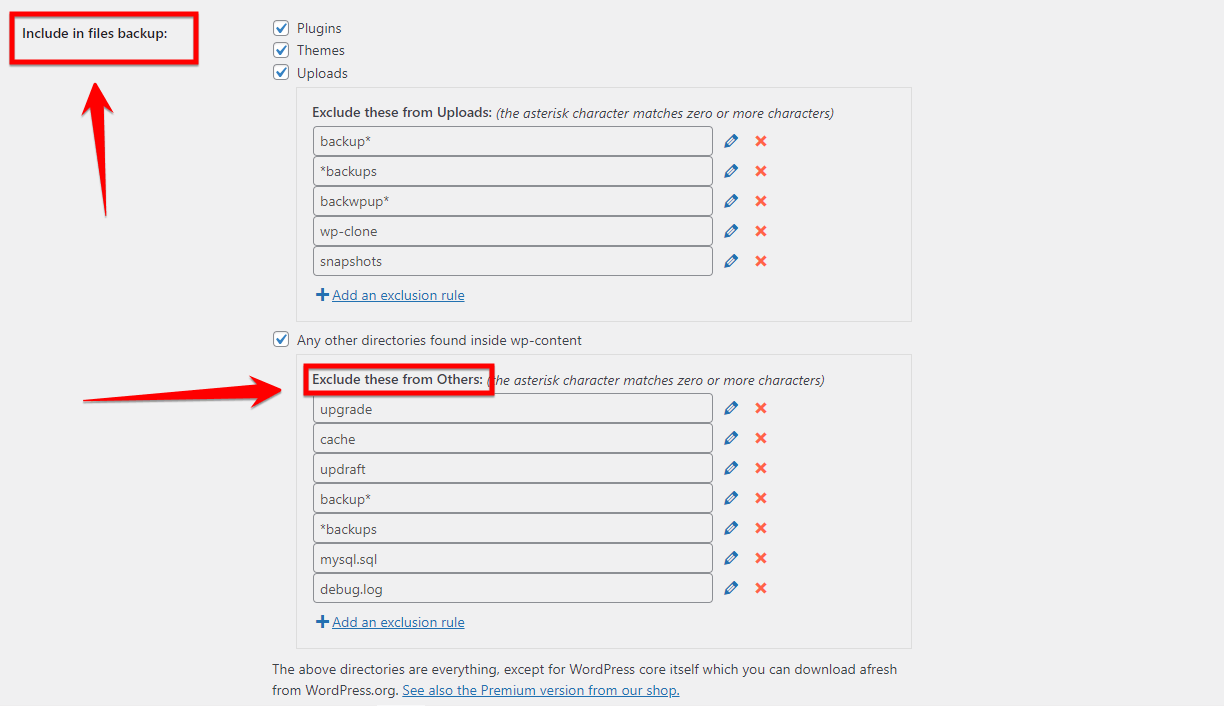
Note: You can pick specific things you want or don’t want to save, like certain plugins or themes.
Step 7: Under the “Settings” in UpdraftPlus, pick where you want to save your backup. Follow the steps you see on the screen.
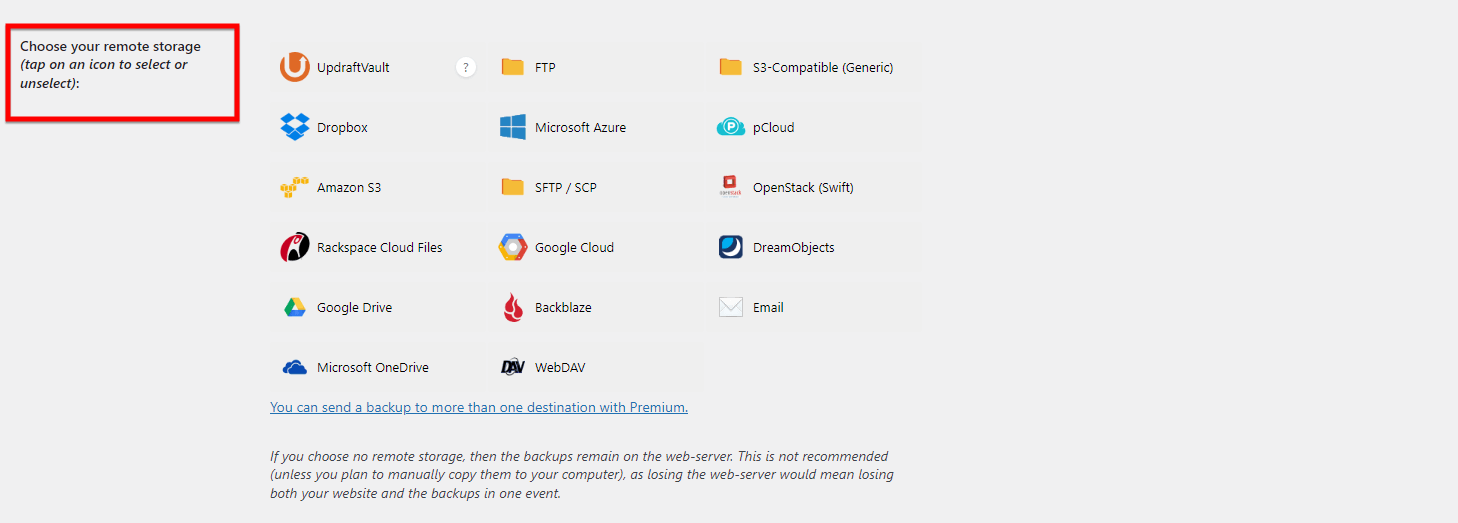
Note: If you don’t pick a place, UpdraftPlus will save it on your website server by default.
Step 8: After choosing what and where to save, click “Backup Now” in the small window to start saving.
Step 9: UpdraftPlus will show you how much is saved as it goes. Wait until it finishes.
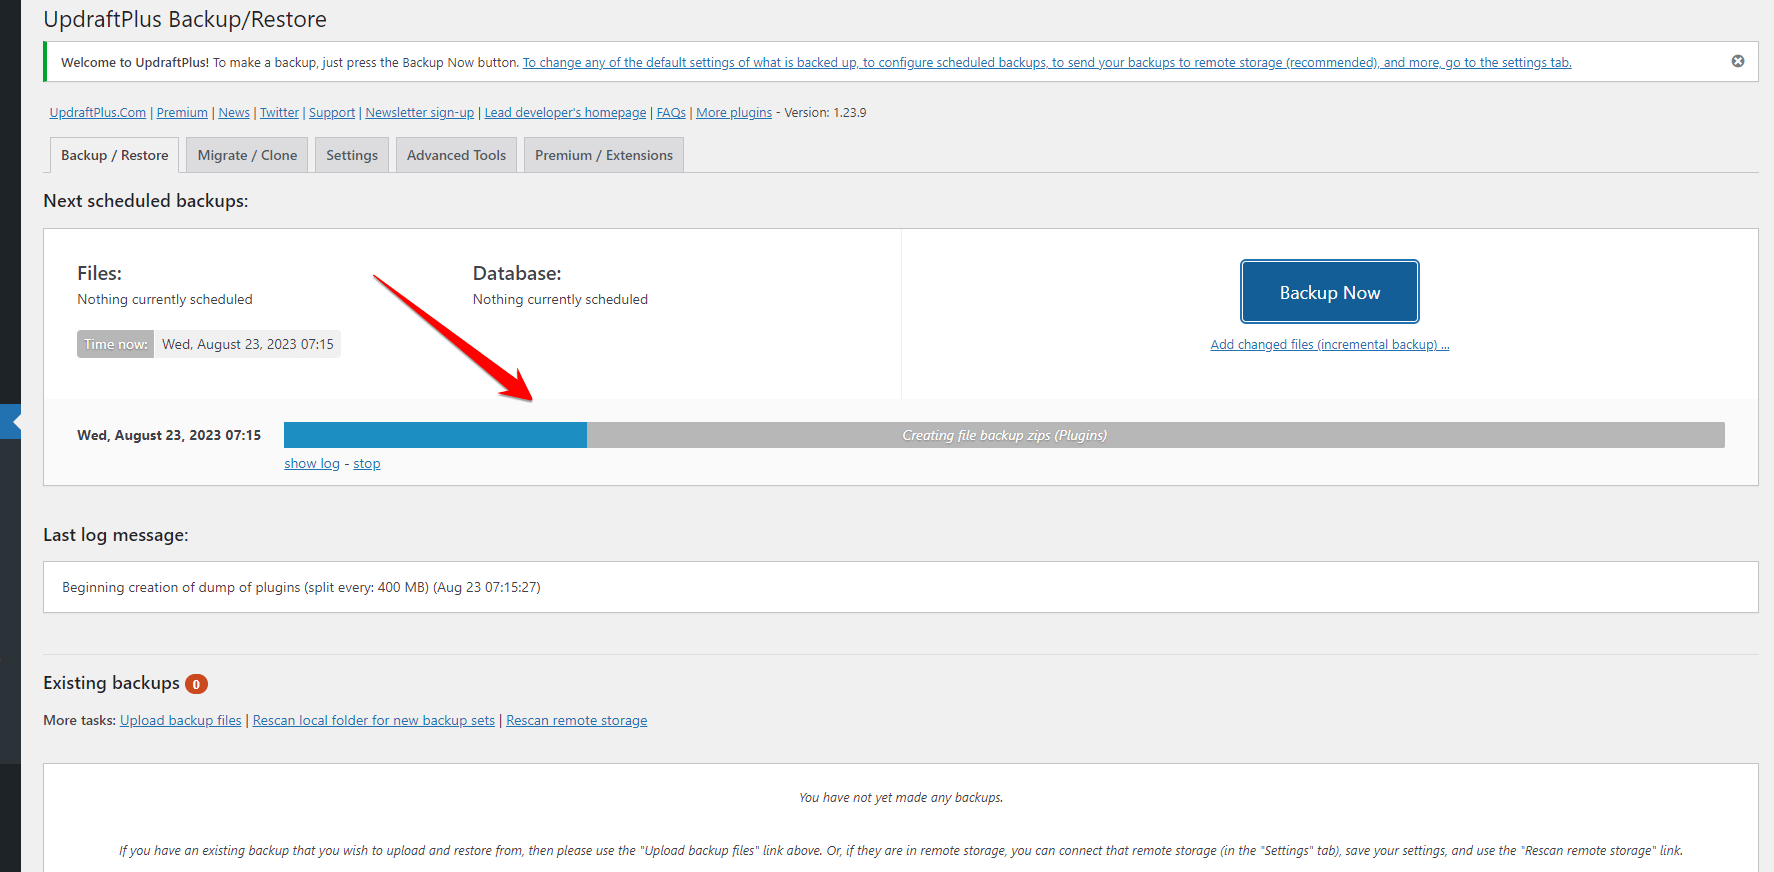
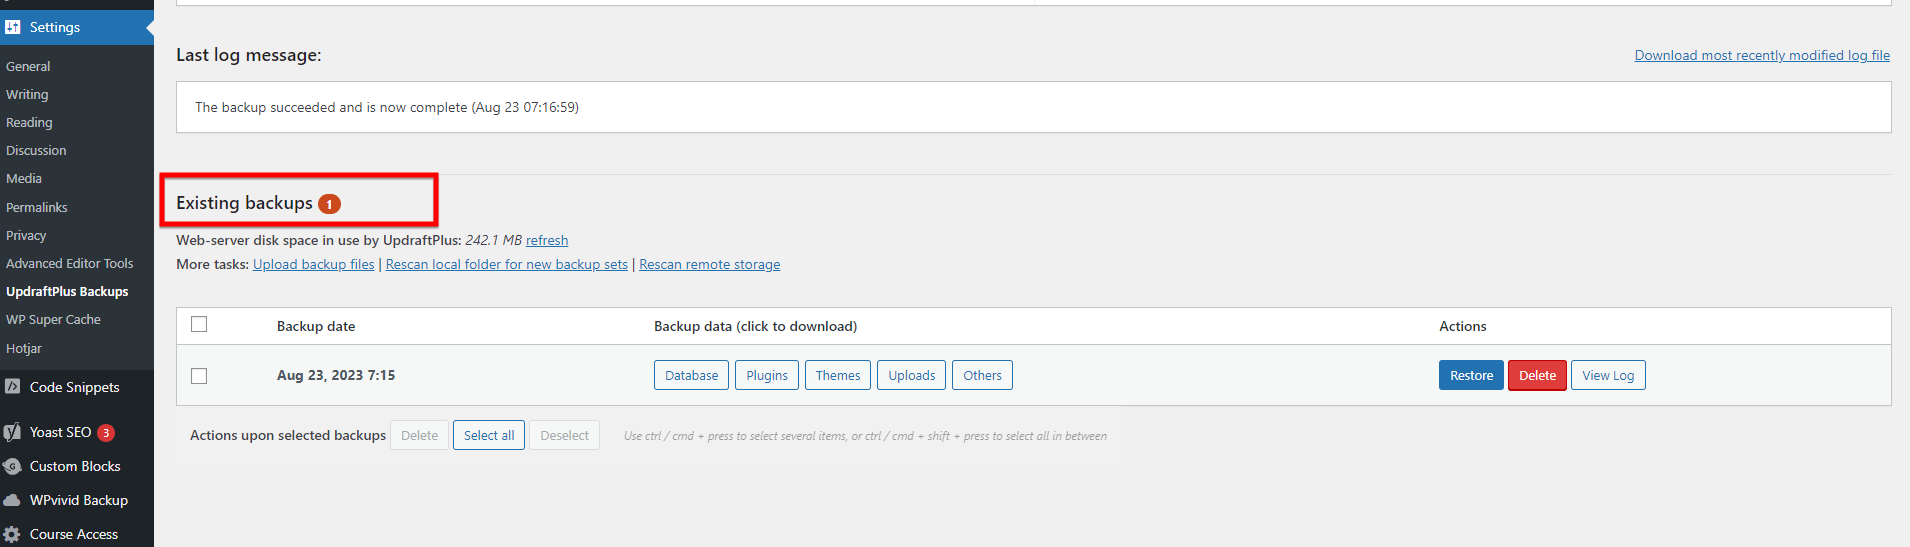
Step 10: Once it’s done, you can check the “Existing Backups” area on the UpdraftPlus page to make sure your saved files are there.
A Pro Tip: If you want backups to happen automatically, you can set how often under the “Settings” in UpdraftPlus. You can choose from daily to monthly.
2: Create a Staging Environment
A “staging environment” might sound technical, but it’s essentially a replica of your live site – a platform where you can test changes without affecting your actual website. Think of it as a playground where you can safely test and tweak without any repercussions on the live site.
Using a staging environment offers a dual advantage. First, it gives you the freedom to experiment without fear. Second, it ensures that your live site’s visitors have a consistent experience uninterrupted by backend tweaks and tests.
For setting up a staging environment, the “WP Staging” plugin is an efficient tool. Here’s how to go about it:
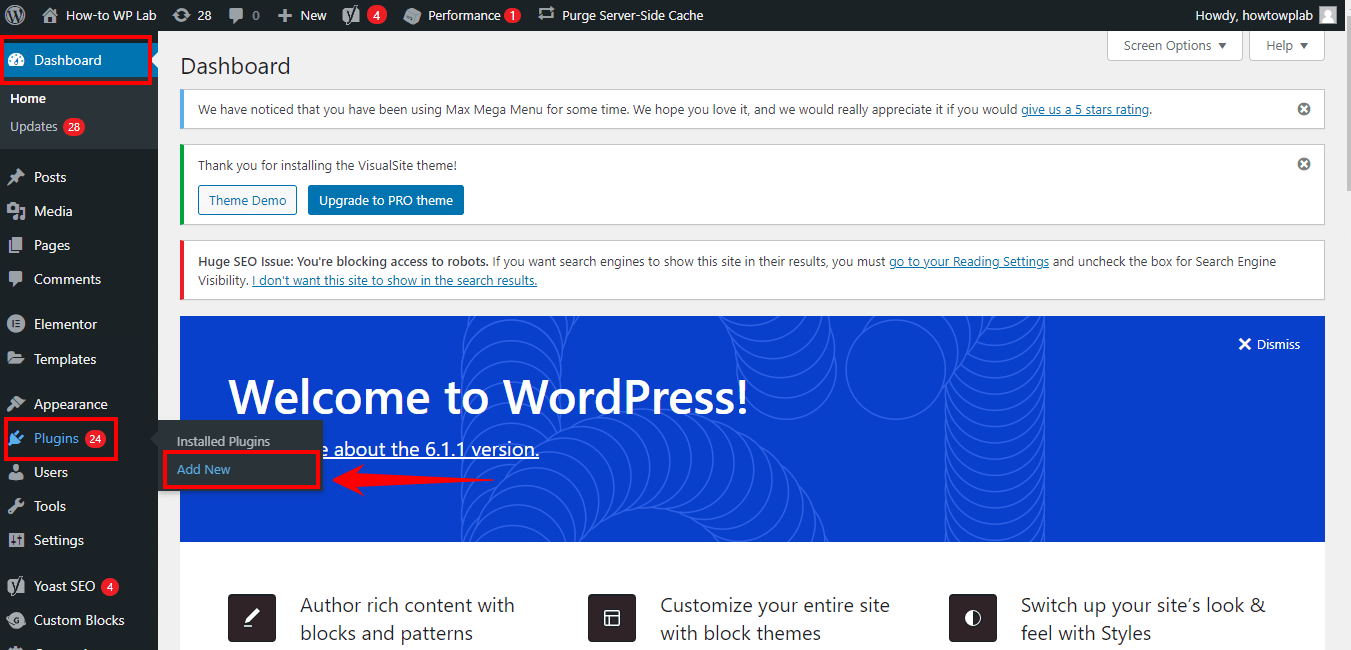
Step 1: Log in to your website and navigate to your WordPress dashboard, ensuring you have administrative rights.
Step 2: On the left-hand sidebar of your dashboard, find and click on the “Plugins” option to view all the plugin-related functionalities.
Step 3: From the plugin options presented, choose “Add New” to initiate the process of adding a new plugin to your site.
Step 4: In the provided search bar at the top right, input “WP Staging” to locate this specific plugin from the WordPress repository.
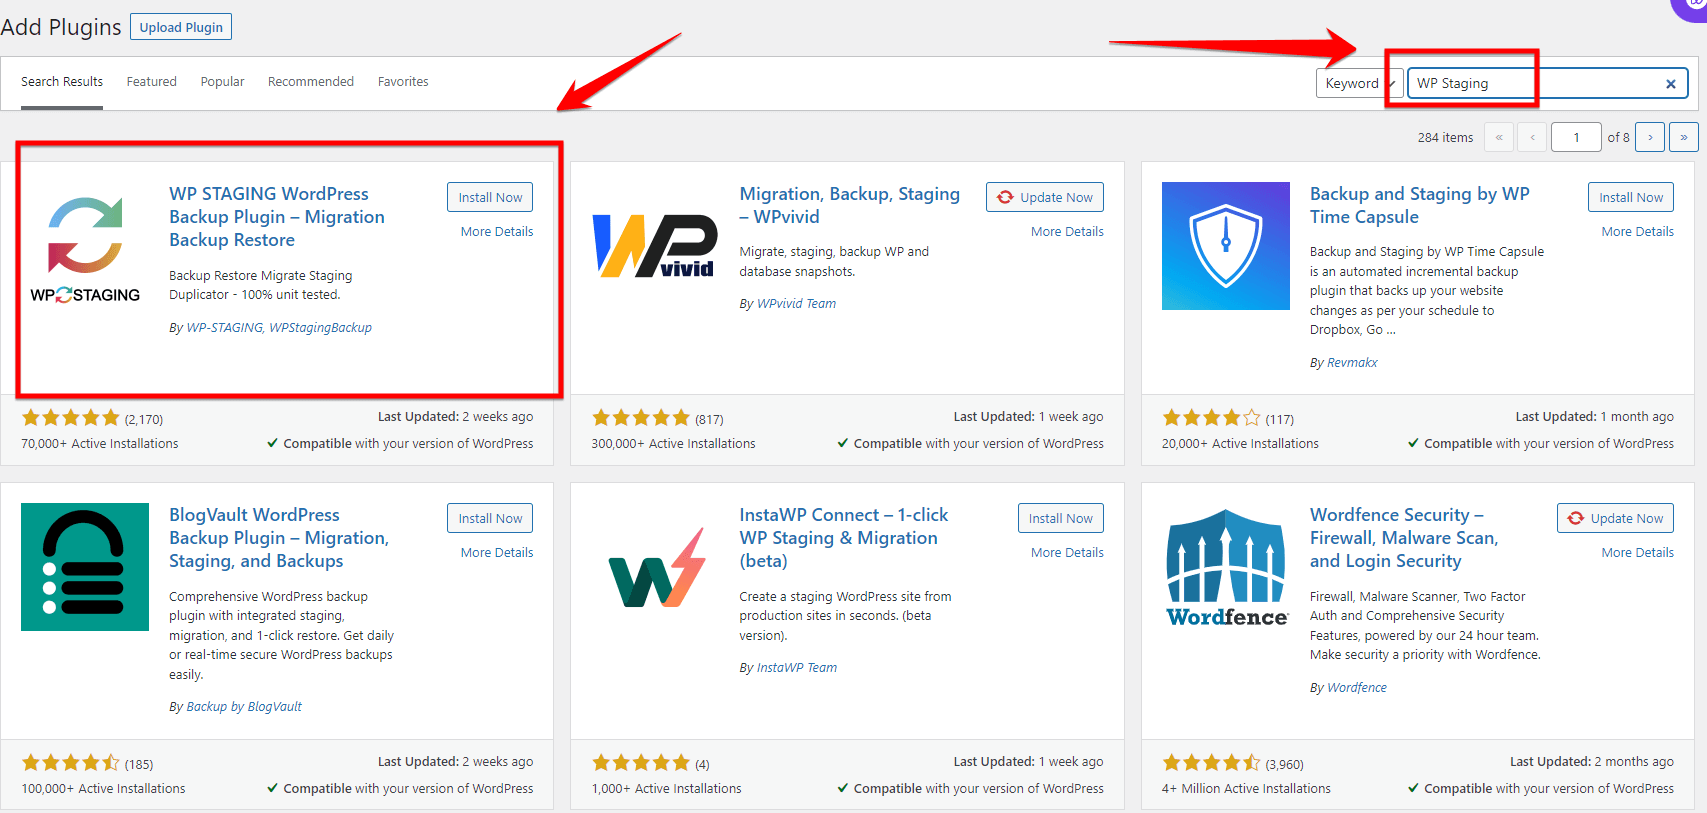
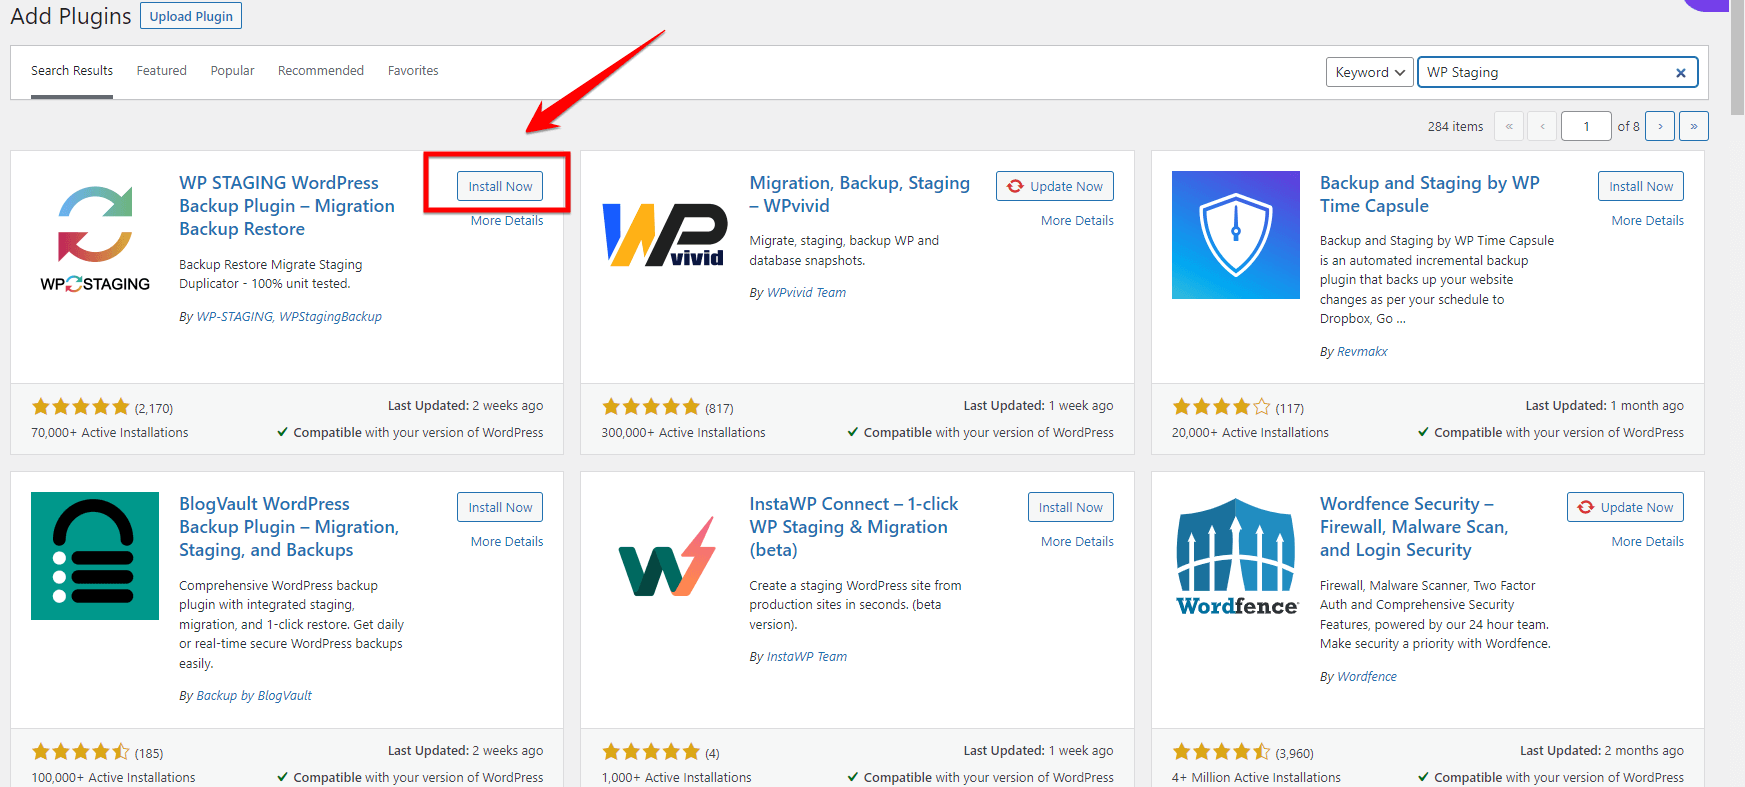
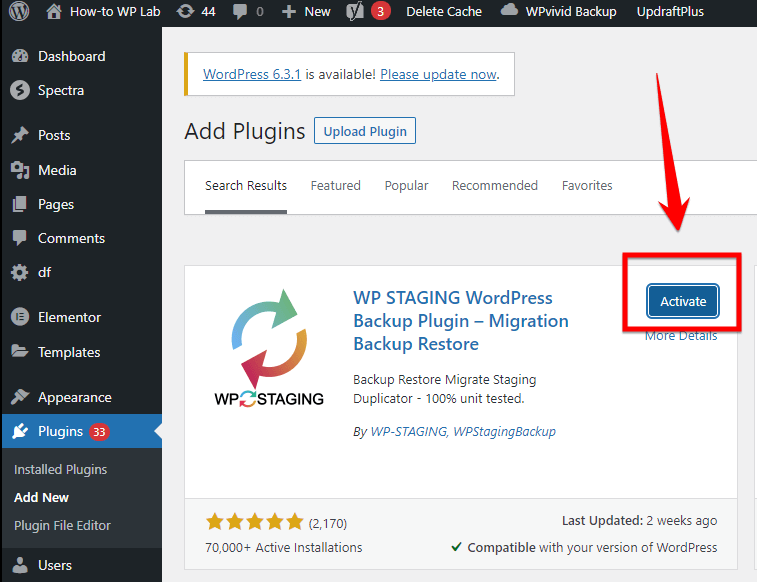
Step 5: Upon locating the “WP Staging” plugin from the search results, press the “Install” button to and integrate it with your website.
Step 6: After a successful installation, an “Activate” button will replace the “Install” button; click it to make the plugin operational.

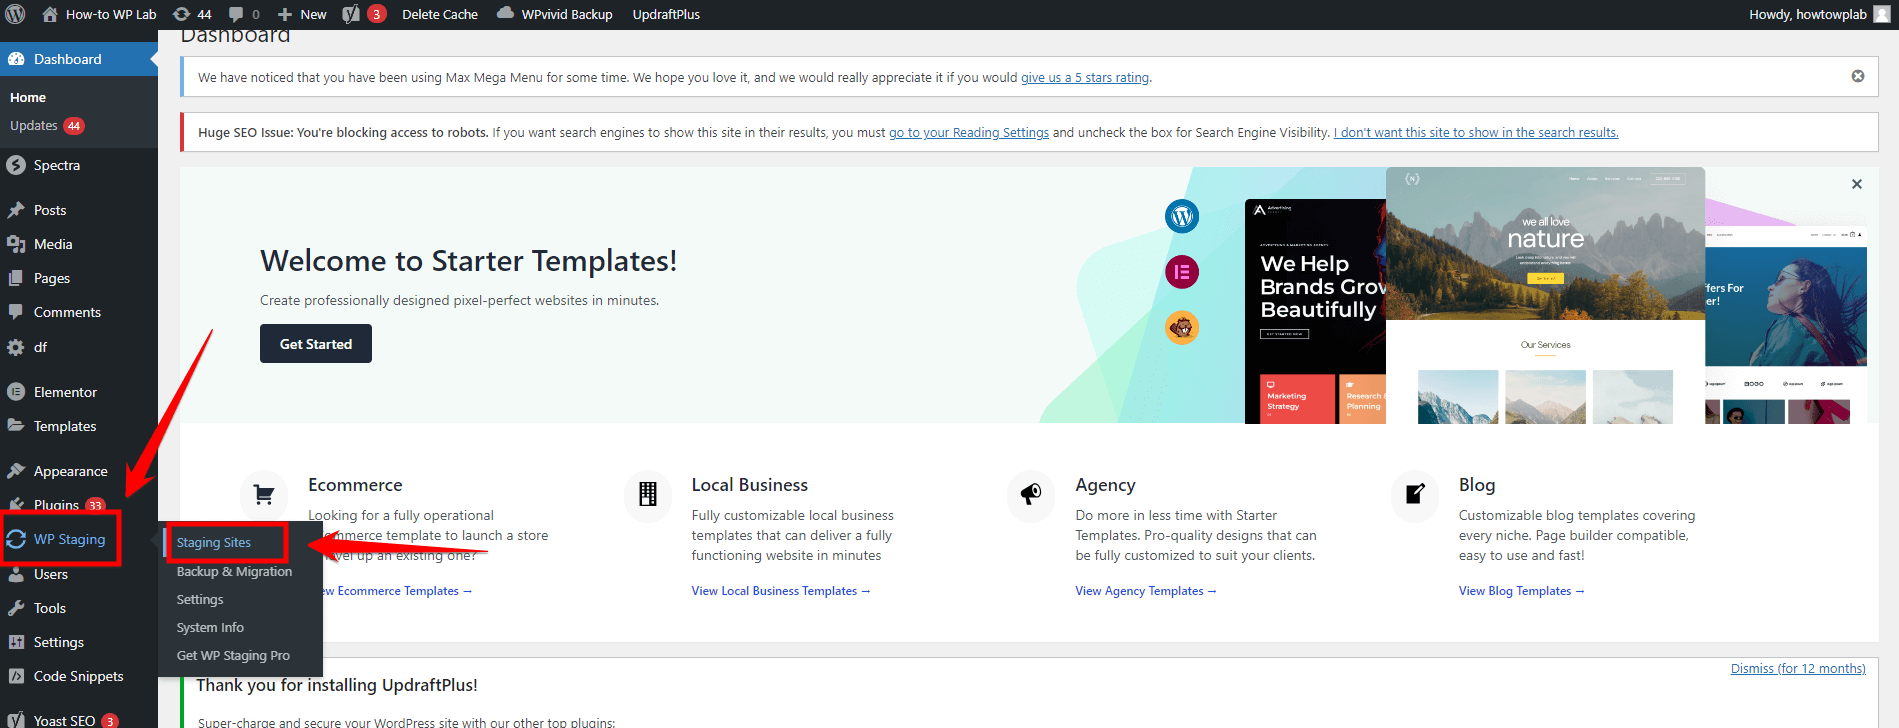
Step 7: Now, scan the left-hand dashboard sidebar to spot the newly appeared “WP Staging” menu option, indicating successful activation.
Step 8: Dive deeper into the plugin’s features by selecting “WP Staging” and then opting for “Staging Sites” from its sub-options.
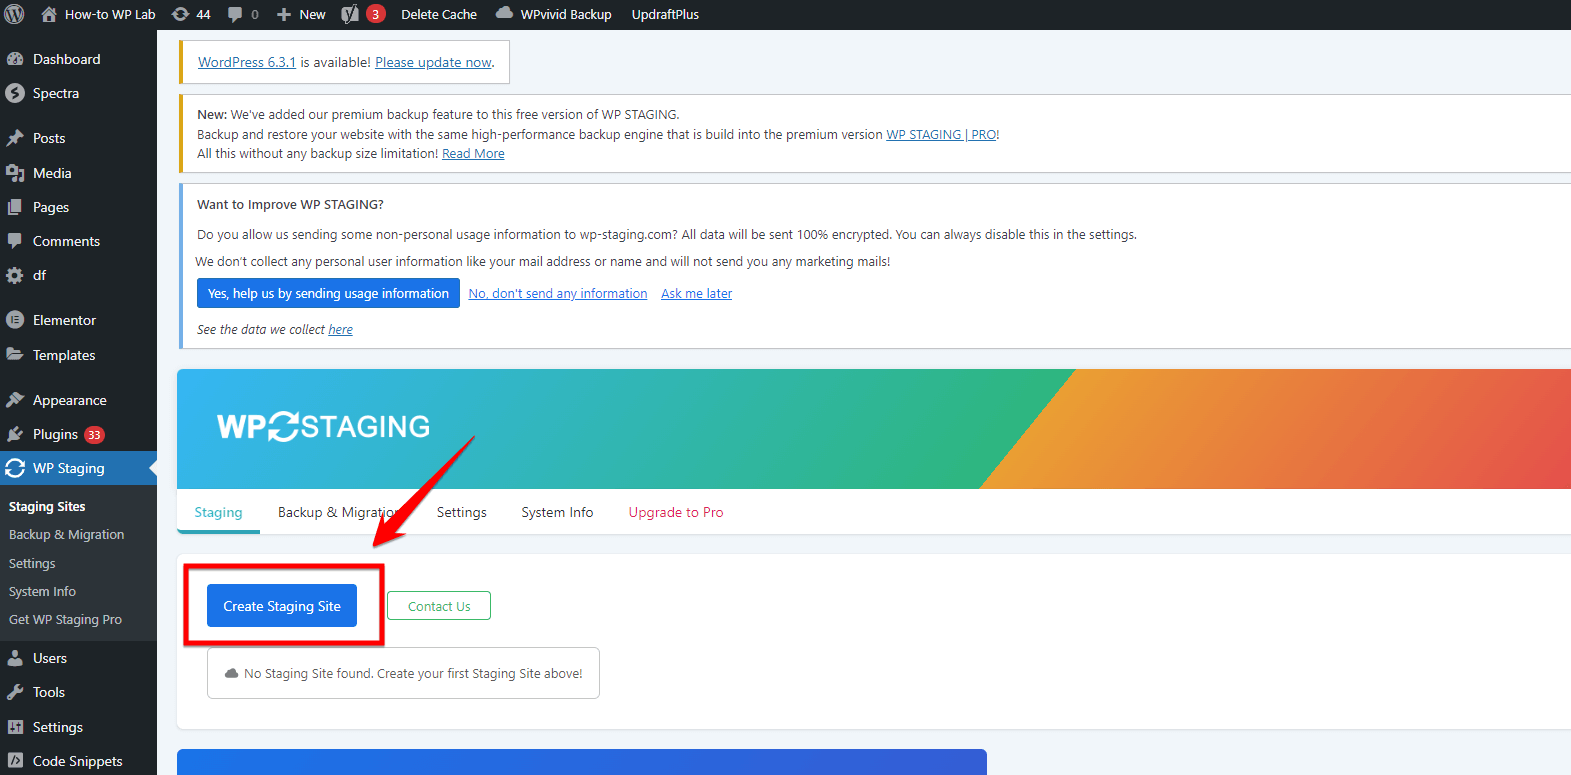
Step 9: To initiate the creation of a staging site, confidently press the “Create New Staging Site” button presented.
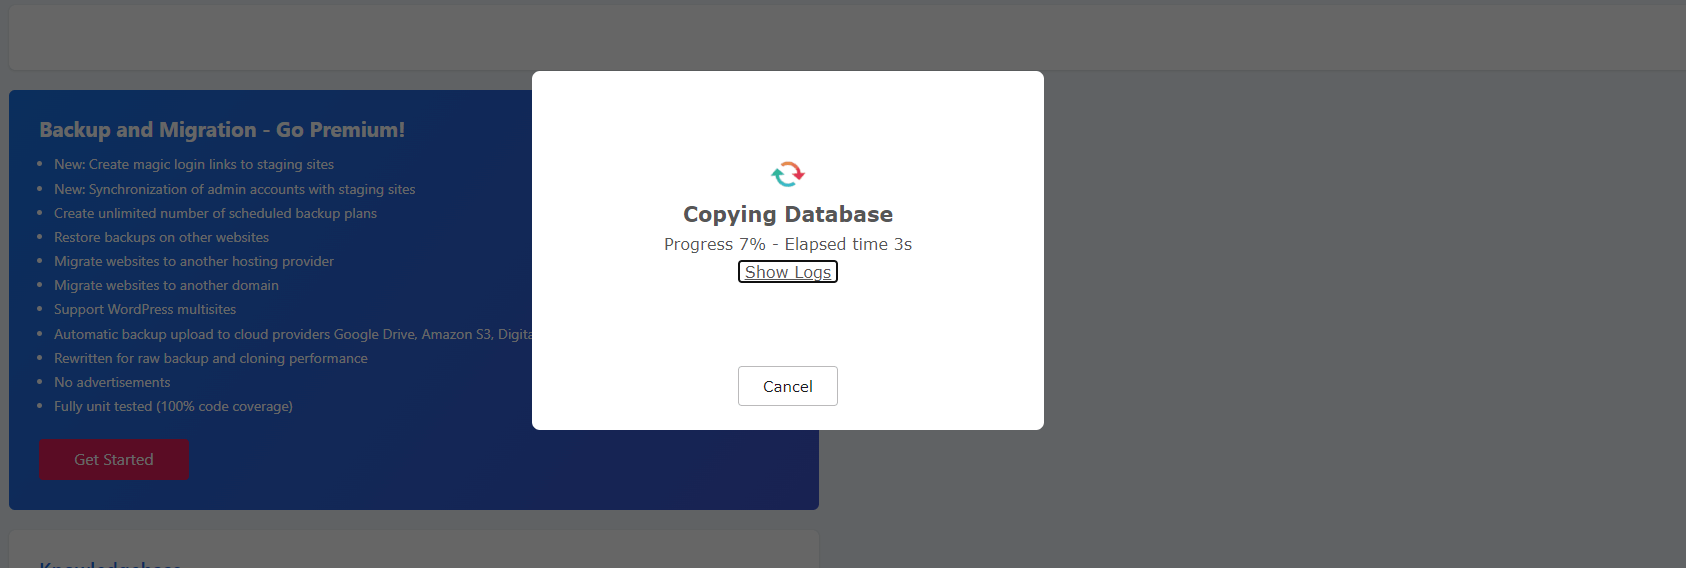
Step 10: For easy identification later, bestow a meaningful name upon your staging site, then finalize the process by hitting the “Start Cloning” button.
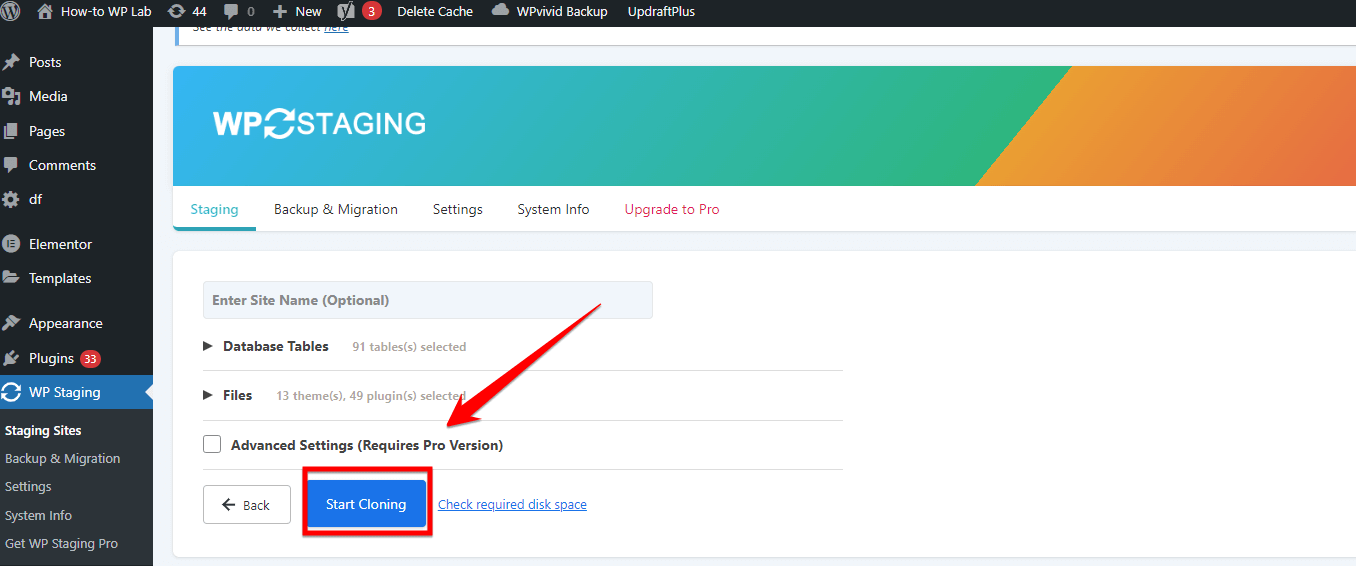
Note: Once you’ve gone through the steps, a popup will show the progress of setting up your staging site. Wait until it’s finished.
Step 11: Afterwards, a new popup will inform you that the staging site was created successfully. You can visit the site using the provided link or just close the popup.
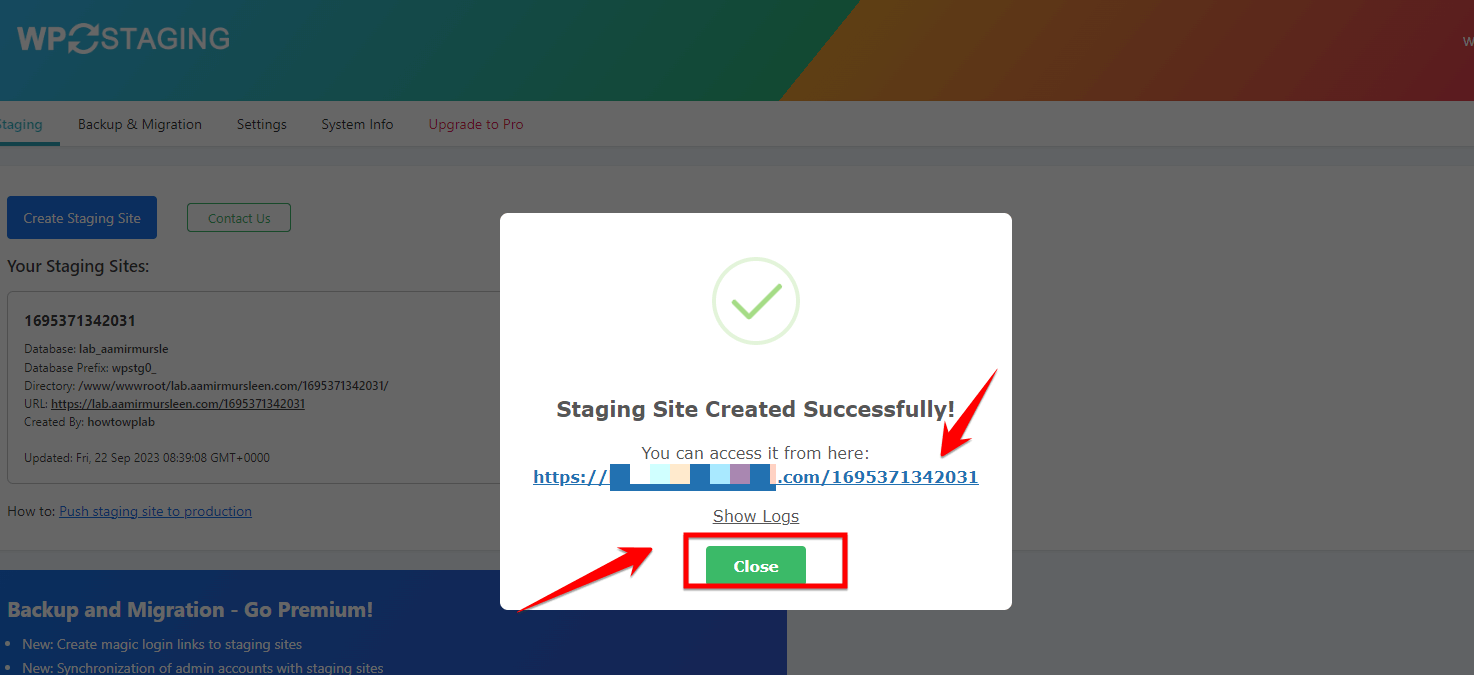
Remember, the staging site acts as a safe testing environment, ensuring changes don’t reflect on your live site until you’re ready.
Top 3 Effective Methods to upload HTML File To WordPress Site
You may sometimes have a hard time navigating WordPress, especially when you have to upload an HTML file. But guess what? I’m here to guide you through it.
Together, we’ll explore the top 3 effective methods that not only get the job done but are also user-friendly. No matter how experienced you are or how new you are, these methods are designed with you in mind.
Ready to dive in? First, let’s take a look at the first method.
Method 1: Upload an HTML File via the WordPress Dashboard
The first method we’re diving into involves the trusty WordPress dashboard. If you’re seeking a hassle-free route, especially if technical jargon like FTP or cPanel makes you wince, this is your go-to. All you’ll need on deck is the backend of your website and the HTML file you’re eager to upload.
Uploading an HTML file directly through the WordPress dashboard is perhaps the most straightforward approach for those who are not well-versed in technicalities. This method leverages the built-in tools of WordPress, ensuring you’re working within a familiar environment. It’s tailor-made for those moments when you have a single HTML file or a handful that you’re itching to get live without digging deep into the server’s backend.
To achieve this, you can either upload the file directly to a post or page or use the Media Library. Here’s a step-by-step guide:
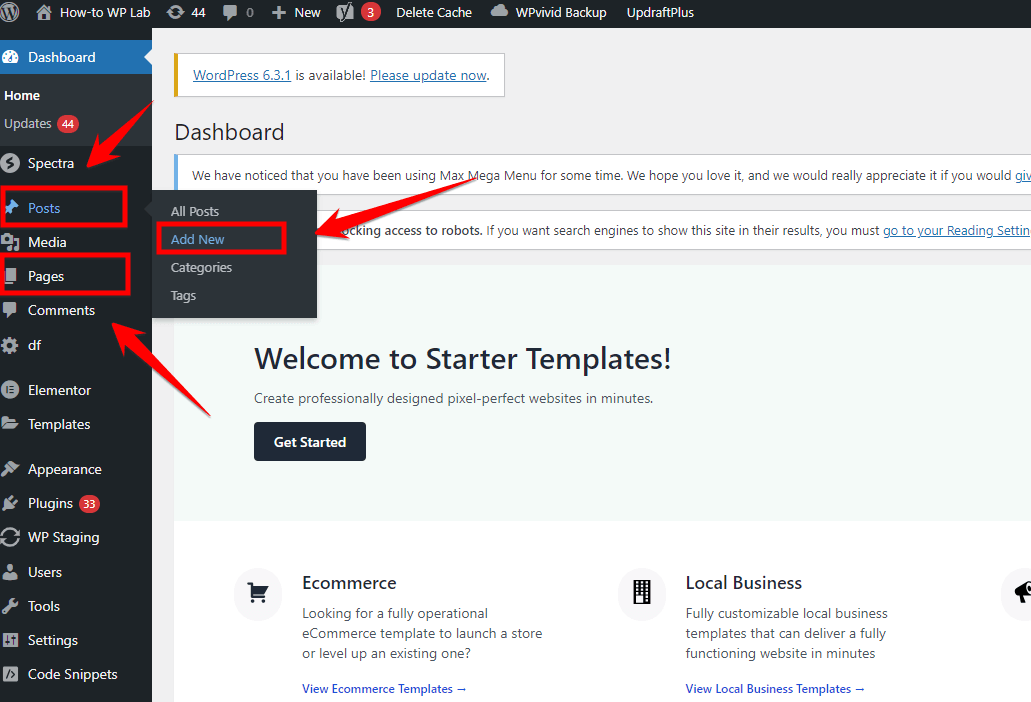
Step 1: Begin by logging into your website. Ensure you’re accessing the WordPress dashboard with the necessary administrative permissions.
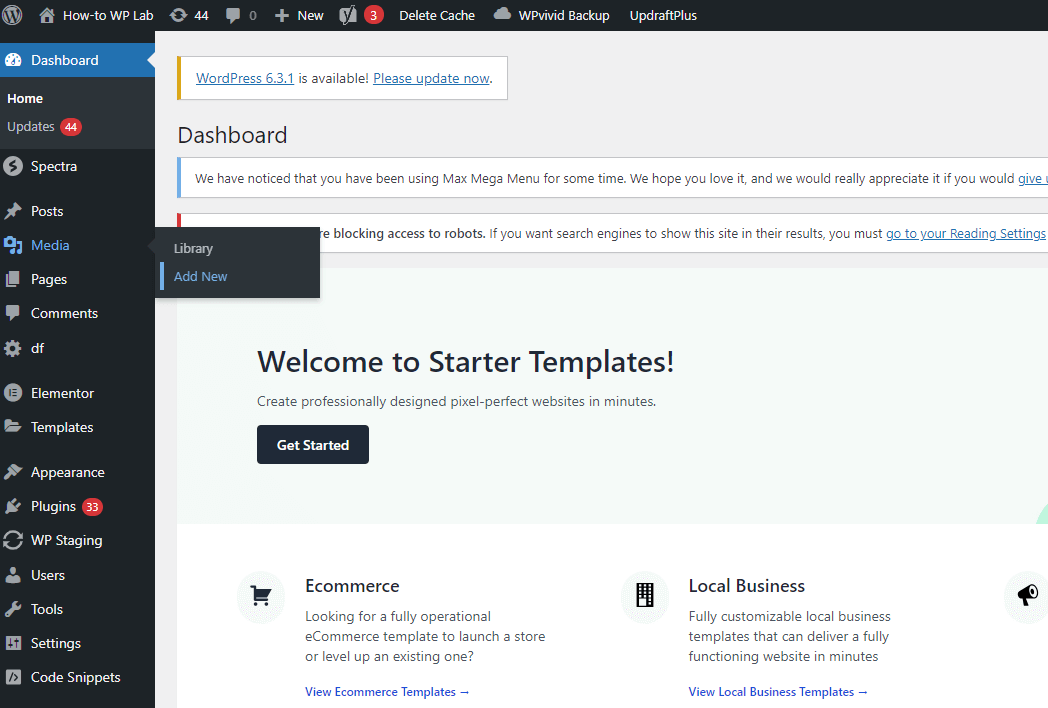
Step 2: Within the dashboard, on the left-hand side, locate the “Media” option and click on it.
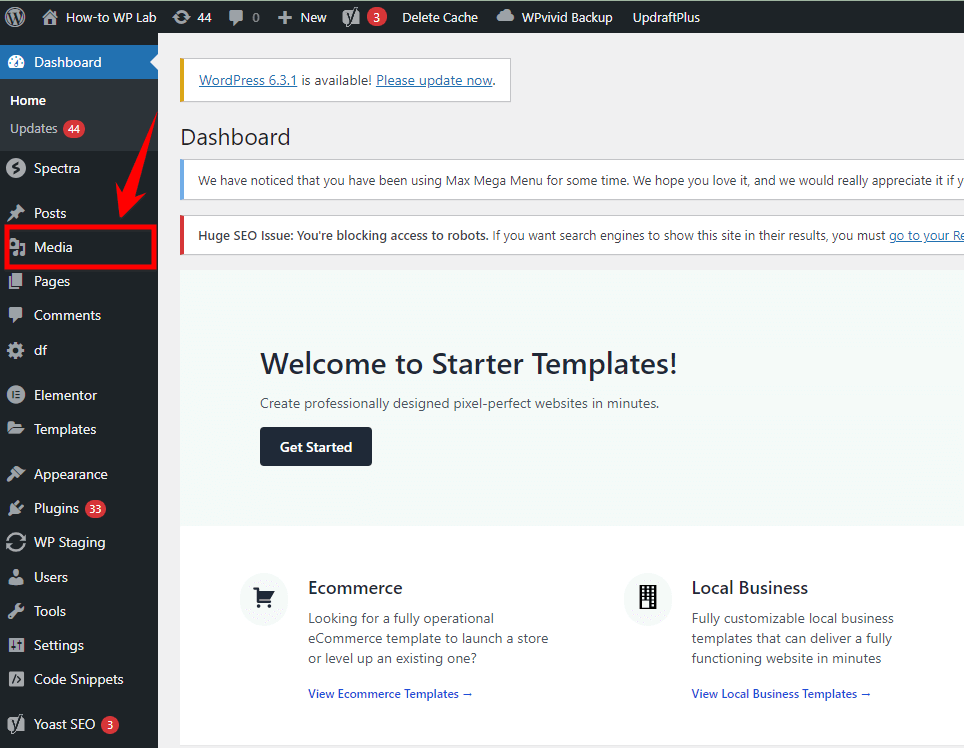
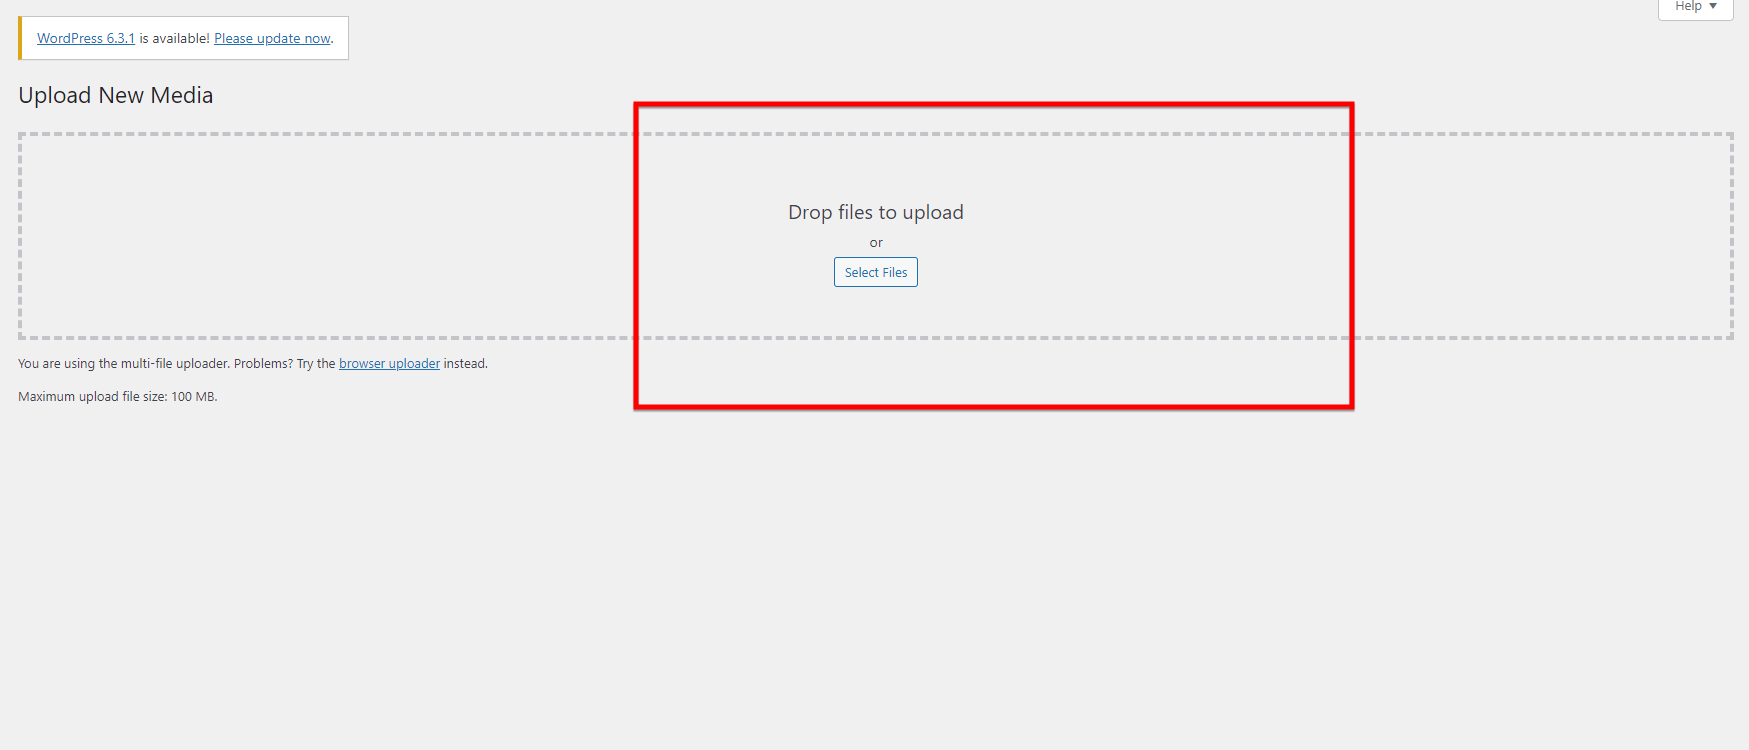
Step 3: After selecting “Media,” you’ll see the “Add New” option. Choose this to move forward.
Step 4: An interface prompting you to select files will appear. Navigate through your computer’s directories and pick the HTML file you aim to upload.
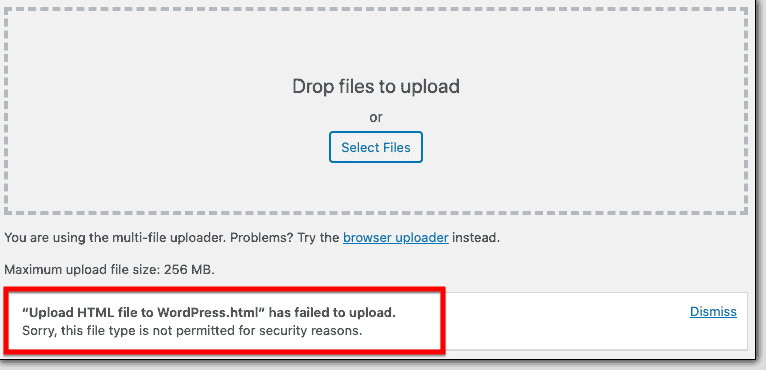
Step 5: If you encounter an error stating, “Sorry, this file type is not permitted for security reasons,” don’t fret! There are alternative methods. Return to the dashboard.
Using the Gutenberg Editor
Step 6: Opt to create a new page or post. You’ll find this option on the left sidebar of your dashboard.
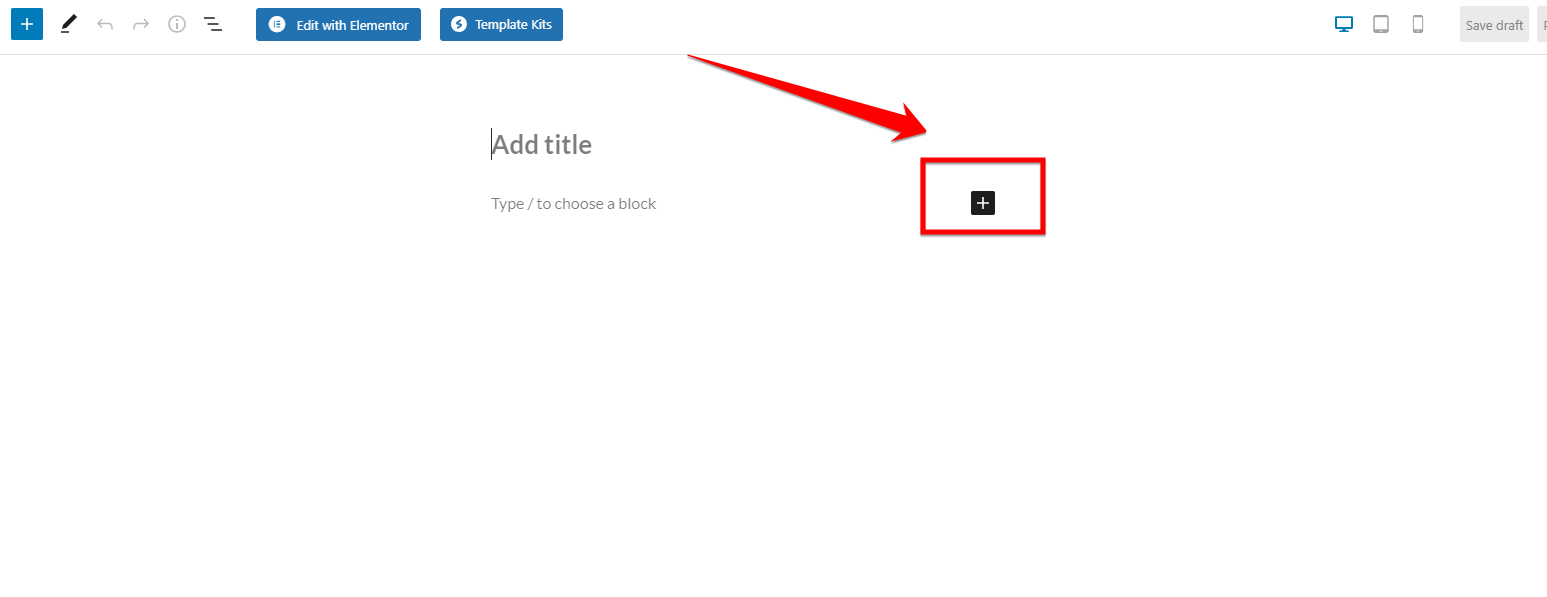
Step 7: Inside your new page or post, look for the “+” icon. This symbol lets you add a new block.
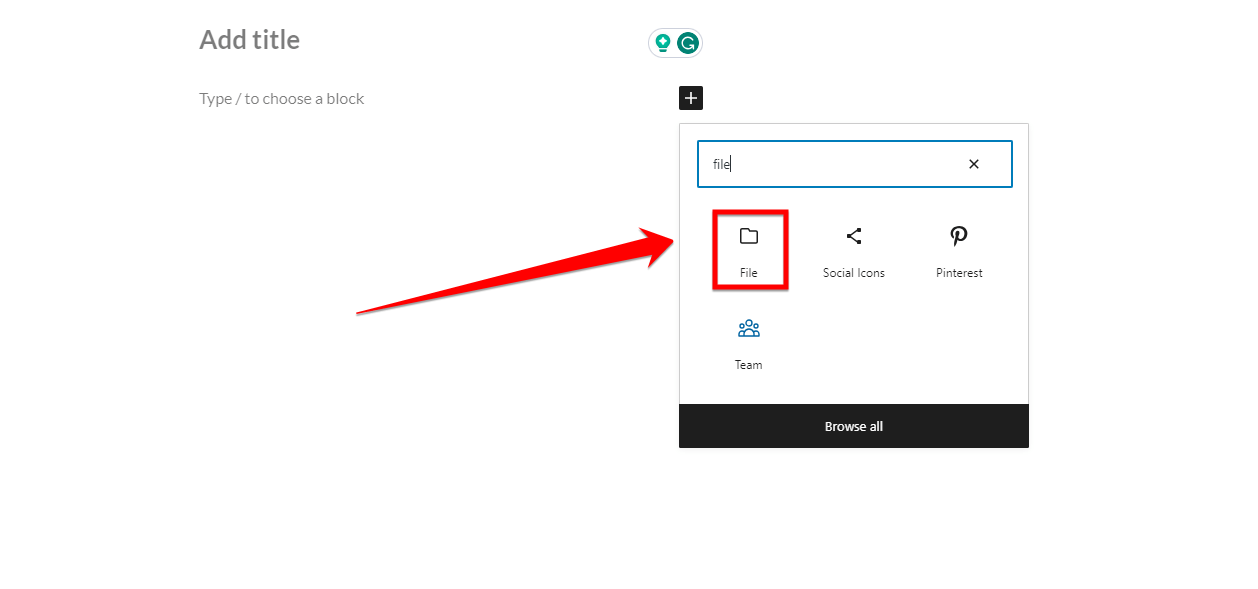
Step 8: From the available block options, search for and select the “File” block. Through this, you can upload your HTML file.
Pro Tip: Gutenberg Editor offers a plethora of blocks. Familiarize yourself with these to maximize your page’s potential.
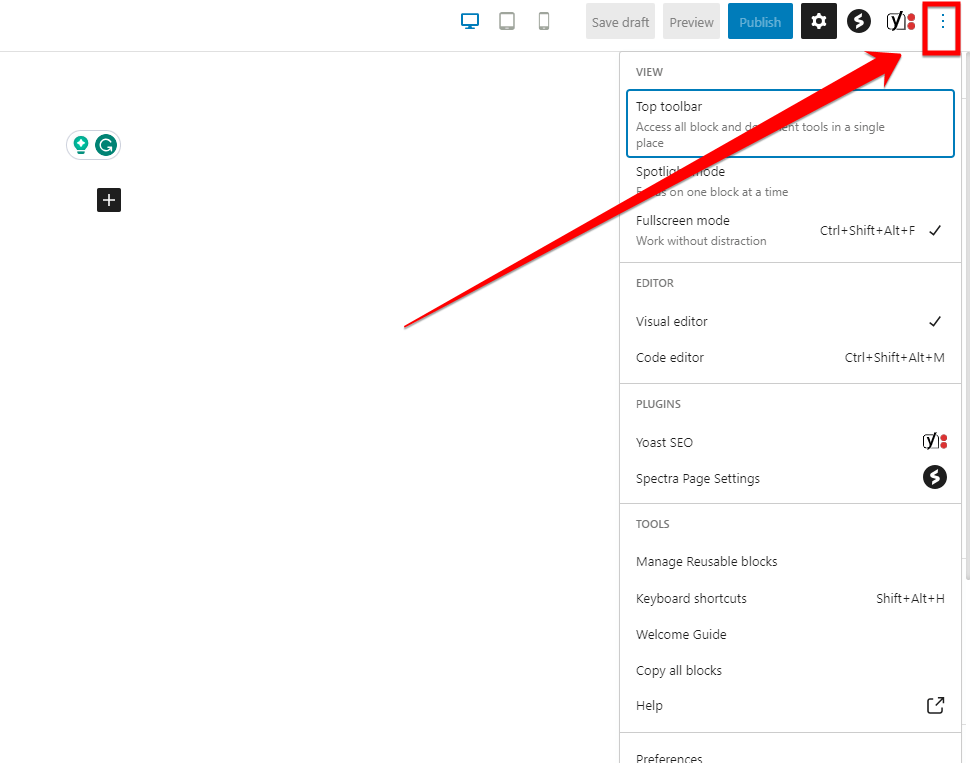
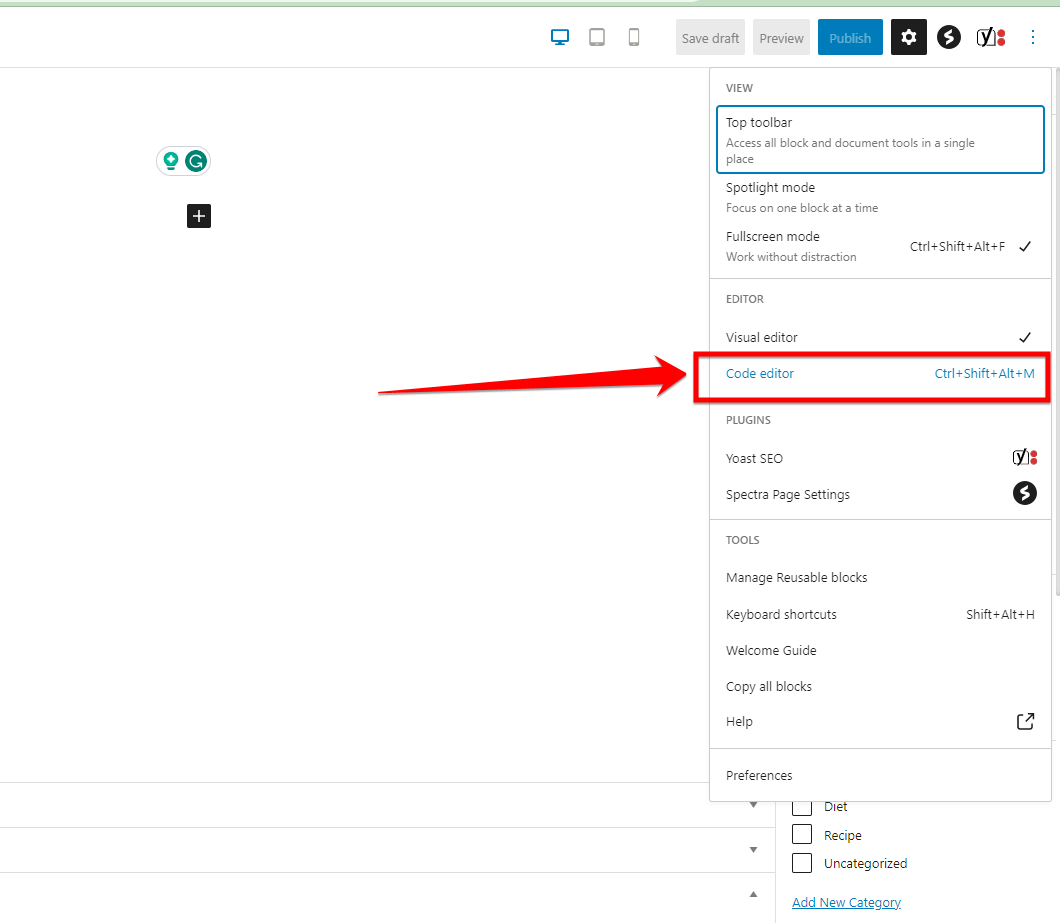
Step 9: If you fancy working directly with the code, there are three dots located on the top-right corner labeled “More tools & options.” Click on it, revealing an option called “Code Editor.”
Step 10: Activate the “Code Editor.” Here, you’re free to paste your HTML code directly.
Note: Always ensure that the HTML code you’re adding is clean and won’t disrupt your website’s layout or security.
Using the Classic Editor
Step 11: Navigate back to the dashboard and initiate a new page or post.
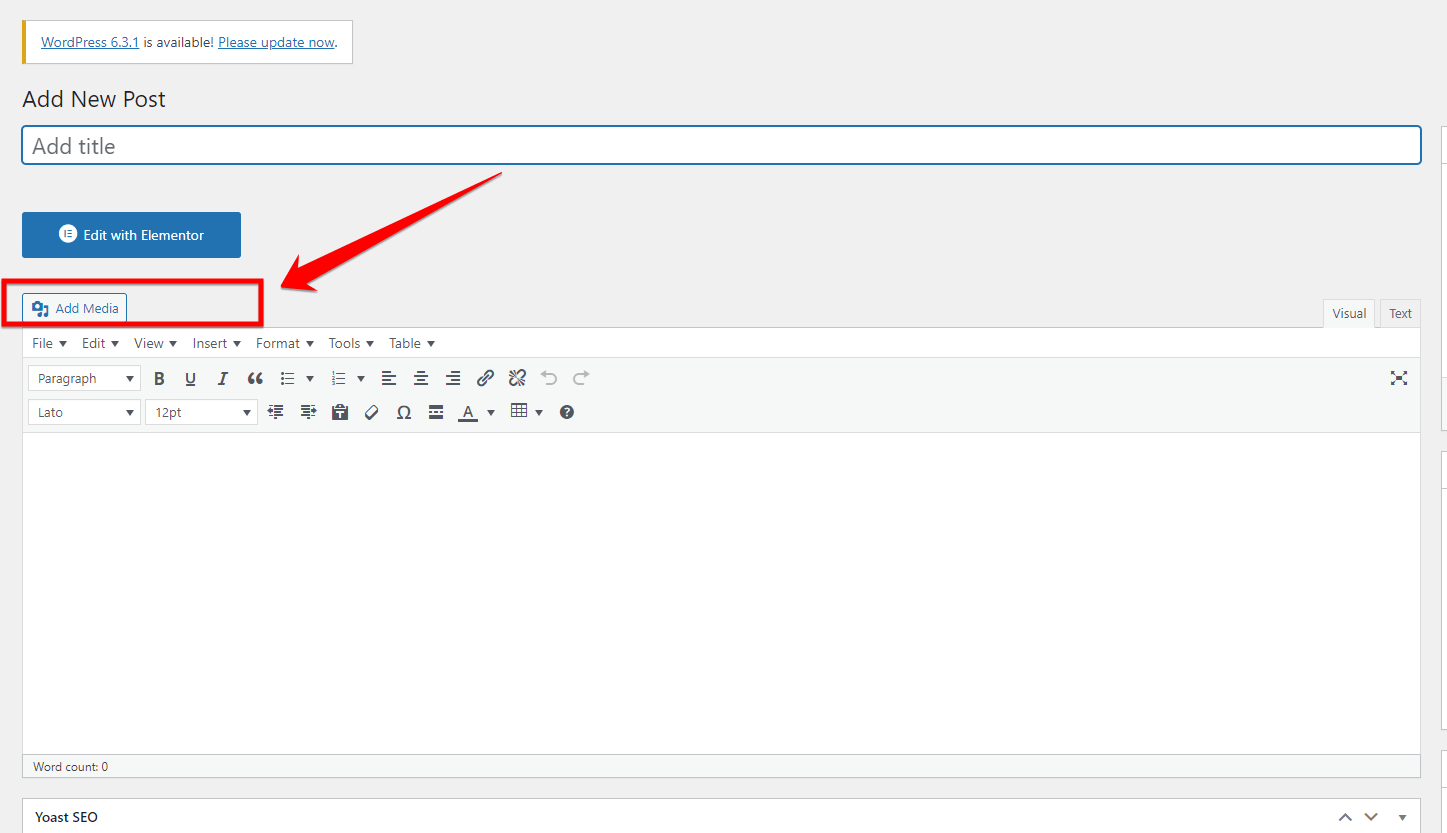
Step 12: Within the editing space, find and click on the “Add Media” button. This action permits you to upload your HTML file.
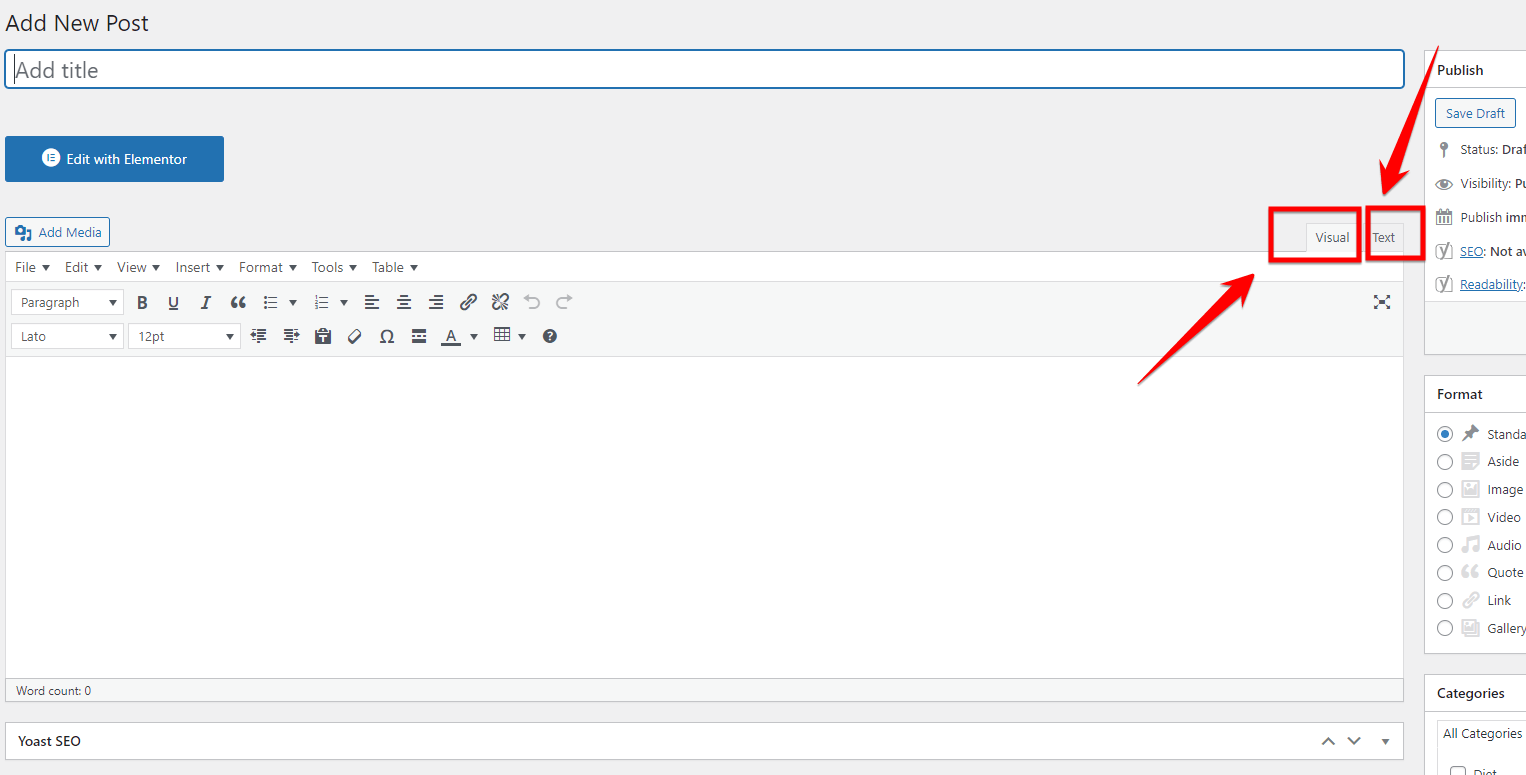
Step 13: The editor displays two views: “Visual” and “Text.” For direct HTML interaction, click on the “Text” mode. Should there have been any issues uploading your file earlier, this space allows you to paste your HTML code directly.
Pro Tip: When using the Classic Editor, having a good understanding of basic HTML can be a great asset. It gives you more control over the content’s appearance.
The WordPress dashboard provides a user-friendly method to upload HTML files. It’s ideal for those who want a simple solution without the need for additional tools. However, like all methods, it has its benefits and limitations.
Pros:
- Ease of Use: The process is intuitive, especially for those familiar with WordPress.
- No Additional Tools: Everything you need is available within the WordPress dashboard.
- Versatile: Supports both Gutenberg and Classic editors.
- Quick: Ideal for uploading individual or smaller-sized HTML files.
- Built-in WordPress Feature: No need for third-party tools or plugins.
Cons:
- File Type Restrictions: You might encounter errors, especially when using the Gutenberg editor.
- Not Ideal for Bulk Uploads: If you have multiple files, this method might become time-consuming.
Remember, always create a backup of your site before implementing any changes to ensure that you can quickly restore it in the case of unforeseen complications.
Method 2: Upload an HTML File via cPanel
Our second method on the HTML uploading journey takes us to the world of cPanel. If you’ve ever tinkered with the backend of hosting or dabbled in site management, you’ve probably crossed paths with this powerhouse. Don’t worry if it’s your first time – cPanel is designed with usability in mind.
Uploading an HTML file through cPanel might sound daunting, especially if you’re a die-hard WordPress dashboard fan. But trust me, once you get the hang of it, the process is smoother than you’d expect, especially for those who are looking to manage more extensive website components beyond mere posts and pages.
Here’s the lowdown on using cPanel:
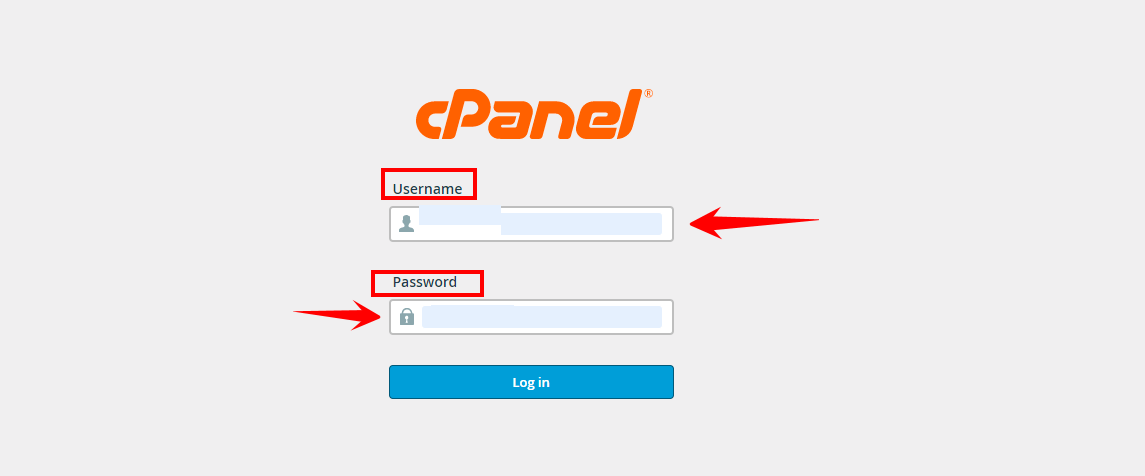
Step 1: Begin by accessing your hosting account. Once inside, find and enter the “cPanel” section.
Step 2: Once inside the “cPanel”, look for the “File Manager” section. It’s usually an icon or tab and is the gateway to your website’s files and folders.
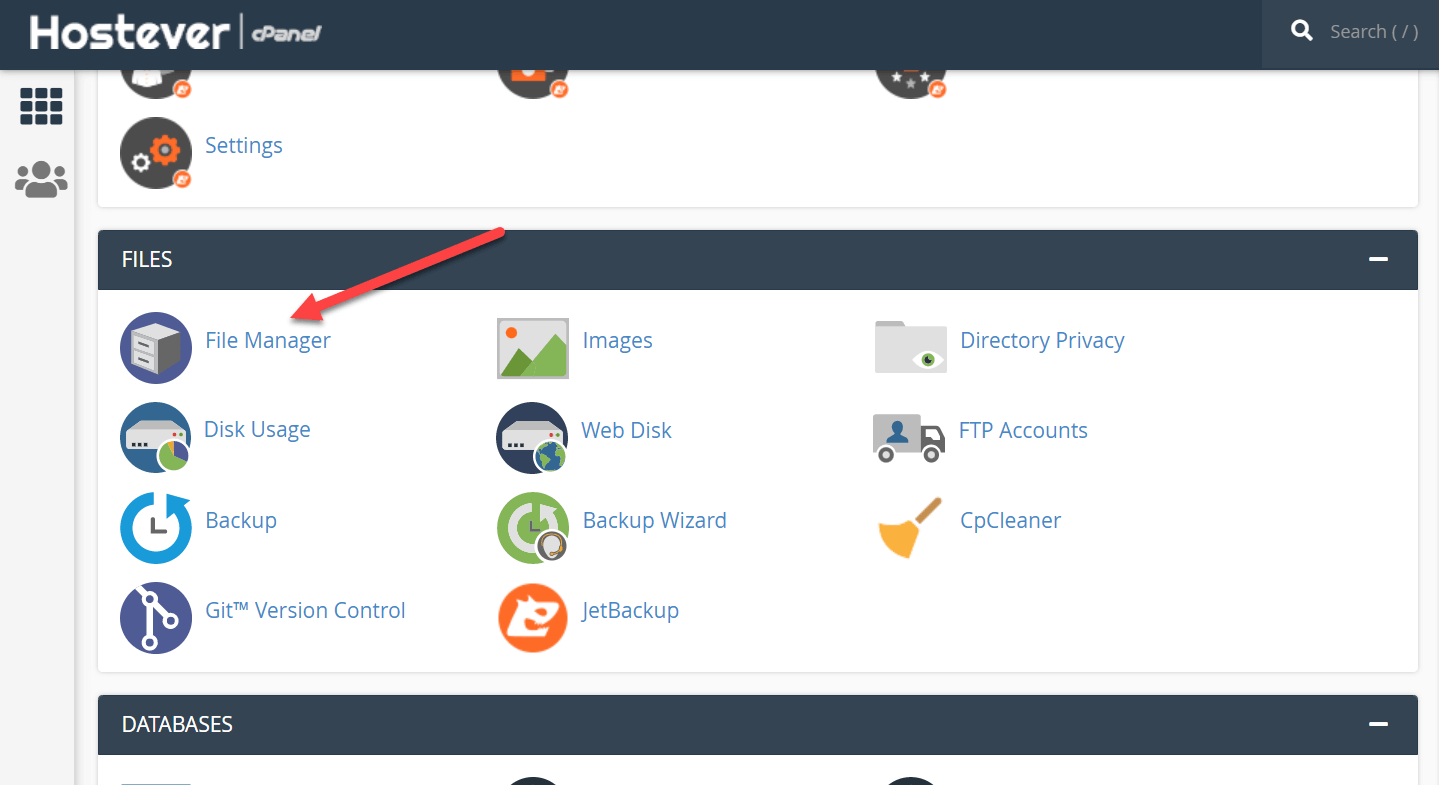
Note: In the “File Manager”, navigate to the root directory of your WordPress site. This directory often contains essential folders like “wp-content” and important files such as “wp-config.php.”
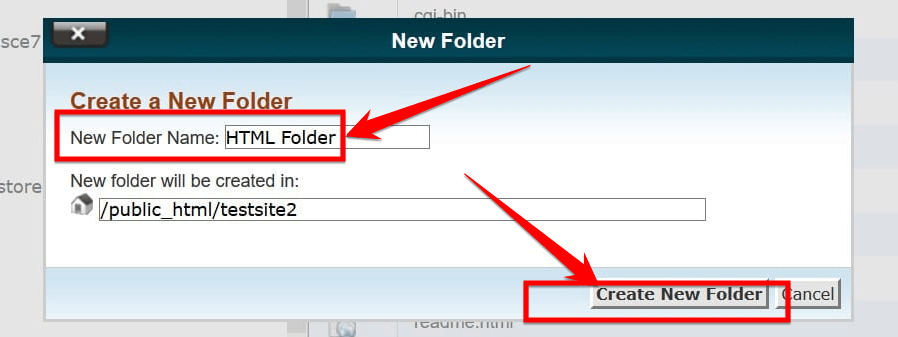
Step 3: Within the root directory, click on “New Folder” to create a new directory.
Step 4: You’ll be prompted to name this new folder. Give it a suitable name and click “Create New Folder.”
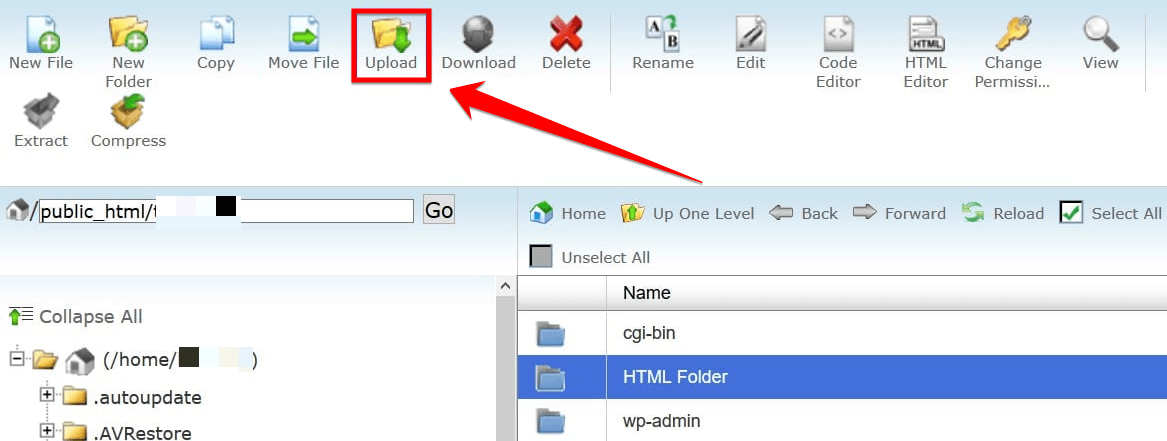
Step 5: Open the folder you’ve just created by double-clicking on it. Once inside, locate and click on the “Upload” button to add your HTML file.
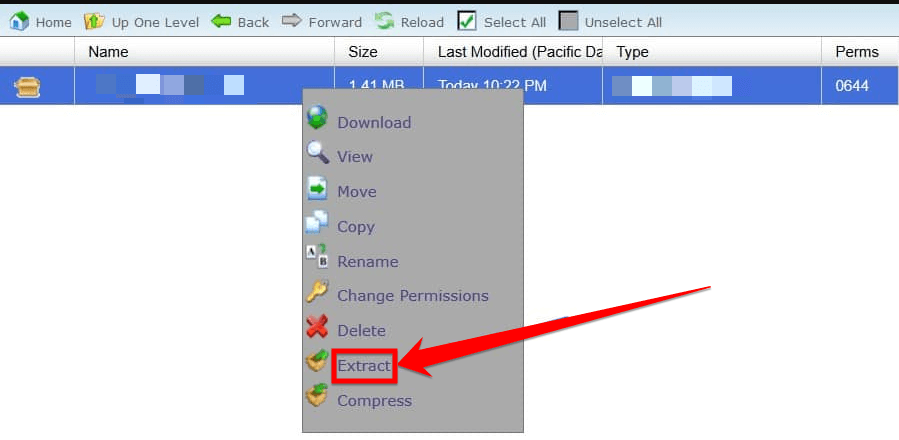
Step 6: After uploading, you’ll notice the HTML file appears in the folder, usually in a zipped format.

Step 7: Right-click on the zipped HTML file and choose “Extract” from the context menu that appears.
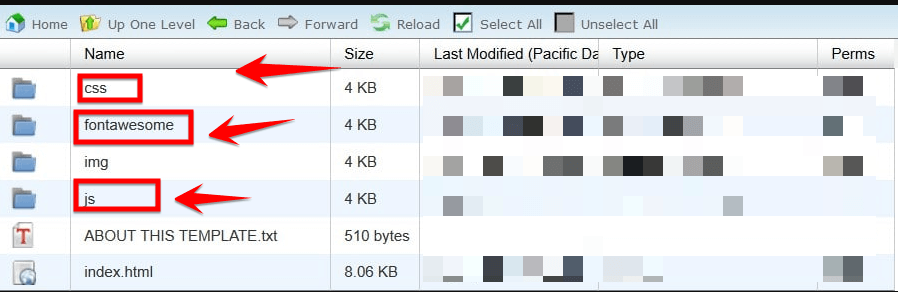
Step 8: Post extraction, you’ll see the HTML’s associated files sprawled out. These can range from design-centric CSS files to functional JavaScript files, and more.
A Pro Tip: To ascertain everything’s in order, pull up your browser, type in your domain, and append the folder’s name. This should display your uploaded HTML content.
Congratulations! Your HTML content is now successfully incorporated into your WordPress site. As a good practice, visit your site to check that everything displays as intended.
When the WordPress dashboard feels a tad restrictive or if you’re just in the mood for a more direct approach, cPanel stands out as an incredibly reliable ally. However, let’s weigh in on its strengths and possible limitations.
Pros:
- Simplicity: No need for additional software. Just log in and get started.
- Direct File Access: Allows you to handle and organize files right at the source.
- Widespread Availability: Most hosting providers incorporate cPanel, making it an easily accessible option.
- Multiple File Uploads: Can handle bulk uploads effortlessly, saving time.
Cons:
- Learning Curve: For beginners, the interface might appear overwhelming initially.
- Risk Factor: Accidental deletions or overwrites can happen if not careful.
- Limited Features: Lacks some advanced features present in specialized FTP clients.
Those who are familiar with the layout and functionality of cPanel can navigate it easily. However, if you’re new to the platform, it might be worth taking some time to familiarize yourself or follow a guide to avoid potential pitfalls.
Method 3: Upload an HTML File Using FTP
FTP, or File Transfer Protocol, is a tried-and-true method used by webmasters for decades to manage and transfer files between their computers and web servers. Unlike the WordPress dashboard, which offers a more integrated environment, FTP gives you direct access to the server’s filesystem. This allows for granular control, but it also means a higher degree of responsibility.
This method is particularly handy when you’re dealing with a large number of files or when you need to organize files in specific directories. It bypasses the restrictions and interfaces of web dashboards, giving you a straight path to your server’s file structure.
To get started with this method, you’ll require an FTP client, such as “FileZilla” or “Cyberduck,” and your FTP login details, typically provided by your web hosting provider.
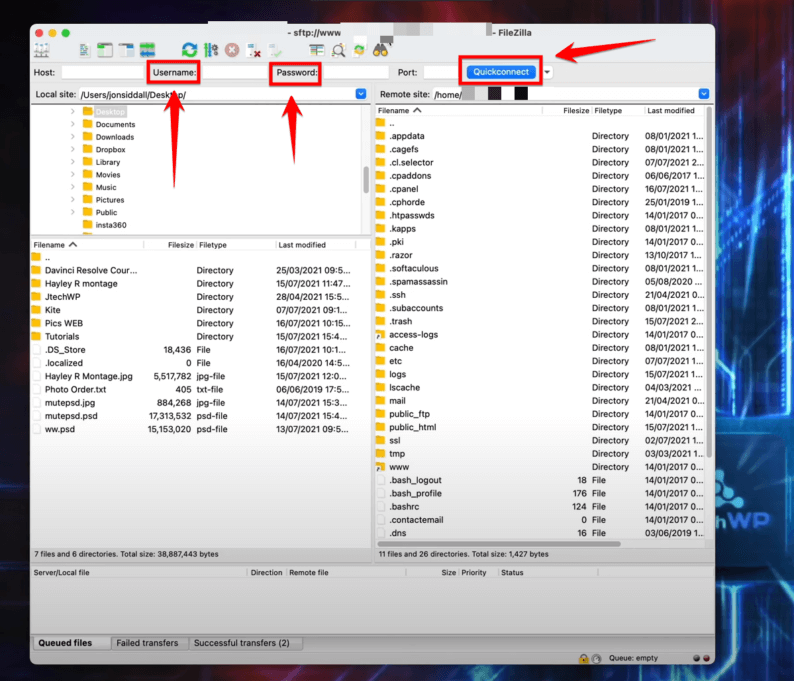
Step 1: Begin by downloading Filezilla, a well-regarded FTP client, and proceed with its installation on your computer.
Step 2: Once you’ve launched Filezilla, you’ll encounter fields asking for FTP details like the hostname, username, password, and port number. After filling them out, hit the “QuickConnect” button.
A Pro Tip: FTP credentials are the keys to the back door of your website. Always keep them confidential and never share them recklessly.
Note: Haven’t got your FTP details? No worries! Reach out to your hosting provider.
Step 3: Once connected, Filezilla will present a split view. On the left, named “Local site,” you’ll see files from your computer. On the right, under “Remote site,” are your website’s directories and files.

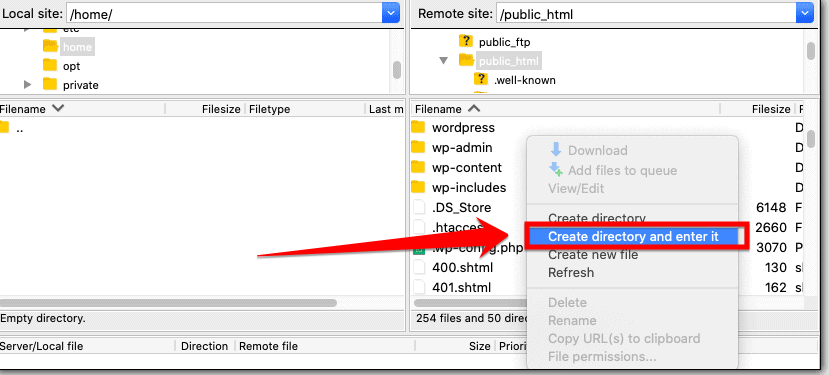
Step 4: Delve into the “public_html” directory on the right side. This is typically the heart of your site’s file system. If, by chance, you’ve customized your directory’s name, navigate there instead.

Step 5: Create a new nesting place for your HTML files. Right-click within the “Remote site” panel, select “Create directory,” and assign a meaningful name.
Step 6: It’s time to introduce your HTML files to your site. On the “Local site” side, navigate to where your HTML files are stored. Highlight the ones you’re looking to transfer, right-click, and hit “Upload.”
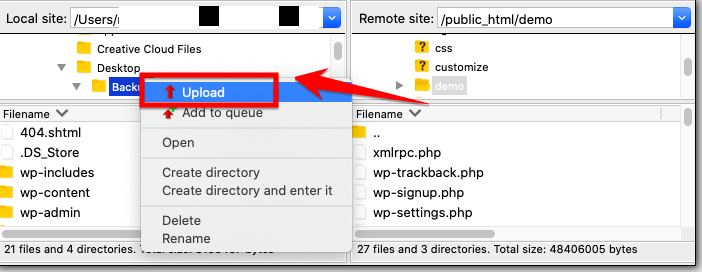
Note: Patience is crucial here. Depending on the size of the files and the speed of your connection, this can take a bit. You’ll know the upload has concluded when you spot your files on the “Remote site” panel.
Take a moment to revel in your achievement! Your HTML files are now a part of your website.
To witness your files in action, open a browser and head to your website, appending the file’s path. For example, navigating to https://example.com/newly-created-directory/html-file should unveil your recently uploaded page.
Note: While using FTP is generally straightforward, you might sometimes encounter issues like “Connection Timed Out” or “Failed to Retrieve Directory Listing.” Most of these can be fixed by double-checking your FTP credentials or consulting with your hosting provider for server-specific settings.
FTP is a powerful tool for uploading files, especially when dealing with multiple documents or larger files. While there’s a slight learning curve, the direct access and management capabilities it offers are unmatched. Ensure you always keep your FTP credentials safe and consider using SFTP (Secure File Transfer Protocol) for enhanced security.
Pros:
- Direct Server Access: FTP provides direct access to server files, offering more control than web interfaces.
- Bulk File Management: Effortlessly manage and upload multiple files and folders simultaneously.
- No Size Limitations: Unlike some web interfaces, FTP doesn’t restrict the size of files you can upload.
- Reliability: FTP connections are stable, and even if interrupted, most clients can resume transfers.
- Widely Supported: Almost all hosting providers support FTP connections, making it a universally applicable method.
Cons:
- Security Concerns: Plain FTP doesn’t encrypt data, potentially exposing information. It’s advisable to use SFTP (Secure FTP) where possible.
- Slightly Technical: FTP can be intimidating for beginners, and a small mistake can lead to website issues.
FTP has long been a favorite for developers and webmasters. It offers a blend of control and versatility. However, always ensure you’re taking the necessary precautions, especially regarding security. If ever in doubt, consult with your hosting provider or a trusted expert.
Top 3 Reasons to Upload HTML Files to WordPress
Understanding the intricacies of WordPress can sometimes feel like an uphill battle. However, one of the game-changers for many site owners is the ability to upload HTML files directly.
If you’ve ever wondered, “Why would I want to do that?”, I’m here to lay out the top three compelling reasons for you. Let’s dive right in!
Reason 1: To Create a Custom Page Layout
WordPress is remarkable for its user-friendly interfaces and diverse array of built-in page layouts. But sometimes, these predefined designs might not be the perfect fit for what you have in mind.
The built-in WordPress layouts, while versatile, come with certain limitations. They might not cater to specific branding requirements or unique design aspirations. This is where the power of HTML shines. By uploading your own HTML file, you can bypass these constraints and bring your personal or company vision to life.
HTML provides a canvas that’s only restricted by your own imagination and coding skills. Want a uniquely styled sidebar, a specially positioned image, or a distinct typography pattern? With an HTML file, you can craft these tailored designs to the T.
Reason 2: To Import Content From Another Website
It’s possible you’ve spent countless hours perfecting content on a standalone HTML page, but now you want to integrate it with your WordPress site. You might find it daunting to re-create every design element, format text, or reorganize the layout of the website.
By uploading the HTML file directly, you’re essentially integrating your pre-existing masterpiece into WordPress. It’s like moving a finished painting from one gallery to another without the need to repaint it.
This method can be a real timesaver, especially if the original content is complex or detailed. Instead of starting from scratch or risking missing crucial details, the upload ensures that every pixel of your original design finds its rightful place on your WordPress site.
Reason 3: To Verify Google Search Console Ownership
For those unfamiliar, Google Search Console is a free service offered by Google that helps you monitor, maintain, and troubleshoot your site’s presence in Google Search results. It provides insights into how Googlebot views your site and offers optimization recommendations.
One of the initial steps to use this service is to verify the ownership of your site. And guess what? One of the simplest ways to do this is by uploading an HTML file provided by Google to your WordPress site.
Upon registering with Google Search Console, Google provides an “HTML file” method as one of its verification options. They hand you a unique HTML file that you need to upload to your site.
Once uploaded, you signal to Google that you’re the rightful owner and operator of the site in question. This process is straightforward, especially when contrasted with other verification methods that involve tweaking DNS records or meta tags. And once done, you unlock a wealth of data and tools to optimize your site’s search performance.
With these three compelling reasons laid out, it’s evident that uploading HTML files to WordPress isn’t just a tech-savvy whim. It’s about maximizing flexibility, ensuring content integrity, and leveraging vital tools for your site’s success. So, the next time you come across an HTML file or think about creating one, remember the power it can bring to your WordPress journey.
How To Resolve Errors While Uploading HTML Files
Uploading an HTML file to WordPress can sometimes throw unexpected curveballs. You might be working diligently, using the backend of your website, and suddenly, you’re confronted with an error you didn’t anticipate. I’m here to guide you in navigating these challenges with ease.
If you’re utilizing the WordPress dashboard, it’s relatively simple to upload an HTML file. All you need is to access the backend of your site and have your HTML file ready. Navigate to the section where you upload a post or a media file, and there, you can start the process.
- Sorry, this file type is not permitted for security reasons.” Web servers often follow strict security guidelines. This might mean even harmless files, like HTML ones, get flagged. Solution? Rename your .html to .txt or chat with your web hosting provider for potential adjustments.
- “File could not be uploaded.” Servers can turn down uploads for myriad reasons—size restrictions, incorrect directory permissions, or minor glitches. What to do? Either compress or break up your file, verify directory permissions, or get in touch with your hosting service if the issue remains unsolved.
- “404 File not found.” This usually pops up post-upload when trying to access the file. It suggests the server can’t spot the file. The fix? Double-check the file’s URL. If everything seems on point, but the snag lingers, reach out to your hosting provider.
- “500 Internal Server Error.” This general-purpose alert indicates a server-side hiccup. The course of action? Dive into server logs for hints, give the upload another shot after a pause, or, if it keeps resurfacing, call in your hosting provider.
In spite of the fact that these roadblocks may seem daunting, if you take the right steps, you will have your HTML content up and running in no time!
Summary
Uploading an HTML file to WordPress can sometimes feel like a journey, but it’s a worthwhile one. While at first glance, it appears straightforward, as I’ve walked you through, there might be bumps along the way.
We’ve dived deep into the varied methods for this upload and addressed some pesky errors that might try to slow you down. But armed with this knowledge, I’m confident that you’re more than ready to tackle any obstacles that come your way.
I truly appreciate your dedication and the time you’ve invested here. Your tenacity and eagerness to learn shine brightly. From the bottom of my heart, thank you for joining me on this exploration. Continue pushing forward, and always remember that every challenge you face is simply an opportunity for growth.
FAQs
Can I upload my own HTML and CSS to WordPress?
Absolutely! WordPress, while primarily known for its dynamic content generated by PHP, allows you to integrate your own custom HTML and CSS. You can incorporate HTML directly into pages or posts using the WordPress editor. As for CSS, you can add custom styles through the “Additional CSS” section found in the WordPress Customizer or by creating a child theme. Remember, it’s always a good idea to backup your website before making any changes, just to be safe.
How do I upload a file to a website using HTML?
Uploading a file using HTML typically involves using a
tag combined with an element. This creates a file selection button, which lets users pick files from their devices. Once a file is selected, you can hit a submit button within that form to send the file to the server. However, just having the HTML in place isn’t enough. On the server side, you’ll also need a script (like PHP or JavaScript) to handle and process the uploaded file.
How do I upload files to WordPress?
Uploading files to WordPress is a breeze. When you’re in the post or page editor, there’s an “Add Media” button. Clicking this lets you select files to upload, whether they’re images, audio, video, or other types. After uploading, WordPress gives you the option to insert these files into your content or link to them. Apart from this, there’s the Media Library in the WordPress dashboard, where you can directly upload or manage existing files.
Where is the HTML file on the WordPress page?
A: WordPress doesn’t use static HTML files for each page or post like traditional websites. Instead, it uses PHP to generate dynamic content from a database. However, if you’re looking to view or edit the HTML structure of a specific page or post, you can do that within the WordPress editor. Once there, you can switch to the ‘Text’ view (or the ‘Code’ view in the Gutenberg editor) to see and modify the raw HTML. If you’re referring to theme files or templates, those can be found in the “Appearance” > “Theme Editor” section, but be cautious when editing there – always keep backups!