How to Fix “Sorry, You Are Not Allowed to Access This Page” Error in WordPress
Being blocked from your WordPress site with a message saying, “Sorry, you are not allowed to access this page” can be frustrating. It’s especially tough when you just want to update or manage your site.
But don’t worry! There are ways to solve this issue and get back to your site’s dashboard without needing expert help. You can troubleshoot and fix this problem on your own with a few simple steps.
In this article, you will explore various personally validated approaches for fixing this error. These methods are authenticated through personal testing and experience, including:
- Refresh your WordPress website
- Clear browser cache and test in different browsers
- Restore a previous backup of your site
- Temporarily disable all of your plugins
- Switch to a default WordPress theme
- Check your WordPress user permissions
- Check your WordPress error log for error
- Verify correct database prefix values
- Upgrade your outdated PHP version
- Check your file permissions
- Create a new .htaccess file
- Reset your entire WordPress website
🌟 Besides sharing the ways to fix this error, I will also explain what might be causing it and what it actually means further in this article. This will help you understand the issue better and deal with it so it doesn’t bother you again.
Now that you have a plan to fix this, let’s work together to get back into your WordPress site without any trouble. Let’s start fixing this problem step by step.
Table of Contents
- Getting Ready to Fix the “Sorry You Are Not Allowed to Access This Page” Error
- 12 Ways to Fix the “Sorry, You Are Not Allowed to Access This Page” Error in WordPress
- Way 1: Refresh Your WordPress Website
- Way 2: Clear Browser Cache and Test in Different Browsers
- Way 3: Restore a Previous Backup of Your Site
- Way 4: Temporarily Disable All of Your Plugins
- Way 5: Switch to a Default WordPress Theme
- Way 6: Check Your WordPress User Permissions
- Way 7: Upgrade Your Outdated PHP Version
- Way 8: Check Your File Permissions
- Way 9: Check Your WordPress Error Log for Error
- Way 10: Verify Correct Database Prefix Values
- Way 11: Create a New .htaccess File
- Way 12: Resetting Your WordPress Website
- Understanding the “Sorry, You Are Not Allowed to Access This Page” Error
- Summary
Getting Ready to Fix the “Sorry You Are Not Allowed to Access This Page” Error
Before we jump into solving the frustrating “Sorry, you are not allowed to access this page” error, make sure you have a few key tools prepared. You might not be able to find what you need through the WordPress dashboard, but here’s what you’ll need:
- Make sure you can access your server’s admin area, at least the main directory.
- Use a user-friendly Secure File Transfer Protocol (SFTP) tool like Cyberduck or FileZilla.
- It might be helpful to refresh your FTP skills before getting started.
- Have a handy text or code editor ready to make changes to your website’s files. While a simple text editor works, more advanced options like Atom or Notepad++ are recommended.
I’m assuming you have the necessary access to these tools lined up, so you’re all set to dive in and start working on fixing the issue!
12 Ways to Fix the “Sorry, You Are Not Allowed to Access This Page” Error in WordPress
Before you dive into these fixes, remember to back up your WordPress site first. This step is crucial as it lets you easily restore your site if anything goes wrong while troubleshooting. So, just keep that in mind as we get started!
Way 1: Refresh Your WordPress Website
Refreshing your website is one of the simplest fixes you can try when you encounter an error. What this means is to reload and force your WordPress site to fully refresh in the browser you are currently using.
Sometimes, the error you are seeing is just caused by a small temporary glitch or bug that gets fixed when the site reloads properly. It’s the web equivalent of “turning it off and back on again”!
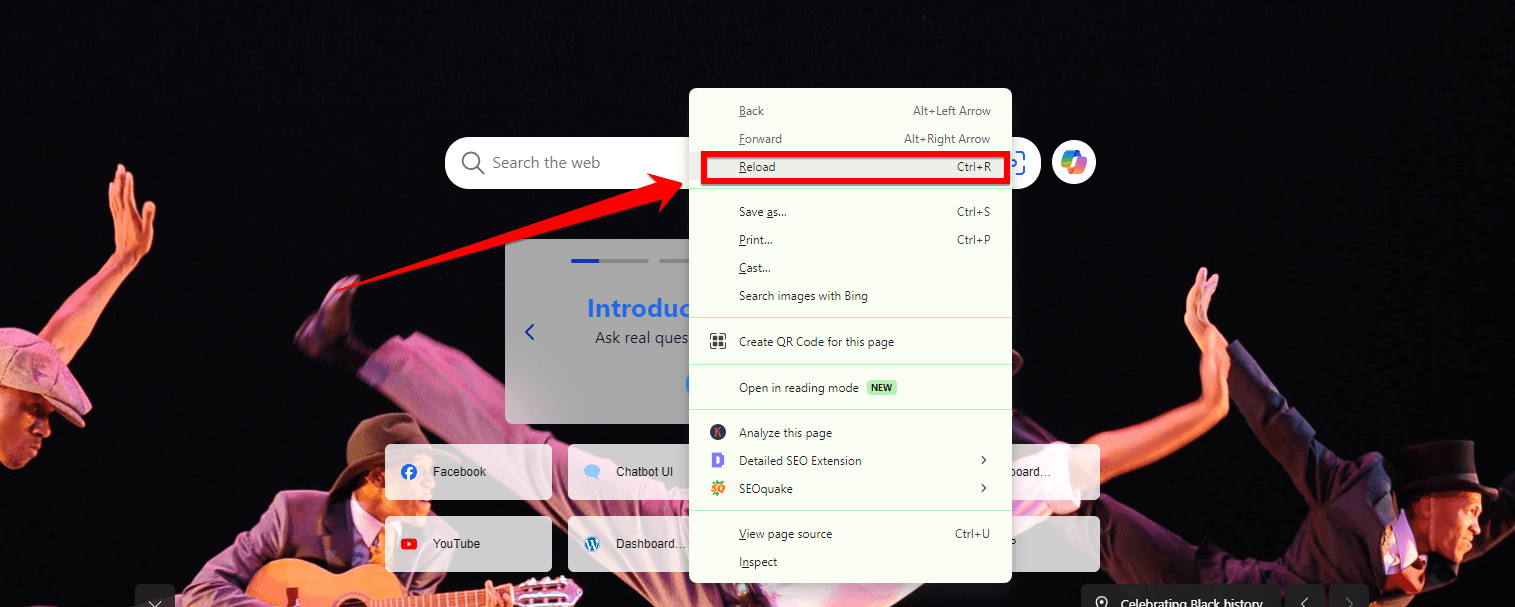
To force refresh and bypass any cached files in Chrome, press the Ctrl key and F5 key together. You can also right click on the reload icon in Chrome and choose the option that says “Empty Cache and Hard Reload”.
If using Firefox, press the Ctrl key and R key together instead to do a hard refresh. Or hold the Shift key and click the reload icon to reload the page, ignoring the cache.
After the forced refresh, check to see if you can now access the pages or content that were showing the “not allowed” error earlier. The simple refresh clears your browser cache and reloads everything cleanly from the source, fixing temporary bugs.
If that doesn’t work, you can move on to the next methods. But the refresh only takes a few seconds, so it’s worth trying first!
Way 2: Clear Browser Cache and Test in Different Browsers
Another common and easy fix to try is fully clearing your browser’s cache and testing your WordPress site in other browsers.
Browsers like Chrome store temporary copies of website files in something called the “cache”. Over time, these cached files can become outdated or corrupted and cause errors like “Sorry, You Are Not Allowed to Access This Page,” even when nothing is wrong with your actual site.
- To clear the browser cache fully in Chrome, Start by opening your preferred web browser on your computer or device.
- Within your browser, locate the settings menu. This is often represented by “three dots”, lines, or a gear icon, typically found in the upper right corner of the window.
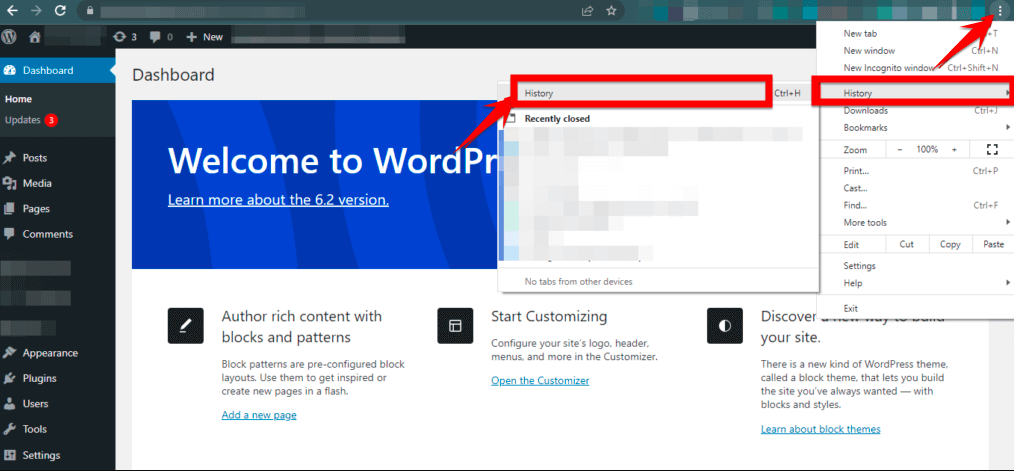
- Chrome users should specifically search for an option labeled “clear browsing data.” This is usually found within the privacy settings or directly within the browsing history section.
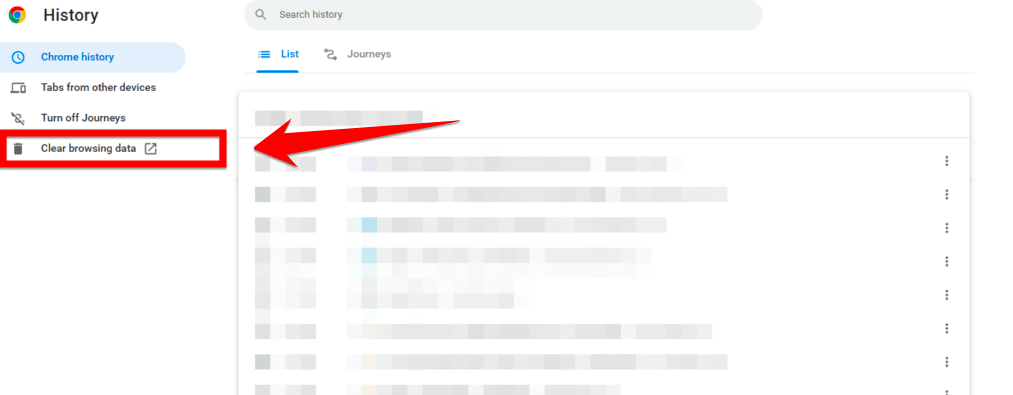
- Next, select the “Time Range” for which you want to clear the cache. Options typically range from the last hour to all time, allowing you to control the extent of the data clearing.

- Choose the cache type you want to clear, such as “cookies”, “browsing history”, or “cached images and files”. This step allows for more detailed management of what data gets removed.

- Finally, click the “Clear data” button to remove the selected data. Confirm your choice if prompted, to complete the process of clearing your browsing data.

Now visit your WordPress admin and any pages showing errors again in the same browser. Sometimes, outdated cached files were the culprit.
Additionally, after clearing the cache, try testing your WordPress site in other browsers as well, like Firefox, Safari, Microsoft Edge, etc. If the access errors only appear in one browser, it indicates a browser-specific bug that clearing the cache and testing in other browsers can fix quickly.
Way 3: Restore a Previous Backup of Your Site
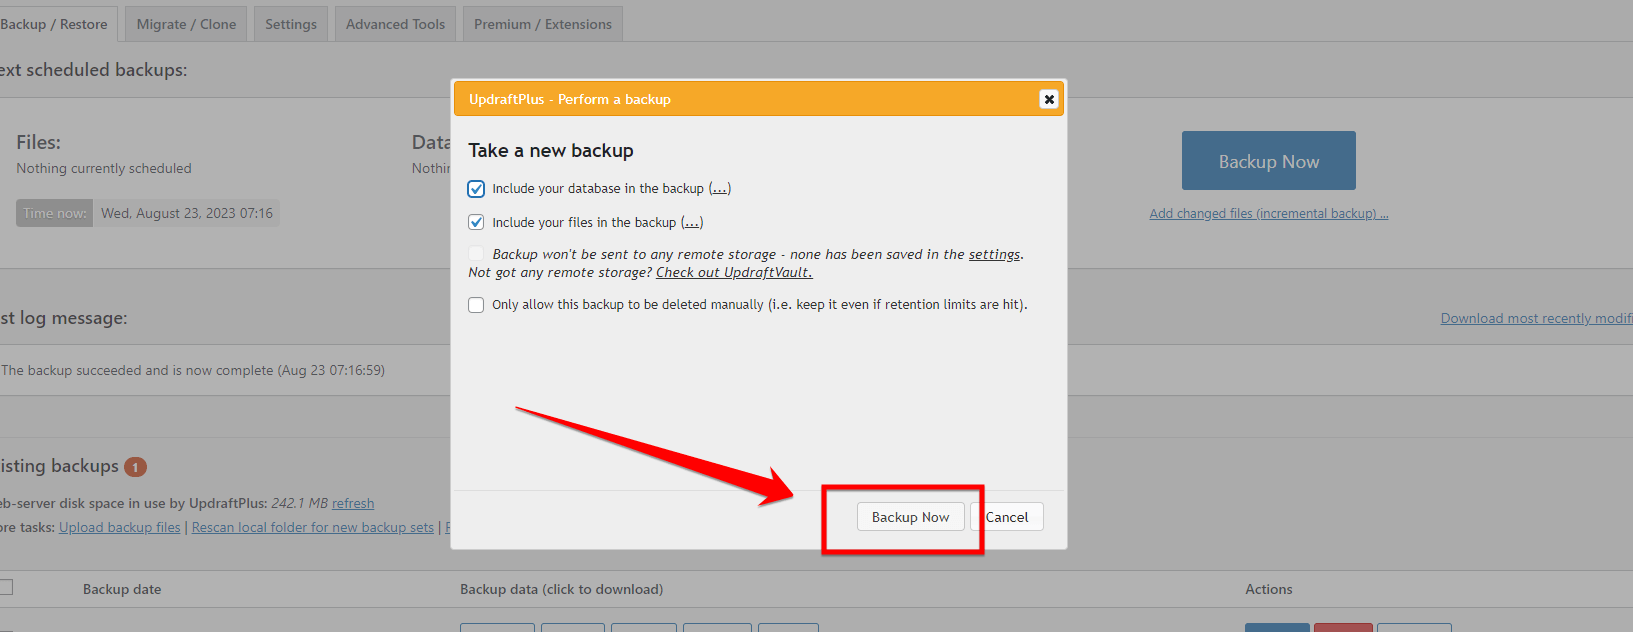
If you have a backup plugin on your WordPress site and you can still get into your WordPress dashboard, it’s easy to fix the error. A backup plugin is a tool that saves copies of your site. With it, you can go back to a version of your site from before the problem started.
Just find the backup plugin in your dashboard, choose a backup from before the error happened, and restore it. This can make the error go away because it brings back the site settings that worked well.
But in this situation, you might not be able to get into your dashboard, or maybe you didn’t set up a backup plugin. If that’s the case, you should talk to your hosting provider. A hosting provider is a company that keeps your website on the internet. They usually keep their own backups of your site.
You can ask them to put your site back to how it was at a time before the error showed up. They have the tools and access needed to do this, even when you can’t get into your dashboard.
Way 4: Temporarily Disable All of Your Plugins
If you see the error “Sorry, You Are Not Allowed to Access This Page” on your WordPress website, here’s how you can fix it by turning off and then turning back on your plugins through the cPanel’s file manager:
- First, log into your hosting account and go to cPanel. Find and click the “File Manager” icon to open it.
- Look for the “wp-content/plugins” folder in your WordPress site’s main folder. This is where all the plugins are kept.

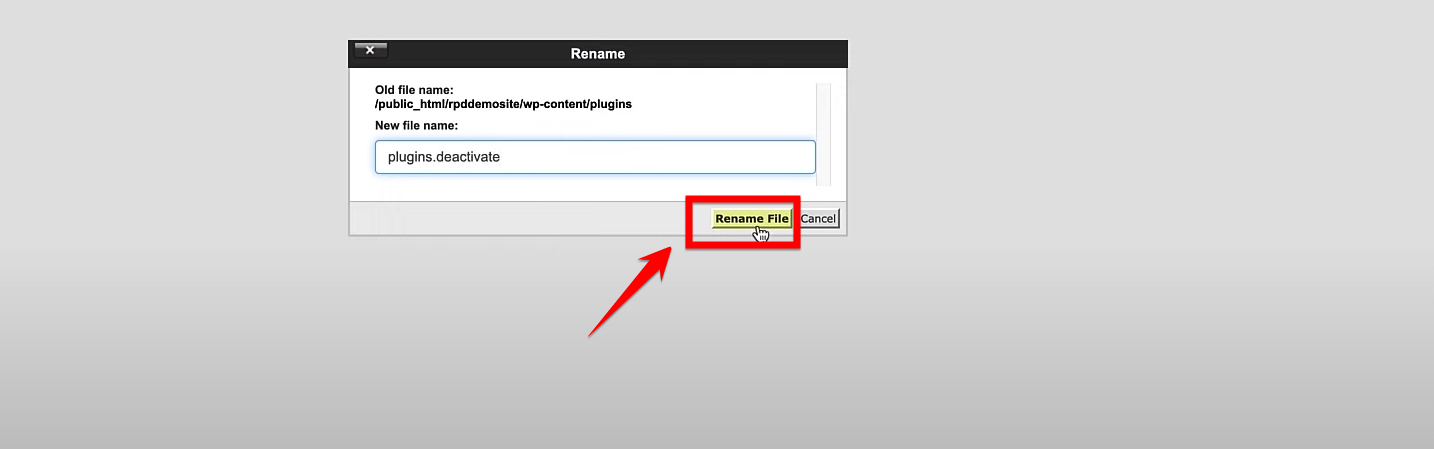
- To stop a plugin from working because it’s causing the error, right-click on its folder and change its name by adding “plugins-deactivate” at the end.
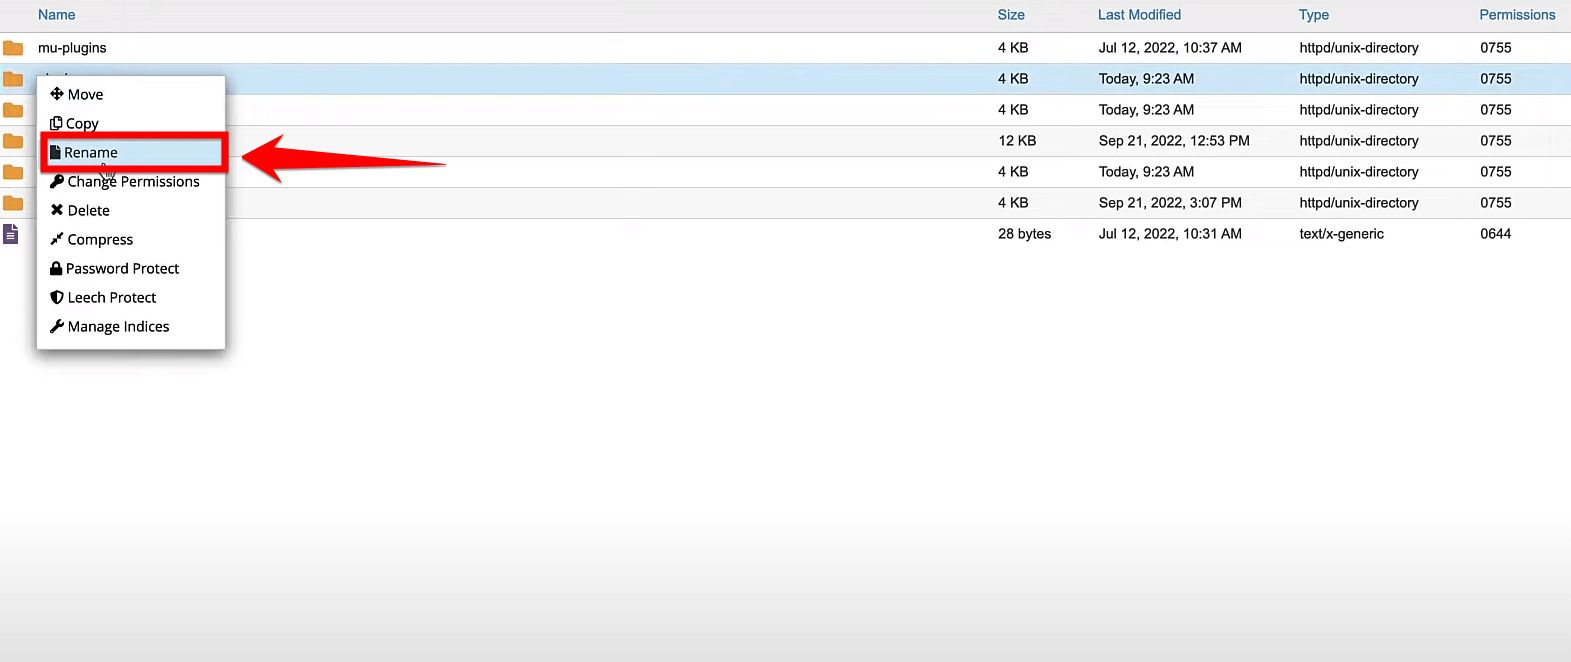
- After you have added “-deactivated” to the plugin folder name, click the “Rename File” button. This action will change the plugin’s status from active to deactivated in the WordPress system.
- Next, try to get into your “WordPress dashboard”. If you can get in, it means that one of the plugins was causing a problem.
- Verify in the plugin section that all of these plugins have indeed been successfully deactivated.

Now, we need to turn all the plugins back on. Usually, the error happens because of a plugin conflict, and turning them off and on like this often fixes it.
Assuming you’re now able to access your dashboard, but if you still can’t and you want to turn all the plugins back on, here’s what you do:
- Repeat the steps to open the File Manager in cPanel.
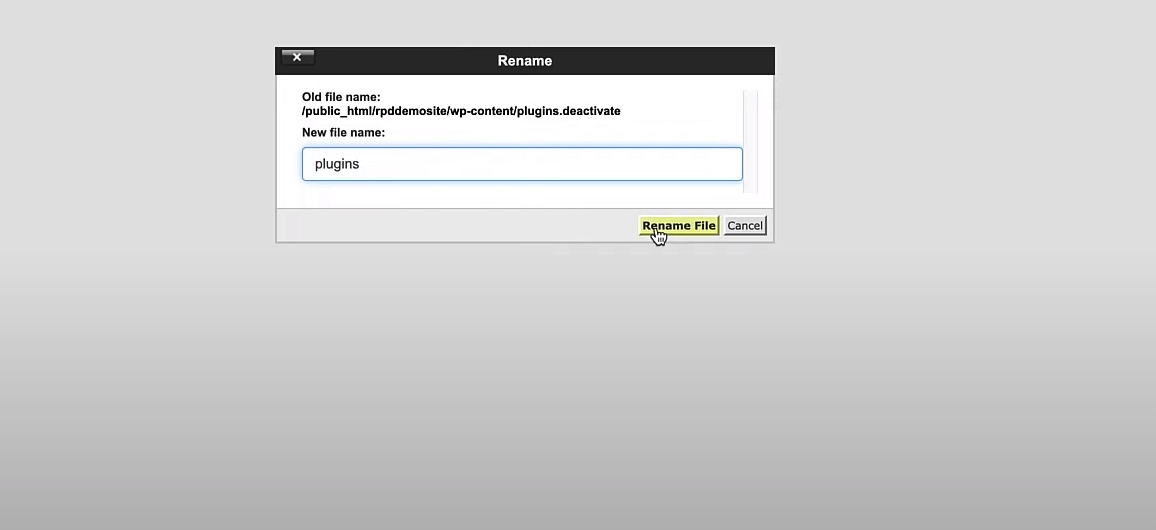
- Go back to the “wp-content/plugins” folder and find the folder of the plugin you turned off (it will have “-deactivate” at the end).

- Remove the “-deactivated” part from the folder’s name to turn the plugin back on, and click the “Rename File” button.
After these steps, clear your web browser’s cache and refresh your WordPress site to see if you can get into your dashboard.
If you can, then head over to the plugin section of your dashboard and refresh the plugin page.
By doing these things, you can solve the problem of not being able to access certain parts of your WordPress site by using the cPanel file manager to turn plugins off and on.
Way 5: Switch to a Default WordPress Theme
When your WordPress site says, “Sorry, you are not allowed to access this page,” it might be a theme issue. Here’s a simple way to fix it by returning to a basic.
- To start, sign in to your hosting account and navigate to the cPanel. Look for the “File Manager” icon and click on it to open.

- In your “File Manager”, look for a folder called “wp-content”, then click on themes. This is where all the different looks for your website are kept.

- Find the folder for the theme you were using and change its name. Just adding something like “_old” to the end will do. This makes WordPress stop using it because it can’t find it by its original name anymore.

Note: Once you’ve changed the name of your current theme folder, WordPress gets a bit confused and picks one of its own basic themes to use instead. This is good because it means you can get into your website again.
Try to go to your website now. WordPress should tell you it’s using a different theme because it couldn’t find your old one. Now you can get in and see what’s wrong.
A Pro Tip: While you’re fixing things, you might want to check if your old theme needs an update or if there’s something in its code that’s causing problems. Sometimes, just updating it or talking to the theme’s creator can sort things out.
Way 6: Check Your WordPress User Permissions
Sometimes, after making changes to your WordPress site, you might find yourself unable to access the admin area. This could be a sign that your admin privileges have been accidentally removed.
If you’re able to sign into the WordPress dashboard but can’t get into certain sections, it’s possible that your user role has been modified, and you no longer have admin rights.
To see your user role, here is what you need to do:
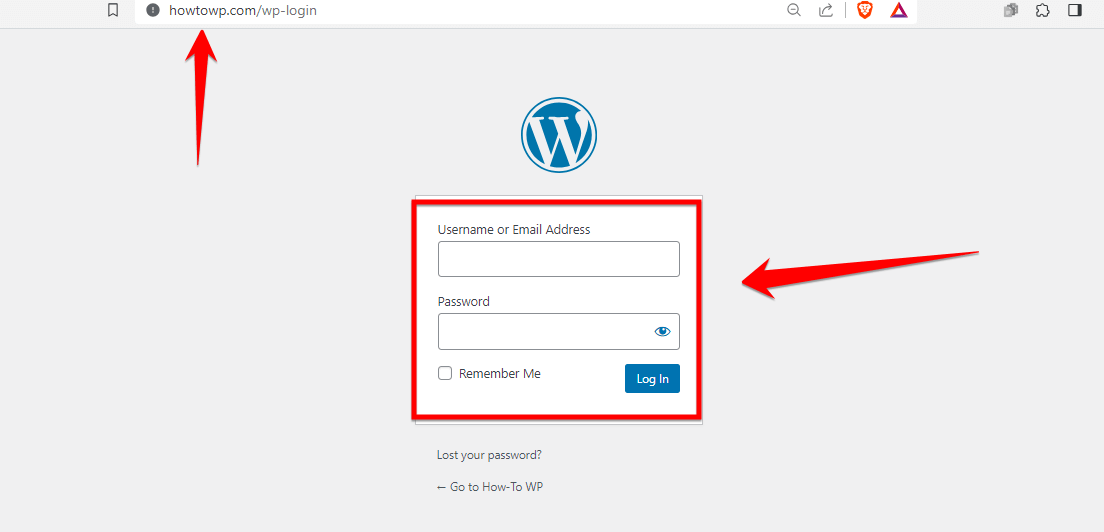
- Log into your “WordPress dashboard” by entering your username and password in the respective fields and clicking on the “Log In” button.
- Once you’re in, go to the left-hand menu and click on “Users” followed by “All Users”. This page lists all the users registered on your WordPress site.

- Look for your username in the list and check the “Role” column next to it to see your current user role.

If you’re unable to view the Users section within your WordPress dashboard, it’s a strong indication that your account does not have administrative privileges.
How might you address the problem? Here’s what you require to resolve it.
- First, go to your web host’s control panel and “log in” using your credentials.
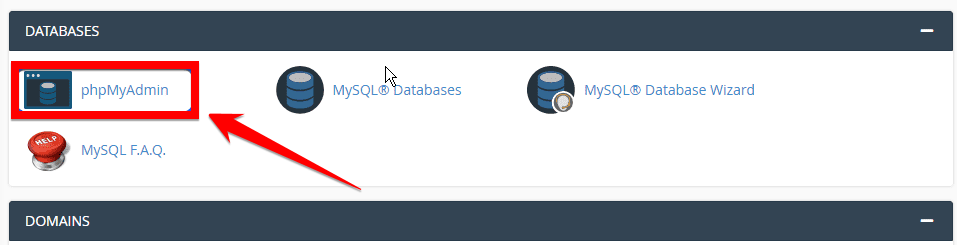
- Find the “phpMyAdmin” icon, usually under “Databases” or “Software,” and click it to launch the database management tool.
Note: In PHPMyAdmin, a list of databases will be visible on the left side of the interface. Find and choose the database associated with the website you are diagnosing. If unsure, consult your web host for guidance.
- Click on the “wp_users” to view all user accounts within your WordPress installation.

- Find the row corresponding to your admin user account. The username will typically be easily identifiable (e.g., admin or user ID). Take note of the user ID for later.

- Next, navigate to the “wp_usermeta”. Here, search for the “wp_capabilities” row associated with the admin user ID you noted earlier.
- Search for the row where meta_key equals wp_capabilities and the user_id matches the admin user ID you noted earlier.
- In the “wp_capabilities” row, look for the meta_value column to verify it contains the following code snippet: a:1:{s:13:”administrator”;b:1;}. If this specific value is missing, it indicates that your admin access has been removed.
- If the administrator code is absent, click on the “edit” option under the “wp_capabilities” row.

- Insert the aforementioned code snippet into the meta_value column. Confirm the update by clicking on “Go”.
After you do these steps, you should be able to get back into your site if you lost access because someone took away your admin rights. Make sure to use quotation marks correctly when you are typing or changing code.
Way 7: Upgrade Your Outdated PHP Version
An outdated PHP version can cause compatibility issues with WordPress and its plugins/themes. Upgrading your PHP version can be a crucial step in resolving the “Sorry, You Are Not Allowed to Access This Page” error in WordPress, especially if you’re hosted on Namecheap.
Here’s how to do it, simplified:
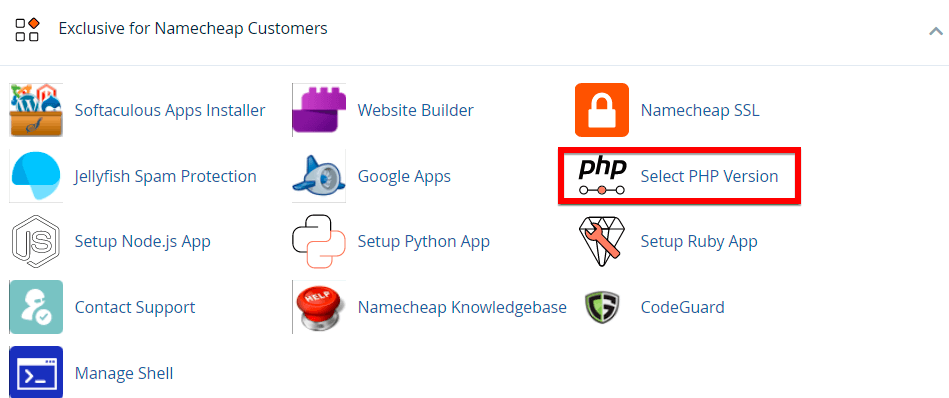
- First off, log into the cPanel provided by Namecheap. This is your control hub for managing your website’s backend settings.
- Once logged in, find the section dedicated to managing PHP. It might be labeled “Select PHP Version” and can often be found under the Software section of your cPanel.
- Within the PHP settings area, you’ll see a list of available PHP extensions. You can turn these on or off based on your needs by checking or unchecking the boxes next to each extension.
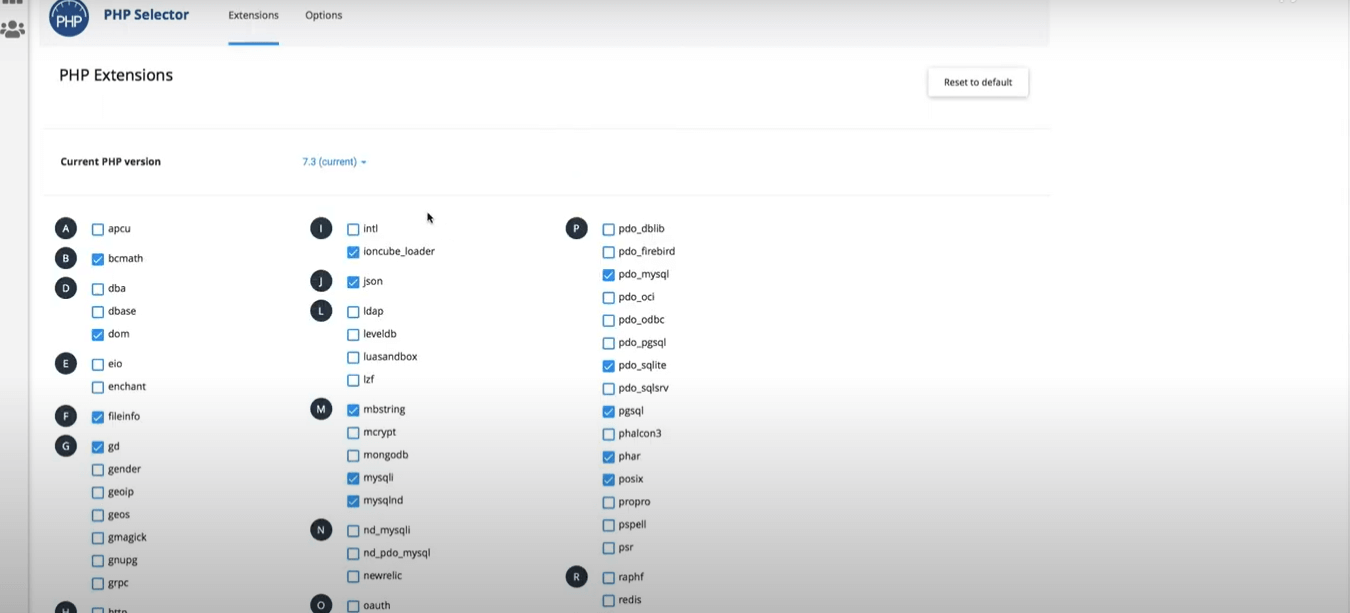
- Look for an option or dropdown menu labeled “Current PHP version.” Click on it, select the PHP version you wish to upgrade to, and then apply your changes. This step is crucial for ensuring your WordPress site is running on a supported and secure version of PHP.
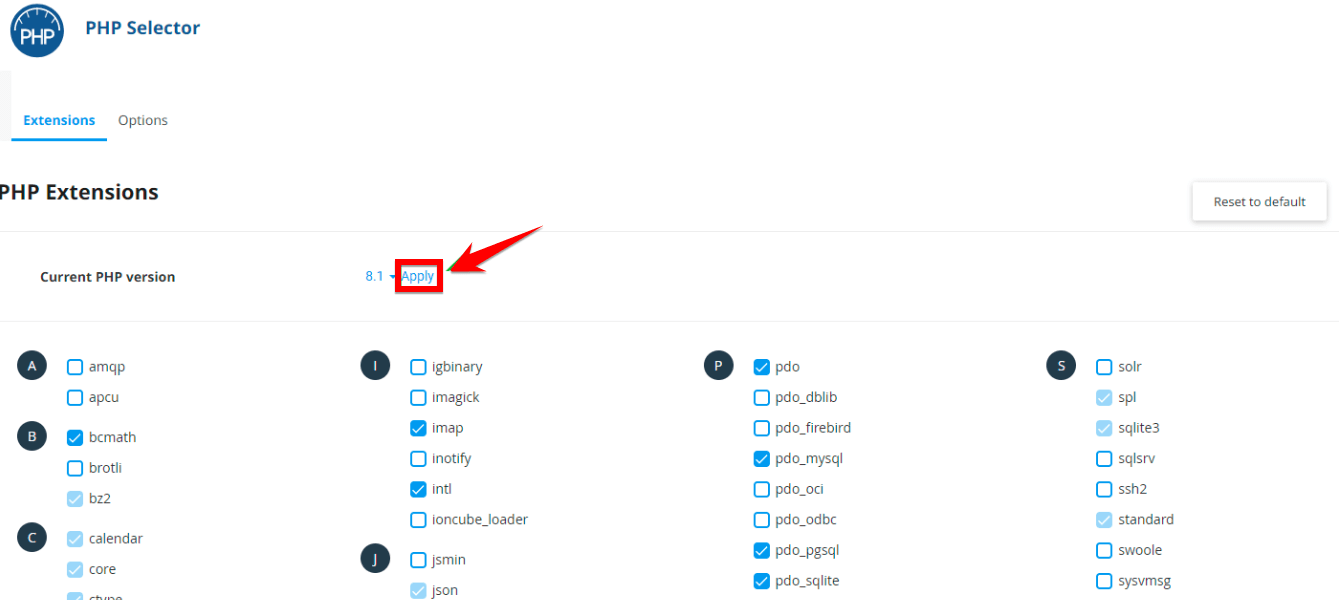
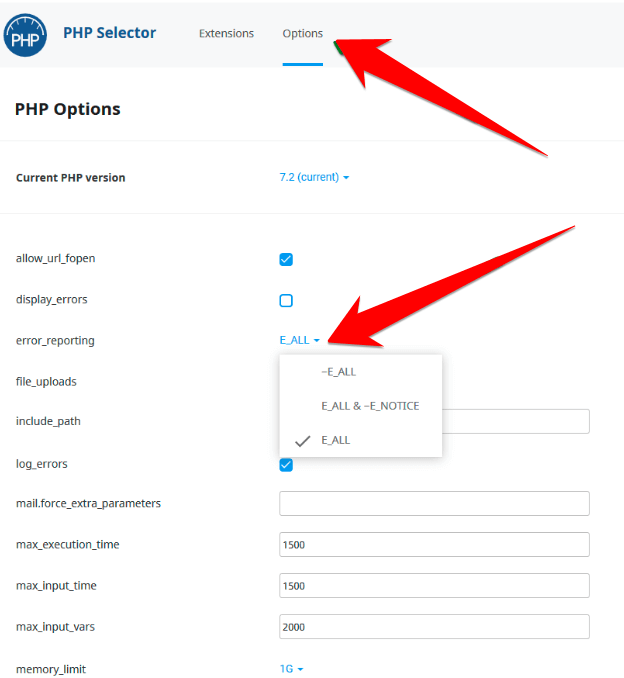
- If there are specific PHP settings you need to adjust, like increasing your max upload size, you can do so under the “Options” tab. Here, you can tweak settings such as “post_max_size” and “upload_max_filesize” to suit your requirements.
Note: If you find yourself needing a PHP version earlier than 5.6, it’s best to get in touch with Namecheap’s support team. However, be aware that older PHP versions may pose security risks to your site.
By following these steps, you can upgrade your PHP version through Namecheap’s cPanel, potentially resolving the error by ensuring your WordPress site runs on a more current and secure PHP version.
Way 8: Check Your File Permissions
Ensuring your files and directories have the correct permissions is crucial for the security and functionality of your WordPress website. Incorrect permissions can lead to errors, including the dreaded “Sorry, You Are Not Allowed to Access This Page.” Here’s how you can check and correct file permissions through your hosting control panel:
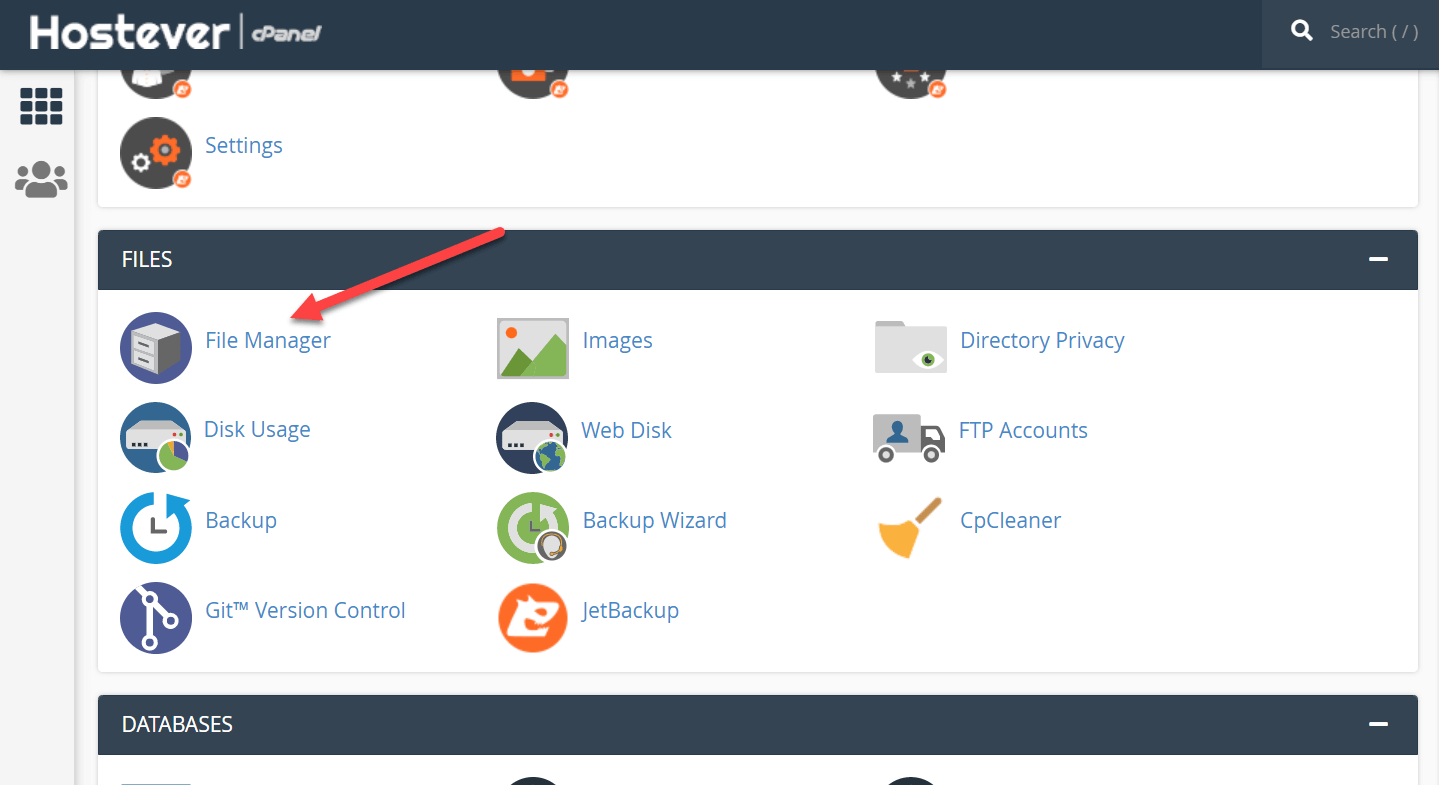
- Start by logging into your hosting account’s control panel. This is often referred to as cPanel, a widely used web hosting control panel.
- Once logged in, look for the “File Manager” icon or a similarly named tool on your cPanel dashboard. This tool allows you to manage all files associated with your websites.
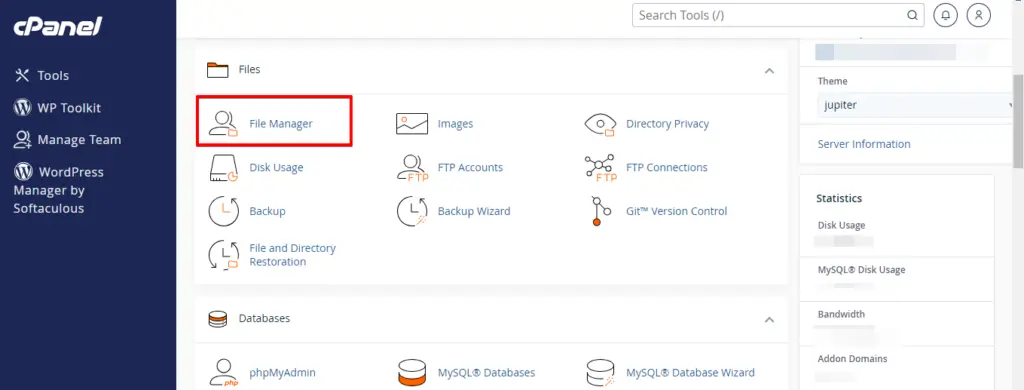
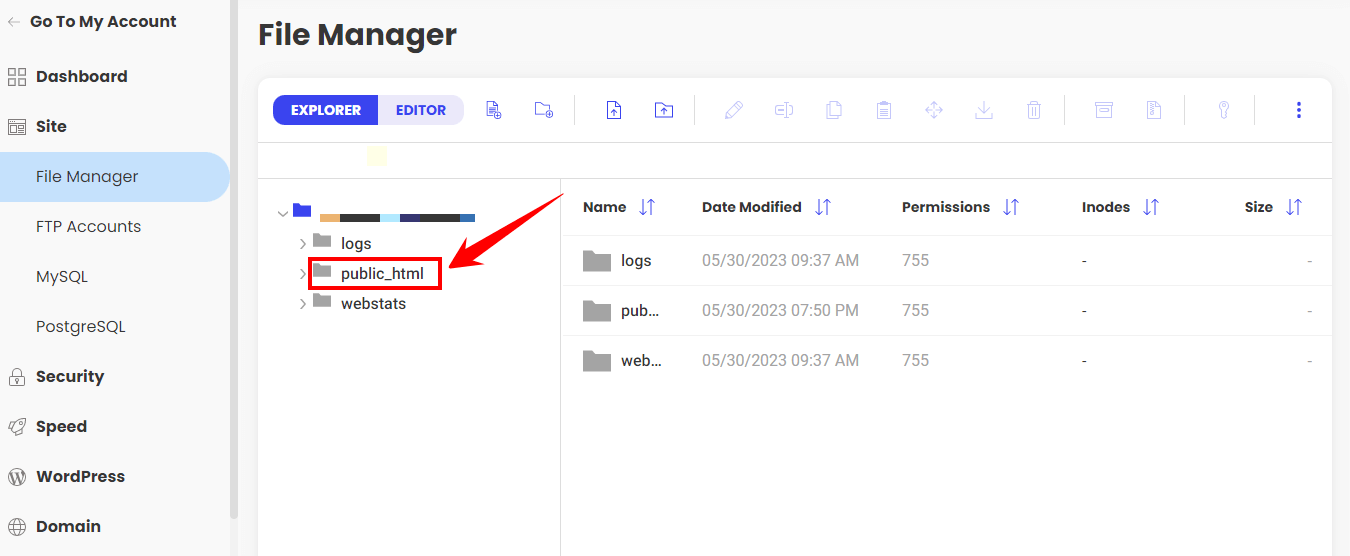
- In the File Manager, proceed to the folder containing your website’s files. This is typically called “public_html” or “www”. It’s the main folder where your WordPress files are stored.

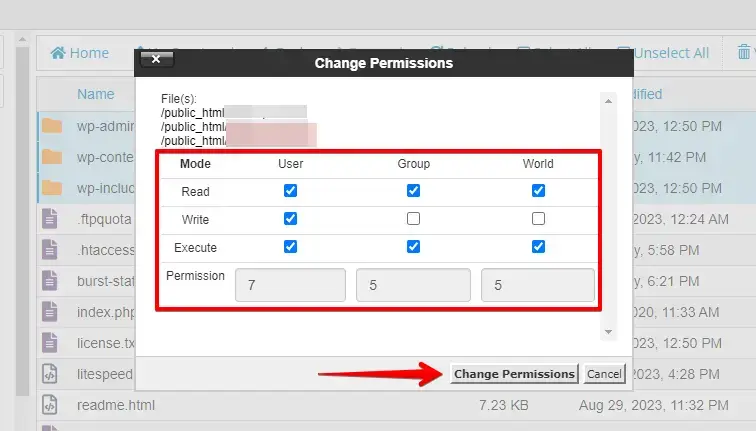
- Explore the list of files and folders within your site’s directory. To check or modify the permissions of any item, right-click on it and select the option for changing permissions, often labeled as “Change Permissions”.
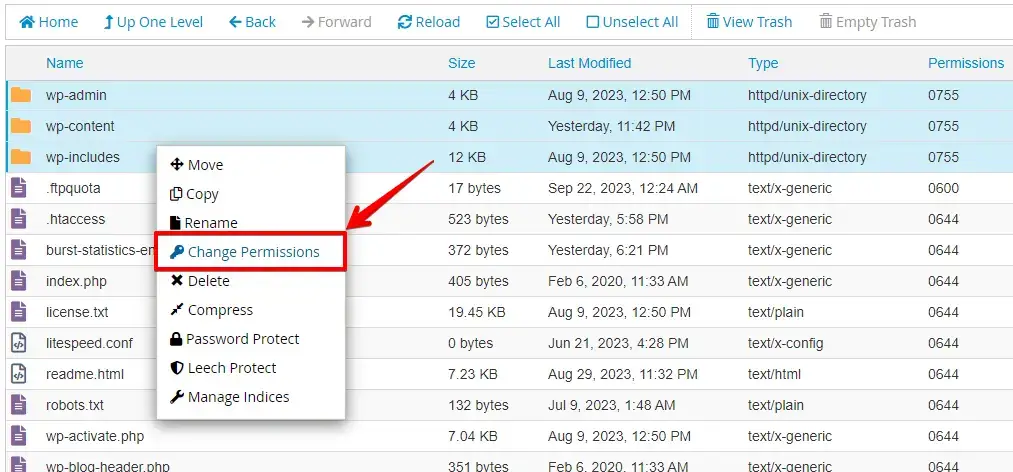
Note: Within the permission editing window, you’ll encounter either checkboxes or fields to adjust the permissions. It’s standard practice to set directory permissions to 755 (or 750) and file permissions to 644 (or 640). These settings ensure security and functionality.
- After setting the correct permissions, confirm your changes by clicking on the button to save or update permissions, which could be labeled “Change Permissions”.
Note: It’s important to go through all the items in your website’s folder to ensure every file and directory has the appropriate permissions set. Consistency is key to avoiding access issues and maintaining site security.
Remember, handling file permissions is a sensitive task, so proceed with caution to avoid inadvertently restricting access to essential files.
Way 9: Check Your WordPress Error Log for Error
The WordPress error log is a crucial tool for diagnosing and resolving issues, including the “wp-admin sorry you are not allowed to access this page” error. It records all errors that occur on your site, providing insights into what might be going wrong.
Here’s how to access and use your WordPress error log to troubleshoot issues:
- Start by logging into the control panel provided by your hosting service.
- Look for the “File Manager” or similar tool within your control panel. This is where all your website files are managed.
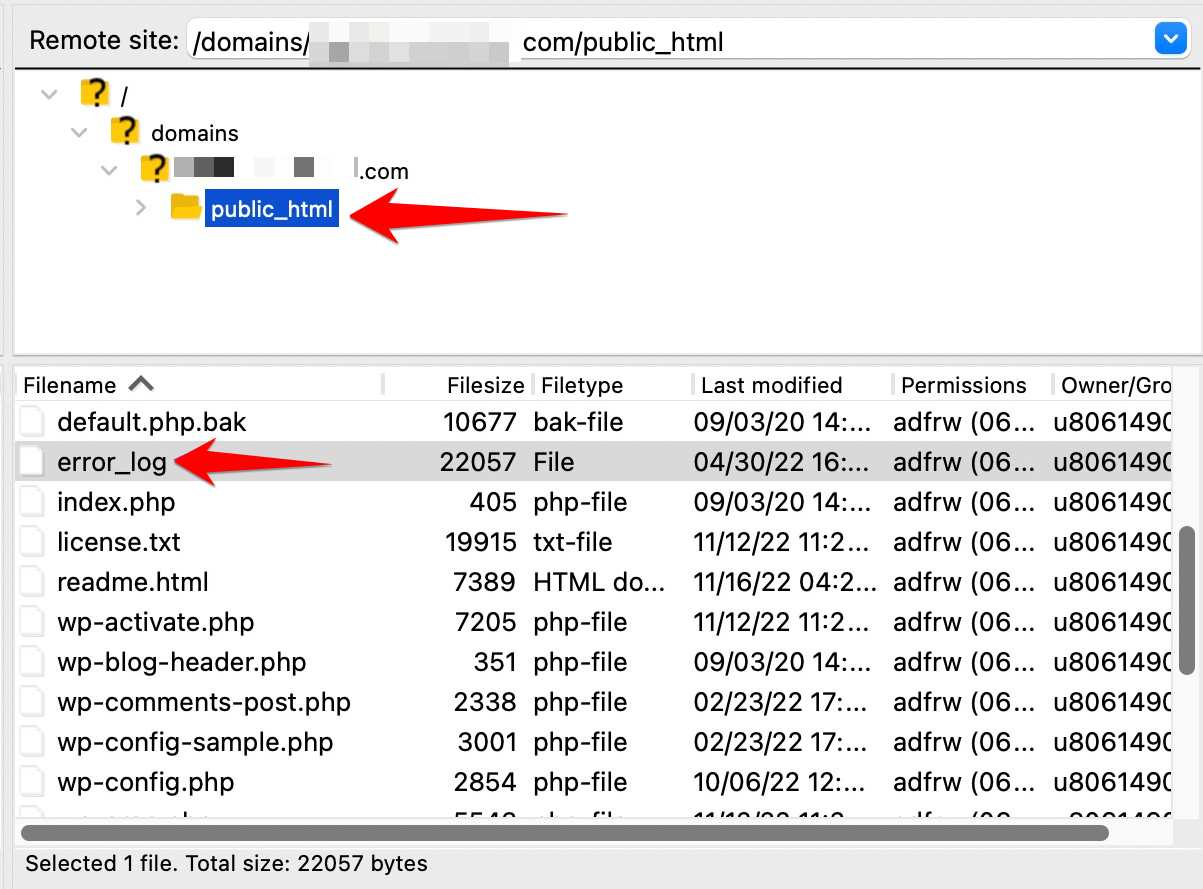
- Your error log file could be named “error_log” and located in the root directory of your WordPress site, often within the “public_html” folder. Some hosts might place the error log in a specific folder or have a tool in the control panel to view error logs directly.
Note: If you can’t find an error log file or want more detailed error messages directly from WordPress, you can enable “WP_DEBUG”. This is done by editing the wp-config.php file, which is a crucial WordPress configuration file. Follow these steps:
- Use the “File Manager” in your hosting control panel or an FTP client to access your WordPress files. Find the “wp-config.php” file in the root directory.
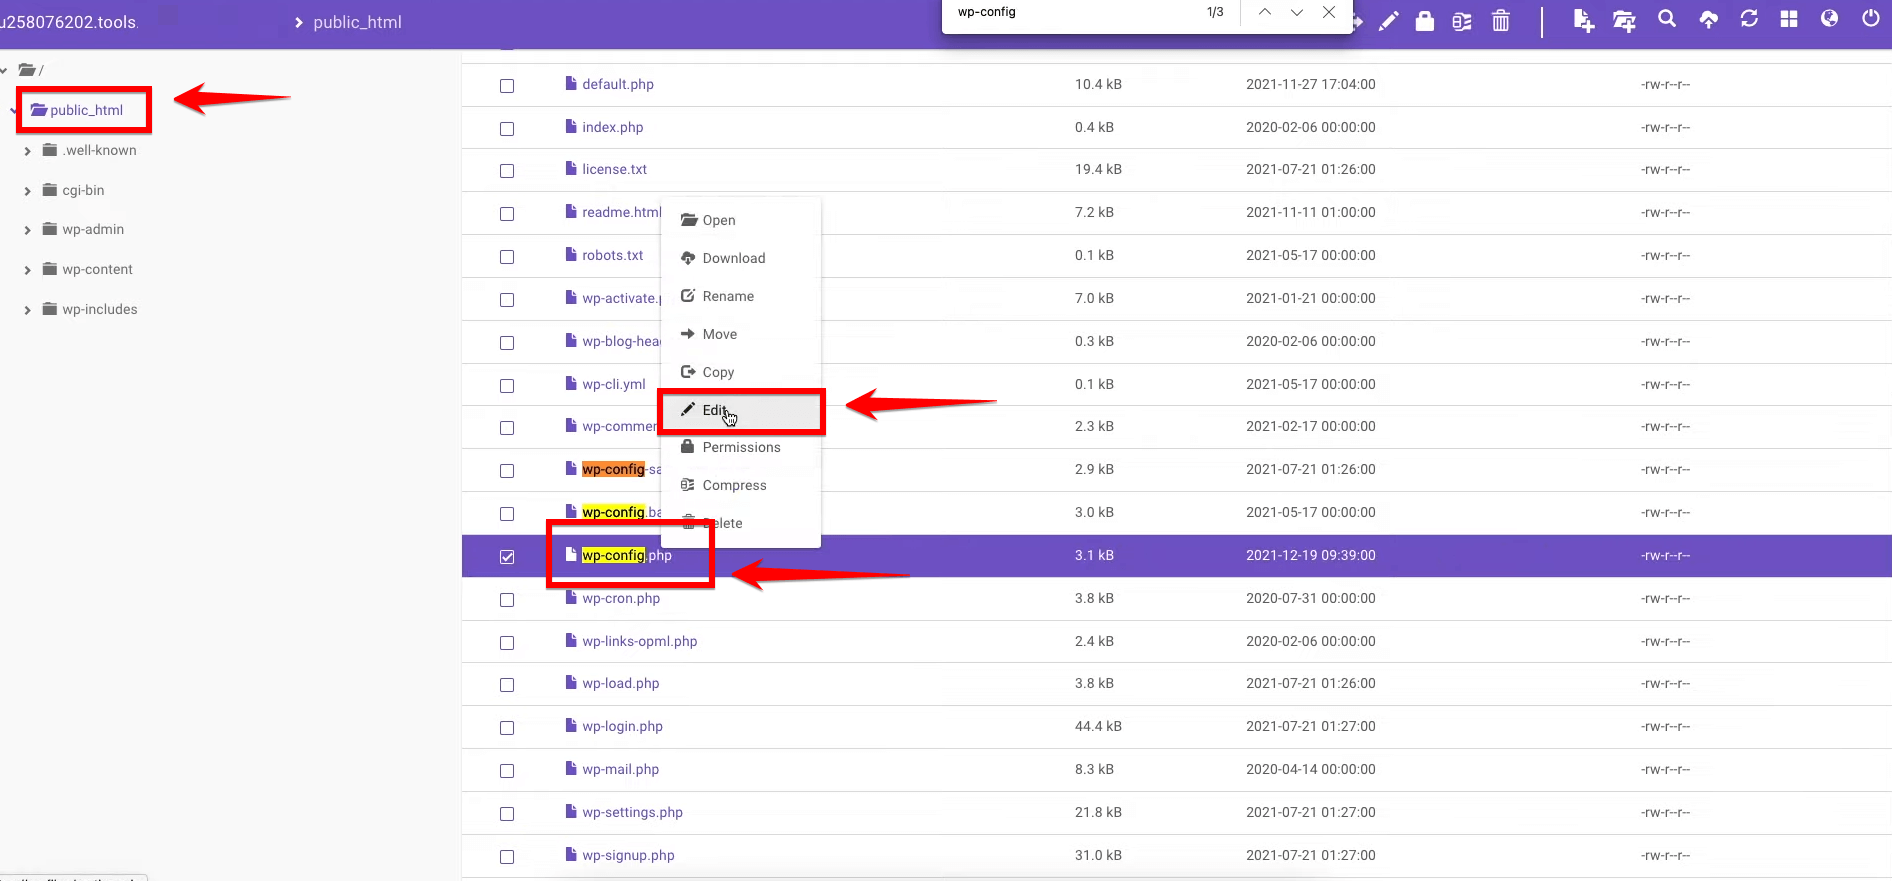
- Edit the “wp-config.php” file and navigate to the bottom of the file. Just before the closing line, input the following code by adding the specified lines of code.
define( 'WP_DEBUG', true );
define( 'WP_DEBUG_LOG', true );
define( 'WP_DEBUG_DISPLAY', false );
@ini_set( 'display_errors', 0 );

Note: This code enables WordPress debugging, logs errors to a file named debug.log within the wp-content directory, and prevents errors from being displayed to site visitors.
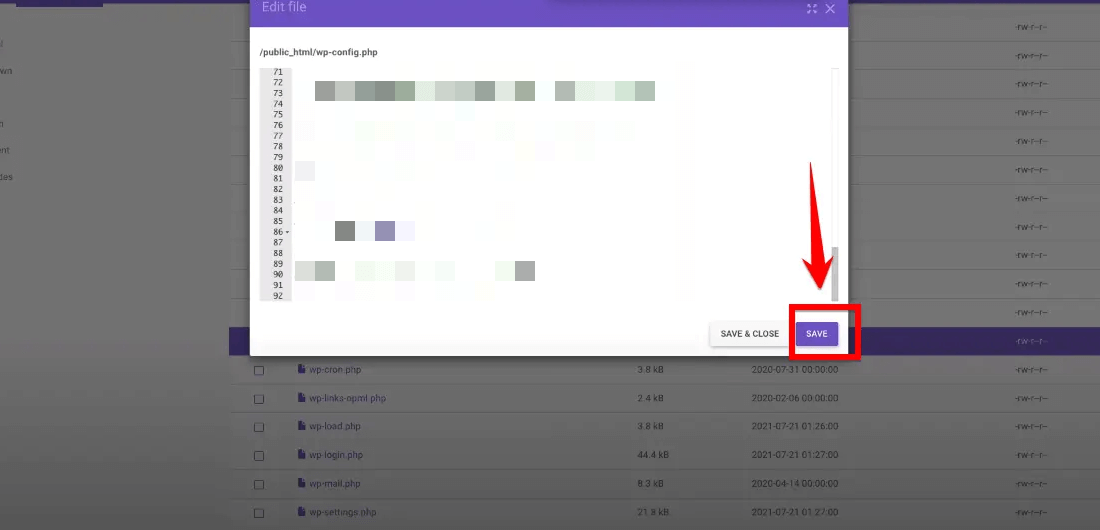
- After adding the code, save your changes and re-upload the file to your server if you’re using FTP.
Visit your site to trigger the error again. Then, go to the wp-content folder and look for the debug.log file. This file will contain recent error messages that can help diagnose the issue.
Open the debug.log file to review any recorded errors. These messages can provide insight into what’s causing the “Sorry, You Are Not Allowed to Access This Page” error, such as a plugin conflict or a theme issue.
Based on the errors you find, you might need to deactivate a problematic plugin, switch themes, or apply other fixes as indicated by the error messages.
Once you’ve resolved the issue, consider turning off “WP_DEBUG” by changing true to false in the wp-config.php file to prevent the log from recording further errors and potentially exposing sensitive information.
By following these steps, you can effectively use the WordPress error log to identify and resolve issues causing the error, enhancing your site’s stability and security.
Way 10: Verify Correct Database Prefix Values
A common yet often overlooked cause of the being blocked from specific pages error in WordPress is a mismatch between the database prefix defined in your “wp-config.php” file and the one actually used in your WordPress database.
This discrepancy can arise during various scenarios, such as site migration or the transition from a local staging environment to a live server. Understanding and resolving this mismatch is crucial for the smooth functioning of your WordPress site.
The database prefix is a small string of characters that WordPress uses to distinguish its own tables within a database. This prefix is appended to the start of each table name.
WordPress sets “wp_” as the default prefix, but it can be changed for security reasons or to allow multiple WordPress installations in a single database.
To verify if the prefixes match, you’ll need to inspect your “wp-config.php” file. This file contains important settings for your WordPress site, including the database prefix. Accessing the “wp-config.php” file can be done through SFTP or any file management tool provided by your hosting service.
Once you’ve opened the wp-config.php file, look for the line that defines the $table_prefix. It typically looks like this:
$table_prefix = 'wp_';
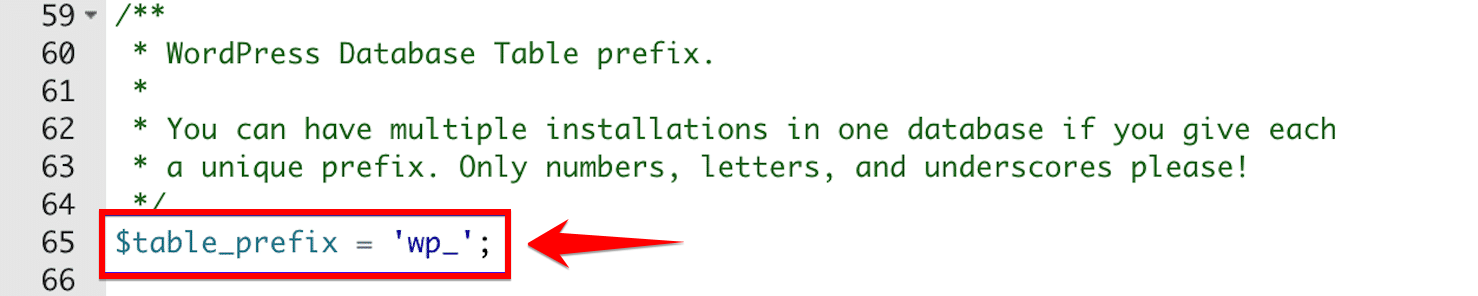
This prefix should be consistent with the prefixes used in your database tables.
Next, log in to your database management tool, usually phpMyAdmin, available through your web hosting control panel. Within phpMyAdmin, select your WordPress database and examine the list of tables. The prefix before each table name should exactly match the prefix specified in your “wp-config.php” file.
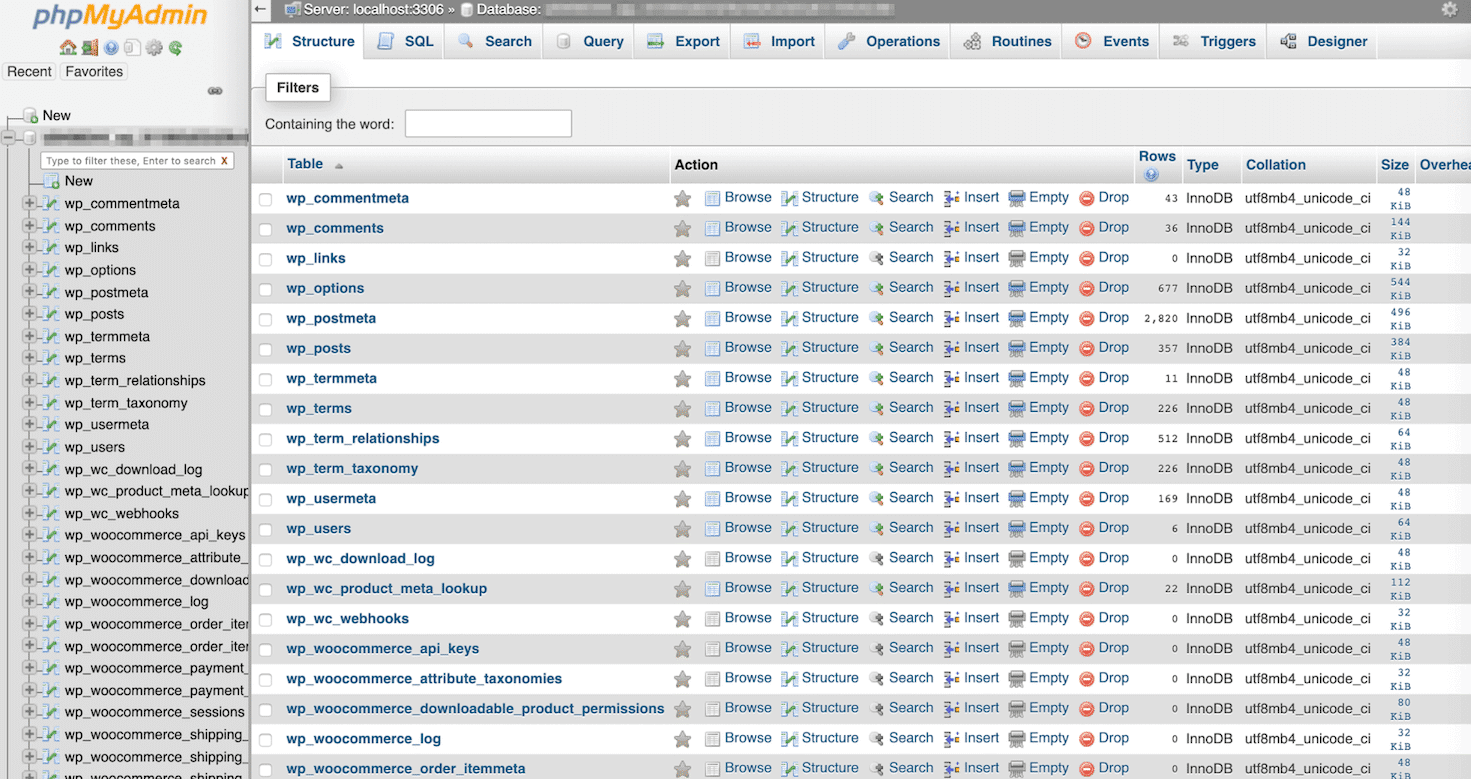
If you notice that the prefixes do not align, this is likely the cause of your access issues. The mismatch tells WordPress to look for tables that do not exist or are not correctly named, resulting in errors.
Way 11: Create a New .htaccess File
If the ways mentioned before didn’t help fix your WordPress problem, you should think about resetting your .htaccess file. A corrupt .htaccess file can cause a variety of problems, including access errors.
Here’s how to replace your existing .htaccess file with a new one to potentially fix the error:
- To begin, go to your web hosting dashboard. Enter your username and password to log in and access the different tools for handling your website’s files and settings.
- In your hosting dashboard, find and open the “File Manager” or a similar tool. This tool helps you move around and manage the files stored on your server.

- Search for the “public_html” folder or a similar folder where your website’s main files are kept. This is usually the main folder of your WordPress website.
- In the root directory, search for the .htaccess file. Once found, rename it to something like .htaccess_old.
Note: After renaming the file, attempt to access your WordPress site to see if the issue has been resolved. If the error continues, it indicates the problem might not be related to the .htaccess file. If this is the case, revert the filename to .htaccess.
If access to your site is restored or you want to ensure a fresh start, you can generate a new .htaccess file.
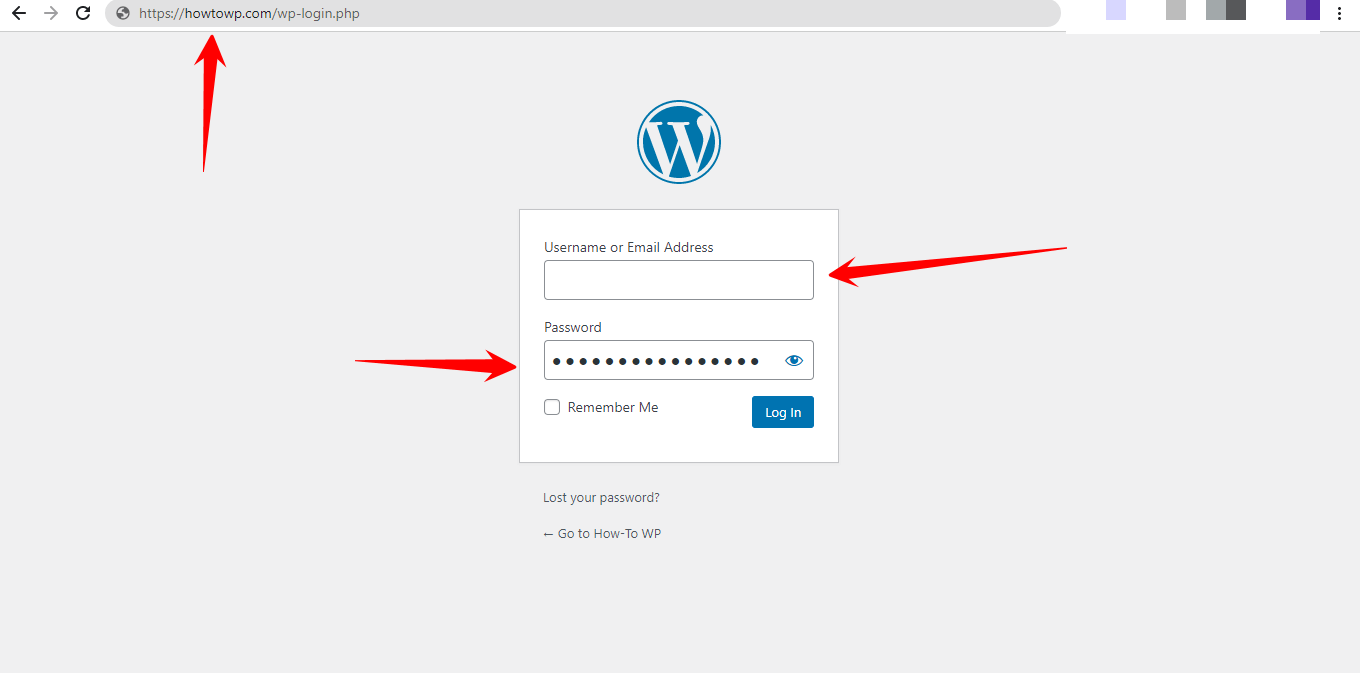
- Log into your “WordPress dashboard” by entering your username and password in the respective fields and clicking on the “Log In” button.
- Once you’re in the dashboard, look for the “Settings” option on the left-hand side menu. It’s usually towards the bottom.

- Under the Settings menu, you’ll see a few options. Click on the one that says “Permalinks.” This is where WordPress handles the structure of your website’s URLs.

- At the bottom of the Permalinks page, you’ll find a “Save Changes” button. You don’t need to change anything on this page; just clicking this button will do the trick.

When you click it, WordPress automatically generates a new .htaccess file with the standard settings for your site.
Way 12: Resetting Your WordPress Website
When all else fails, and you’re still seeing the “Sorry, You Are Not Allowed to Access This Page” error, a complete reset of your WordPress site might be the drastic step needed.
This method should be considered a last resort, indicating a deeper problem with your WordPress installation that hasn’t been resolved through other troubleshooting methods.
Important: This approach assumes you can access parts of your WordPress admin dashboard. If you’re locked out completely, seeking help from a WordPress specialist might be necessary.
Before you dive into resetting your WordPress website, it’s crucial to protect your content by exporting it. Here’s a quick breakdown of the steps:
- Begin by accessing your WordPress dashboard, where you’ll authenticate by entering your username and password, followed by clicking the “Log In” button for verification purposes.
- Navigate to the left-hand side of the dashboard and locate the “Tools” option.
- Within the “Tools” section, opt for “Export” to reveal a range of export options available to you.

- Select “All Content” to ensure that all your essential elements, such as posts, pages, and comments, are included in the export process.

- To safeguard a local backup of your website’s content before making any further adjustments or resets, finalize the procedure by clicking the “Download Export File” button. This action guarantees that you have a secure copy of your site’s data at hand.

We will utilize the “WP Reset Plugin” for the site reset procedure, a specialized tool designed explicitly for this purpose. This plugin offers a professional solution for efficiently reverting your WordPress site to its original state, akin to a fresh installation, while ensuring critical configurations are preserved.

- Begin by logging into your WordPress admin dashboard to initiate the reset process.
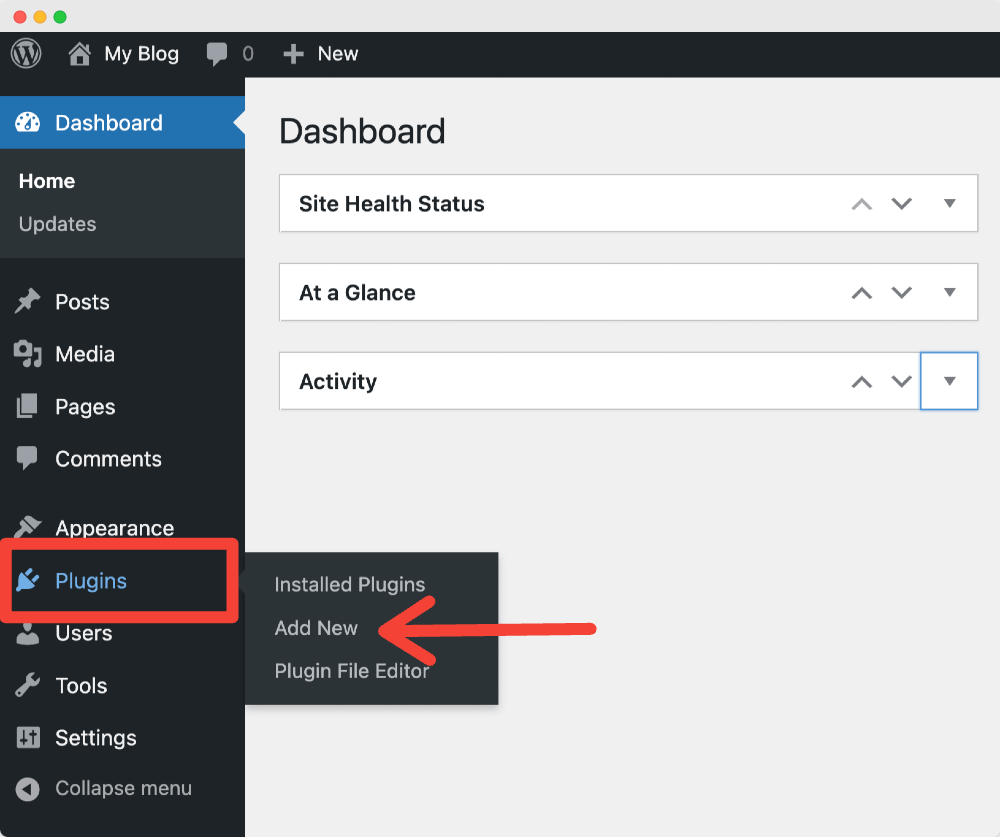
- Navigate to the “Plugins” section and select “Add New.” Locate the WP Reset Plugin by searching for it.
- Install the “WP Reset Plugin” and activate it to start using its functionalities seamlessly.

- After installing the “WP Reset Plugin,” you will notice an “Activate” button appear on the same page. Simply click on this button to activate the plugin instantly, allowing you to seamlessly utilize its functionalities without delay.

- After activation, proceed to the “Tools” section on the dashboard and choose “WP Reset” from the menu.

- In the plugin dashboard, meticulously review the data that will be erased during the reset to ensure you are informed of the consequences.

- As a precautionary measure, utilize the plugin’s snapshot or backup feature to create a restore point. This step proves vital in case you need to reverse the reset process. Click on “Create Snapshot”.
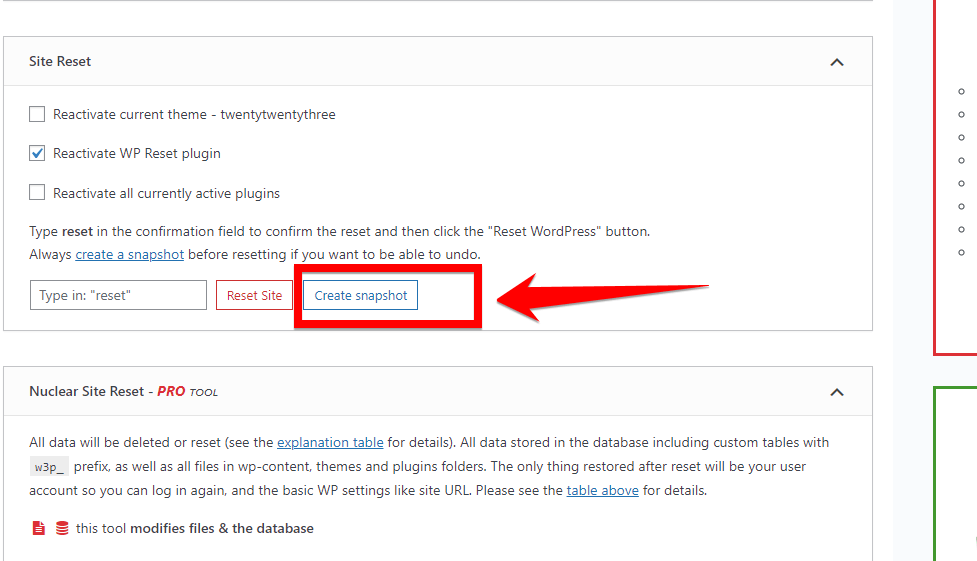
- To finalize the reset action, input “reset” into the provided box and proceed by clicking “Reset Site”.
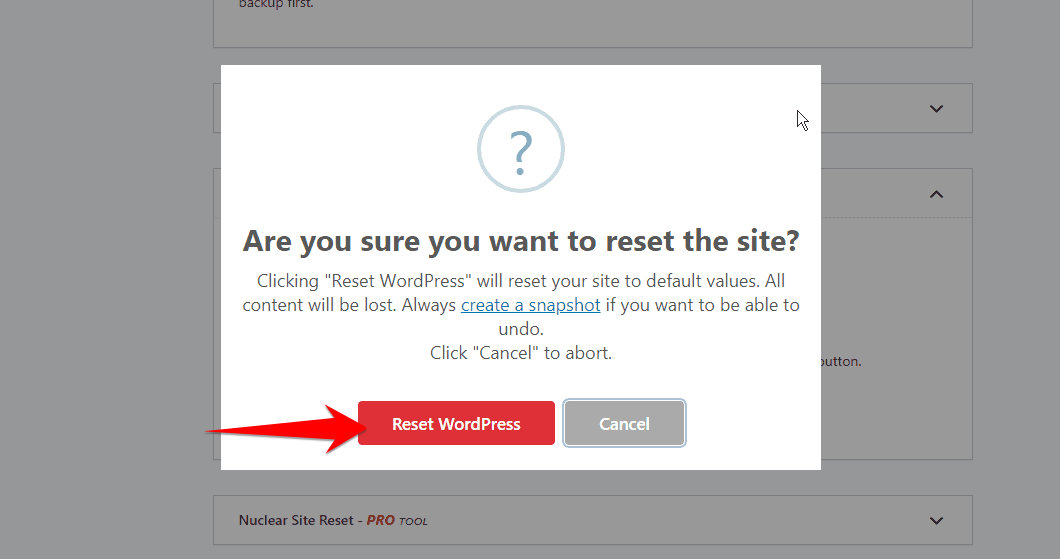
Note: A confirmation prompt will present itself. Validate your decision by clicking “Reset WordPress” to confirm the reset process, ensuring seamless execution of the selected action.
After the reset, your site will be in a fresh state, akin to a new WordPress installation. At this point, you can begin the process of importing your content back into your site using the file saved during the export step.
While effective in addressing unresolved errors, this method wipes your site clean of its current state. Therefore, ensuring you’ve backed up your site and understand the implications of a full reset before proceeding is crucial.
Understanding the “Sorry, You Are Not Allowed to Access This Page” Error
When you see the message “Sorry, you are not allowed to access this page” in WordPress, don’t worry—it’s not always an error. This message is actually a security feature that keeps unauthorized users from accessing certain parts of a WordPress site.

This message pops up when someone doesn’t have permission to view a particular page. Even admin users, who usually have full access, might see this message if they’re not supposed to be on that page. It’s just WordPress doing its job to keep things safe and secure!
Usually, this error appears when you’re attempting to view a webpage or view a file you don’t have permission to access. Here are a few common reasons behind this error:
- You are not logged in: Many websites require you to log in to see private information. If you have not logged in or your login has expired, the website does not recognize you and blocks access. You will see the “not allowed” message if you try to go directly to pages that require you to be logged in.
- You do not have permission: Some pages have extra restrictions, so only certain people can access them. For example, a company website may only allow employees to access some pages. If you do not have the right employee account permissions, the website will not let you see those pages even if you are logged in.
- Your IP address is blocked: Websites may block some IP addresses if there was suspicious or bad activity from them before. If your computer’s IP address is on the blocked list, the website will refuse access and show the “not allowed” message.
- Location restrictions: Sometimes, websites only allow people from certain countries or regions to access content. If you are traveling or using a VPN, the website may not be able to confirm you are accessing from an allowed location. This could lead to an error message.
- Broken links: Trying to use an old shortcut or bookmark to access a page that you once had access to can also result in the “not allowed” message if that access has changed or been revoked since you first bookmarked it.
- Incorrect details in the wp-config.php file: If your WordPress site has the wrong database name, username, password, or other incorrect details in the wp-config.php file, it can sometimes produce this error message.
- Old PHP version: Running a very outdated version of PHP that does not meet the minimum requirements for the website you are trying to access can also be the reason for the “not allowed” error appearing.
Essentially, an update or configuration issue causes WordPress to inaccurately classify administrators as not having access, blocking them out contrary to how the permissions should actually be set.
Rather than being a random error message, this is WordPress heightening security as intended, but in a way that inadvertently restricts legitimate backend access until the underlying permissions issue is resolved.
Summary
We’ve talked about 12 ways to fix that annoying “Sorry, You Are Not Allowed to Access This Page” message on your WordPress site. We looked at everything from refreshing your website and checking permissions to resetting the whole site with a particular plugin. It’s like we’ve been detectives, looking for clues and figuring out how to solve this mystery!
Now that we’ve gone through all these steps, it’s like we’ve ended our adventure. If you tried some of these tricks and your website is still acting up, it might be time to talk to someone who’s good with WordPress, like a superhero for websites! They can dive in and help fix things up.
Remember, it’s okay to ask for help if things get too tricky. And who knows? Maybe you’ll learn some cool new stuff along the way. Thanks for sticking with me through all these tips! Let’s hope your website starts behaving better now.


