How to Get a Free SSL Certificate for WordPress [Visual Guide]
The security of a website is a major concern, especially when it comes to the WordPress website. WordPress as a CMS is no stranger to hackers. That’s why it’s important to set up a free SSL in WordPress.
You’ll learn about:
- What is SSL
- How to get a free SSL certificate for WordPress
- Why is SSL important
- Do you need an SSL certificate
I’ll be covering all of these topics, but before we start, it’s essential that you know what SSL is.
Table of Contents
What Is SSL
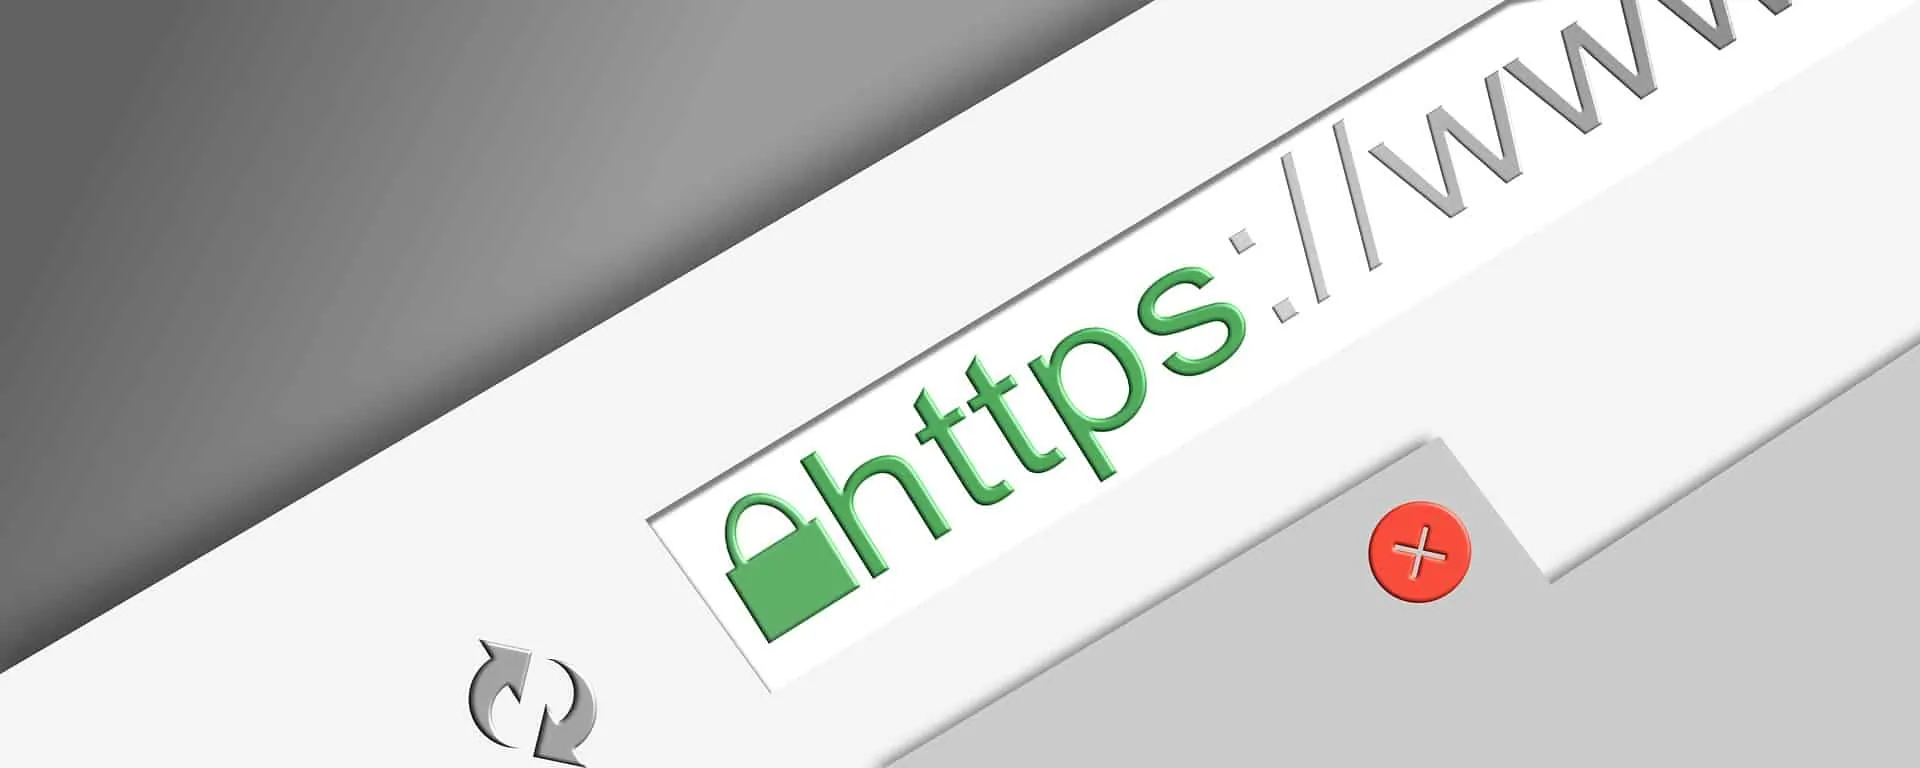
SSL stands for “Secure Sockets Layer,” which is used to create an encrypted connection between a web server and a web browser. This ensures that all data passed between the two is private and secure. It’s an industry-standard protocol used by millions of websites worldwide to protect online transactions.
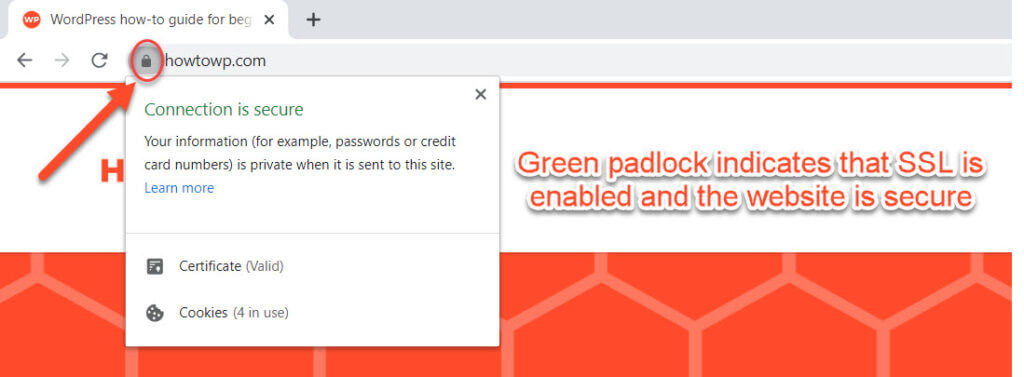
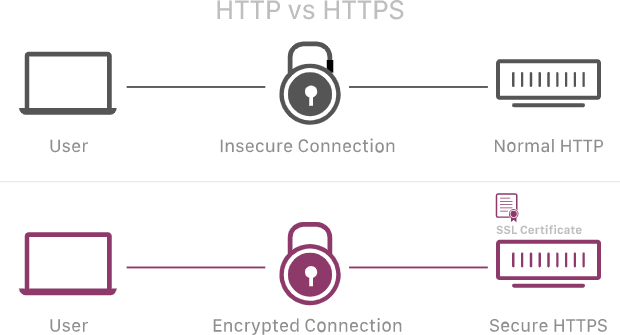
However, if you’re wondering about the visual representation of the SSL, then look no further than the green padlock at the start of your domain in the browser’s address bar. It tells whether a website is secure or not.
If SSL is enabled for your website or blog, then you should see a green padlock like this (like the below screenshot) at the start of your website address in the browser’s address bar.
Moreover, if SSL is enabled on your website or blog, your website address also starts with HTTPS instead of HTTP, and your users establish secure connections between your server and the browser. Otherwise, your website is vulnerable to hackers on an insecure connection. Regularly updating and renewing the SSL certificate on your website is essential to fortify its defenses against evolving cyber threats.
How to Get a Free SSL Certificate for WordPress? Step-by-Step Guide
Due to the high demand for SSL, almost all popular web hosts started providing SSL certificates for free as part of their services.
Here is a list of some of the popular web hosts that provide SSL for free:
- SiteGround
- HostGator
- BlueHost
- DreamHost
- Liquid Web
- GreenGeeks
- WPEngine
If you haven’t bought web hosting yet, you can check the web host features you want to purchase and make sure that they provide an SSL certificate for free.
But if you have already bought a web host, then you can log in to your web host’s cPanel and search for SSL or Let’s Encrypt to find out if your web host provides SSL for free.
When it comes to getting a free SSL certificate for WordPress, there are multiple methods that you can choose. The choice of the method depends on “What is the easiest choice for you?” These methods are as follows:
- Ask your host
- cPanel free SSL
- Cloudflare 15 years free SSL
Why don’t we start with the simplest and most straightforward means of getting a free SSL certificate for WordPress?
Method 1: Ask Your Host
Why bother to setup SSL by yourself when your web host can do it for you with pleasure? I always believe in making the best use of the products and services I buy.
Nowadays, many popular web hosts offer great customer support, So if I need to do something with my website at my hosting level, I always get in touch with my web host via live support and ask them to do it for me, and they do it with pleasure.
However, many people are skeptical and don’t believe that customer support will help them in this regard. You can be surprised by how much customer support can help you.
So, don’t hesitate to contact customer support for your hosting. Furthermore, You can get in touch with your web host via Call or Live Chat (if they support it) and ask them to set up a free SSL for you on your website, and they will do it for you.
Method 2: cPanel Free SSL
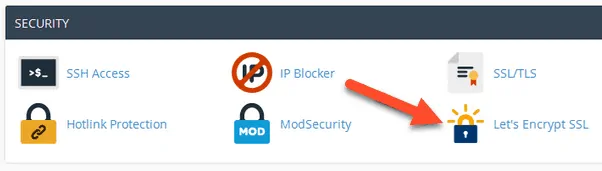
If, for some reason, your customer support doesn’t provide you with a free SSL certificate for WordPress, then there is another method that you can use for this purpose. This method involves you accessing the cPanel of your website (if you have one).
- Start by Logging in to your web hosting account’s cPanel, navigate to the “Security” section, find “Let’s Encrypt free SSL,” and activate it.
Note: If you face any sort of issue after activating the “Let’s Encrypt SSL,” contact your host via call or live chat to resolve the issue. The free SSL options could also vary depending on your hosting provider. So if you face any trouble finding Let’s Encrypt or free SSL in your cPanel dashboard, then ask your hosting provider about it.
- I’m currently using Namecheap hosting, and in my cPanel dashboard, there is an option called “Namecheap SSL.”
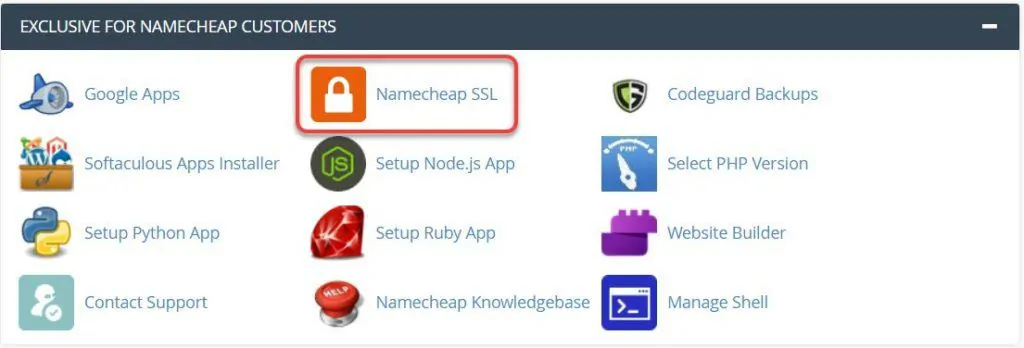
- You can activate Namecheap free SSL when you click on Namecheap SSL; however, I’ve already activated it in this case.
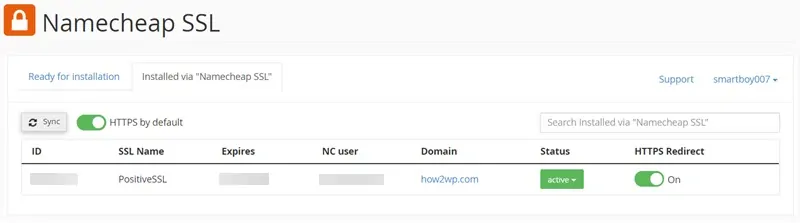
Note: You can also see there is already an HTTPS redirect option available, and it’s turned ON, but if you don’t see an HTTPS redirect option in your cPanel, you can do that using the “Really Simple SSL” plugin.
- If you’re using Namecheap EasyWP, an SSL certificate is incredibly easy to enable. Just sign in to EasyWP, and click Manage.
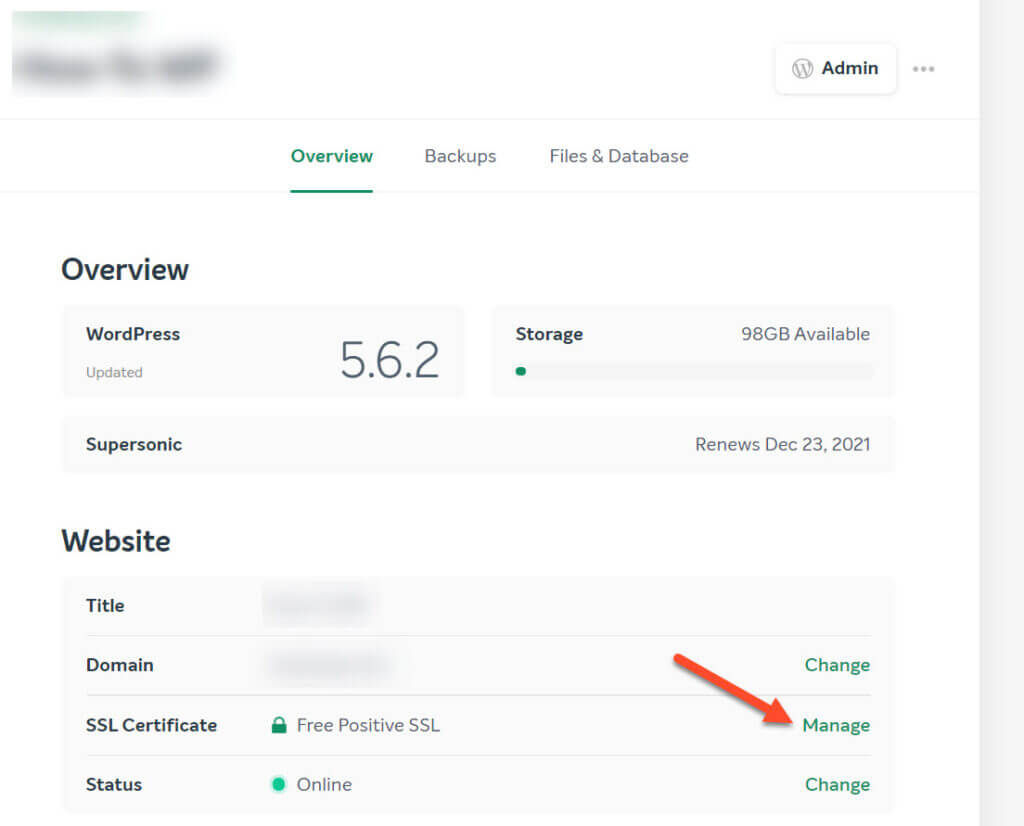
- All you need to activate the status of your SSL certificate.

- Of course, you can use a custom SSL certificate from any company or even 15 years of free SSL from Cloudflare as shown have to renew is in section 3.

Method 3: Cloudflare 15 Years Free SSL
When we use the “Let’s Encrypt SSL” option, it expires after 90 days, but Cloudflare SSL may not end until you become a father dancing with your two kids 😀

You might be asking yourself, “What is Cloudflare?” It is a Content Delivery Network (CDN) that makes your website faster and enhances security. In 2022, Cloudflare has become a new source certificate authority that offers you a self-signed certificate. Meaning it won’t be a security certificate that is not signed by a certificate authority (CA).
The best part? You don’t need to enable the certificate installation feature on your server, as it is the case with “Let’s Encrypt,” where you have to renew it after 90 days.
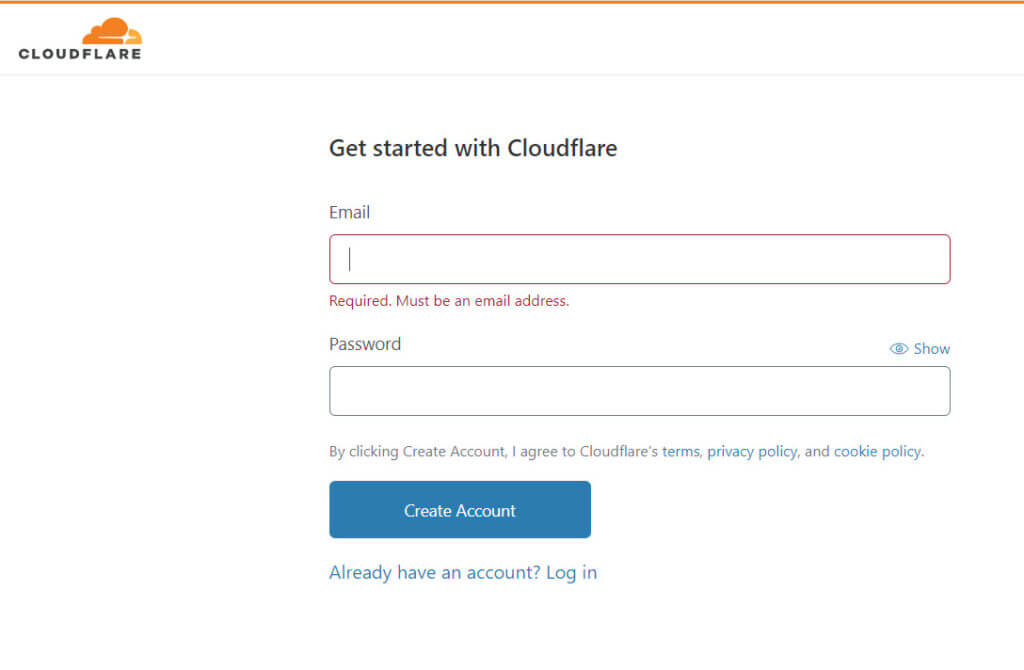
Don’t have a Cloudflare account? Don’t worry; I’ll guide you.
- First of all, sign up on Cloudflare.
- Now enter the website name you want to add to Cloudflare.
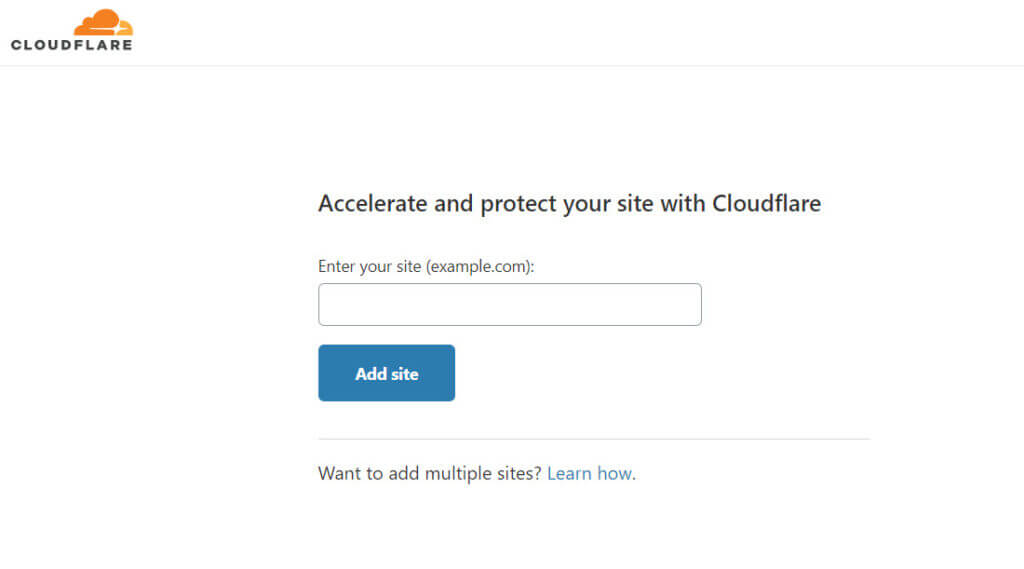
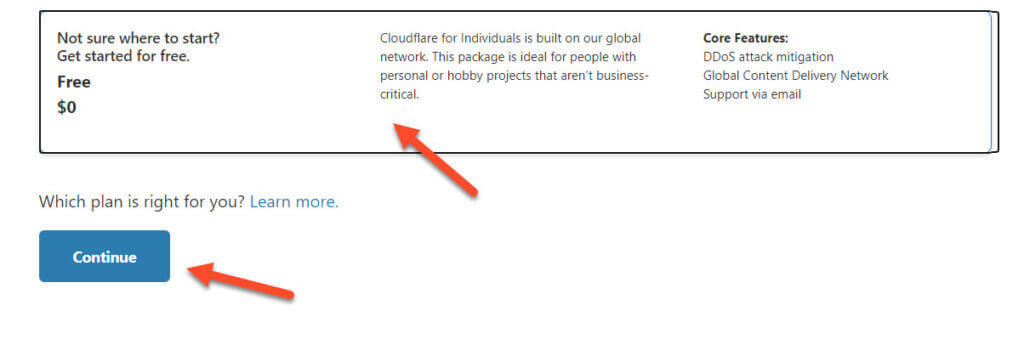
- Choose the free plan and hit Continue.
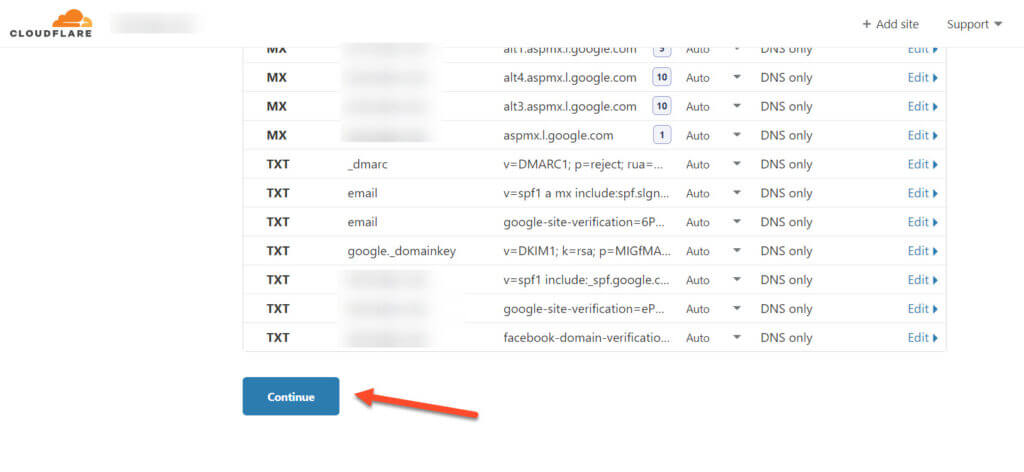
- In your Review your DNS records step, again click Continue.
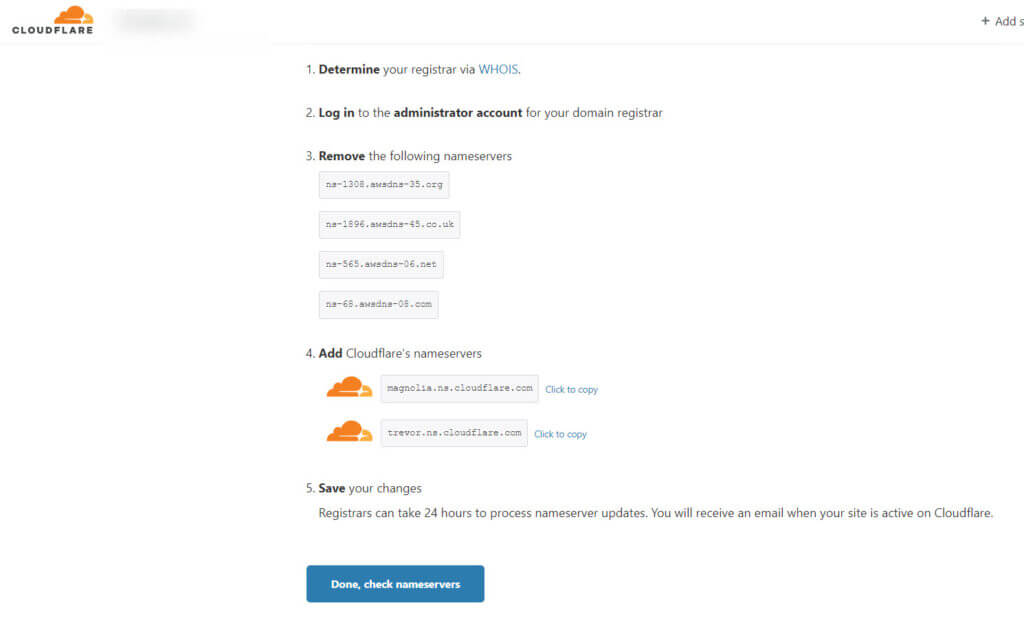
- Here comes the most challenging part of the process, setting the nameservers suggested by Cloudflare.
Don’t worry, your website will not face a down time when you change nameservers.
- Depending on your domain registrar, the process of changing name servers might be different for different registrar companies, but the fundamentals remain the name. I’ll use Namecheap to change the nameservers. Sign in to Namecheap and click Manage.

- Now, replace Cloudflare’s nameservers with your existing nameservers.
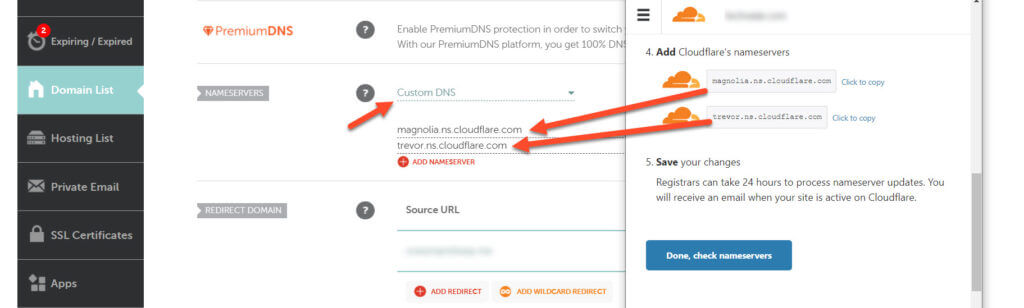
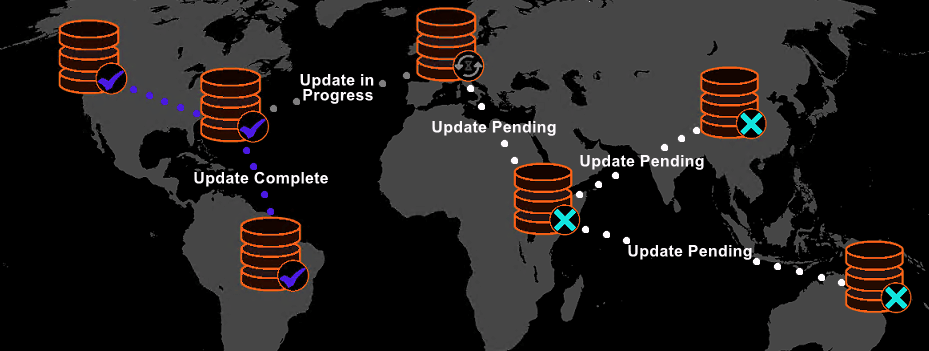
- Don’t forget to hit Save Changes. Wait at least 30 minutes as DNS propagation takes time.
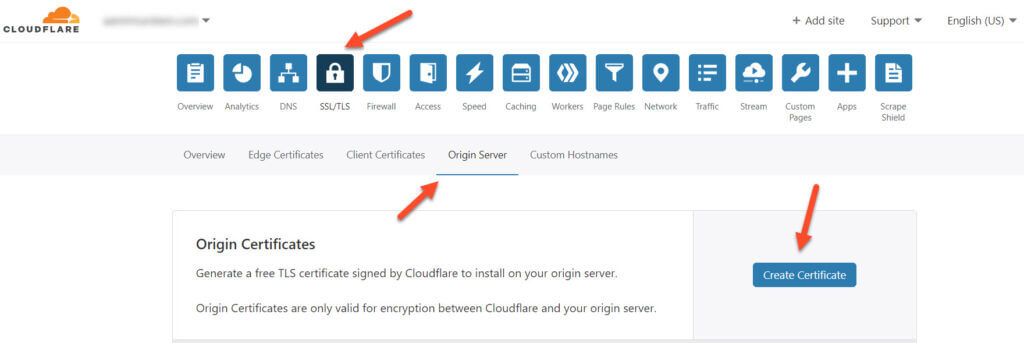
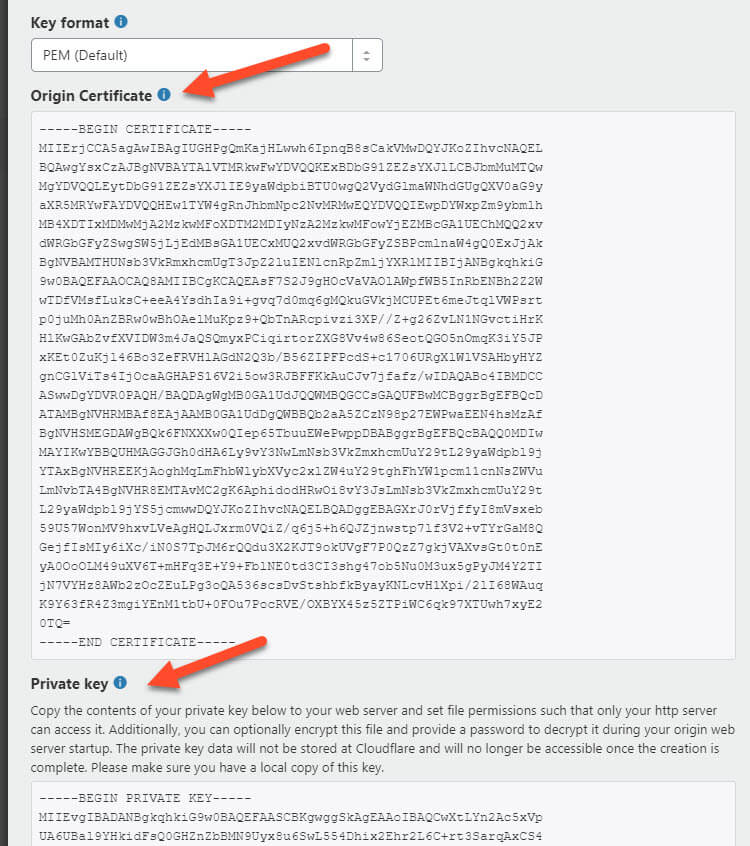
- Once Cloudflare is activated on your domain, it’s time to create a free SSL certificate for WordPress. Go to SSL/TLS > Origin Server > Create Certificate.
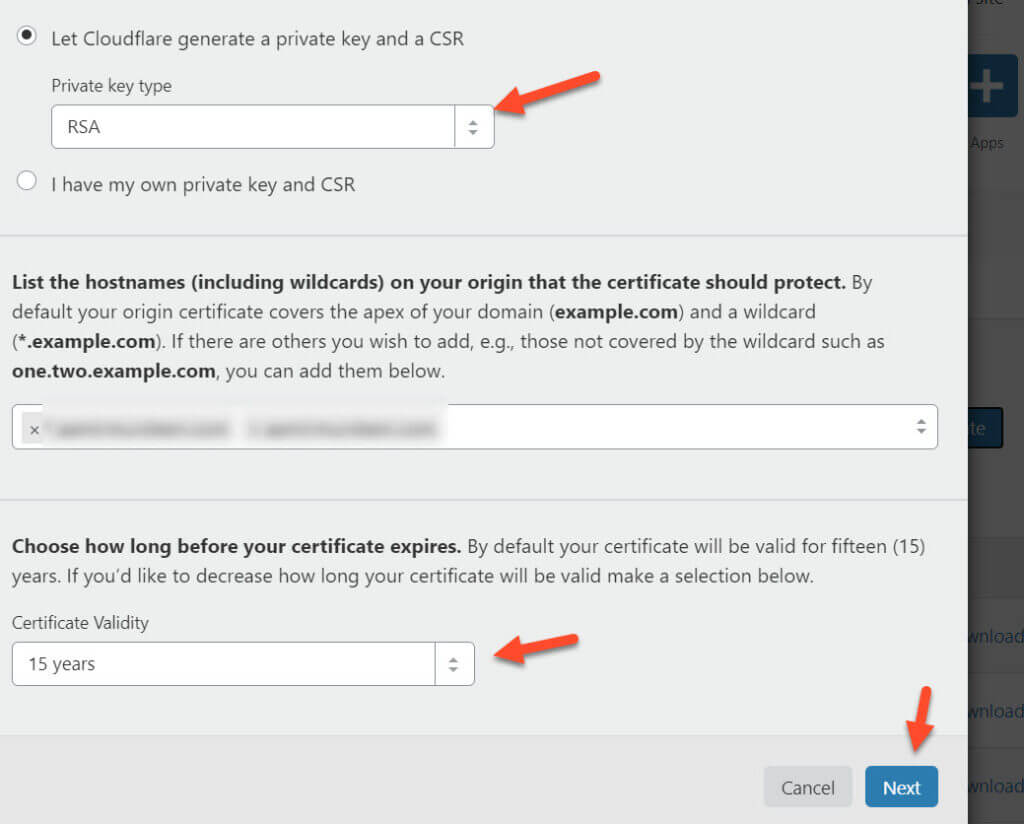
Note: You’ll get a pop-up window, after which you’ll use the following settings:
Private Key Type: RSE
Certificate Validity: 15 Years
- After making all the necessary changes, hit the “Next” button.
You’ll get two keys:
- Origin Certificate
- Private Key
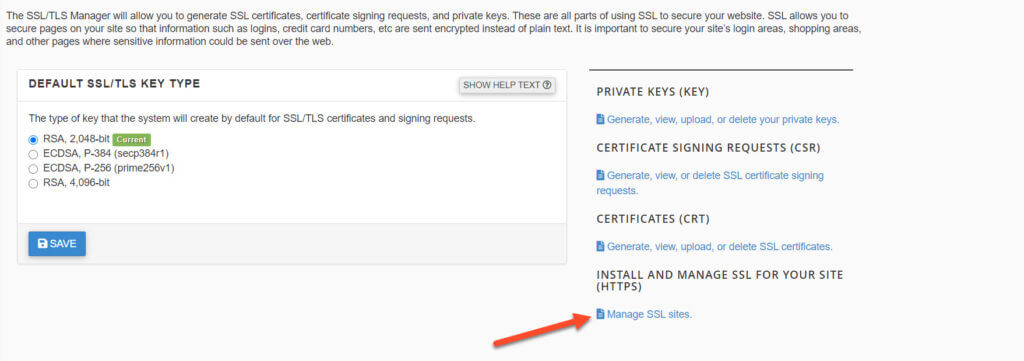
- Now go back to your cPanel and find SSL/TLS.
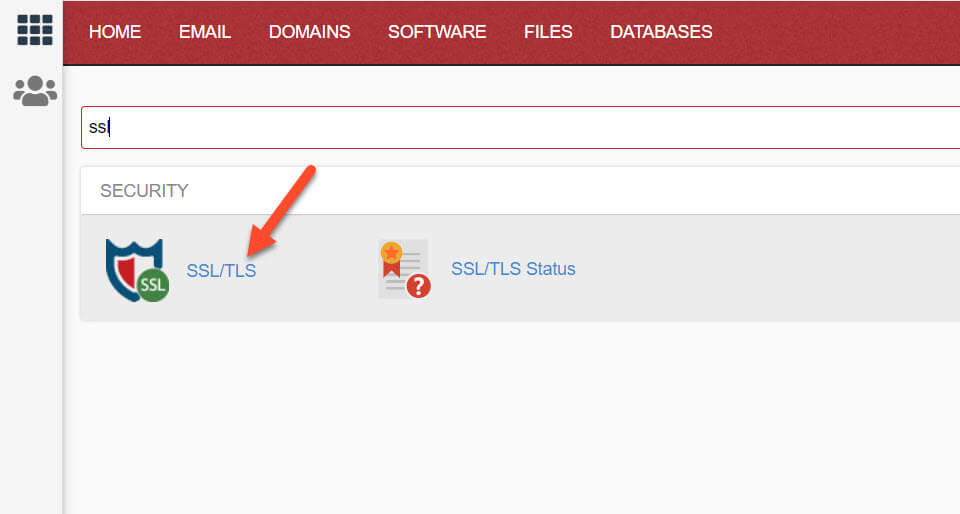
- Click the link “Manage SSL sites” falling under “INSTALL AND MANAGE SSL FOR YOUR SITE (HTTPS)”
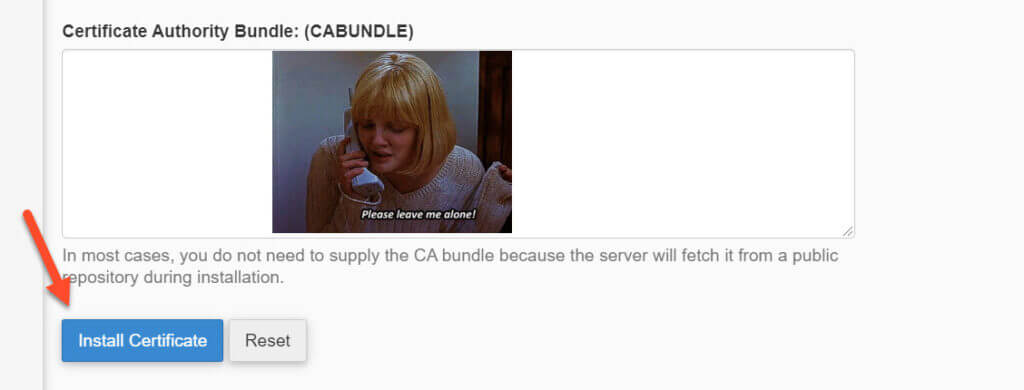
- Select the domain from the dropdown menu where you’ll install the SSL and paste the Cloudflare values.
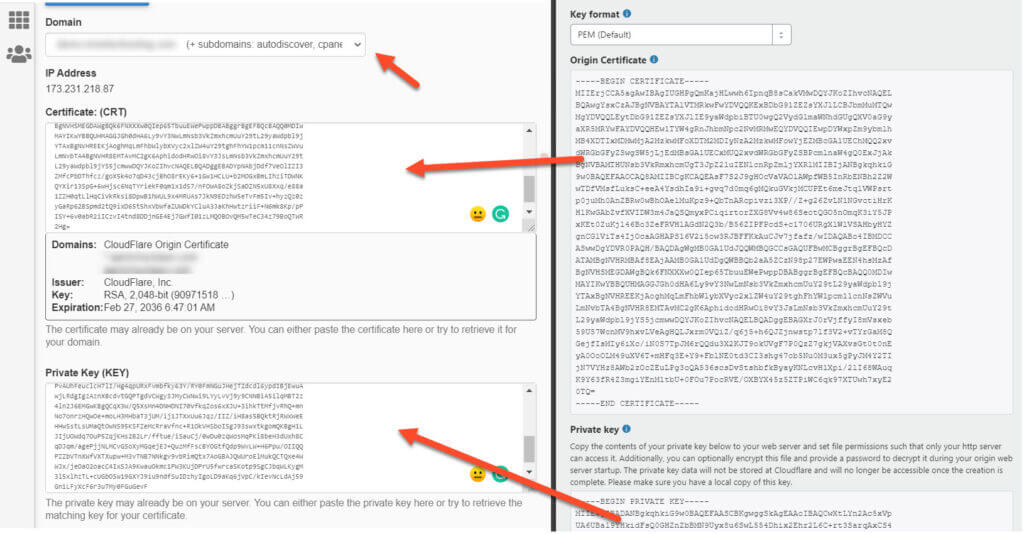
- Leave the “Certificate Authority Bundle: (CABUNDLE)” empty and click Install Certificate.
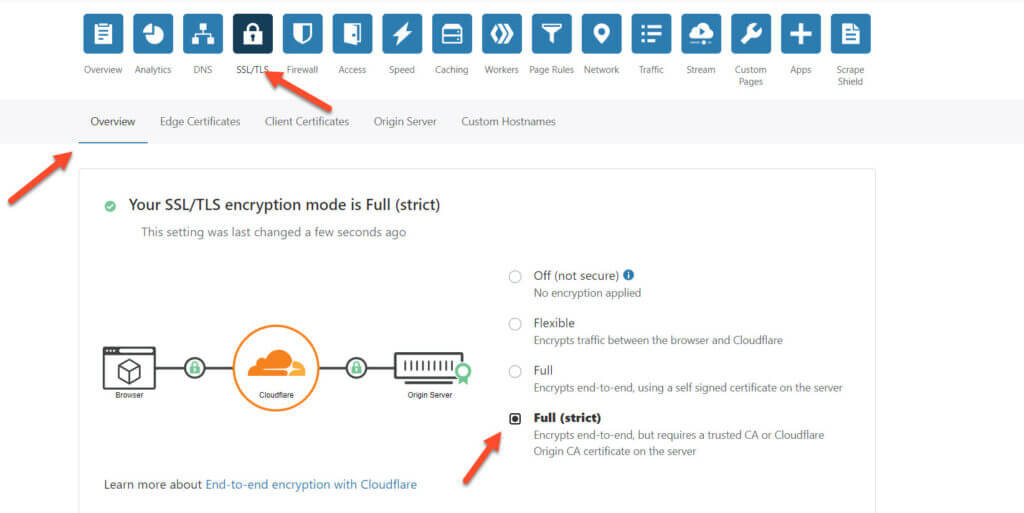
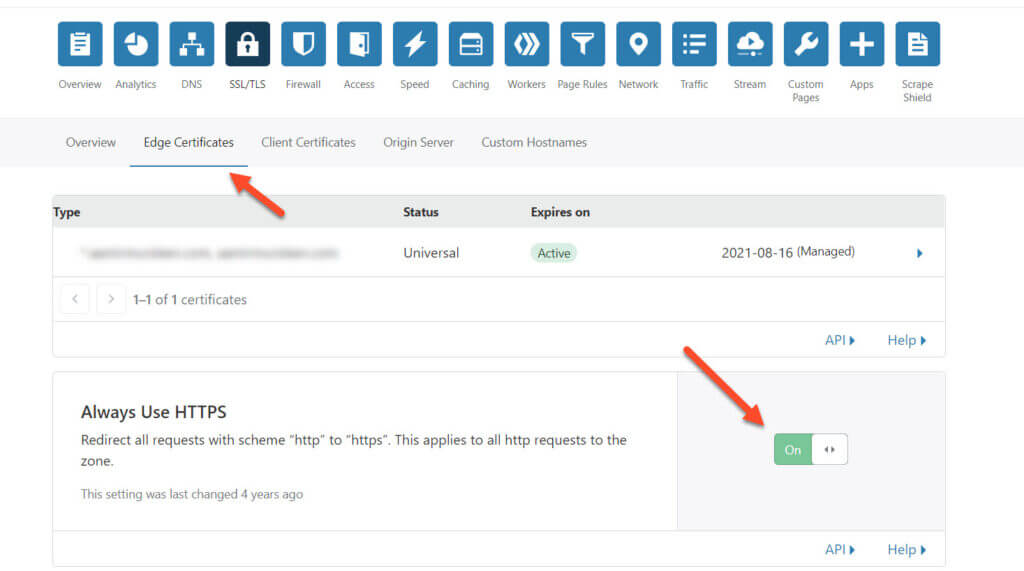
Congratulations! You’ve done all the steps necessary to enable SSL and HTTPS for your website. But don’t forget to choose “Full (Strict)” to enable HTTPS on your domain on Cloudflare.
Moreover, use the feature “Always Use HTTPS” to make all the HTTP requests to HTTPS requests properly.
Setup Redirect from HTTP to HTTPS
If your hosting provider doesn’t provide this feature, then you can use a plugin called “Really Simple SSL” to enable redirection from HTTP to HTTPS, so all your URLs start with HTTPS.
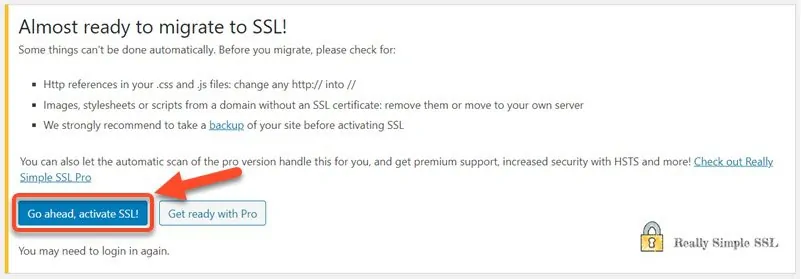
Install and activate Really Simple SSL plugin, and it will check if your site has an active SSL certificate. It will also provide you recommendations based on your content before you activate SSL using it.
Take a backup, and then click on the button “Go ahead, activate SSL” to activate SSL for your site, and BOOM, you’ve successfully activated SSL for your WordPress website or blog.
Once the SSL is activated, make sure that all your URLs start with HTTPS instead of HTTP, and even if one of your URLs begins with HTTP, then web browsers will treat it as non-secure or partially secure.
The good thing is if you use the Really Simple SSL plugin, then it takes care of that.
I hope this article helped you, but if you face any trouble, you can ask me in the comments section below or contact me directly, and I’d be more than happy to guide you through the process. 🙂
If you liked this article, please share it with your friends and subscribe to the How-To WP Newsletter below to get the latest WordPress tips, tricks, and how-to tutorials directly into your inbox.
Why Is SSL Important
There are many reasons which indicate the importance of SSL for a website, and I’ll list a few of them below, and I believe they will be more than enough for you to consider SSL and set up a free SSL for your website today.
- Improve Security. SSL (or HTTPS) improves the security of your website. The hackers cannot manipulate the data since the communications between the end-user and the server are protected.
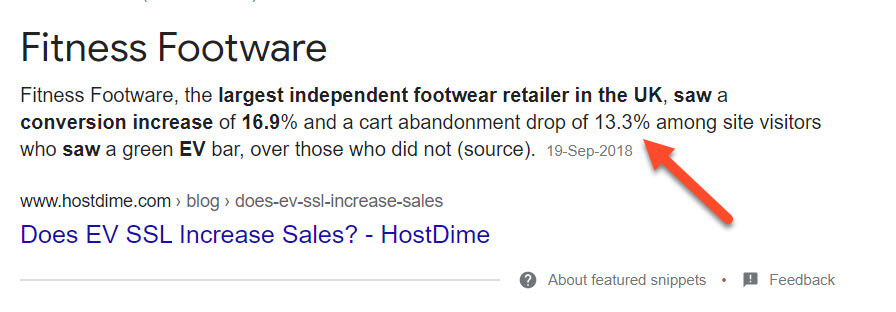
- Boosts Conversions. SSL increases your website trust and boosts conversions. When a user looks at the green padlock, it boosts trust and credibility. Fitness Footwear, the largest footwear retailer in the UK, saw a whopping 13% conversion boost when they enabled the SSL. If anyone else thinks that non-SSL websites can achieve the same feet, then they are sorely mistaken.
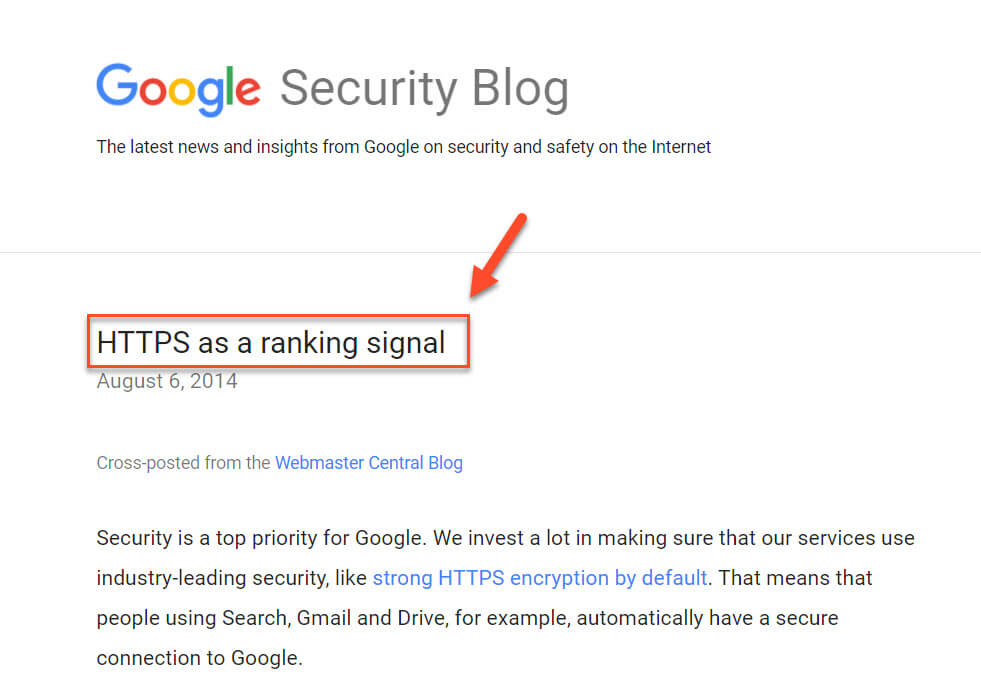
- Better SEO Ranking. SSL-enabled websites enjoy better rankings as Google announced in 2014 that HTTPS, aka SSL, would be a ranking factor. There are several other things that also affect the SEO of the website (Such as backlinks, On-page, etc.), but without the SSL certificate, they don’t matter.
Do You Need an SSL Certificate
Now you may be asking yourself, “How much of a difference can the SSL certificate can make and do I really need it?” To keep it short and simple, “Yes, you do need an SSL certificate.”
Due to the reasons I mentioned above, I think every website should have SSL activated, be it a social media website, a forum, an e-commerce store, a membership site, or a simple blog.
Having an SSL certificate will create a positive impression of your brand among your users and audience.
Moreover, your users will feel safe and secure when they land on your website, and if you require users to log in or accept payments on your website, they won’t hesitate to input their important information if SSL is enabled on your website.
But if your website is not using the SSL, then popular web browsers like Google Chrome and Opera will show “Not Secure” at the start of your website address in the address bar, and you might lose credibility with potential customers.

Summary
Getting a free SSL certificate for your WordPress website is easy. You can use Let’s Encrypt, Cloudflare, or your web host’s SSL tools to add HTTPS to your site. This protects your visitors’ data, helps your search rankings, and makes your site seem more trustworthy. \
As you have seen, the process is relatively simple and can be completed in just a few steps. With the help of the screenshots and detailed instructions provided, you can secure your website with HTTPS and enjoy the benefits of enhanced security and improved user trust.
Note: With cybersecurity being so important these days, using a free SSL certificate is a wise move that will benefit your WordPress site.
Frequently Asked Questions (FAQs)
How do I add free SSL to WordPress?
The best places to get free SSL are Cloudflare and Let’s Encrypt. Cloudflare SSL is for 15 years, while Let’s Encrypt SSL is only suitable for 90 days.
How can I get free SSL hosting?
The most common way is to find a hosting that provides a free SSL certificate for WordPress like Siteground, Kinsta, and WP Engine.
How much does an SSL certificate cost?
An SSL certificate from Let’s Encrypt costs $0. It costs anywhere between $60 to $3000 per year for an SSL certificate from any other Certificate Authority.
Does GoDaddy offer free SSL?
No, GoDaddy doesn’t offer a free SSL certificate for WordPress, but you can install them using Cloudflare and Let’s Encrypt. And the other way is to use their managed WordPress service to get the SSL certificate.


Hello, can this be done before install softaculos (WordPress) or after?
Hello, great question! You can install an SSL certificate anytime, whether before or after installing WordPress through Softaculous. However, it’s often considered best practice to install the SSL certificate before you install WordPress.
The primary reason is to ensure that your site is secure from the get-go, thus avoiding any potential security issues. Additionally, setting up your SSL certificate before installing WordPress can save you from changing your site settings from HTTP to HTTPS later on, as WordPress will automatically detect the secure connection during installation and set your website to operate under HTTPS.
If you’ve already installed WordPress without an SSL, don’t worry. It’s not too late to add an SSL certificate. After acquiring your SSL certificate (there are many free options available, as mentioned in the article), you can implement it on your website.
After implementation, you will need to update your WordPress settings and redirect your site from HTTP to HTTPS to ensure your site is secure and that your visitors are directed to the secure version of your site.
I hope that answers your question! If you have any more queries, feel free to ask.
This is so useful for when you need to install SSL and secure your site. A must-read for every beginner blogger. Thank you!
I’m glad it’s helpful.
Nice post. My host GoDaddy provided free SSL for the first year then charging on every renewal. I just want to know if there really exists something like free SSL certificate?
Yes of course, you can generate a free SSL certificate using https://www.sslforfree.com/ and add it to your host manually.
To add SSL manually on your host you need to click on the SSL button under Security section in your cPanel and then add certificate generated by sslforfree.com.
I haven’t included this in the tutorial yet, but I will update the post and the method to manually add SSL certificate in cPanel.
So stay tuned, and thanks for liking the post. 🙂