How to Setup Hotjar for Your WordPress Website [Visual Guide]

Are you a WordPress website owner looking to enhance your user experience and optimize your site’s performance? Setting up Hotjar for your WordPress website can be a game changer, offering valuable insights into how your visitors engage with your site and allowing you to make data driven improvements.
Hotjar is a powerful and user-friendly tool that provides heatmaps, visitor recordings, conversion funnels, and more, giving you a comprehensive understanding of user behavior on your website. By setting up Hotjar correctly, you can gain valuable information that helps you identify areas for enhancement, boost conversions, and improve overall user satisfaction.
In this article, you will learn:
- 2 Methods to Set up Hotjar for Your WordPress Website
- Case study: How Hotjar improved my website’s user experience
- Best practices when using Hotjar
- Troubleshooting common issues
By the end of this guide, you will have successfully integrated Hotjar with your WordPress website and be ready to leverage its powerful features to optimize your site’s performance.
So, let’s dive in and unlock the potential of Hotjar for your WordPress website! Let’s get started.
Table of Contents
- Basic Requirements for Hotjar Integration
- 2 Methods to Set Up Hotjar for Your WordPress Website
- Method 1 vs. Method 2: Choosing the Right Approach for Your Website
- Explore Hotjar Features
- Case Study: How Hotjar Improved My Website’s User Experience
- Important Considerations After Installing Hotjar
- Best Practices When Using Hotjar
- Troubleshooting Common Issues
- Final Thoughts
Basic Requirements for Hotjar Integration
Alright, now that you’re excited to dive into the world of Hotjar, let’s ensure we’ve covered our bases. We don’t want any stumbling blocks halting our process midway, do we?
So, before we take the plunge into the nitty-gritty of Hotjar installation, we need to make sure a few key requirements are in place. Don’t worry, and it’s nothing too complicated!
1: Ownership of a WordPress Site
The first step towards this journey is having a WordPress website you manage and control. Sounds obvious, right? However, it’s important to highlight because the process we are about to discuss is specifically tailored for WordPress websites.
Do you have a website that’s built on WordPress? Excellent! You’re ready to move on to the next requirement. If you’re still working on setting up your website or if it’s built on another platform, you might want to pause here and sort that out first.
2: Hotjar Account
The second requirement is, of course, a Hotjar account. You can’t really integrate Hotjar without having an account, can you? But don’t fret! Creating an account with Hotjar is as easy as pie.

You just need to visit Hotjar’s website and sign up for a free account. The signup process is pretty straightforward, but remember to jot down your account details because we will need those later in the setup process.
3: SSL Encryption (HTTPS)
Finally, we come to the third prerequisite – SSL encryption for your website. Wondering what it is? Let me explain.
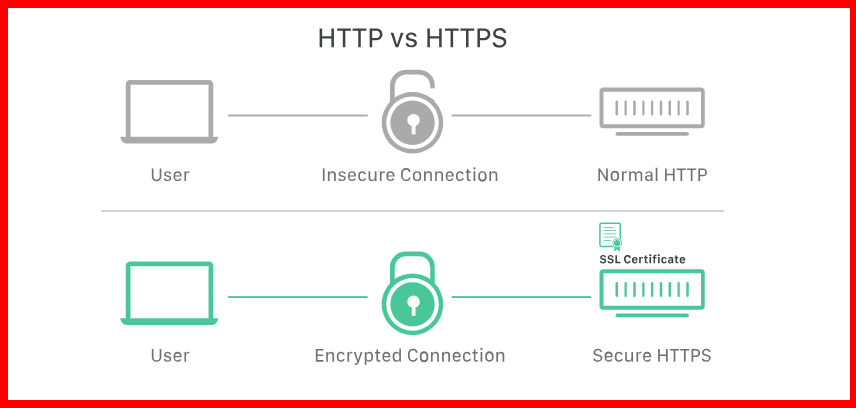
SSL, which stands for Secure Sockets Layer, is a security technology that ensures all data exchanged between a website and a user remains private. Hotjar requires this level of security to work, and you can identify an SSL encrypted website by the ‘HTTPS’ at the beginning of its URL.

So, before starting with Hotjar, ensure your WordPress site is SSL encrypted. If you don’t have an SSL certificate, I’d recommend getting one – not only for Hotjar but also for the enhanced security it offers your users.
And that’s it! These are the basic requirements you need to have in place to integrate Hotjar on your WordPress website. Once you’ve checked all these boxes, you’re all set to delve into the fascinating world of user behavior analysis with Hotjar!
2 Methods to Set Up Hotjar for Your WordPress Website
Discovering the right methods to set up Hotjar for your WordPress website can revolutionize your understanding of user behavior and fuel your website optimization efforts.
Using two highly effective methods, you can seamlessly integrate Hotjar into your WordPress site. Whether you prefer a manual installation process or the convenience of a dedicated WordPress plugin, I’ve got you covered.
Let’s start with Method 1 as we dive into setting up Hotjar for your WordPress website. Get ready to unlock the power of Hotjar and gain valuable insights into your website’s performance.
Method 1: Installing Hotjar with Script Code
If you’re looking for a customized and fine-tuned integration of Hotjar into your WordPress website, we have just the solution for you.
In this way, you gain full control over the implementation of the tracking code by manually installing Hotjar using script code. This approach offers the flexibility to seamlessly integrate Hotjar according to your specific requirements, ensuring a tailored and optimized setup.
If you’re comfortable with basic coding principles and want to maximize the customization of Hotjar’s integration, follow the step-by-step guide below.
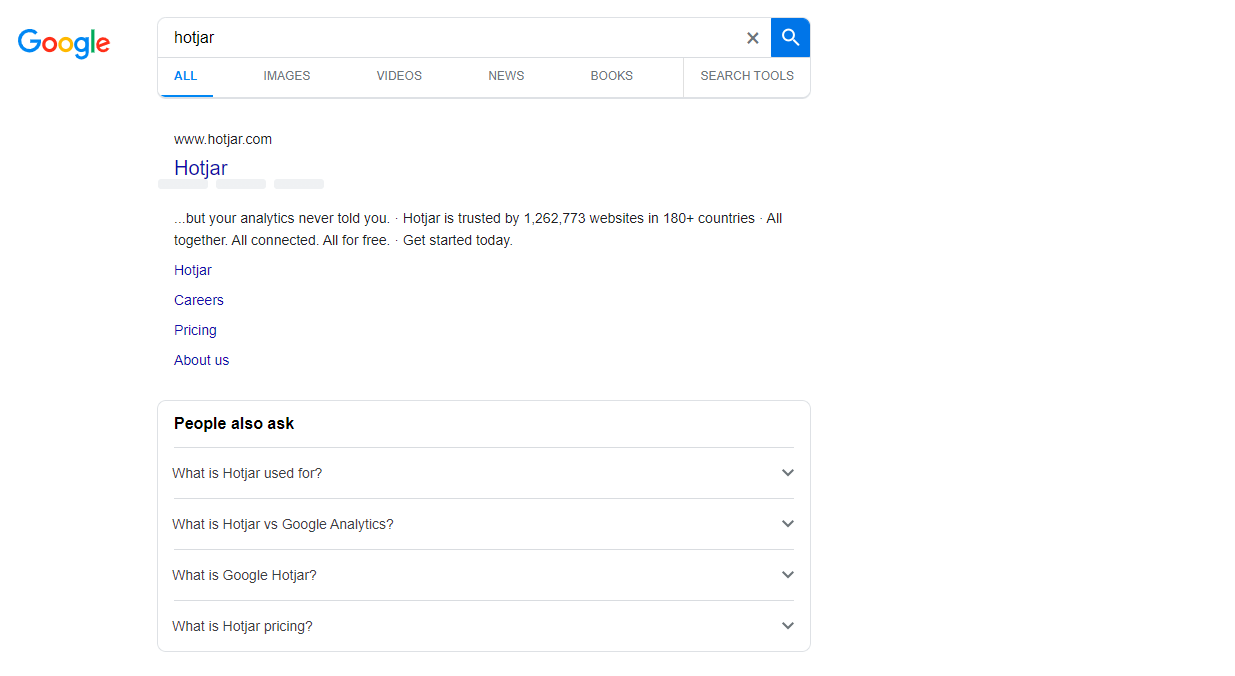
Step 1: Open a web browser and navigate to hotjar.com by searching for it on Google.
Step 2: On the Hotjar website, you will find different options in the header, including “Try it for Free” and “Sign in.” If you already have a Hotjar account, click on “Sign in.” Otherwise, click on “Get Started Free” to create a new account.

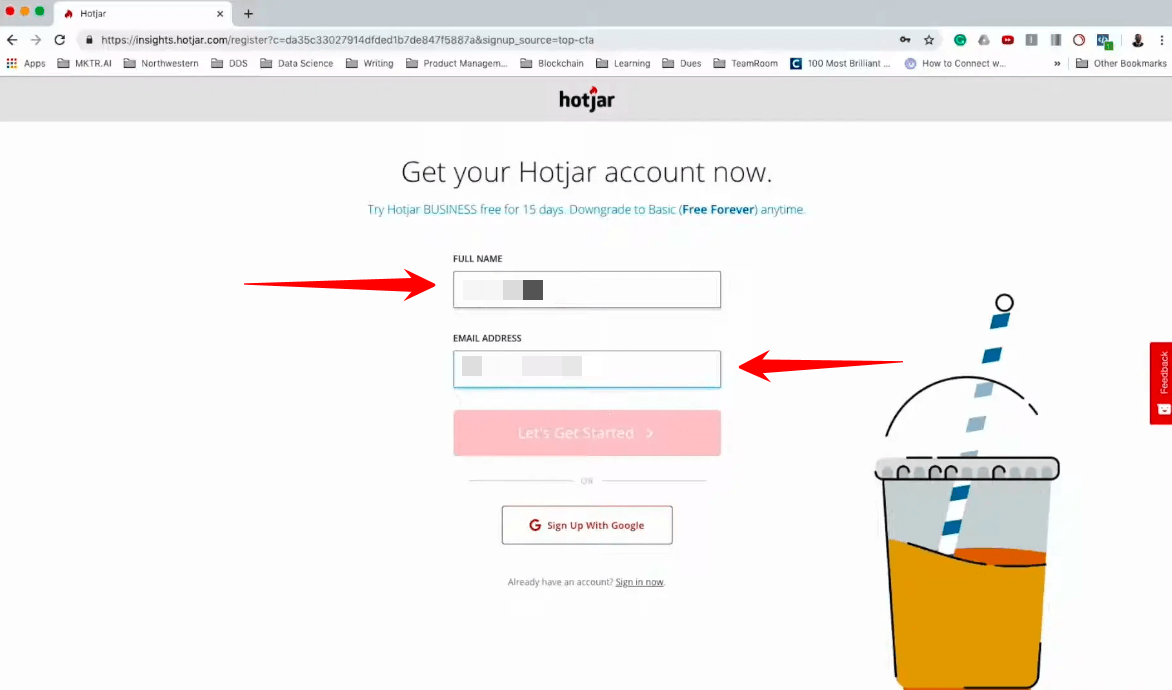
Step 3: After clicking on “Get Started Free,” you will be directed to a page where you need to create your account. Provide your full name and email address, and then click on “Let’s get started.”
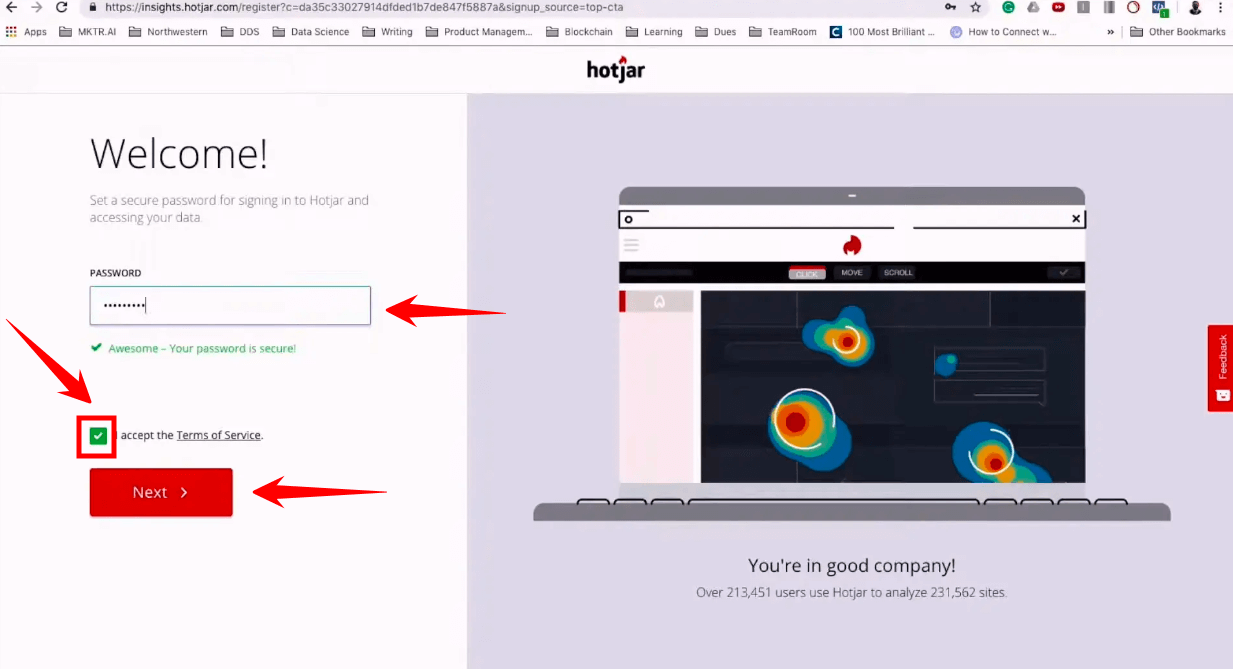
Step 4: On the next page, create a strong password. You can use a password generator like LastPass for assistance. Once you have a password, check the box to accept the terms and services and click on “I accept.”
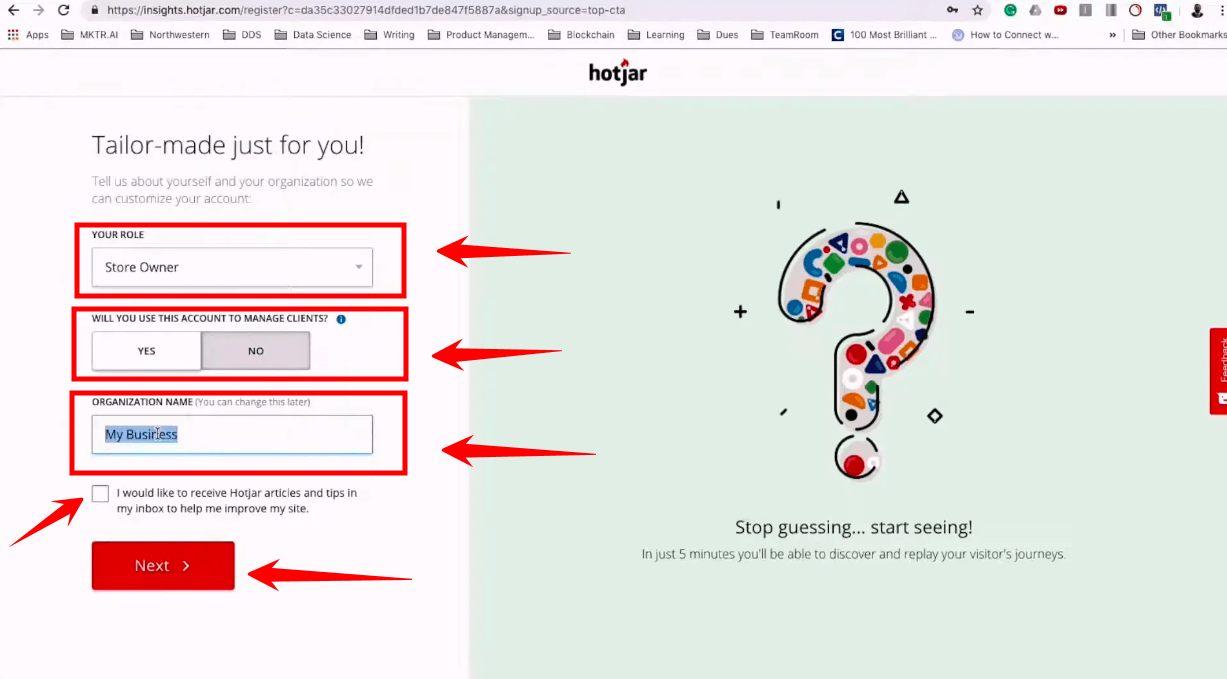
Step 5: On the following page, specify your role and indicate whether you will be managing clients with this account. Additionally, provide your organization’s name (which can be your website name) and check the box if you want to receive articles and tips in your inbox to help improve your website. Click “Next” to proceed.
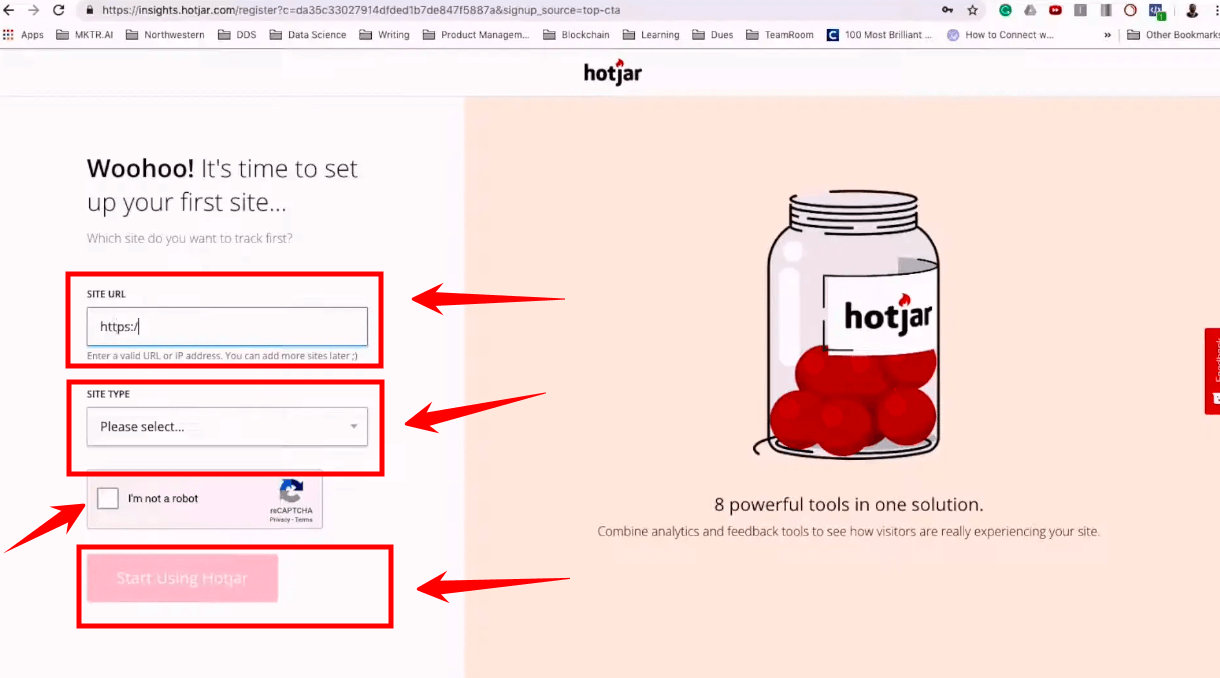
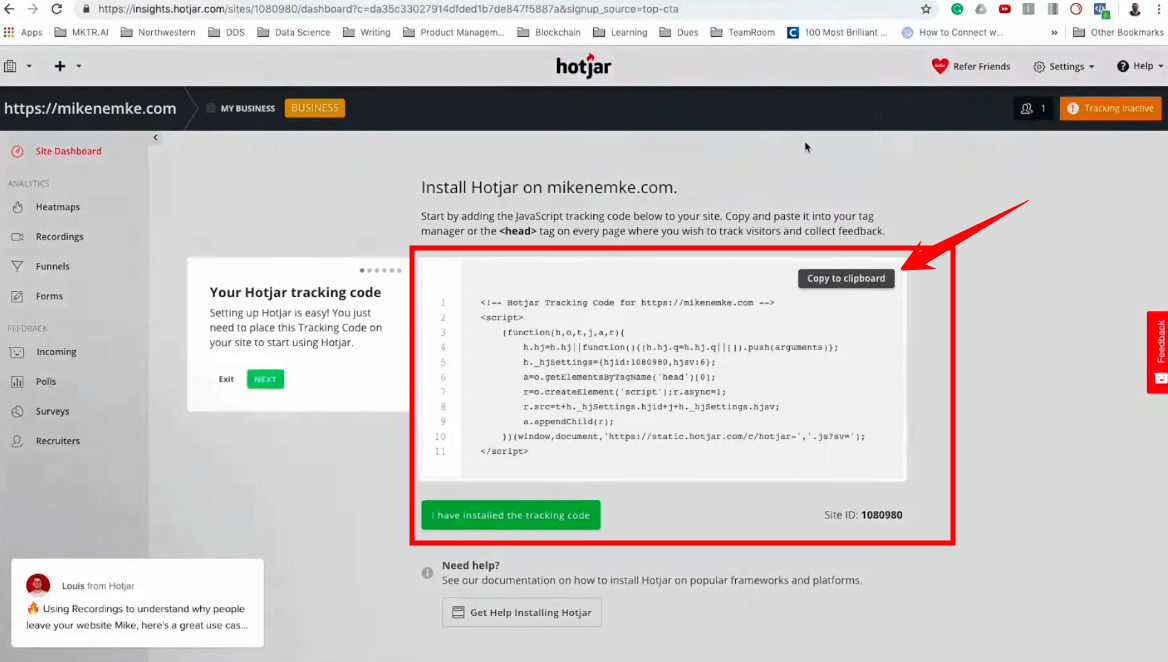
Step 6: You will now see a page where you need to add your website. Provide the necessary information about your website, including its type. Complete the captcha verification, and then click on “Start using Hotjar.”
Step 7: You will be redirected to a page where you can find your Hotjar tracking code. Click on the “Copy to clipboard” button to copy the code.
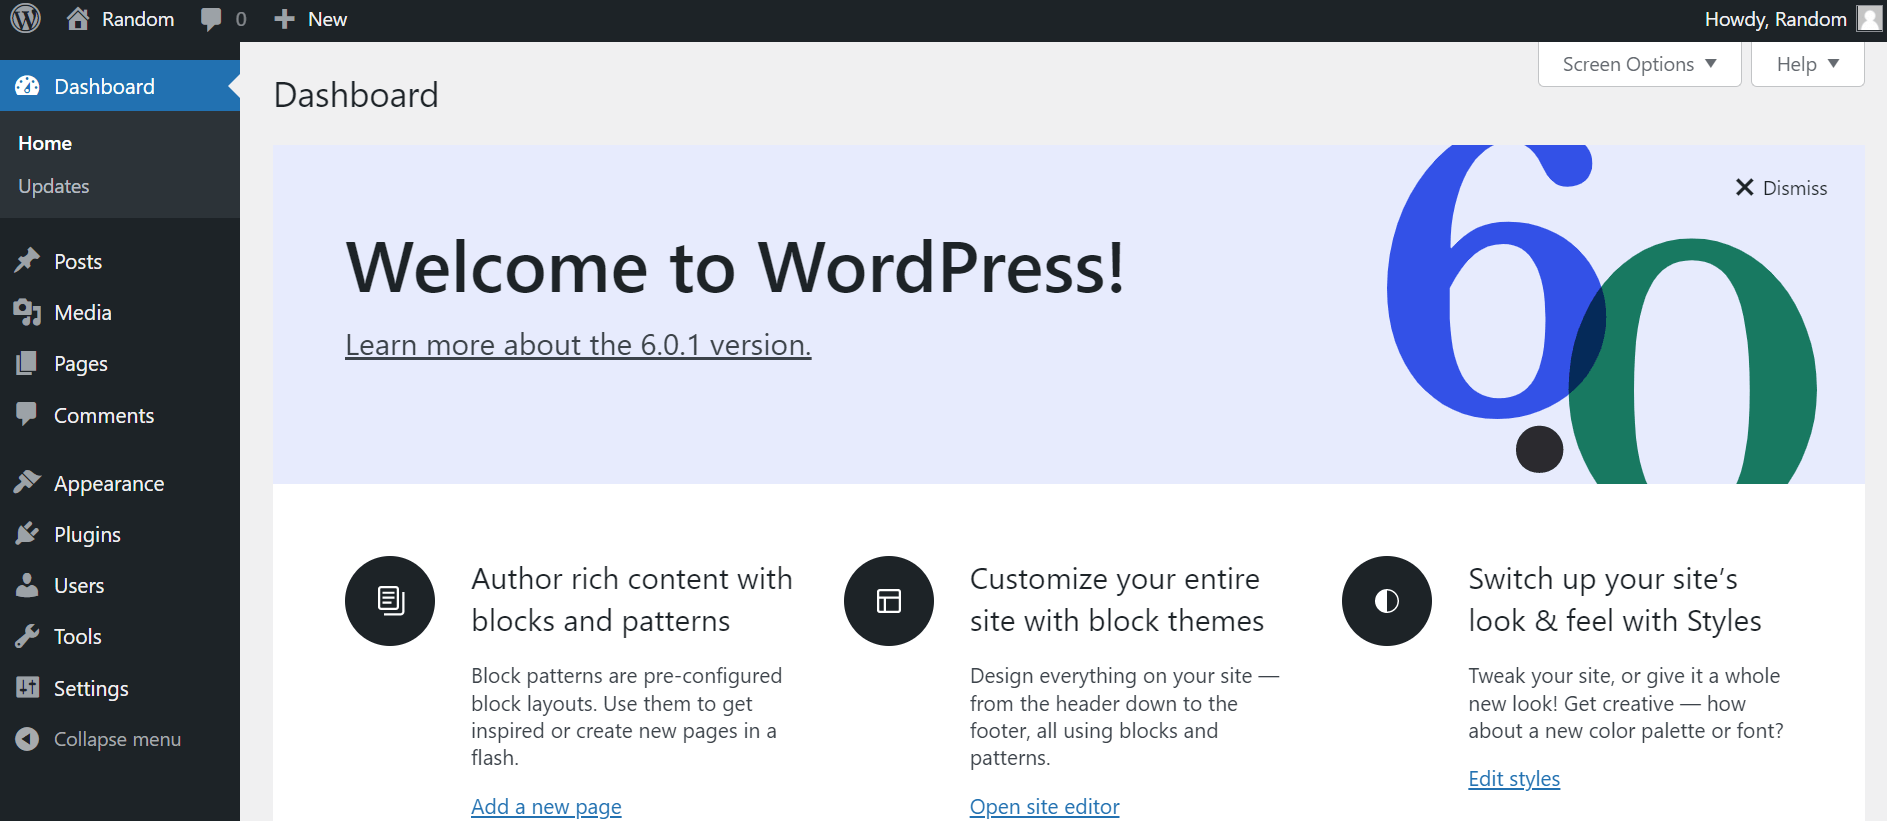
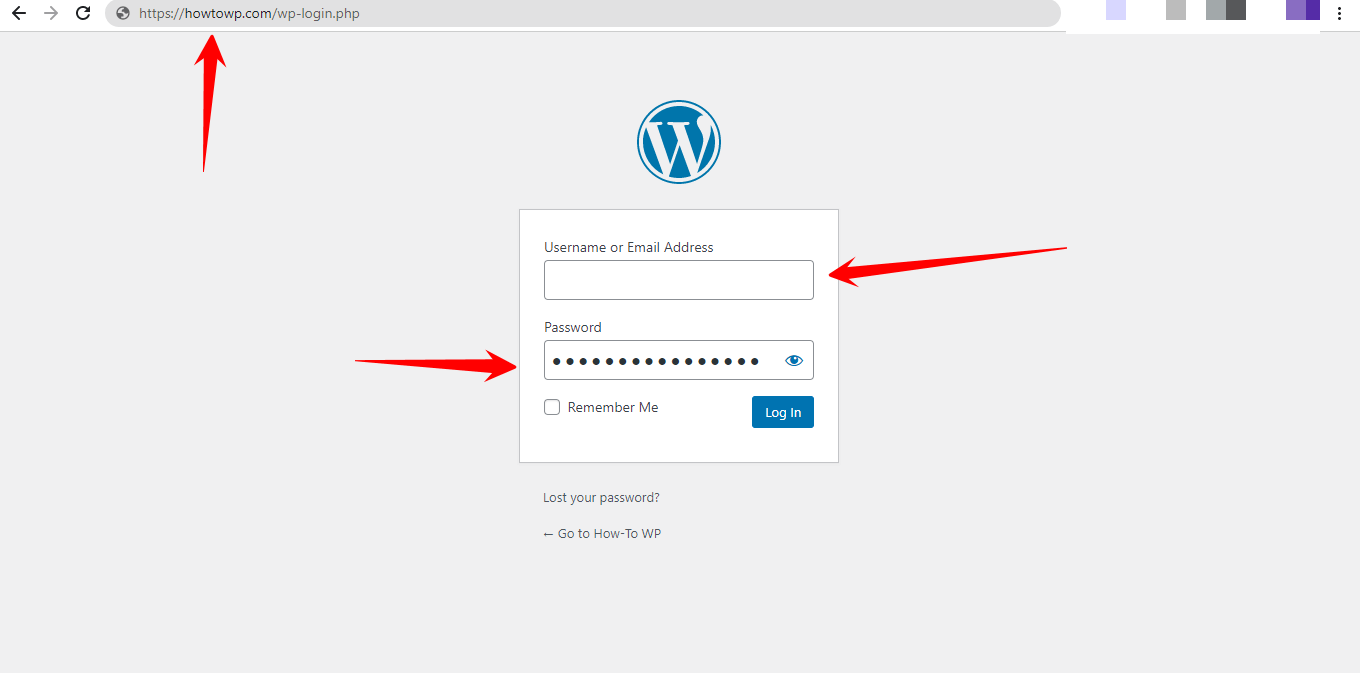
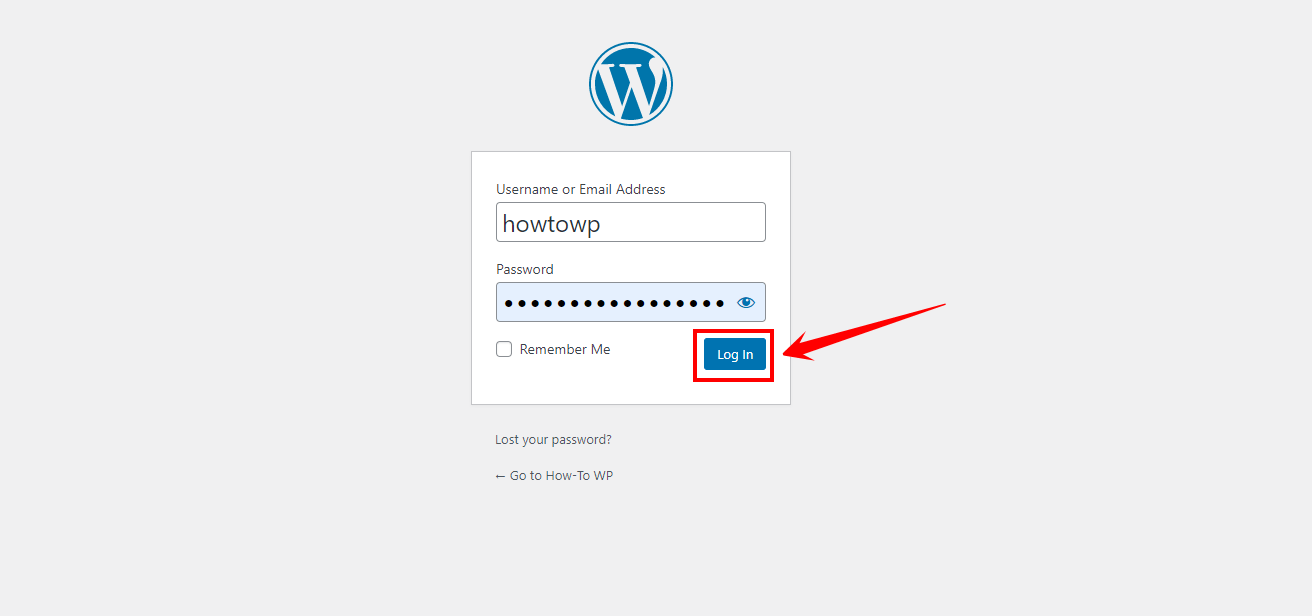
Step 8: Open your WordPress website and log in to the “WordPress dashboard” using your credentials.
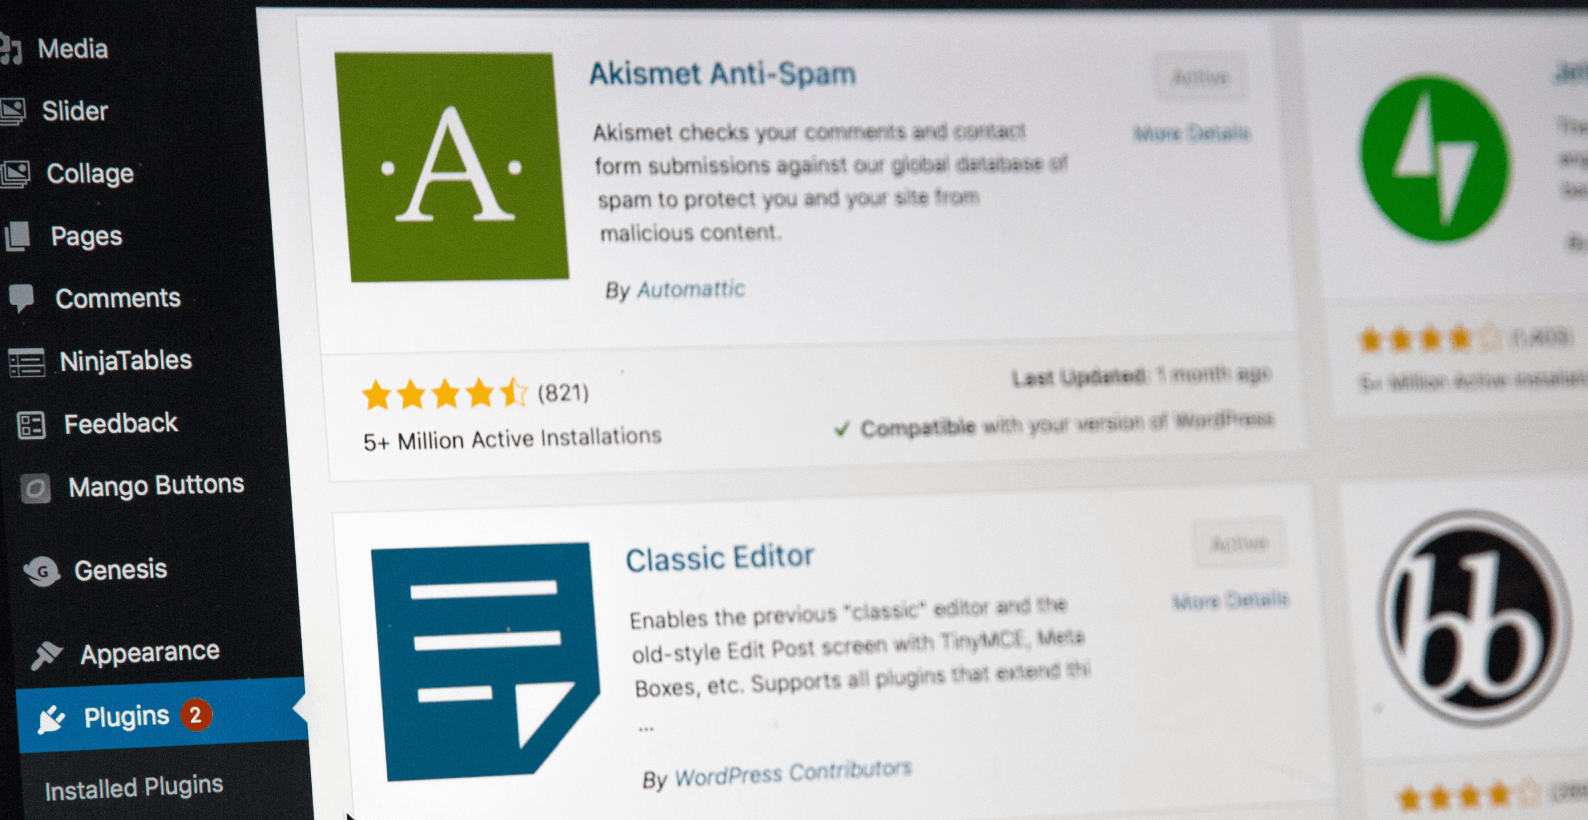
Step 9: Access the “Plugins” menu from the left sidebar and select “Add New” to open the plugin directory.
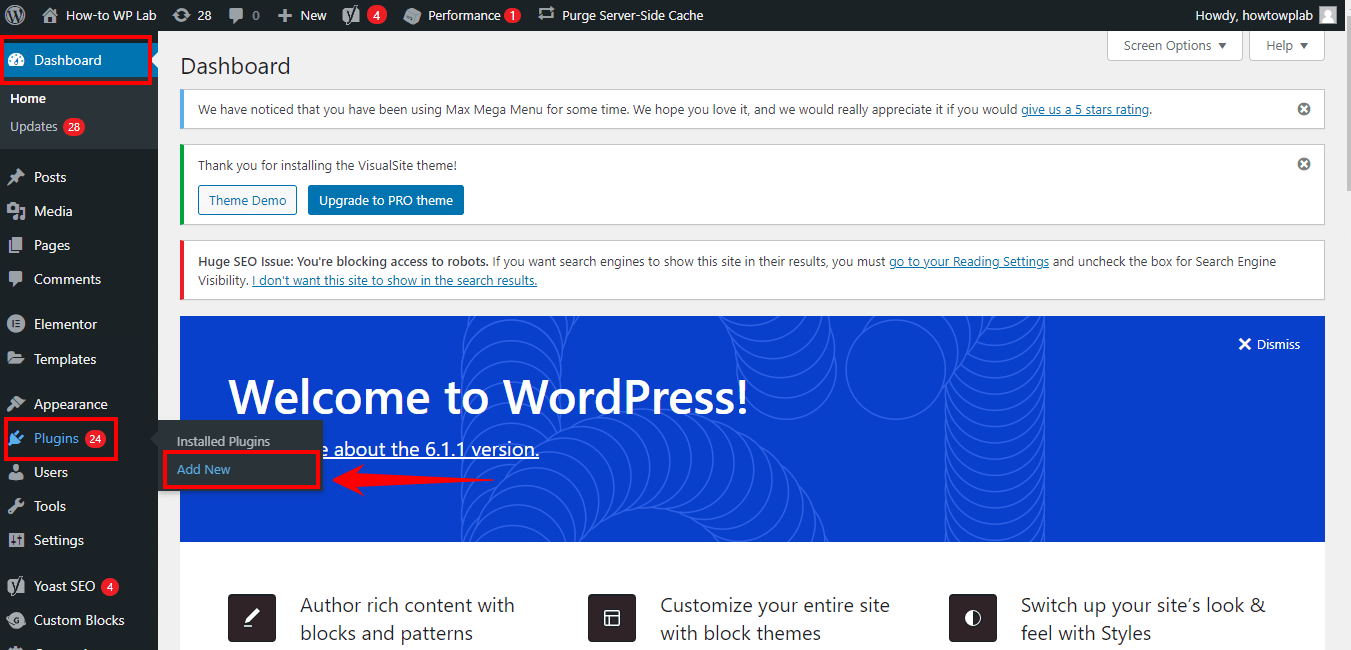
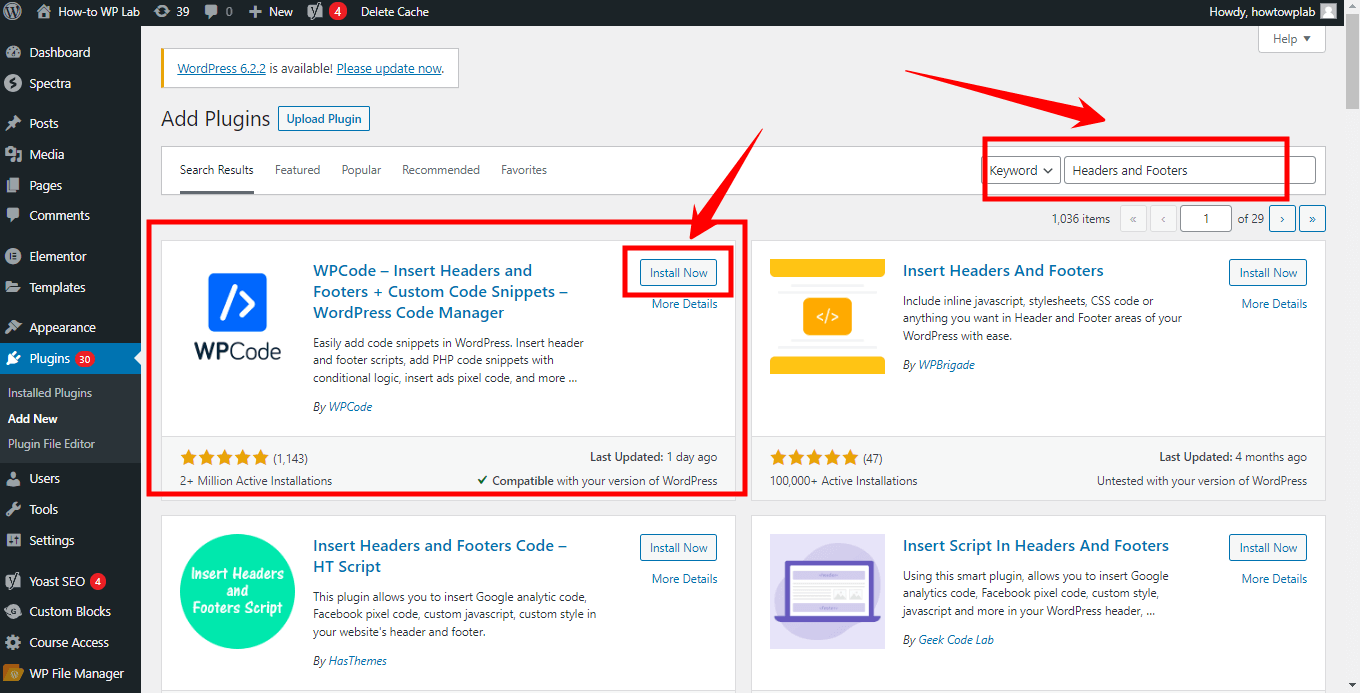
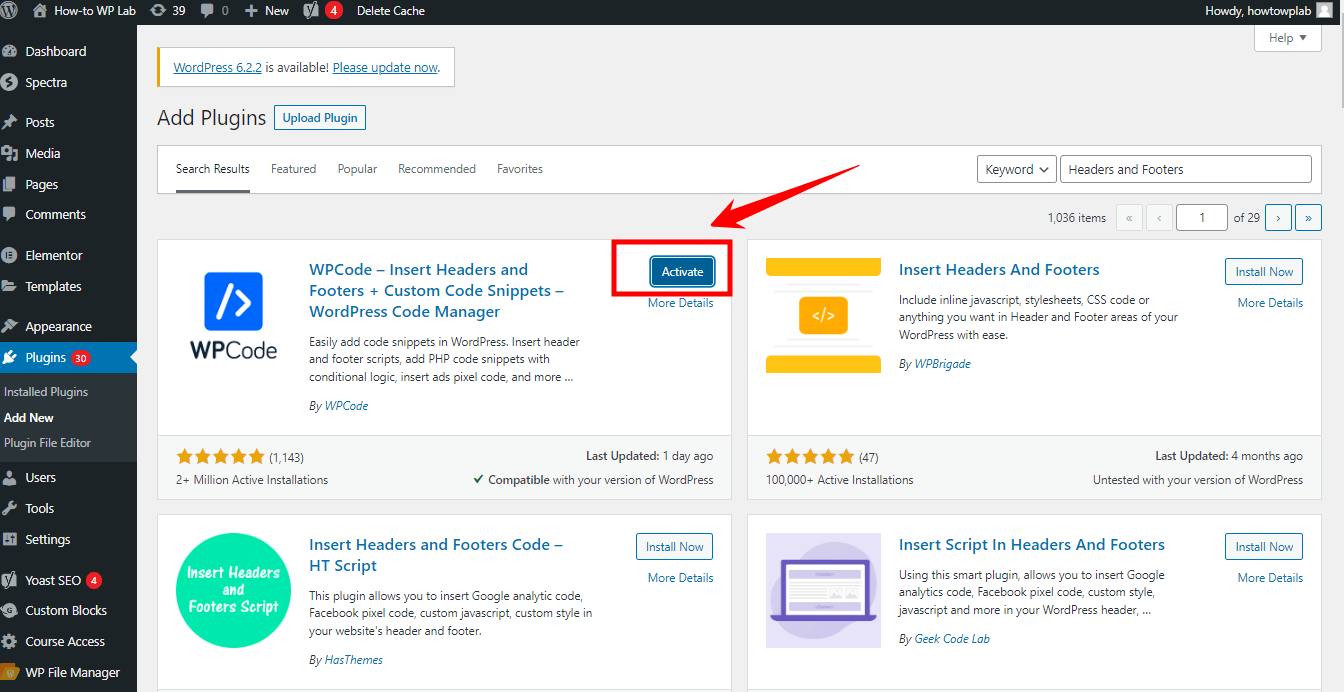
Step 10: In the search box, type “WPCode – Insert Headers and Footers,” which is the name of the plugin you need. When the plugin appears in the search results, click on “Install Now.”
Step 11: After installing the plugin, click on “Activate” to start using it.
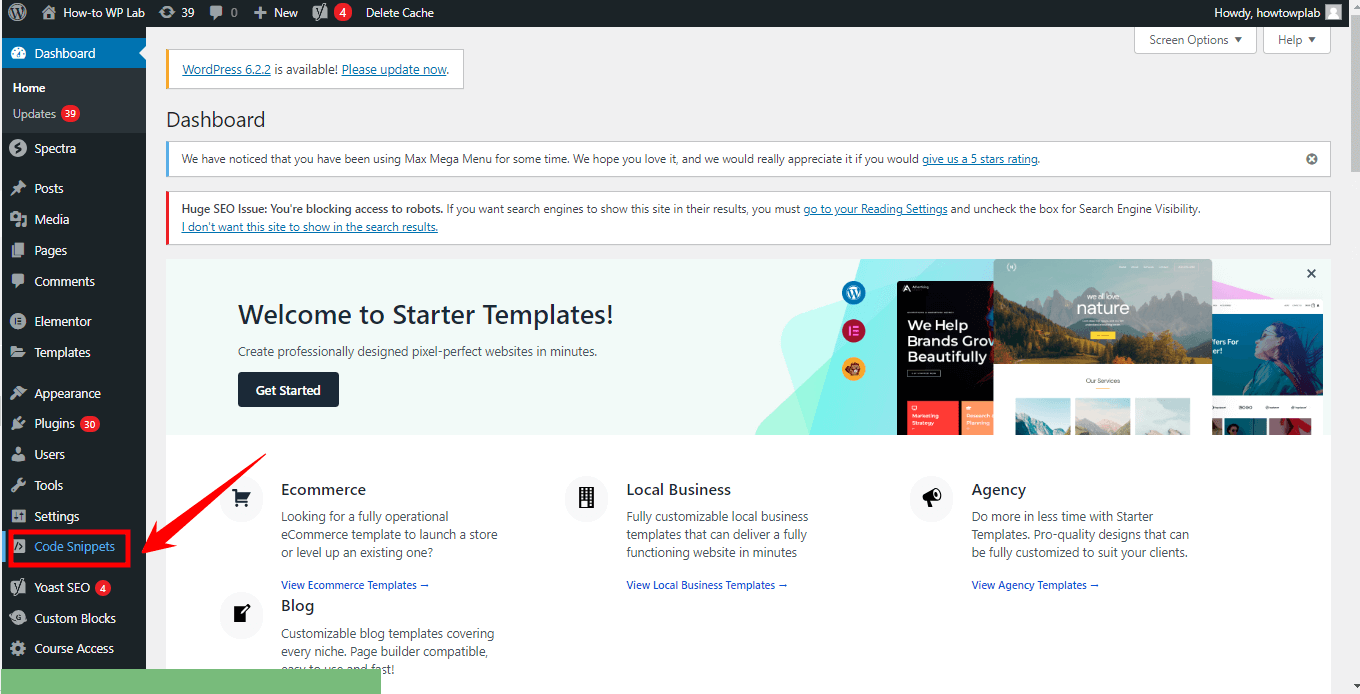
Step 12: After activating the plugin, navigate to the lower-left section of your screen, where you will find a newly added option called “Code Snippets.” Simply click on this option to proceed.
Step 13: In the Headers and Footers settings, locate the header section and paste the copied Hotjar tracking code. Remember to save the settings after pasting the code.
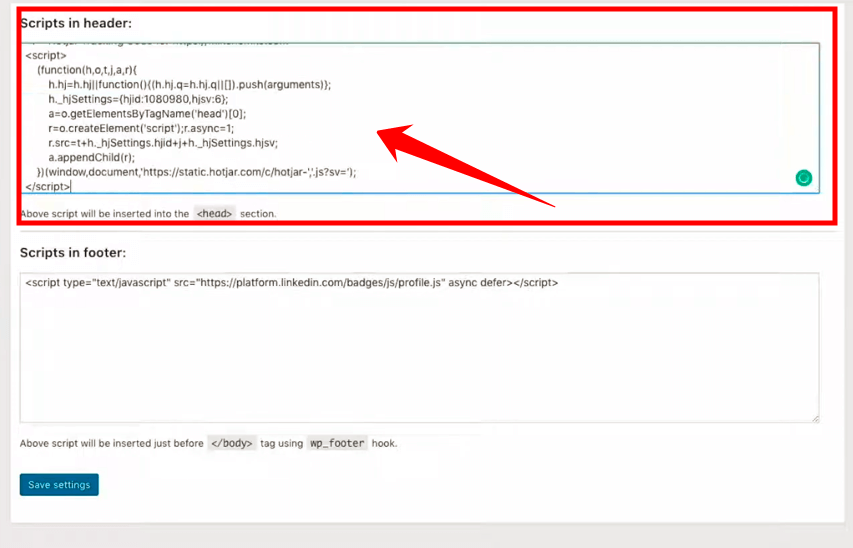
Note: It may take a few minutes for the changes to take effect and for Hotjar to be activated on your website.
Step 14: Return to your Hotjar account and click on “Verified Installation.” Then, click on the “Exit” button to proceed. Finally, click on “I have installed the tracking code.” Please note that it might take some time for the installation to be verified.
Step 16: Go back to your website, refresh the page, and you should see a pop-up indicating that the installation has been verified.
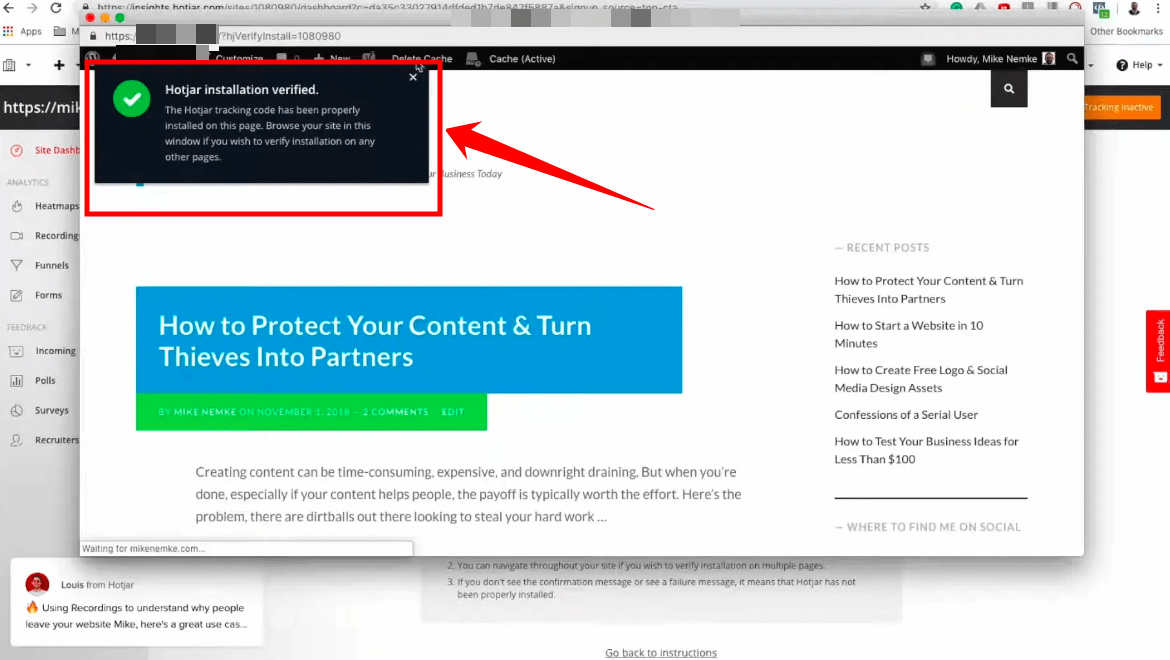
Congratulations! You have successfully installed Hotjar on your WordPress website. Now you can start exploring the powerful features and gather valuable insights to optimize your website’s user experience.
Pros:
- Customization: Manual installation allows for more customization options. You can place the tracking code precisely where you want it in your website’s header, ensuring seamless integration.
- Complete Control: By manually adding the tracking code, you have full control over the implementation process. You can easily make adjustments or modifications as needed.
- Compatibility: This method works well with different themes, plugins, and custom website setups, as it does not rely on a specific plugin for integration.
Cons:
- Technical Knowledge: Method 1 requires a basic understanding of how to add code to your website’s header. If you need to familiarize yourself with coding or are uncomfortable making changes to your website’s files, it might be more challenging to implement.
- Time-Consuming: Manual installation can be more time-consuming, especially if you have a complex website structure or multiple pages to update with the tracking code.
Note: Remember, this is just one method of setting up Hotjar. If you prefer an alternative approach using the Hotjar WordPress plugin, refer to the relevant section in this guide.
Method 2: Installing Hotjar Using WordPress Hotjar Plugin
If you prefer a simpler and more streamlined approach to integrating Hotjar with your WordPress website, we have just the solution for you.
By utilizing the WordPress Hotjar plugin, you can quickly and effortlessly set up Hotjar on your WordPress site without the need for advanced technical skills. This user-friendly plugin takes care of the technicalities, making installation a breeze for users of all experience levels.
If you value convenience and ease of use, follow the step-by-step guide provided below.
Step 1: Log in to your WordPress website’s dashboard using your credentials.
Step 2: From the left sidebar, navigate to the “Plugins” menu and select “Add New” to open the plugin directory.
Step 3: In the search box, type “Hotjar” and click on the “Search” button.
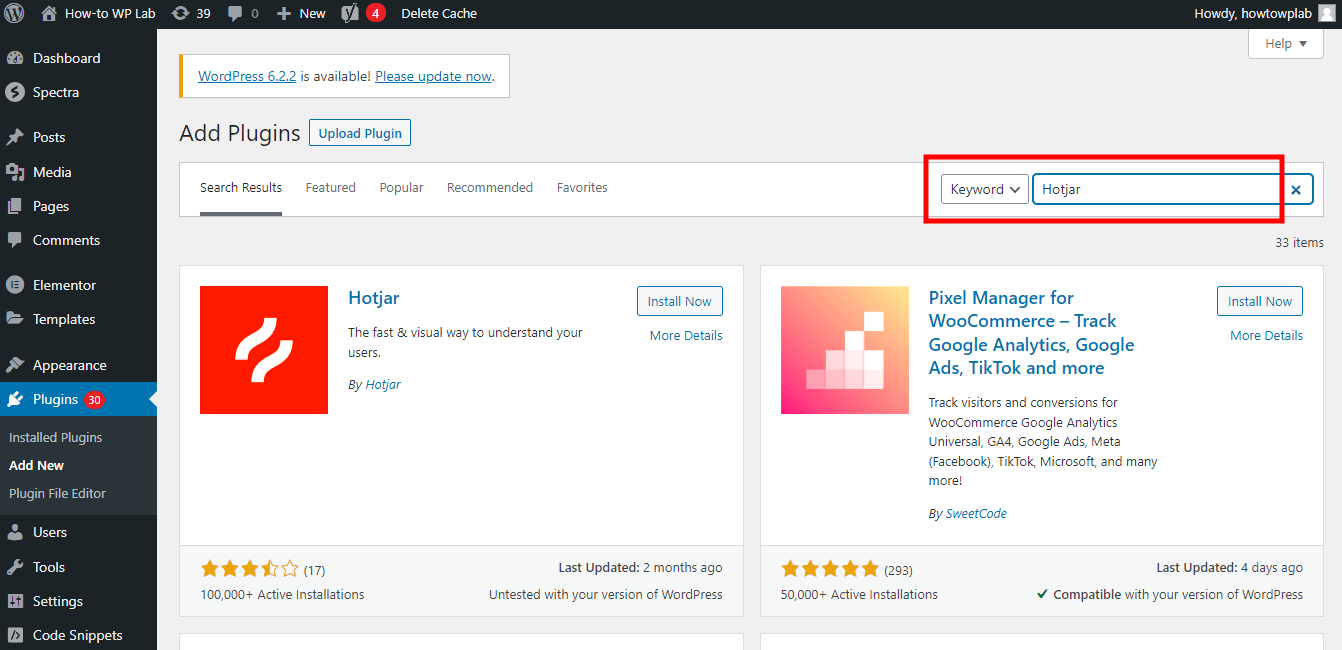
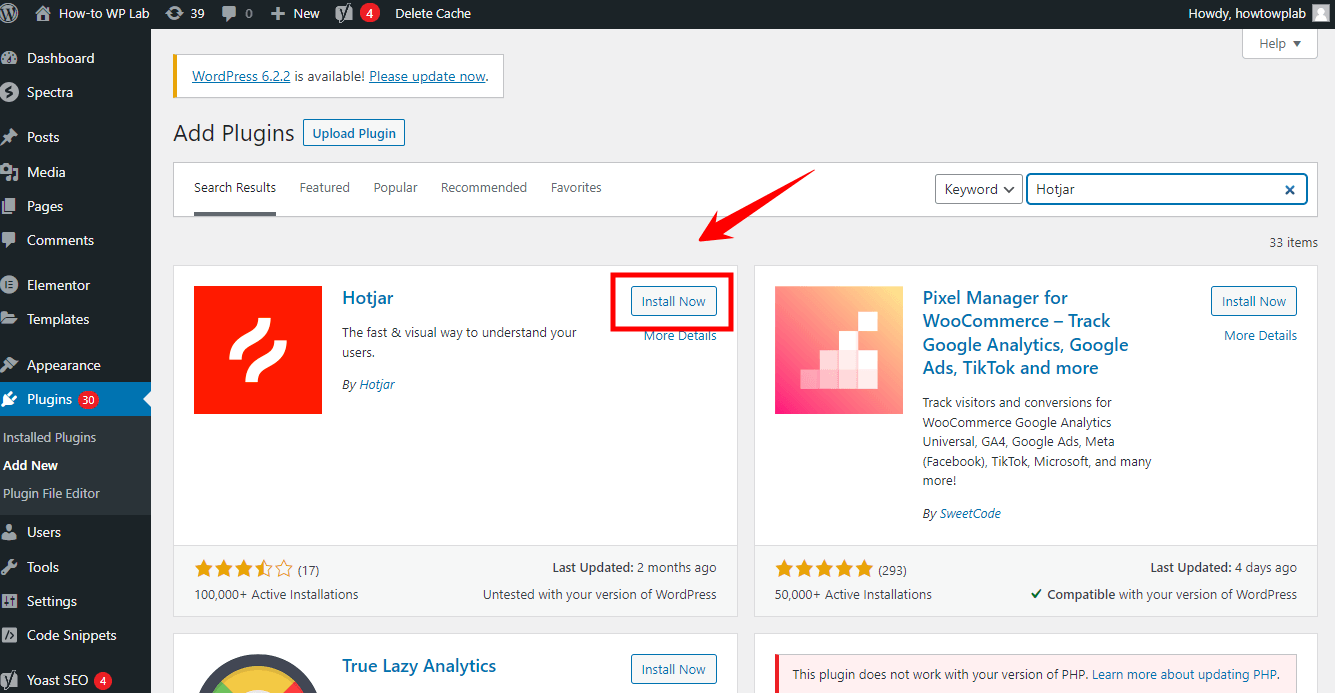
Step 4: Look for the “Hotjar” plugin in the search results and click on “Install Now” next to it.
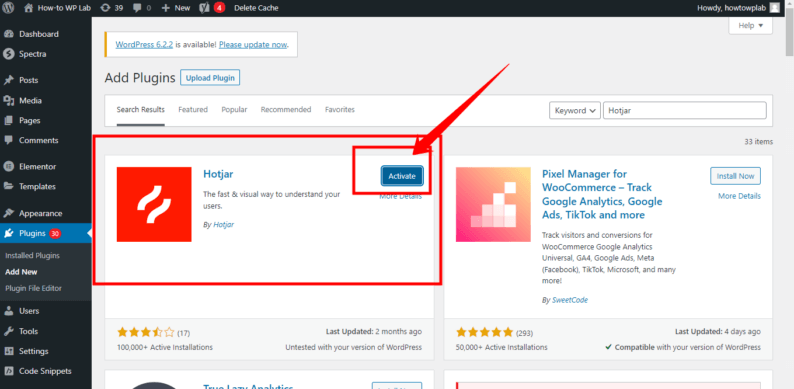
Step 5: Once the plugin is installed, click on “Activate” to activate the Hotjar plugin.
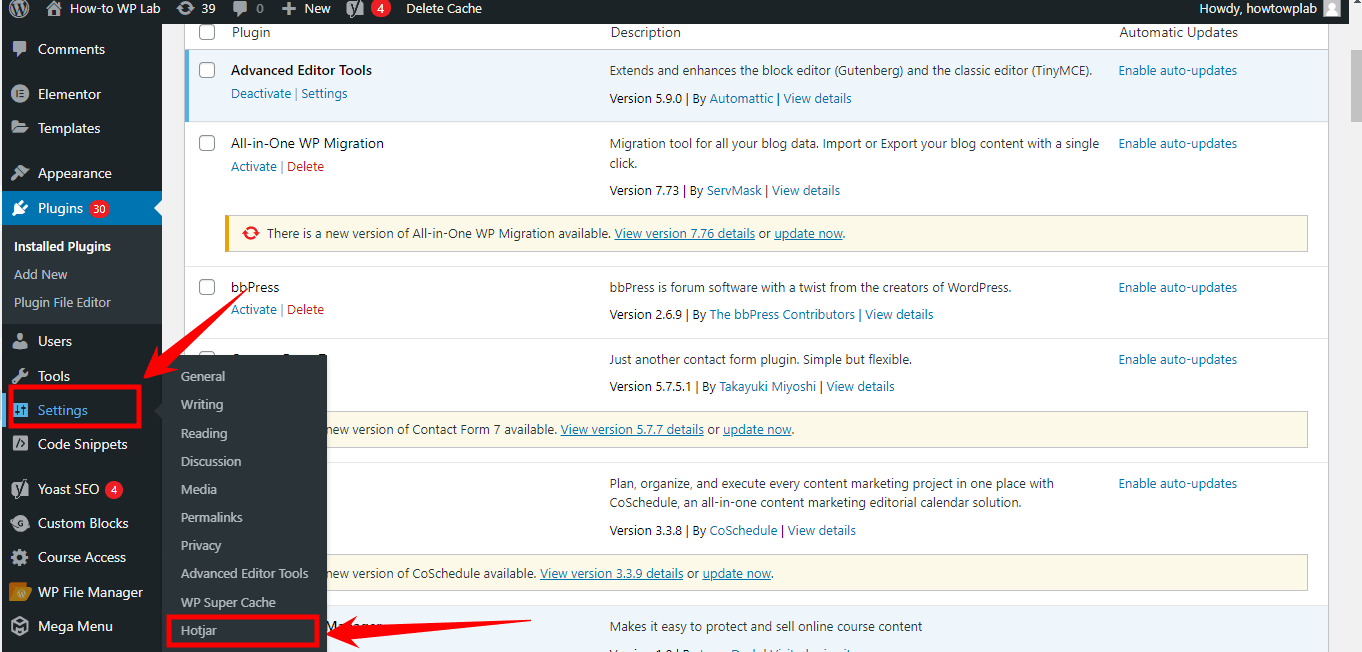
Step 6: After activation, go to the “Settings” menu in the WordPress dashboard and click on “Hotjar.”
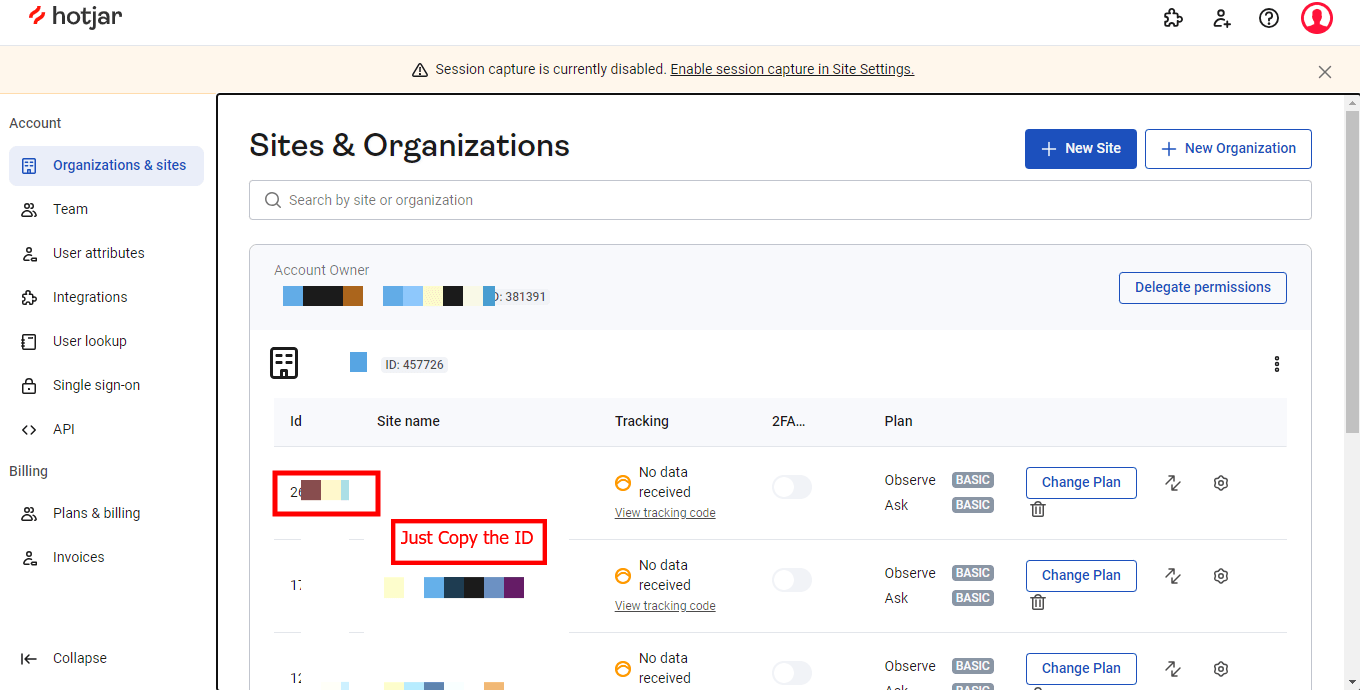
Step 7: Now, navigate to your Hotjar account and access the “Hotjar Sites” page. Here, you will find the Site ID specific to your WordPress site.
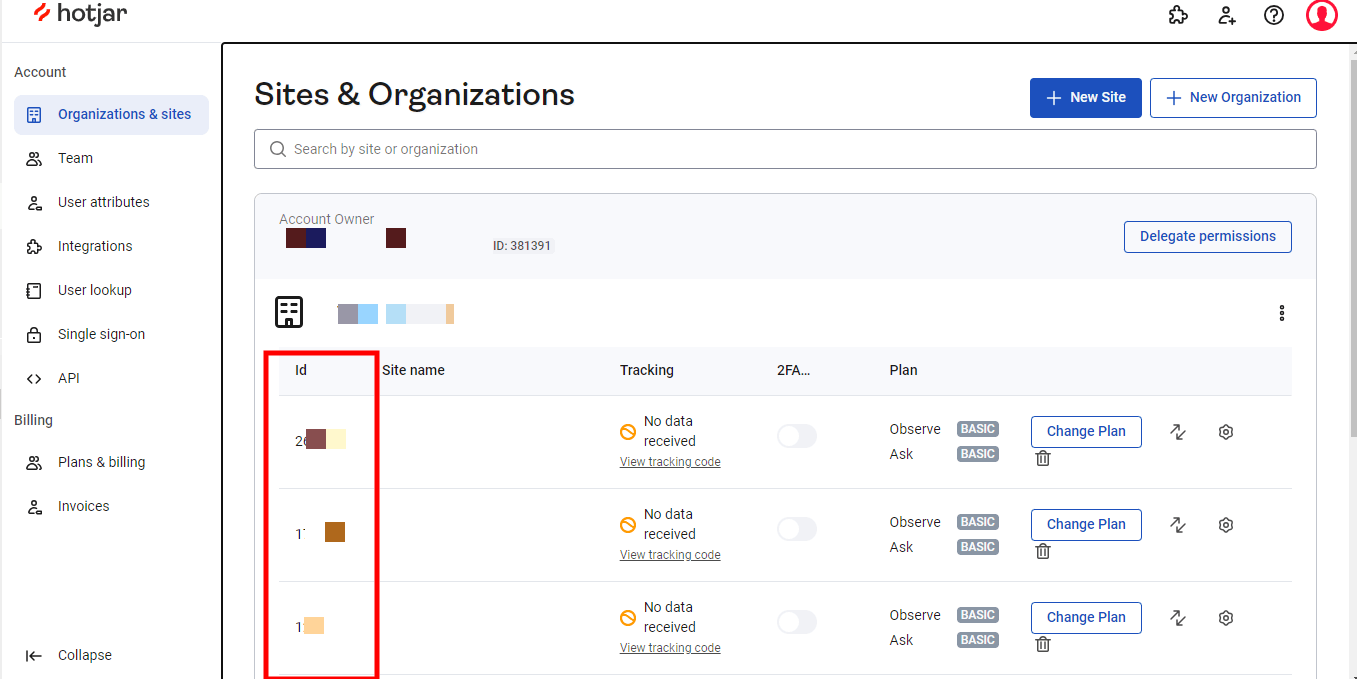
Step 8: Copy the Site ID, which consists of a set of numbers located to the left of your site’s URL.
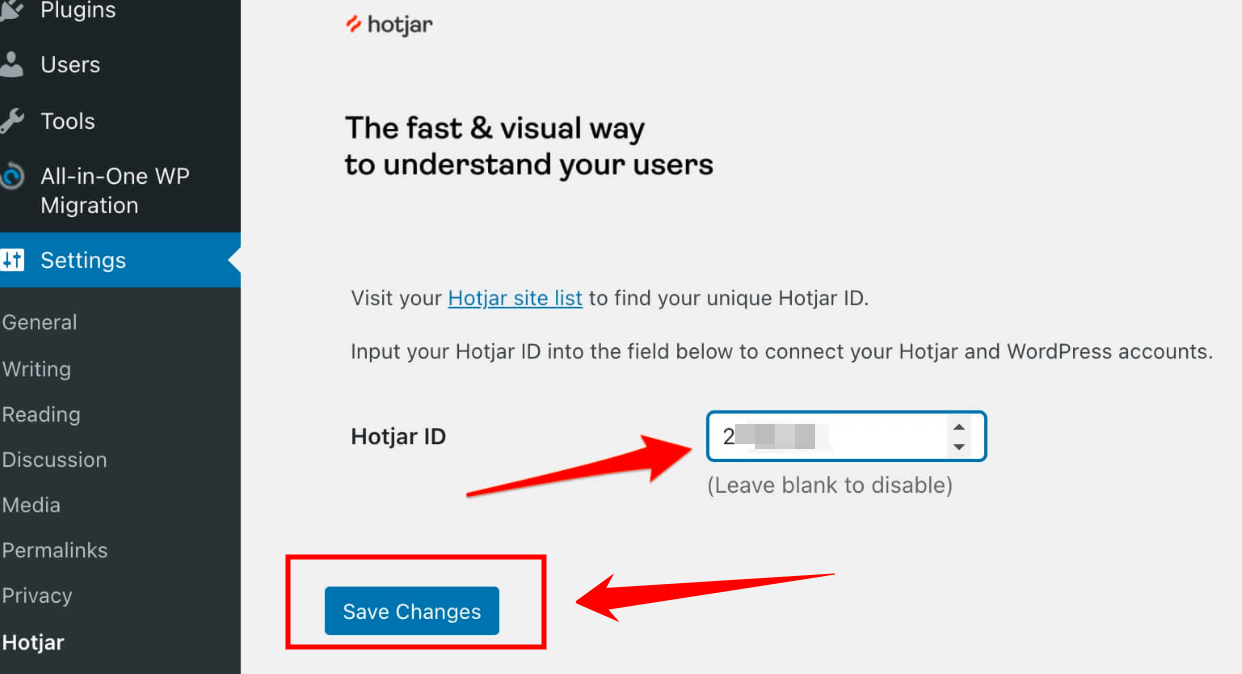
Step 9: Return to your WordPress dashboard and go to the “Settings” menu. Look for the “Hotjar” option and click on it.
Step 10: Within the Hotjar settings page, locate the designated text field where you can paste your Hotjar Site ID.
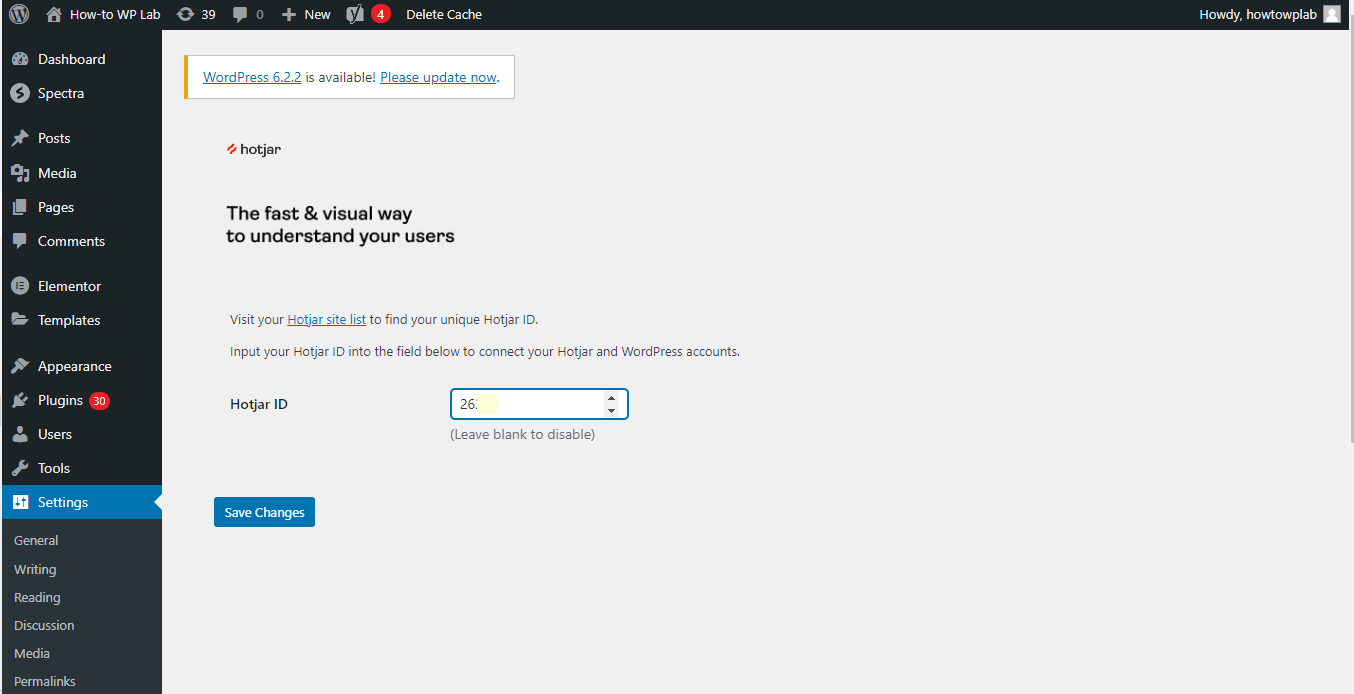
Step 11: Paste the Site ID into the text field and click on the “Save Changes” button to apply the configuration.
Pro Tip: To ensure a successful installation, it is crucial to follow the steps for verifying your Tracking Code. This verification process confirms that the Hotjar Tracking Code is correctly integrated into your WordPress website.
Congratulations! You have successfully installed Hotjar using the WordPress Hotjar plugin. You can now start leveraging Hotjar’s powerful features to analyze user behavior, improve user experience, and optimize your website for better conversions.
Pros:
- Ease of Use: The WordPress Hotjar plugin offers a user-friendly interface, making it easier for non-technical users to install and set up Hotjar.
- Streamlined Integration: With the plugin, the installation process is simplified, and you can quickly enter your Hotjar Site ID and configure the settings within the WordPress dashboard.
- Compatibility: The WordPress Hotjar plugin is specifically designed to integrate Hotjar with WordPress websites, ensuring seamless compatibility and reduced chances of conflicts.
Cons:
- Limited Customization: While the plugin simplifies the installation process, it might offer fewer customization options compared to manual installation. You may have less control over the exact placement of the tracking code.
- Dependency on the Plugin: Method 2 relies on the WordPress Hotjar plugin, which means that any issues or updates related to the plugin could potentially impact Hotjar integration on your website.
Pro Tip: Remember to explore the different tools and settings in the Hotjar plugin to tailor the data collection and analysis according to your specific needs. Enjoy harnessing the insights Hotjar provides to enhance your WordPress website!
Method 1 vs. Method 2: Choosing the Right Approach for Your Website
Now that we’ve delved into both methods to integrate Hotjar into your WordPress website, you might be pondering, “Which method should I choose?” That’s an excellent question, and it’s time we help you make an informed decision.
Remember, the best approach depends on your specific needs, your comfort level with technology, and your website’s particularities. Let’s dive in and compare both methods to help you decide.
| Consideration | Method 1: Script Code | Method 2: Plugin |
|---|---|---|
| Ease of Use | Requires some technical knowledge | Very easy, no coding knowledge required |
| Flexibility | You decide where the script is placed | Automatic placement of script |
| Features | No additional features | Depending on the plugin, might offer other features |
You can make an informed decision based on your technical knowledge, your desired level of ease and flexibility, and the specific features each method offers. Let’s dive deeper into each factor and discover the approach that best suits your needs and preferences.
1: Ease of Use
If you’re someone who has a limited amount of experience with coding or the back-end of WordPress, the plugin method could be your best bet. It’s designed to be user-friendly and straightforward. You install the plugin, activate it, input your Site ID, and voila – you’re all set!
On the other hand, if you’re comfortable dealing with website codes and the website header, manual installation might be manageable. You’ll have more control and can ensure the Hotjar tracking code is placed exactly where you want it.
2: Flexibility
The manual method certainly allows for more flexibility. Since you’re directly embedding the script into your website’s header, you have a greater degree of control over its placement and implementation.
The plugin method, while incredibly user-friendly, does not offer this level of control. However, for most website owners, the default settings provided by the plugin should suffice.
3: Features
Both methods essentially enable the same suite of features as they’re both integrating the same tool – Hotjar – into your WordPress website. Your choice, therefore, hinges more on your comfort with the integration process rather than the features you can access.
4: Factors to Consider
When deciding between these two methods, consider your technical expertise and your comfort level with handling website code. If you’re comfortable with coding, the manual method might appeal to you. If not, the plugin approach provides an easy, fuss-free alternative.
Moreover, consider the type of your website. If you’re running a simple blog or a small website, the plugin method might be more than sufficient. But if you have a complex, large-scale website or specific needs regarding script placement, you might want to opt for the manual method.
Ultimately, remember that there is no ‘one size fits all’ approach here. It’s about finding the method that works best for your website, your technical ability, and your specific needs. Both methods have their pros and cons, but they both lead you to the same goal: harnessing the power of Hotjar for your WordPress website. So choose the path that suits you best, and let’s get started with user behavior analysis!
Explore Hotjar Features
Congrats on successfully setting up Hotjar on your WordPress site! But wait! There’s more. We’re now going to dive into the juicy part – understanding Hotjar’s features and how to make the most out of them.
Buckle up as we explore these tools, figure out how to read the reports they generate, and ultimately, how to use them to boost your website’s user experience.
Feature 1: Heatmaps
Heatmaps in Hotjar are vibrant, color-coded visual aids that help you understand how users interact with your website. Picture a thermal image, where ‘hot’ areas represent high interaction, and ‘cold’ ones show lesser activity. But how do we make sense of these pretty colors?

Analyzing heatmaps involves looking for patterns and areas with high user interaction. Are users fixated on certain images? Do they tend to ignore some parts of the page? Answers to these questions can help you understand what captures users’ attention, enabling you to optimize content placement accordingly.
Feature 2: Recordings
Hotjar’s visitor recordings are like your private cinema, showing how users navigate your site. It’s a treasure trove of insights into user behavior and interaction.
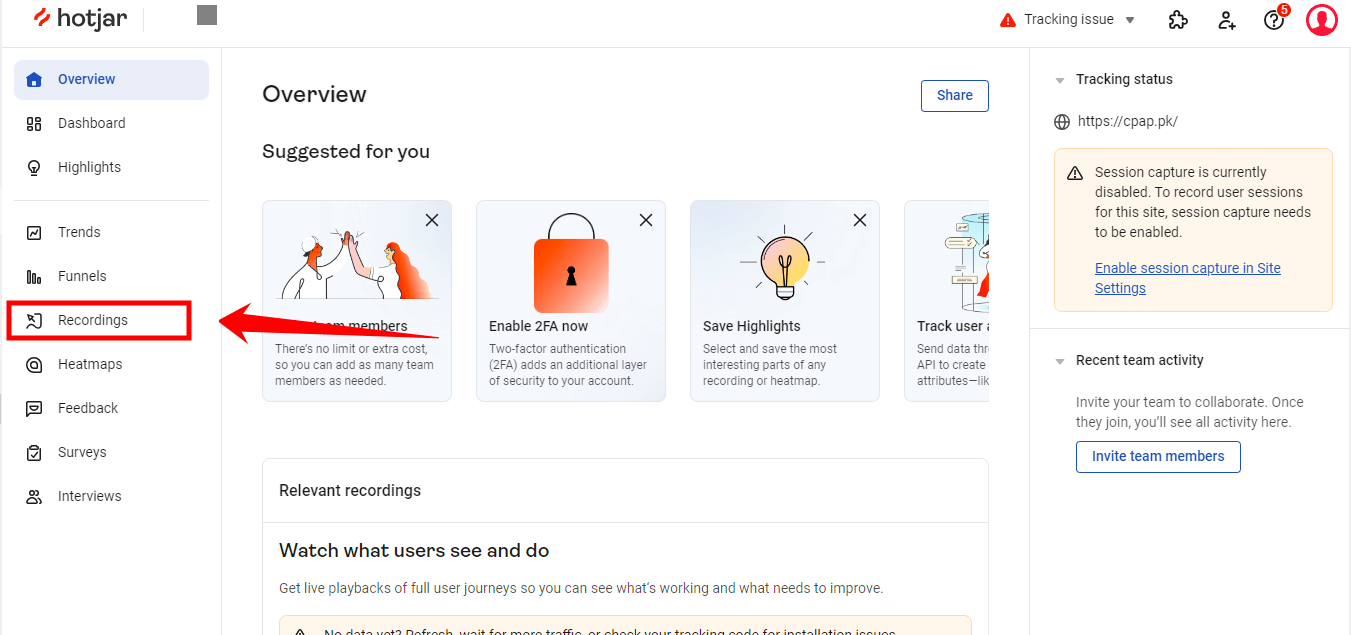
When you watch these recordings, pay attention to where users spend most of their time, what they click on, and any challenges they encounter. Notice if they’re struggling to find a button or if a particular page has a higher exit rate. Identifying and rectifying these issues can significantly enhance the user experience.
Feature 3: Conversion Funnels
Think of Hotjar’s conversion funnels as a road map showing where users start their journey and where they drop off. It’s a key tool for identifying weak spots in your users’ journey, such as a form with too many fields or a complicated checkout process.
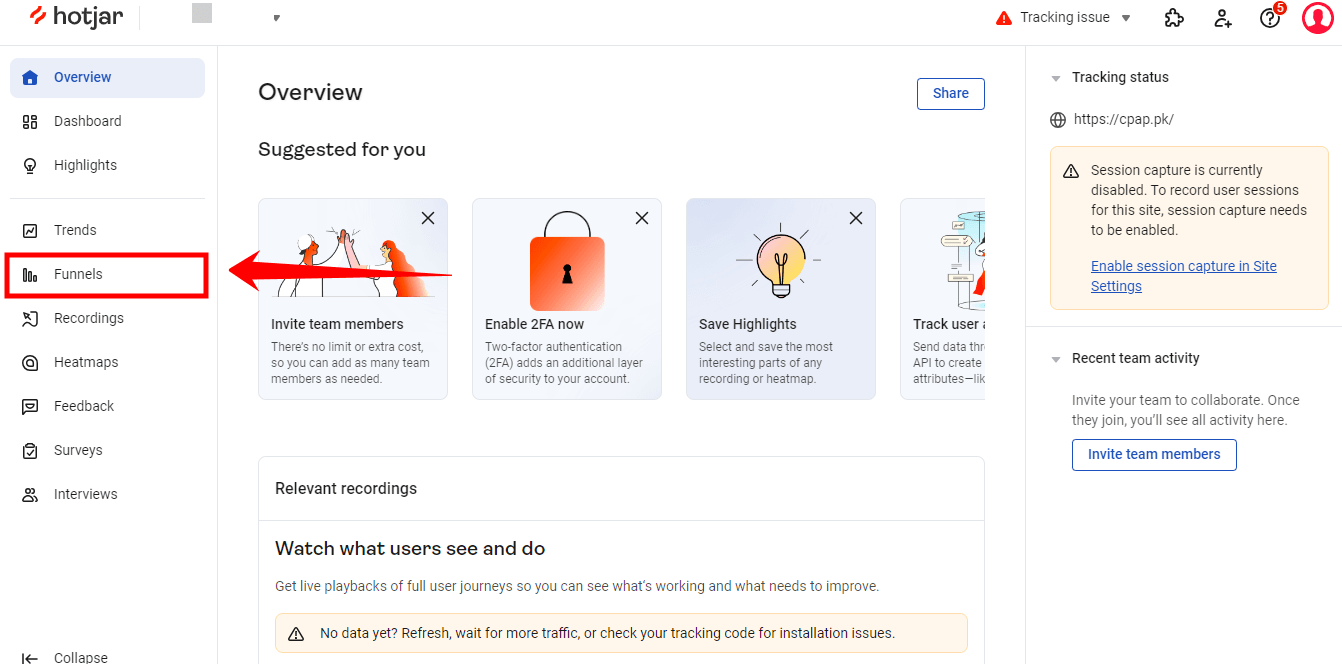
By examining these funnels, you can pinpoint exactly where users abandon their journey. Focus on these areas and find ways to streamline the process, thereby increasing user retention and conversion rates.
Feature 4: Feedback and Surveys
There’s no better way to understand your users than by directly asking them. Hotjar’s feedback polls and surveys give you just that – direct insights from your users.

When analyzing feedback, look for recurring themes or issues. Is there a feature users consistently ask for? Are they facing similar problems? The answers to these questions provide invaluable guidance for improving your website and making it more user-friendly.
Maximizing Hotjar’s Potential
To truly maximize Hotjar’s potential, remember to regularly review these reports. The insights you gain can drive significant improvements to your website, making it more engaging and user-friendly.
Whether it’s rearranging content based on heatmap results, rectifying issues found in visitor recordings, adjusting steps in your conversion funnels, or responding to user feedback – the key is to keep learning and evolving.
By mastering Hotjar’s tools and interpreting the reports, you can turn these insights into actions, leading to a better understanding of your users and, ultimately, a better website. So, dive in and unleash the full power of Hotjar!
Case Study: How Hotjar Improved My Website’s User Experience
Are you eager to witness the remarkable impact Hotjar had on enhancing the user experience of my website? Before we dive into the intriguing case study, I want to provide you with a necessary disclaimer.
Disclaimer: While I am enthusiastic about sharing the exact name of my Ecommerce store for this case study, I must prioritize confidentiality. Regrettably, I am unable to disclose the specific asset name. However, to give you a clear understanding of the transformative effects of Hotjar, I will present you with illustrative screenshots and compelling statistics that vividly demonstrate the positive outcomes it delivered.
Rest assured, the valuable principles and strategies outlined in this case study are universally applicable, enabling any Ecommerce store to drive similar enhancements. Let’s embark on this exciting journey together as we explore the invaluable insights and tangible results that Hotjar brought to my website.
The Previous State of the Website
My Ecommerce website, let’s call it ArtisanEmporium, was an eclectic store selling handmade goods from artisans worldwide. However, despite boasting a healthy visitor count of approximately 29,000 each month, the conversion rate was stuck at a paltry 0.5%. The disconnect was glaring: the traffic was there, but why weren’t people clicking the ‘buy’ button?
Most puzzling was the observation that many visitors added products to their carts but never completed their purchases.
Implementation of Hotjar
We turned to Hotjar for answers, installing the tool on our WordPress site. (A screenshot of the Hotjar plugin in WordPress would be useful here)
With Hotjar set up, we initiated our investigation using Heatmaps. This showed us how users interacted with the site. Unexpectedly, some crucial elements in our navigation menu were mostly ignored, while seemingly insignificant parts got more attention. We needed to rethink our layout.
Next, we deployed Visitor Recordings. By observing our visitors’ journey, it became evident that many users were struggling at the checkout stage. They lingered on this page for a while but left without completing their purchases. The video evidence was compelling.

We decided to follow up on this observation and set up Conversion Funnels from the homepage to the thank-you page post-checkout. This further confirmed our suspicions: the most substantial visitor drop-off was happening at the checkout stage. (Screenshots of conversion funnels should be inserted here)
To understand why, we implemented Form Analysis. We discovered our checkout form was too long and daunting for users, causing them to abandon it halfway through. (Insert screenshots of form analysis here)
For a more direct approach, we also set up Feedback Polls on the checkout page. The feedback received echoed our observations: users found the checkout process too long and complicated.
The Impact of Hotjar
Hotjar provided us with a wealth of insights. Now, it was time to act.
We started by redesigning our navigation menu, highlighting crucial links, and making it more user-friendly.
Next, we addressed the elephant in the room: our complicated checkout process. We streamlined the checkout form, reducing the number of fields and adding a ‘Guest Checkout’ option. We wanted our visitors to focus on their purchases, not the paperwork.
The Current State of the Website
After implementing these changes, we closely monitored our metrics. The results were astounding. Within a month, ArtisanEmporium’s conversion rate leaped from 0.5% to 2%—a 300% increase! Our average session duration increased, and cart abandonment rates took a nosedive.
But the journey doesn’t end here. We continue to leverage Hotjar to monitor user behavior, analyze new trends, and make continuous improvements to our site. One recent finding from our heatmaps indicated an unexpected interest in a particular homepage section. Now, we’re testing a new design that accentuates this section. The saga of data-driven improvement continues. (Screenshots of analytics showcasing improved metrics can be inserted here)
Data is the heartbeat of user experience optimization, and Hotjar is an incredible tool for understanding that data. Whether you’re running an e-commerce store like ShopStop or any other website, taking a deep dive into your user behavior data could unlock improvements you never thought possible.
Important Considerations After Installing Hotjar
1: Privacy and Data Protection
Congratulations on successfully installing Hotjar on your WordPress website! As you embark on this journey of user insights, it’s crucial to address an important aspect: privacy and data protection.
2: Compliance with Data Protection Laws
When collecting user data, you must comply with relevant data protection laws and regulations, such as the General Data Protection Regulation (GDPR). These laws are designed to protect the privacy and rights of individuals, and they apply to websites that gather user data.
Ensure that your website’s data collection practices align with these regulations. Familiarize yourself with the specific requirements outlined by the data protection laws in your jurisdiction.
3: Transparency and Consent
Transparency is key when it comes to using tools like Hotjar. Be upfront with your website visitors about the data you collect, how you use it, and the purpose behind it. This can be achieved through a clear and concise privacy policy that outlines the types of data you collect, the purpose of collecting it, and how users can opt out if they wish.
Additionally, obtaining proper consent is crucial. Users should have the option to provide their consent to data collection before any tracking or recording takes place. Implement a consent mechanism that allows users to easily understand and control their data sharing preferences.
4: Necessity of Data Collection
Collecting data for the sole purpose of improving your website’s user experience is essential. However, it’s important to strike a balance and collect only the data necessary for your improvement efforts. Avoid gathering excessive or irrelevant data that may infringe on users’ privacy.
Regularly review your data collection practices and assess the necessity of each data point you collect. This ensures that you respect your users’ privacy while obtaining valuable insights.
5: Data Security
User data must be handled securely to prevent unauthorized access or data breaches. Hotjar itself takes data security seriously, but it’s your responsibility to ensure your website’s overall security measures are in place. This includes having secure hosting, implementing strong passwords, and regularly updating your website’s software.
Remember, maintaining user trust and protecting their privacy is of utmost importance. By complying with data protection laws, being transparent, collecting data responsibly, and prioritizing data security, you can establish a solid foundation of trust with your users.
Best Practices When Using Hotjar
When it comes to utilizing Hotjar effectively, you should follow some best practices to ensure optimal results and a seamless user experience on your WordPress website. By incorporating these practices, you can maintain user data privacy, regularly review and analyze Hotjar data, and leverage insights to improve the overall user experience.
Practice 1: Privacy Concerns and Ensuring User Data Safety
Protecting user data is of utmost importance. To address privacy concerns and ensure user data safety while using Hotjar, consider the following best practices:
- Be Transparent and Communicate: Transparency is key. Clearly communicate to your website visitors that you are using Hotjar to collect data for optimizing the user experience. Create a privacy policy that explains the type of data collected, how it will be used, and any third-party sharing practices.
- Collect Only Necessary Data: Collect data that is directly relevant to improving your website’s user experience. Avoid gathering sensitive or personally identifiable information unless absolutely necessary. Minimize the data you collect to respect user privacy.
- Anonymize Data: Hotjar provides options to anonymize IP addresses and mask sensitive information in visitor recordings. Take advantage of these features to protect user privacy and ensure compliance with data protection regulations.
- Honor User Preferences: Respect user preferences regarding data collection. Offer an easy opt-out option for users who prefer not to have their data collected. Provide a clear mechanism for users to exercise their choice and ensure their preferences are respected.
By adhering to these privacy best practices, you can build trust with your website visitors and demonstrate your commitment to protecting their data.
Practice 2: Regular Review and Analysis of Hotjar Data
Regularly reviewing and analyzing Hotjar data is crucial for extracting meaningful insights and making data-driven decisions. Here are some best practices for effectively reviewing and analyzing Hotjar data:
- Set a Regular Schedule: Establish a routine for reviewing Hotjar data. Determine a suitable frequency, such as weekly, monthly, or based on your website’s traffic and activity levels. Consistency is key to gaining valuable insights.
- Focus on Key Metrics: Identify the key metrics that align with your website goals and objectives. Whether it’s heatmaps, visitor recordings, conversion funnels, or feedback poll results, prioritize these metrics during your review process. Focus on the data that provides the most relevant insights for your specific objectives.
- Identify Patterns and Trends: Analyze the data over time to identify patterns and trends in user behavior. Look for recurring issues, areas of high engagement, or drop-off points in conversion funnels. These insights can guide your decision-making process and help you address pain points effectively.
- Combine Data Sources: Consider integrating Hotjar data with other analytics tools you use. By combining data sources, you can gain a more comprehensive understanding of user behavior and make informed decisions. Cross-referencing data from multiple sources can provide valuable insights into the overall user experience.
Regularly reviewing and analyzing Hotjar data allows you to identify areas for improvement, gain actionable insights, and continuously optimize your website’s user experience.
Practice 3: Utilizing Insights to Improve User Experience
Hotjar provides valuable insights into user behavior, but it’s essential to leverage those insights effectively to enhance the user experience. Here are some best practices for utilizing Hotjar insights:
- Identify Pain Points: Use Hotjar data to identify areas where users may encounter difficulties or experience friction on your website. Look for patterns in visitor recordings, heatmaps, or feedback polls that indicate common pain points. By addressing these issues, you can significantly improve the user experience.
- Prioritize Improvements: Based on the insights gathered from Hotjar, prioritize the areas that require attention and improvement. Focus on the issues that have the most significant impact on user experience or hinder conversions. By prioritizing improvements, you can allocate your resources effectively and make targeted changes.
- Experiment with Changes: Implement changes based on the insights gained from Hotjar. Test different design elements, content placement, or user flows to see how they impact user behavior and engagement. Conduct A/B testing to compare variations and measure their effectiveness. Experimentation allows you to refine your website and optimize the user experience based on data-driven decisions.
- Iterate and Refine: User behavior and expectations are constantly evolving. Continuously monitor and evaluate the impact of the changes you make based on Hotjar insights. Iterate and refine your website based on user feedback and the results of your experiments. Adopting an iterative approach allows you to keep pace with evolving user needs and deliver an exceptional user experience.
By utilizing Hotjar insights effectively, you can make data-informed decisions, optimize the user experience, and create a website that resonates with your visitors.
Remember, incorporating these best practices will enable you to maximize the benefits of Hotjar, gain valuable insights, and continuously enhance the user experience on your WordPress website.
Troubleshooting Common Issues
Even with a well-configured setup, you might encounter some common issues when using Hotjar on your WordPress website. Don’t worry! Let’s explore these issues and provide you with troubleshooting tips to overcome them.
1: Hotjar Tracking Code Not Appearing on the Website
If you’re unable to see the Hotjar tracking code on your website, follow these steps to troubleshoot the issue:
- Check the Plugin Settings: Ensure that the tracking code is properly inserted in the Hotjar plugin settings within your WordPress dashboard. Double-check that the code is correctly pasted and saved.
- Plugin or Theme Conflicts: Verify that there are no conflicts with other plugins or theme scripts. Disable any recently installed or updated plugins one by one to identify if any are causing conflicts. Additionally, switch to a default WordPress theme temporarily to rule out any theme-related conflicts.
2: Heatmap or Recording Data Not Being Captured
If you’re not seeing any heatmap or recording data in your Hotjar account, follow these troubleshooting steps:
- Verify Tracking Code Implementation: Check that the Hotjar tracking code is correctly implemented on all pages of your website. Review the code placement and ensure it appears within the <head> section of your HTML.
- Hotjar Plugin Configuration: Confirm that the Hotjar plugin is active and configured correctly in your WordPress settings. Ensure that the Site ID is accurately entered and saved within the plugin.
3: Slow Website Performance After Installing Hotjar
If you experience a decrease in website performance after installing Hotjar, consider these troubleshooting tips:
- Plugin Conflicts: Check for any conflicts between Hotjar and other plugins. Deactivate other plugins temporarily to determine if any are causing performance issues. Once identified, reach out to the respective plugin developer for assistance or explore alternative plugins.
- Optimize Hotjar Settings: Review your Hotjar settings and adjust them to optimize performance. For example, reduce the frequency of data collection or limit the number of visitor recordings stored. Fine-tuning these settings can help mitigate any impact on website performance.
Please do not hesitate to contact Hotjar’s support team if you have any questions or concerns. They are knowledgeable and can provide guidance specific to your situation.
When using Hotjar on your WordPress website, you can ensure a smooth and effective experience by troubleshooting and addressing these common issues.
Final Thoughts
Setting up Hotjar on your WordPress website is a valuable step towards optimizing the user experience. Whether you choose the manual installation method or the WordPress Hotjar plugin, Hotjar’s powerful tools will provide valuable insights into user behavior.
You can continuously enhance your website’s performance by regularly reviewing and analyzing data, prioritizing improvements, and leveraging user feedback. Remember to prioritize user data privacy and comply with regulations.
With Hotjar as your ally, you can create a user-centric website that drives meaningful results. Start integrating Hotjar today and unlock its full potential for your WordPress website.
How do I add Hotjar to my WordPress site?
To add Hotjar to your WordPress site, you have two options. The first method involves manually installing Hotjar’s script code. You can obtain the code from the Hotjar website and add it to your WordPress site by editing the theme files or using a plugin like “Headers and Footers.”
The second method is to use the WordPress Hotjar plugin. You can search for the plugin in the WordPress plugin directory, install it, and then activate it. Once activated, you can configure the plugin by adding your Hotjar Site ID. These methods will enable you to integrate Hotjar with your WordPress site and start collecting valuable user data.
How to implement Hotjar in my website?
Implementing Hotjar in your website involves adding the Hotjar script code or using the WordPress Hotjar plugin. The script code can be manually added to your website’s theme files or inserted using a plugin like “Headers and Footers.”
Alternatively, you can install and activate the WordPress Hotjar plugin, which simplifies the process by providing a user-friendly interface to configure Hotjar for your website. Both methods allow you to implement Hotjar and start gathering insights into user behavior.
How do I add a Hotjar script to WordPress?
To add a Hotjar script to WordPress, you can follow these steps:
Obtain the Hotjar script code from the Hotjar website.
1. Access your WordPress dashboard and go to the “Appearance” or “Theme Editor” section.
2. Locate the header.php file within your active theme’s files.
Insert the Hotjar script code just before the closing </head> tag in the header.php file.
3. Save the changes, and the Hotjar script will be added to your WordPress site. You can verify the installation by checking your Hotjar account.
Is Hotjar a WordPress plugin?
Yes, Hotjar offers a dedicated WordPress plugin called “Hotjar – Heatmaps & Feedback.” This plugin simplifies the process of integrating Hotjar with your WordPress site. You can find the Hotjar plugin in the official WordPress plugin directory.
Once installed and activated, the plugin allows you to configure Hotjar by entering your Hotjar Site ID. The Hotjar WordPress plugin provides an intuitive interface for managing Hotjar settings, making it convenient for WordPress users to implement and utilize Hotjar’s features on their websites.