How to Use WordPress Dashicons [A Visual Guide]

Are your WordPress menus looking boring? Do you want to add some ✨style✨** to your site? If so, you need to learn how to use WordPress Dashicons!
Dashicons are a set of free icons that come with every WordPress installation. They’re perfect for adding a touch of personality to your menus, widgets, and posts.
Here are some of the things you’ll learn in this post:
- Overview of What Are WordPress Dashicons
- How to enable Dashicons in your theme
- How to find the HTML code for Dashicons
- How to add Dashicons to your menus, widgets, and posts
So, let’s dive in and discover how to effortlessly incorporate these delightful icons into your website’s design and take your user experience to the next level! 🚀🌟
💡 Tip: Dashicons are also great for adding social media icons to your site.
Table of Contents
- Overview of What Are WordPress Dashicons
- Installing and Enabling Dashicons in WordPress
- 4 Ways to Use Dashicons in WordPress
- Comparing Dashicon Integration Techniques: Choosing the Best Approach for Your WordPress Site
- Customizing and Styling Dashicons
- How to Use Dashicons in WordPress Admin
- Best Practices for Using Dashicons in WordPress
- Troubleshooting Common Dashicon Issues
- Final Verdict
- FAQ’s
Overview of What Are WordPress Dashicons
WordPress Dashicons is a set of web-optimized icons used within the WordPress admin dashboard and in themes and plugins. Introduced in WordPress 3.8, Dashicons serve as WordPress’s official font icon library.
Dashicons are a library of hundreds of vector icons representing many symbols and metaphors used in a typical WordPress website. These icons are scalable, meaning they maintain high quality at any size without taking up additional bandwidth, an essential factor for website speed and performance.

Within the WordPress environment, these icons can be used in various ways. They can represent custom post types, add visual cues to admin menus, signal notifications or status updates, and even stylize buttons or links.
The use of Dashicons in WordPress brings in several benefits. It offers a cohesive and consistent look to the WordPress interface, enhancing user experience and interaction. Dashicons also come with native support in WordPress, making them easy to use and integrate within a site.
Moreover, as they are vector-based, they scale beautifully without losing quality, making them suitable for responsive designs. Also, because they’re font-based, they can be styled and colored using CSS, offering further customization options.
Installing and Enabling Dashicons in WordPress
Looking for a way to level up the aesthetics of your WordPress site? Dashicons, WordPress’s default icon set, can be your go-to tool. This guide will provide a roadmap for installing and enabling Dashicons on your WordPress site.
Note: For users on WordPress 3.8 and beyond, Dashicons come as a standard feature in the admin interface. But what if you want to jazz up the front end of your website with these nifty icons? Well, a few extra steps are required. This process involves tweaking your theme’s functions file and applying the Dashicon classes accordingly.
While this might sound like a coding marathon, it’s just a short sprint. With this step-by-step guide, you’ll have Dashicons up and running in no time.
Here’s the step-by-step guide:
Step 1: Log into your “WordPress website,” which will take you to the admin dashboard.
Step 2: On the Dashboard’s left sidebar, click “Appearance,” then select “Theme File Editor” from the dropdown list.

Step 3: In the Theme Editor, find and select the “Theme Functions” (functions.php) file in the right-hand list.

Step 4: At the end of this file, paste the following lines of code:
function wpdocs_enqueue_dashicon() {
    wp_enqueue_style( 'dashicons' );
}
add_action( 'wp_enqueue_scripts', 'wpdocs_enqueue_dashicon' );

Step 5: Save your changes by clicking the “Update File” button.

Note: Dashicons are now ready for the limelight on the front end of your website! To showcase a Dashicon, simply add the icon’s class to an HTML element in your site content or theme files. For example:
<i class="dashicons dashicons-format-gallery"></i>
Be sure to replace “format-gallery” with the specific class name of the Dashicon you want to display.
Pro Tip: To ensure that future theme updates don’t erase these changes, consider adding this code to your child theme instead of the primary theme.
And voila! Your WordPress site is now Dashicon-ready and set to impress your visitors.
4 Ways to Use Dashicons in WordPress
When it comes to adding flair and functionality to your WordPress website, Dashicons is the secret weapon you need. These versatile icons can be integrated in various ways, enhancing your site’s appearance and user experience.
Are you ready to elevate your WordPress game with the captivating charm of Dashicons? We present to you four dynamic ways to make the most out of these incredible icons.
Each method unlocks endless possibilities for creating a captivating and user-friendly website, from custom post types to styling your site.
Let’s dive into these four fantastic methods that will make your website stand out!
Adding Dashicons to menu items effectively makes navigation on your website more user-friendly and visually appealing. It brings life to your usually text-based menu, adding an extra interaction layer for your users.
You can perform this minor enhancement right away since it is simple and does not require any plugins. So let’s take a walk through the process.
Step 1: Open your internet browser and visit the official WordPress Dashicons library.

Step 2: Skim through the wide range of Dashicons available and choose one that best suits your requirements. Once selected, click on it.

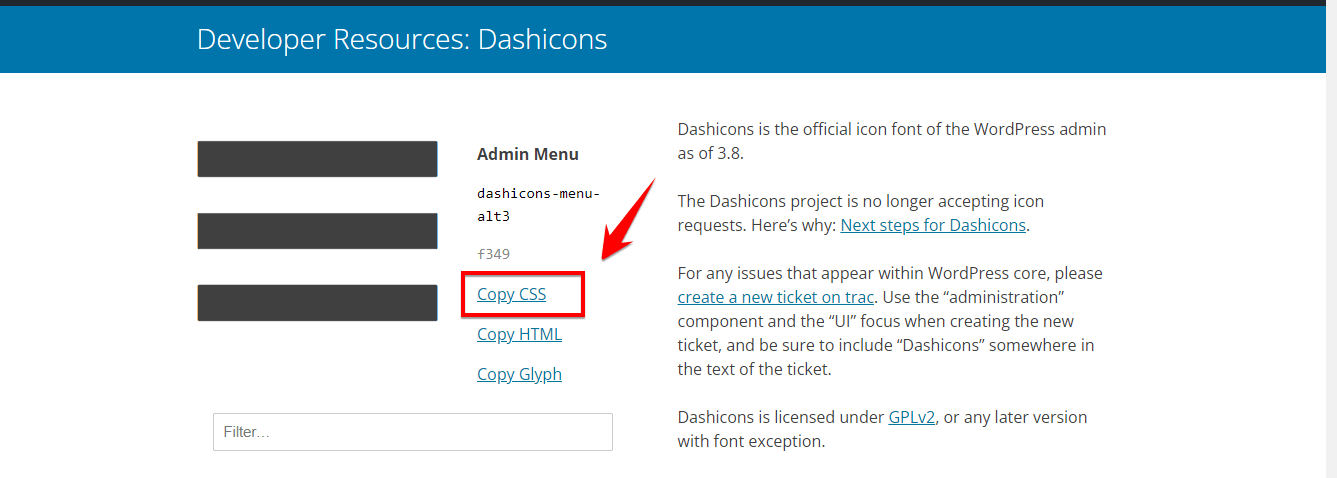
Step 3: A small pop-up window will appear showcasing the selected Dashicon. Here, you’ll find the icon’s CSS class. Copy this class.
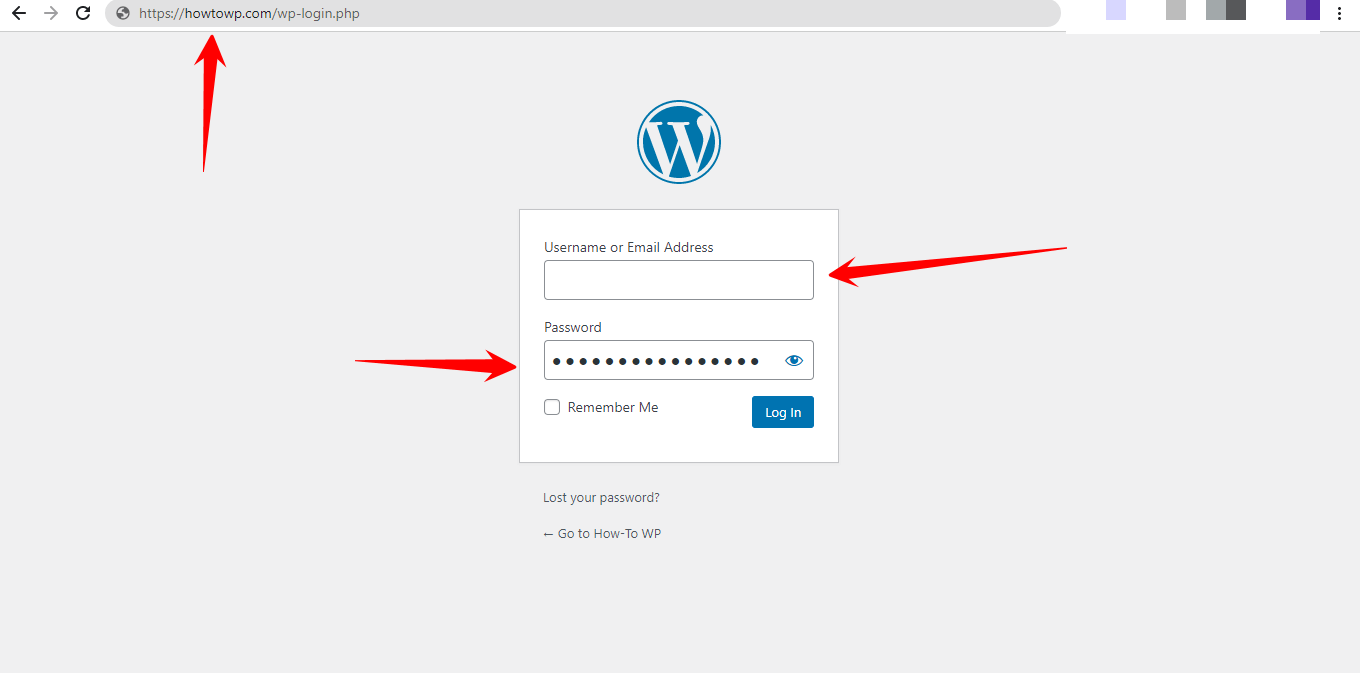
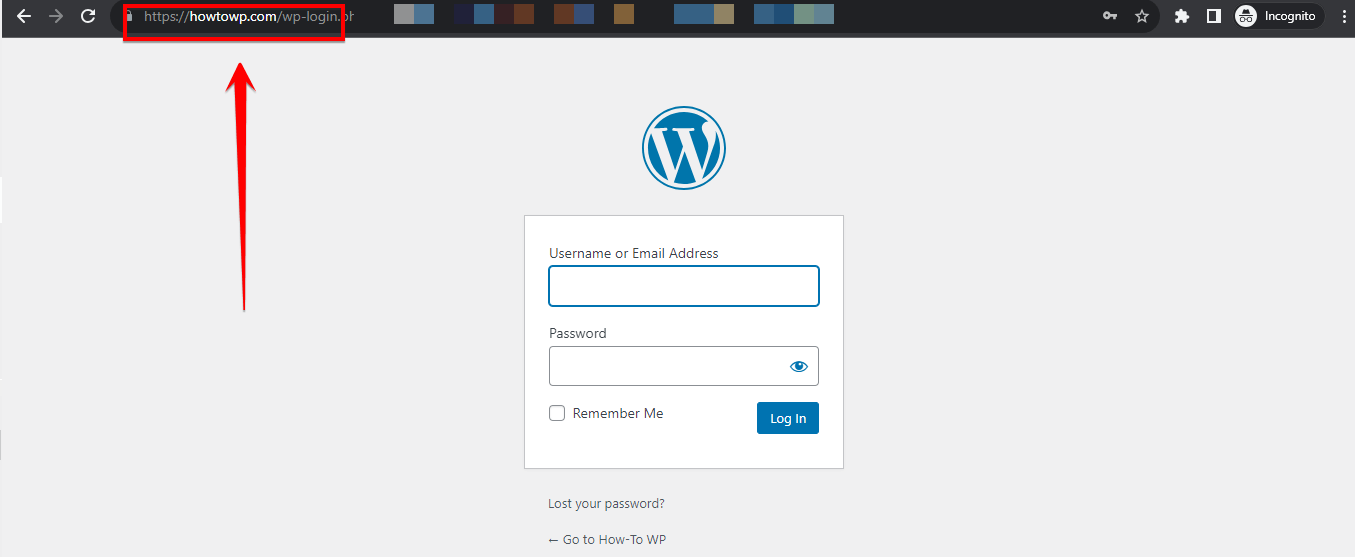
Step 4: Now, switch to your “WordPress website.” In your internet browser, type in your website’s URL and add /wp-admin at the end. Hit Enter. This will take you to the login page.
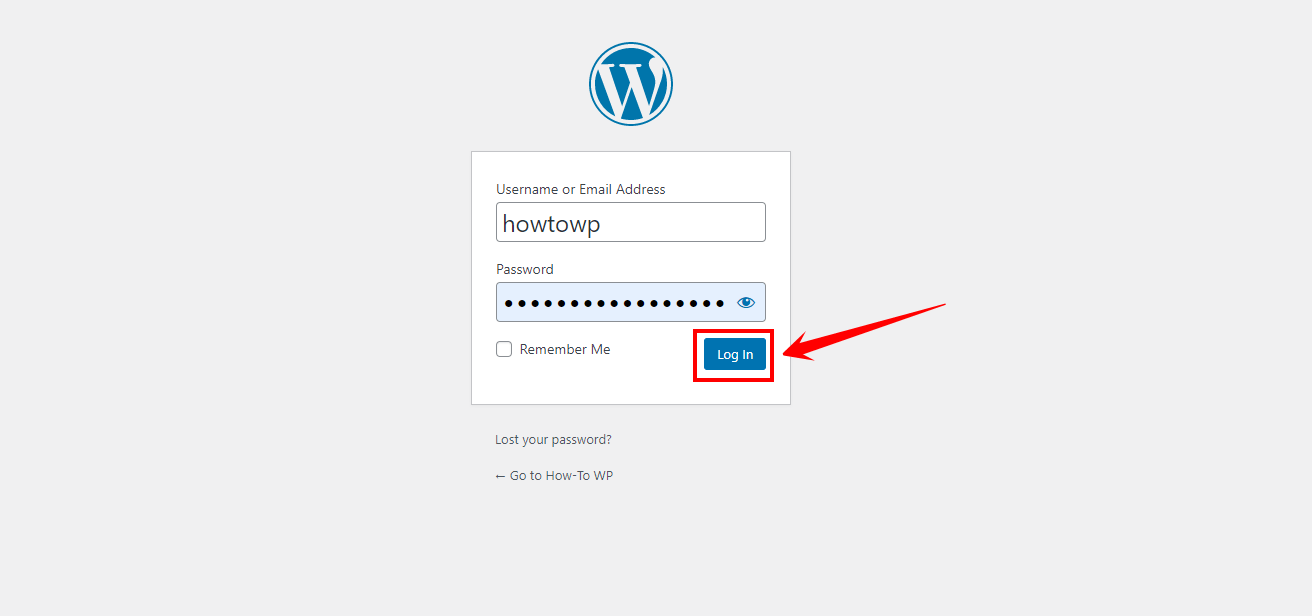
Step 5: Enter your “WordPress credentials” and click “Log in.”
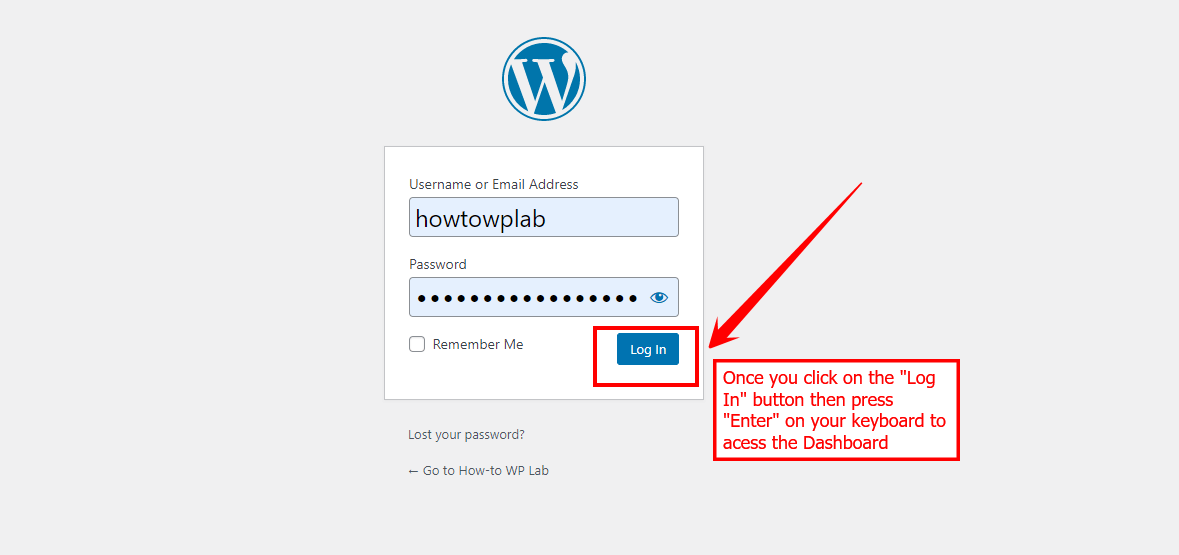
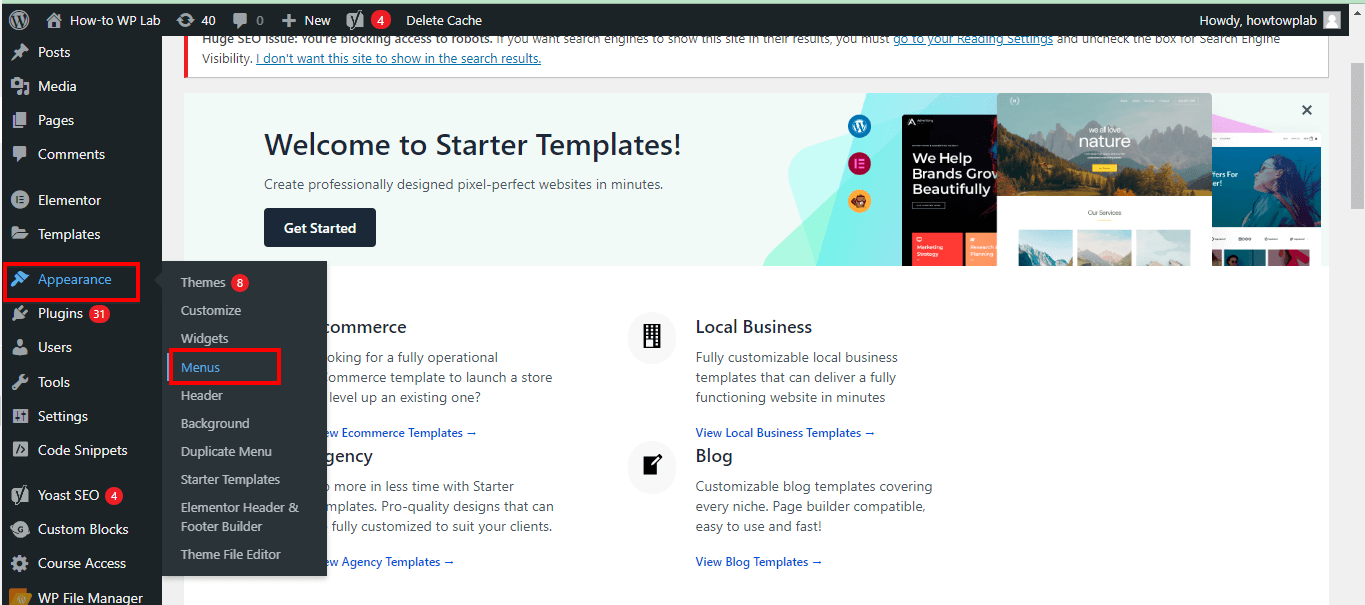
Step 6: This will direct you to the admin dashboard. On the Dashboard’s left sidebar, click “Appearance,” then select “Menus” from the dropdown list.
Step 7: If you haven’t set up a menu yet, click on the button labeled “Create a new menu,” type a name for your new menu in the box, and select “Create Menu.”

Step 8: On the left, under “Pages,” select the page you want to add to the menu by ticking the checkbox beside it, then click “Add to Menu.”

Step 9: You should now see the page listed under “Menu Structure” on the right. Click on the dropdown arrow next to the page title.

Step 10: In the “Navigation Label” box, paste the Dashicon class you copied earlier. After the class, write the text for the menu item, with a space between the class and the text.

Step 11: After you’re done, click “Save Menu” at the bottom.

Note: Finally, open a new tab in your internet browser, type in your website’s URL, and hit Enter. This will take you to your website’s homepage. Check out your newly decorated menu!
Pros:
- User-Friendly: Dashicons make the navigation process more intuitive and visually engaging for users.
- Customizable: You can choose from a wide range of Dashicons to best suit your website’s theme and style.
- No Plugin Required: The process is simple and doesn’t need any plugins.
- Enhances Aesthetic Appeal: Dashicons add a visual element to your otherwise text-heavy website.
Cons:
- Limited Icons: While Dashicons offers a variety of icons, the selection might be limited for particular needs.
- Potential Display Issues: Some Dashicons might not display as expected, depending on your theme. Testing is essential.
Way 2: Using Dashicons in Widgets
Widgets are a fantastic way to enhance your website’s functionality, and adding Dashicons to these widgets can elevate their visual appeal. It might sound complicated at first, but don’t worry! We’ve got your back. Let’s sail through this process together.
Step 1: Start by revisiting the WordPress Dashicons library.
Step 2: Select a Dashicon that fits your widget’s purpose. Click on the Dashicon to reveal its CSS class, and copy it.
Step 3: Now, go to your “WordPress website.” Log in by entering your credentials and hitting “Login.”
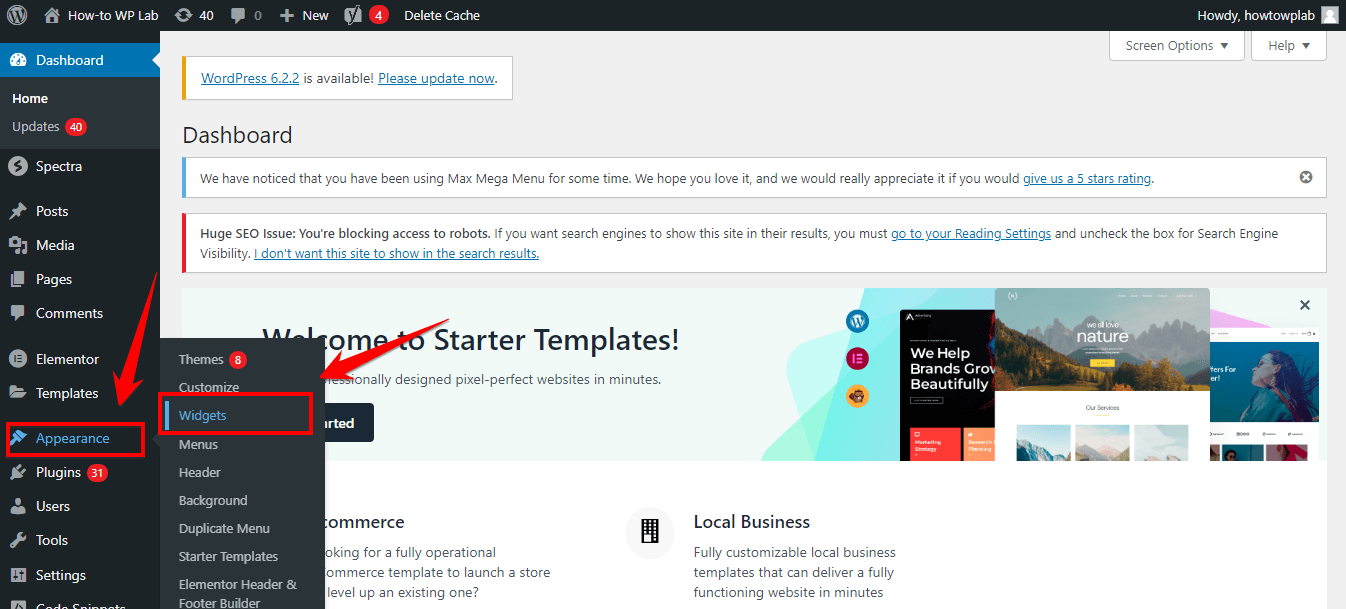
Step 4: Once you’ve arrived at the admin dashboard, look for “Appearance” in the left sidebar menu. Click on it to reveal a dropdown list, then select “Widgets.”
Step 5: Here, you’ll see all the widgets you can edit. Please choose the one you’d like to add a Dashicon to and click on the dropdown arrow next to it.

Step 6: A form will appear. In the relevant field (Title, Content, etc.), paste the Dashicon CSS class.
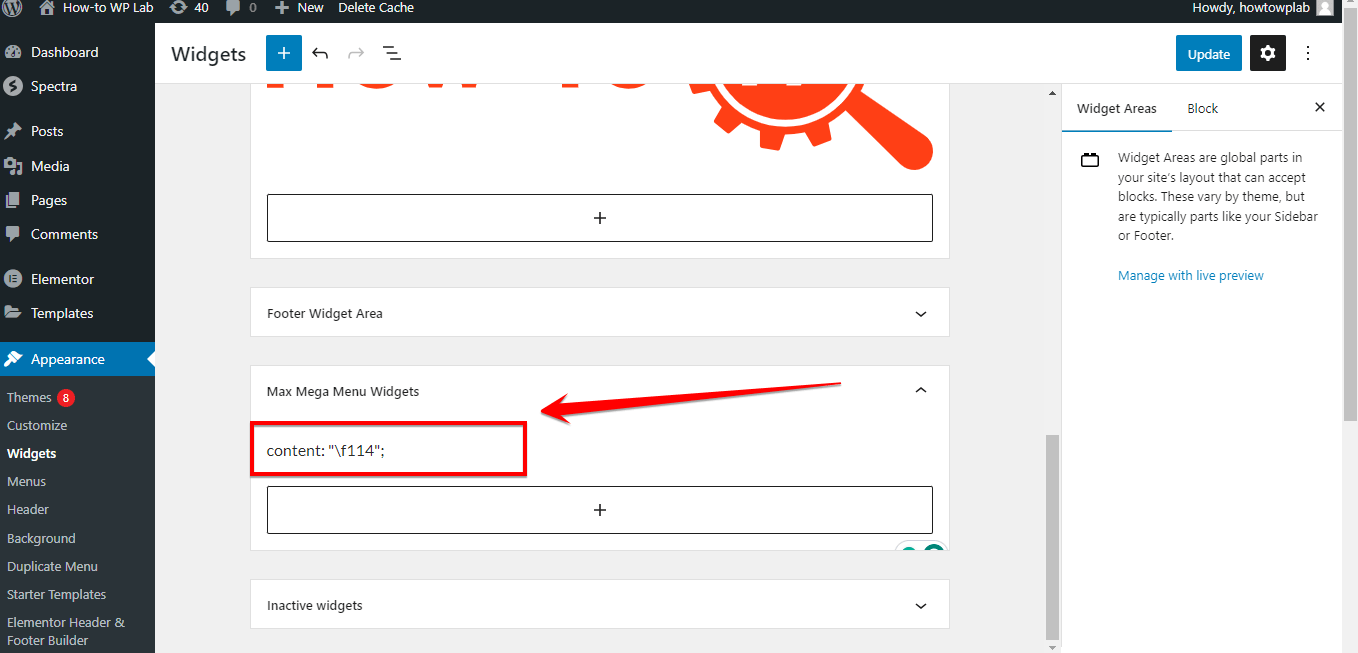
Pro Tip: If you’re adding the Dashicon to the title, remember to add your title text after the Dashicon class, with a space in between.
Step 7: After you’ve pasted your Dashicon and title, click on “Save.”

Step 9: Now, it’s time to see the fruit of your labor. Visit your website and check out the widget you just edited.
Pros:
- Enhances User Experience: Dashicons add an engaging visual element to your widgets, improving the overall user experience.
- Customizable: You can select different Dashicons for different widgets, tailoring each one to its function.
- No Plugin Needed: The process is simple and doesn’t require any plugins.
- Easier Navigation: With Dashicons, users can quickly identify the purpose of each widget.
Cons:
- Potential Compatibility Issues: Some WordPress themes might not display Dashicons correctly in widgets, requiring some extra testing.
- Limited Selection: While Dashicons offers a variety of icons, you might not find the perfect one for every widget.
Way 3: Adding Dashicons to Posts and Pages
Spicing up your WordPress posts and pages with Dashicons is a great way to draw your reader’s attention to specific sections or points. It’s a simple addition that can make your content more visually appealing and readable. Let’s get to it!
Step 1: Begin by heading over to the WordPress Dashicons library.
Step 2: Browse through the library and pick a Dashicon that fits the content of your post or page. Click on it to reveal its HTML code, then copy it.

Step 3: Now, make your way to your “WordPress website” and log in.
Step 4: Once you’re at the admin dashboard, click on “Posts” or “Pages” from the left sidebar, depending on where you want to add the Dash icon.

Step 5: Choose the specific post or page you want to edit and click on “Edit.”

Step 6: Inside the “Post Editor,” switch to the “Text” tab to view the HTML version of your content.

Step 7: In the content area, find the spot where you want the Dashicon to appear. Paste the Dashicon class there.

Step 8: Click “Update” or “Publish” to save your changes.

Step 9: Finally, visit the edited post or page to see how the Dashicon enhances your content!

Pros:
- Eye-catching: Adding Dashicons to your posts or pages can make specific points stand out, thereby making the content more engaging.
- Customizable: You can choose different Dashicons for different posts or pages, tailoring each one to its content.
- No Plugin Needed: The process is simple and doesn’t require any plugins.
- Improves Readability: With Dashicons, readers can easily identify key points or sections within your content.
Cons:
- Can Distract Readers: Dashicons can distract readers from the main content if overused.
- Limited Icon Selection: Although Dashicons has a variety of icons, you might not find the perfect one for every context.
Way 4: Using Dashicons in Custom Post Types
In the WordPress ecosystem, Custom Post Types are potent tools that can tailor your content to your needs, enhancing the user experience. By default, WordPress assigns the same icon to these custom post types as it does to Posts.
To break this monotony and give your custom post types a unique identity, we can use Dashicons. To accomplish this, we’ll use the Custom Post Type UI plugin. Don’t worry if you’ve never used this plugin before – we’re here to guide you through each step.
Step 1: The first step, as always, is to log into your “WordPress website” and access the admin dashboard.
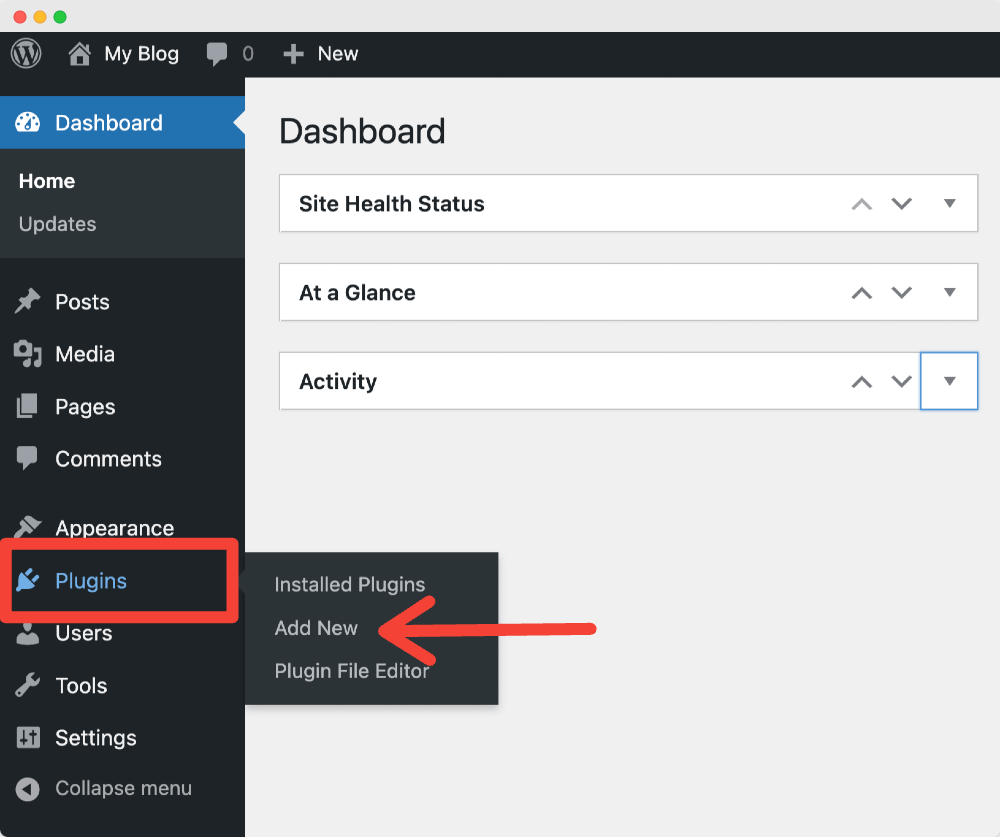
Step 2: On the Dashboard’s left sidebar, find “Plugins” and click on it. Then select “Add New” from the dropdown list.
Step 3: In the “Search Plugins” bar at the top right, type “Custom Post Type UI” and press Enter.

Step 4: You’ll see the “Custom Post Type UI” plugin among the search results. Click “Install Now” and, once installed, click “Activate.”

Step 5: With the plugin activated, find “CPT UI” on the Dashboard’s left sidebar and click on it. Then, select “Edit Post Types” from the dropdown menu.

Step 6: From the dropdown menu under “Select Post Type to Edit,” choose the custom post type you want to add a Dashicon to.

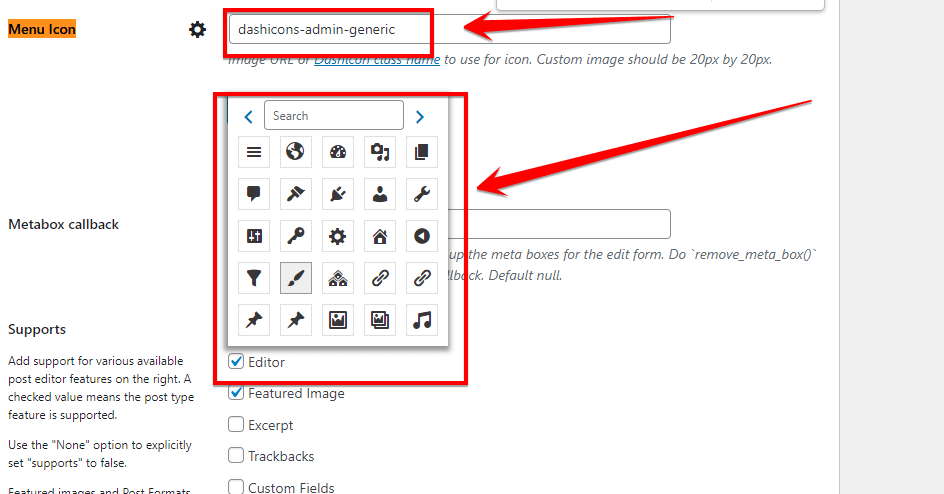
Step 7: Scroll down until you find the “Menu Icon” section. Click on “Choose Dashicons,” which will bring up a window with all available Dashicons.

Step 8: Browse through and choose a Dashicon that fits your custom post type. Once you’ve chosen, click on the Dashicon to reveal its CSS class, then click “Select.”
Step 9: Having selected the WordPress Dash icons, click “Add Post Type” at the bottom to save your changes.

Step 10: Now, you can see the Dashicon next to your custom post type on the Dashboard’s left sidebar.
Pros:
- Enhances User Experience: Dashicons make your custom post types more distinguishable, thus improving the user experience.
- Customizable: You can select different Dashicons for different post types, tailoring each one to its function.
- Makes Dashboard Pleasing: With Dashicons, your Dashboard becomes more visually appealing, making website management a more enjoyable experience.
- No Coding Knowledge Required: The process is simple and doesn’t require any coding knowledge thanks to the “Custom Post Type UI” plugin.
Cons:
- Needs a Plugin: This method requires a plugin, which might be better for those looking to minimize the number of plugins on their site.
- Limited Selection: While Dashicons offers a variety of icons, you might not find the perfect one for every custom post type.
Comparing Dashicon Integration Techniques: Choosing the Best Approach for Your WordPress Site
After examining the four distinct methods for integrating Dashicons into your WordPress website, you might wonder, “Which method best fits my needs?” The answer lies in your unique requirements, familiarity with WordPress, and specific characteristics of your site.
To help you decide, let’s compare each method based on the following critical factors:
| Key Factors | CSS Implementation (Method A) | Widgets Integration (Method B) | Admin Menu Application (Method C) | Custom Post Types Inclusion (Method D) |
|---|---|---|---|---|
| WordPress Proficiency Level Needed | Intermediate to advanced, CSS knowledge required | Intermediate, familiarity with WordPress widgets and some coding | Beginner, minimal coding knowledge | Beginner, minimal coding knowledge |
| Implementation Flexibility | High: Can be used anywhere CSS is utilized | Medium: Limited to widget-ready areas | Low: Limited to the admin menu | Medium: Applicable to all custom post types |
| Customization Possibilities | High: Full control over icon appearance and positioning | Medium: Control limited by widget constraints | Low: Limited customization options | Medium: Dependent on post type design |
| Setup Time | High: Requires manual coding | Medium: Requires knowledge and setup of WordPress widgets | Low: Simple selection process | Medium: Depends on the number of custom post types |
| Maintenance Requirement | Medium: Updates needed with changes to CSS or theme | Medium: Updates may be required with WordPress or theme changes | Low: Rarely need changes | Low: Changes are rarely needed unless new post types are added |
With the key factors table providing a snapshot, let’s discuss each factor in more detail:
1: WordPress Proficiency Level Needed
Method A, CSS Implementation, requires intermediate to advanced WordPress proficiency, particularly knowledge of CSS. Method B, Widgets Integration, is suitable for those with intermediate knowledge, especially those familiar with the WordPress widget system and basic coding. Methods C (Admin Menu Application) and D (Custom Post Types Inclusion) require the least technical knowledge, making them ideal for WordPress beginners.
2: Implementation Flexibility
In terms of versatility, Method A shines as you can implement Dashicons wherever CSS is utilized. Method B and D provide moderate flexibility, limited to widget-ready areas and custom post types, respectively. Method C, focused on the admin menu, offers the least flexibility.
3: Customization Possibilities
Regarding customization, Method A provides the most excellent level of control, allowing you to dictate the exact appearance and positioning of your Dashicons. Methods B and D offer medium control levels, which are restricted by widgets’ limitations and custom post types’ design, respectively. Method C offers limited customization options
confined to the admin menu.
4: Setup Time
Method A typically demands the most time, as it requires manual coding. On the other hand, Methods B and D necessitate a medium-time investment, while Method C is generally the quickest to execute.
5: Maintenance Requirement
Methods A and B may require more maintenance over time, mainly when there are changes to the CSS or the WordPress theme. Conversely, Methods C and D are relatively low maintenance unless you frequently add new items to the admin menu or create new post types.
Customizing and Styling Dashicons
Dashicons offer more than just a way to incorporate icons into your WordPress site. They’re a canvas on which you can paint your creativity. From changing sizes and adjusting colors to implementing hover effects, the world of Dashicon customization is vast and exciting. Let’s dive in!
1: Changing Dashicon Sizes
While Dashicons come with a default size, they’re not confined to it. Want your icons to stand out more or blend subtly into your content? The size of your Dashicons can be easily adjusted using CSS.
Step-by-Step Guide:
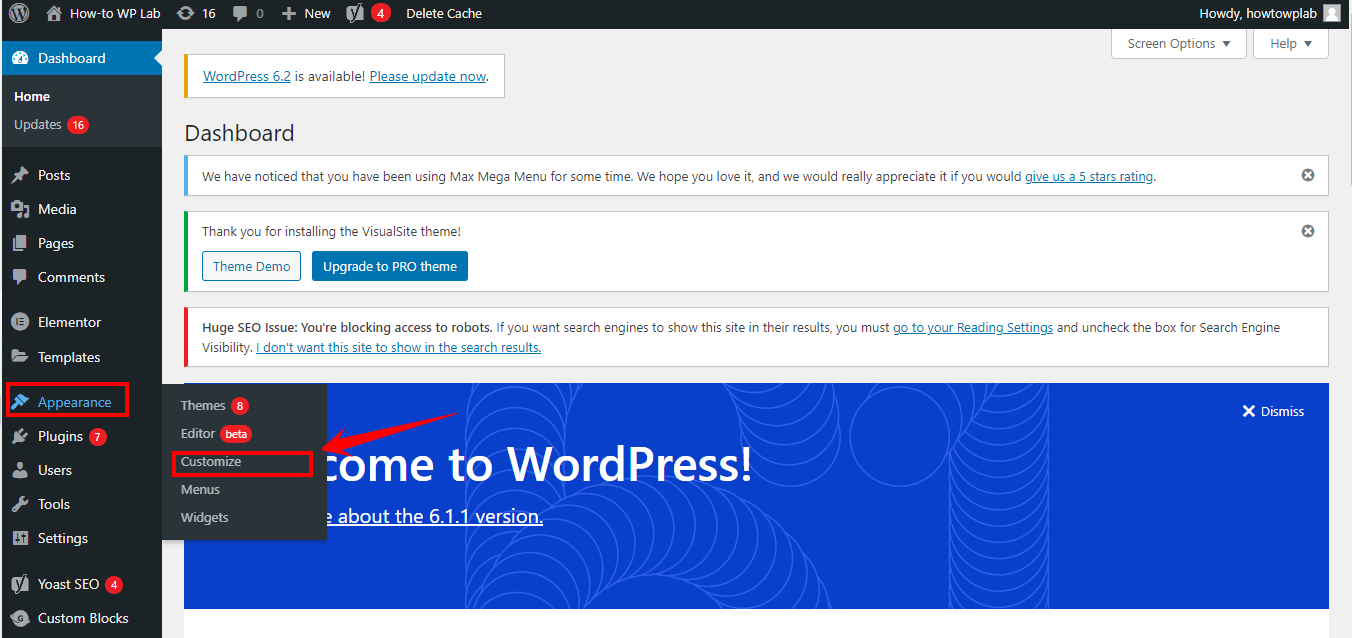
Step 1: Log into your WordPress dashboard and navigate to “Appearance”> “Customize.”
Step 2: In the Customizer, select “Additional CSS.”

Step 3: Add the following code to change the size of your Dashicons:
.dashicons {
    font-size: 25px;
}
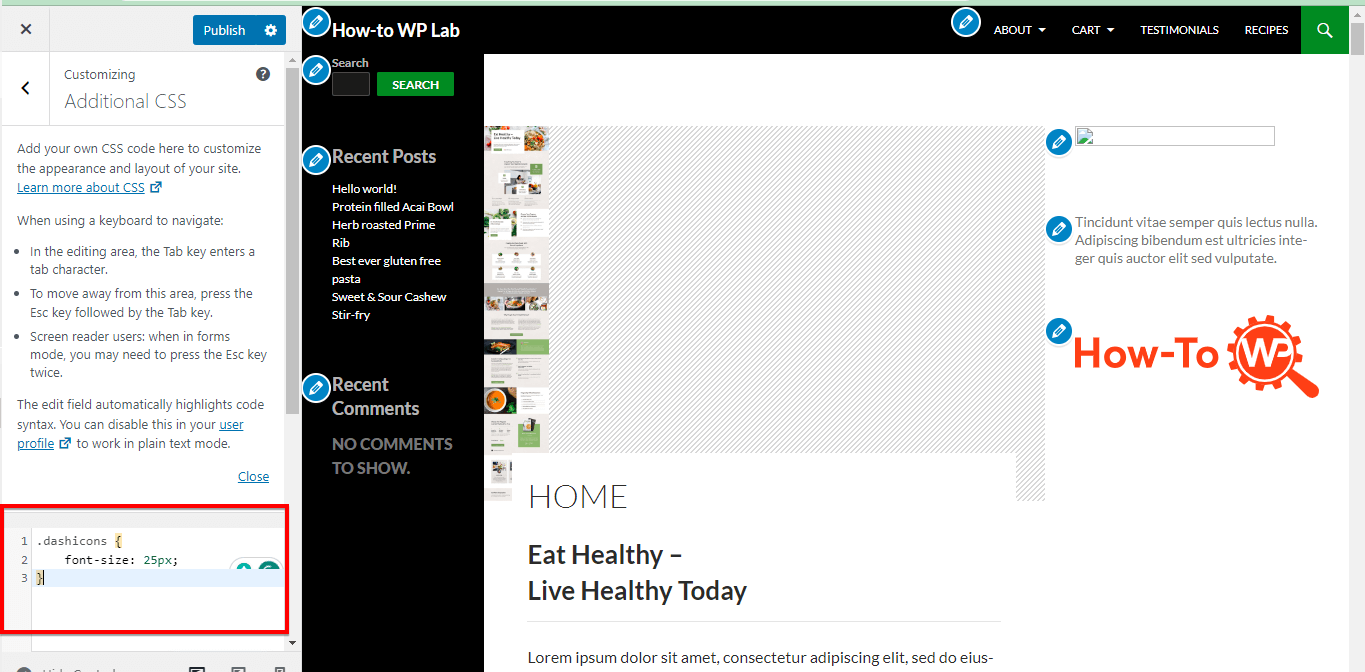
Step 4: Don’t forget to hit “Publish” to save your changes.

Note: By replacing ’25px’ with your desired pixel value, you can make your Dashicons as large or small as you want.
2: Adjusting Dashicon Colors
Add a splash of color to your Dashicons to align them with your site’s aesthetic or to highlight specific elements. By tweaking your CSS, you can personalize the color of your Dashicons.
Step-by-Step Guide:
Step 1: Again, head over to your WordPress dashboard and select “Appearance”> “Customize.”
Step 2: Choose “Additional CSS.”
Step 3: Add the following code to change the color of your Dashicons:
.dashicons {
    color: #ff0000;
}

Step 4: Click “Publish” to implement the changes.
Note: Change ‘#ff0000’ to any hex color code that suits your design needs.
3: Implementing Hover Effects on Dashicons
Hover effects can enhance interactivity and user engagement on your site. With CSS, you can implement cool hover effects on your Dashicons, such as color changes, size shifts, and more.
Step-by-Step Guide:
Step 1: As always, go to “Appearance”> “Customize” from your WordPress dashboard.
Step 2: Select “Additional CSS.”
Step 3: To add a simple color change hover effect, you could use the following code:
.dashicons:hover {
    color: #00ff00;
}

Step 4: Click “Publish” to bring your new hover effects to life.
Note: Replace ‘#00ff00’ with the hex color code of your choice. Now, when you hover over a Dashicon, its color will change to the one you specified.
4: Other Customization Options
The possibilities with Dashicon customization are nearly endless. From adjusting margins and padding to adding animations, Dashicons can be customized to fit your exact needs and desires. All it takes is a bit of CSS know-how.
Some Other Customization Options:
- Rotate Dashicons: With CSS transforms, you can rotate Dashicons to any desired degree. Example code:
- Animate Dashicons: Try adding CSS animations to your Dashicons for a more dynamic look. Example code:
Remember, Dashicon customization is all about creativity. Play around with different styles and options until you find the perfect fit for your site.
How to Use Dashicons in WordPress Admin
Dashicons aren’t only for your site’s front end; they can work wonders in the back end as well. The versatile icon set can enhance your WordPress Admin User Interface (UI), aid in creating custom buttons, and embellish your custom meta boxes. Let’s explore how.
1: Enhancing the WordPress Admin UI with Dashicons
Your WordPress Admin UI can be transformed with the addition of Dashicons. These handy icons can serve as visual cues that improve navigation, categorization, and overall user experience within your admin area.
Step 1: Access your WordPress dashboard and navigate to “Appearance”> “Theme File Editor.”
Step 2: Select your theme’s functions.php file on the right.
Step 3: Add the following code to enqueue the Dashicons style:
add_action( 'admin_enqueue_scripts', 'load_dashicons_front_end' );
function load_dashicons_front_end() {
  wp_enqueue_style( 'dashicons' );
}

Step 4: Save your changes by clicking the “Update File” button.
Note: By now, Dashicons should be enabled and ready for use within your WordPress admin area. Use relevant CSS classes to add Dashicons to your menu items, posts, categories, and more.
Custom buttons featuring Dashicons can add personality and clarity to your admin area. These can be used in multiple ways, including actions like “save,” “delete,” “edit,” etc.
Step 1: Go to your WordPress dashboard and select “Appearance”> “Editor.”
Step 2: Open your theme’s functions.php file.
Step 3: You can create a custom button with a Dashicon by adding the following code:
<button class="button">
    <span class="dashicons dashicons-heart"></span>
    Love
</button>
Step 4: Save your changes by clicking the “Update File” button.
Note: The above example creates a button labeled “Love” with a heart icon. You can change the ‘dash icons-heart’ class to any Dashicon class of your choice.
3: Adding Dashicons to Custom Meta Boxes
Custom meta boxes in WordPress can benefit from Dashicons. By using these icons, you can make each box more distinctive and intuitive for users.
Step 1: From your WordPress dashboard, go to “Appearance”> “Editor.”
Step 2: Open your theme’s functions.php file.
Step 3: To add a Dashicon to a custom meta box, you can use the following code:
function add_custom_meta_box() {
  add_meta_box(
      'custom_meta_box', // ID, should be a string
      '<span class="dashicons dashicons-admin-site"></span> Custom Meta Box', // Meta Box Title
      'custom_meta_box_callback', // Callback function
      'post' // Admin page (or post type)
  );
}
add_action('add_meta_boxes', 'add_custom_meta_box');

Step 4: Save your changes by clicking the “Update File” button.
Note: Replace ‘dash icons-admin-site’ with the Dashicon class that fits your meta box’s purpose. The icon will now appear next to your meta box title in the WordPress admin.
Best Practices for Using Dashicons in WordPress
Whether you’re sprucing up your website’s appearance or fine-tuning your WordPress admin, Dashicons can be a tremendous ally. But to ensure they genuinely boost your site’s usability and appeal, there are some best practices to follow.
Practice 1: Accessibility Considerations
One vital aspect you shouldn’t overlook when using Dashicons is accessibility. Only some visitors to your website will perceive visual elements the same way. Some people might have visual impairments, color vision deficiency, or even a slow internet connection that impedes the loading of images.
To accommodate these varying needs, include appropriate alt text for each icon. The alt text provides a text description of the image, which can be read by screen readers or displayed if the image fails to load. Moreover, try to choose Dashicons that are universally recognizable and have intuitive meanings.
Practice 2: Importance of Thematic Consistency
Remember that Dashicons are not just decorative elements – they are part of your site’s design language and should reflect your theme’s feel and tone. Maintaining thematic consistency is key. Flashy or overly complex Dashicons may seem out of place if your website has a minimalist design.
To uphold consistency, select Dashicons that resonate with your overall design ethos. Stick to a uniform style, color, and size across all icons, unless there’s a solid reason to make a particular icon stand out.
Practice 3: Updating and Maintaining Dashicons
It’s also important to regularly update and maintain your Dashicons. WordPress releases updates and new features regularly, and Dashicons are no exception. New icons might be added, or existing ones might be tweaked or removed.
Staying updated ensures you have the full range of icons at your disposal and avoids the scenario where a chosen icon is retired.
Troubleshooting Common Dashicon Issues
Even when you’re familiar with the ins and outs of Dashicons, you might occasionally run into some common issues. Fear not; most of these are easily rectifiable.
1: Dashicons Not Displaying Properly
If your Dashicons aren’t showing up as they should, there might be an issue with your CSS class. Ensure that you’ve used the correct Dashicon class name and that it’s been spelled correctly. If that works, your theme might be consistent with the Dashicon styles. Use a child theme or tweak your theme’s CSS to resolve the conflict.
2: Issues with Dashicon Sizing or Positioning
Should you encounter trouble with Dashicon sizes or positions, it’s likely a CSS issue. Adjust the CSS properties, such as font size for scaling icons and margin or padding for positioning. Remember that Dashicons, font icons, respond to CSS properties as text does.
3: Common Coding Errors
Coding errors can often be the culprit behind Dashicon issues. Incorrect syntax, missing semi-colons, or misplacement of code within the functions.php file can all cause problems. Ensure your PHP and HTML syntax is correct and that you’ve placed your Dashicon code within your WordPress files. Consult the WordPress Codex, forums, or professional developers for guidance when in doubt.
Final Verdict
Dashicons in WordPress are an incredibly versatile and powerful tool that can enhance your website’s aesthetics and functionality. With an extensive library of icons, Dashicons empowers you to create a visually captivating user experience.
Whether you’re customizing your theme, adding flair to your posts, or improving the WordPress admin interface, Dashicons offers a seamless integration that elevates your site’s appeal.
From beginners to experienced developers, using Dashicons is a breeze. Their accessibility, flexibility, and ease of use make them valuable in crafting a unique and professional website. So don’t hesitate to leverage the beauty and utility of Dashicons in WordPress to make your website truly stand out.
Embrace the power Dashicons WordPress offers and embark on a journey of transforming your website into an engaging and delightful online destination.
FAQ’s
How to Add Custom Dashicons to WordPress?
To add custom Dashicons to WordPress, follow these steps:
Create Your Custom Dashicon: Design an icon using an SVG file.
Register Your Dashicon: Add the Dashicon to your WordPress theme or plugin by registering it using the wp_enqueue_style function.
Display Your Dashicon: Use the registered Dashicon in your theme or plugin by adding CSS rules to specify its appearance.
By adding custom Dashicons, you can enhance the visual elements of your WordPress site and create a more unique user experience.
How do I add Dashicons to the custom post type?
To add Dashicons to a custom post type in WordPress, you need to:
Register your custom post type.
Specify the Dashicon you want to use for the custom post type by setting the menu_icon parameter when registering the post type.
After registering the post type, the specified Dashicon will be displayed next to the custom post type menu item in the WordPress admin area.
By adding Dashicons to custom post types, you can visually distinguish them from regular post types and improve user navigation within your WordPress dashboard.
How do I add an icon to my WordPress site?
To add an icon to your WordPress site, you can utilize Dashicons or custom icons. For Dashicons, use the built-in WordPress Dashicon library which offers a variety of symbols to choose from.
To add a custom icon, create an SVG file or use icon libraries like FontAwesome.
Register and enqueue the icon in your theme or plugin files using appropriate WordPress functions.
Add the icon CSS rules to specify its appearance on your site.
Icons play a crucial role in enhancing the visual appeal and user experience of your WordPress site, making it more engaging and user-friendly.


Hey Muhammad, thanks for writing this post, very informative! I have a question if you don’t mind, how can I change the search icon on the upper right corner of the WordPress site to the dashicons-search? This I couldn’t do in the menu section and I couldn’t figure out how to do this with CSS. Can you help? Thanks!
Hey Charice,
Absolutely! I’m glad you found the article informative. To change the search icon on your WordPress site to the “dashicons-search”, you’ll need to use some CSS. Here’s a step-by-step breakdown for you:
Step 1: First, make sure you have the “Dashicons” font enqueued on your site. If you’re using the WordPress admin, it’s already enqueued for you.
Step 2: Go to the “Appearance” section in your WordPress dashboard.
Navigate to “Customize.”
Step 3: From there, go to the “Additional CSS” section.
Step 4: In the “Additional CSS” box, enter the following code:
.your-search-icon-selector:before {
content: “\f179”;
font-family: “dashicons”;
}
Note: Replace “.your-search-icon-selector” with the actual CSS selector for your search icon. If you’re not sure about the selector, right-click on the icon on your site, choose “Inspect”, and identify the relevant CSS class or ID.
Step 5: After pasting, click “Publish.”
This will replace the current search icon with the “dashicons-search” icon. If you face any issues, let me know! Always here to help.
Best wishes,
Shakeel