How To Fix WordPress Permalinks Not Working Error

Sometimes you might click on a link on your website and come across a 404 error. It’s one of the most commonly occurring errors that can be solved with proper guidance. Over the decade there has been a total of 66.5% of website URLs don’t go anywhere.
That’s why I’m here to show you how to fix the WordPress permalinks not working error. You’ll come to know about all the means for fixing the 404 error.
In this article, you’ll learn about:
- How to fix WordPress permalinks not working error
- Permalinks, and what are their benefits
- Reasons for WordPress permalinks not working
Let’s start with how to fix WordPress permalinks not working error.
Table of Contents
How To Fix WordPress Permalinks Not Working Error
WordPress permalinks not working error can be caused by a number of factors when managing a WordPress website. I’m going to show you all the methods through which you can resolve this issue.
These methods range from easy to complex, so choose whichever method suits you the best or (preferably) the one that actually works for you😂.
Let’s start with the simplest method.
Method 1: Reset WordPress Permalinks
Go to the “Settings” section on your dashboard and click the “Permalinks” option.
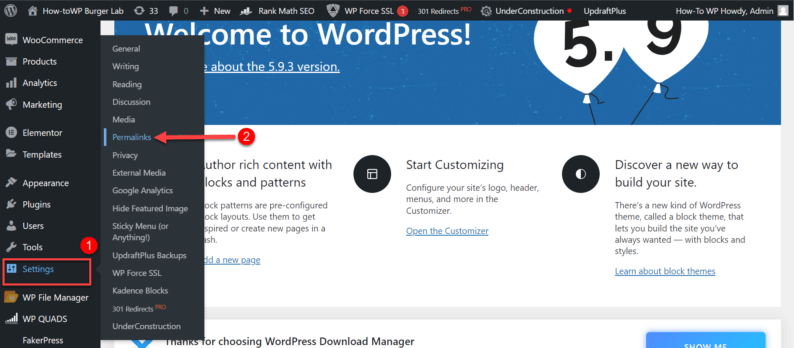
Scroll down a bit, and you’ll see the “Post name” option. Click it because it’ll change all the permalinks to the name of the post.
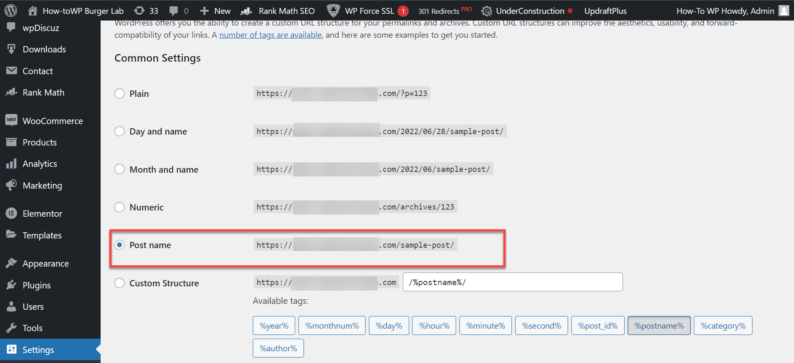
Click “Save Changes” after scrolling down a bit more.
It’ll reset all the permalinks and hopefully fix the WordPress permalink not working error.
Method 2: Deactivate Plugins Causing the Issue
If for some reason, the WordPress permalinks not working error doesn’t go away by using the previous method, there are a few other things you can do to resolve the issue. One of the ways is to deactivate the plugins.
You might be thinking that “Why would I need to deactivate the plugin just to remove the permalink issue?” Actually, they’re not only the cause for most of the attacks on a website, but sometimes they’re also the cause for permalinks.
There are multiple ways to deactivate the plugins that are causing the issue. Let’s start with the method that you can easily do.
1. Deactivating From the Hosting Dashboard
There’s no definitive way to know which plugin is causing the WordPress permalinks not working error; that’s why it’s best to deactivate all of the plugins on your WordPress website and check if the issue has been resolved.
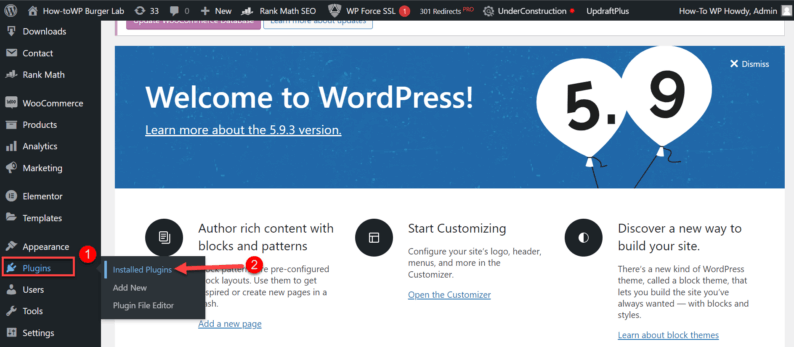
To deactivate all or some of the plugins, go to the “Plugins” option and click the “Installed Plugins” option.
Select the plugins you want to deactivate.
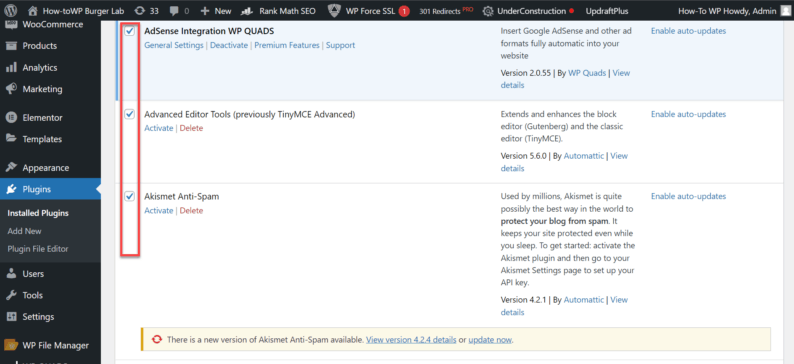
Click on the drop-down menu, select the “Deactivate” option and click on the “Apply” button.
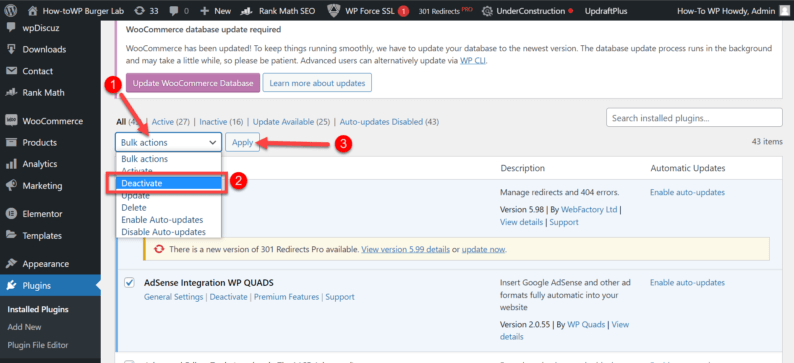
It will deactivate all of the selected plugins and possibly resolve the WordPress permalinks not working error, but if you’re unable to deactivate all of the plugins, then no need to worry because you still can deactivate them.
2. Deactivating From Hosting Control Panel
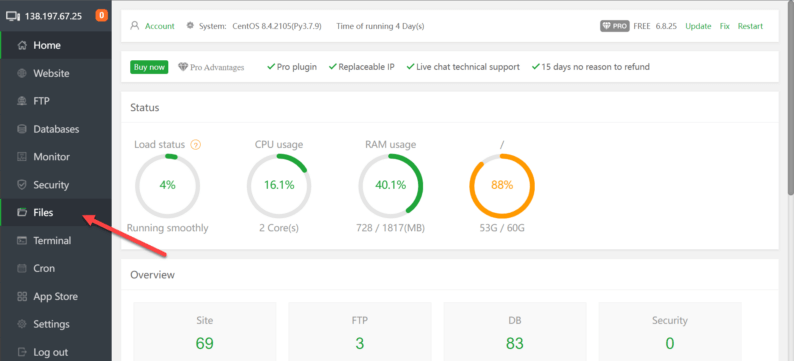
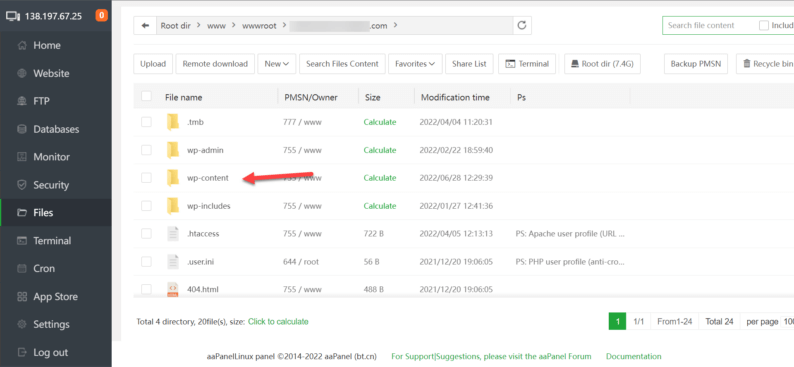
Go to the dashboard of your hosting account and click on the “Files” option.
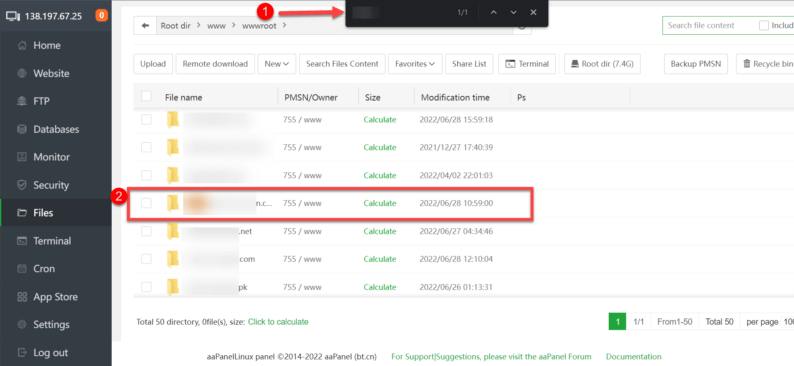
If you have more than one website, you’ll need to search for the site that you’re looking for. Press the Ctrl+F key and search for the website by the name of its URL.
Once you find the website, click on it.
Here you’ll see multiple folders, but you’ll need to go to the “wp-content” folder.
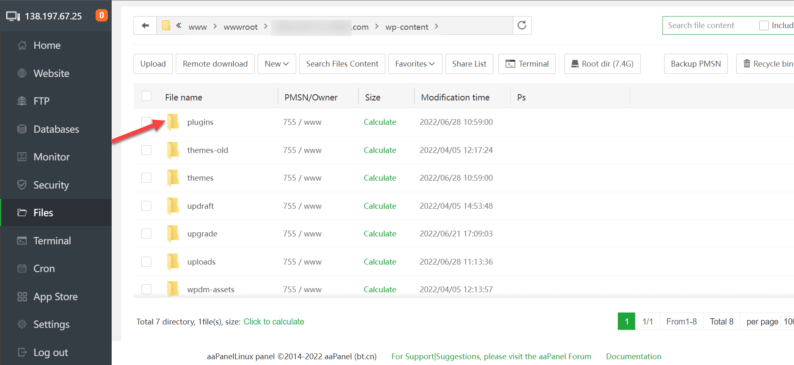
Now, go to the “plugins” folder.
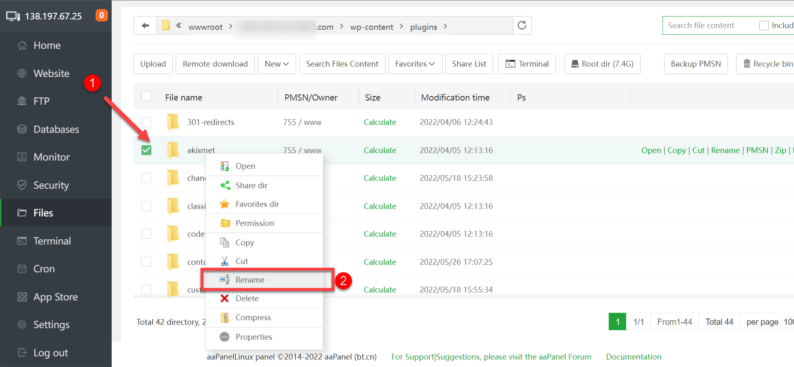
Click the right-click button next to the plugin you want to deactivate. A menu will appear from which you’ll click the “Rename” option.
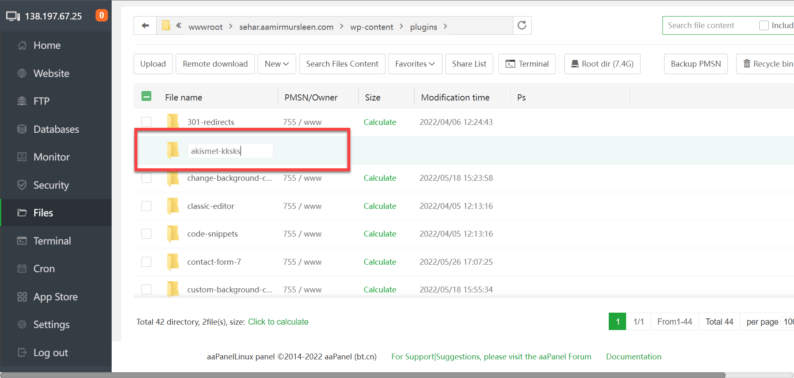
Change the name of the plugin to whatever you want and press the enter key. That’s all you need to deactivate that particular plugin.
Note: If you want to activate that plugin, you’ll need to rename it exactly the same as it was before because otherwise, it won’t work.
You can also do the same thing if you’re using third-party software such as FileZilla. All you have to do is first establish a connection between both the application and the hosting.
The procedure is exactly the same, where you go to files and locate the website. Then find the “wp-content” and the “plugins” subfolder. Select the plugin, and by renaming it, you’ll deactivate the plugin and possibly resolve the WordPress permalinks not working error.
3. Delete the Plugin or Create a Support Ticket
There are some alternatives available if you don’t want to deactivate the plugin. Basically, there are 2 options for it:
- Delete the Plugin
Go to the “Plugins” option and click the “Installed Plugins” option.

Choose the plugin you want to delete and click the “Deactivate” button.

Once the plugin is deactivated, you’ll need to click on the “Delete” option that appears under the plugin name.

- Create a Support Ticket
This method is used by those people who believe in the developers and want to help them resolve the issue that arises with the plugin.
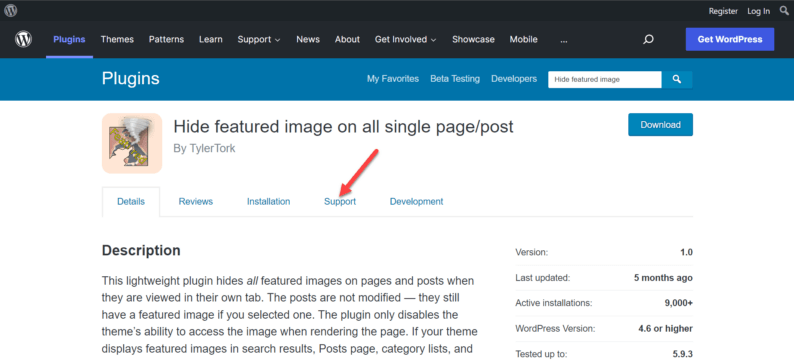
Go to WordPress.org and search for the plugin you want to create the support ticket for.
No, go to the “Support” section for the plugin.
Next, if you’re not already logged in, you’ll need to click on the “Login to Create a Topic” button.
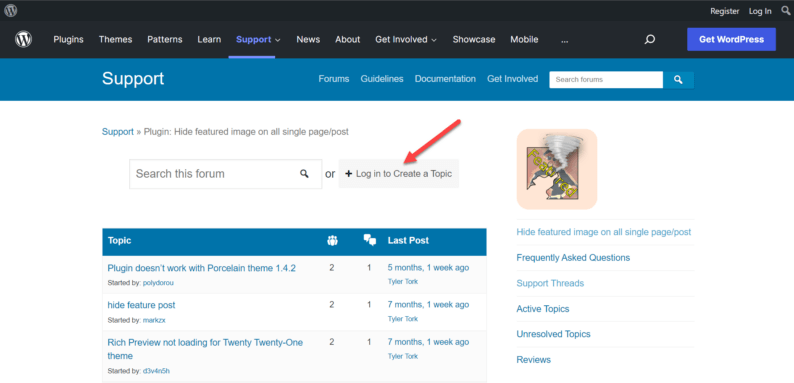
Once everything is said and done, write down the issue regarding the plugin and explain that it’s causing 404 errors. It’s not an immediate fix, but if the developers are actively working on the plugin, then the issue will be resolved quickly.
Method 3: Fixing the .htaccess File
You might think that the .htaccess file is an insignificant file. Actually, it has the potential to break your entire website. The main objective of a .htaccess file is to redirect URLs, create custom permalinks, and is used to enable password protection on your website. Furthermore, its usage also includes displaying custom 404 pages.
To access the .htaccess file, you must have access to the hosting dashboard or the FTP of your website. In any other case, you cannot edit the file.
Keep in mind that I use Nexcess for this website, but you might not. So the experience may differ according to the type of hosting, but the procedure is exactly the same.
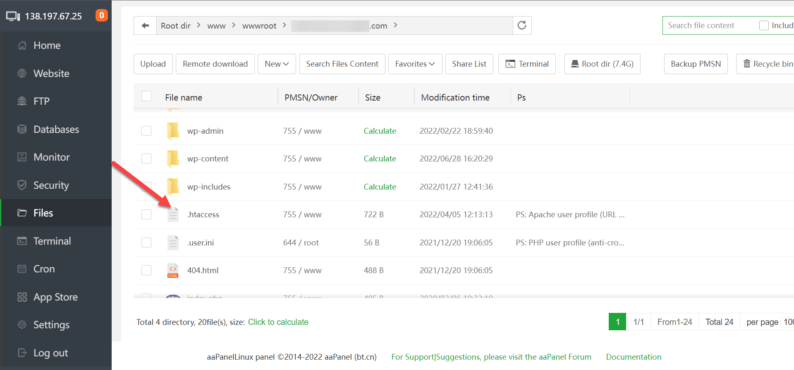
Start off by going to the dashboard of your hosting account and clicking the “Files” option.

Search the website by clicking the Ctrl+F keys (cmd+F keys for MacBooks) and searching the name of the website.
Once you find the website folder, double-click on it.

Next, you’ll see the “.htaccess” file. Right-click on it, and a menu will appear on the screen. After that, click the “Permission” option.
Note: In some instances, the “.htaccess” file might be invisible because it’s a hidden file. What you’ll need to do is to go to the “Settings” and change the visibility settings for hidden files.

Before moving forward, ensure that you create a backup of the current permission settings for the “.htaccess” file.

After that, change the permission number to “644” and click the “OK” button.

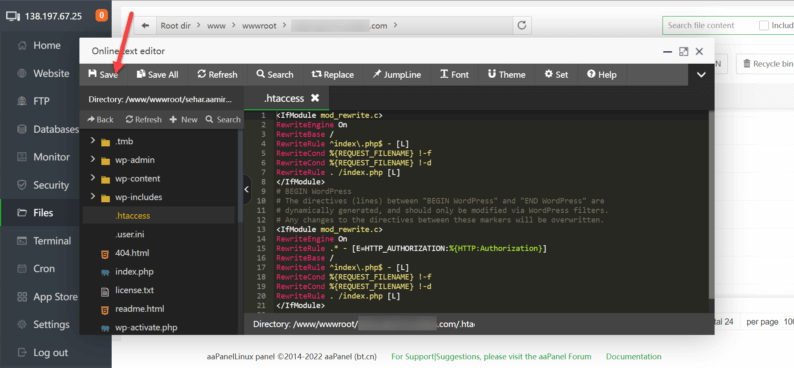
Now that you’ve changed the permission of the “.htaccess” file, double-click on it to edit it.
Remove all the code from the file and paste this code:
# BEGIN WordPress
# The directives (lines) between “BEGIN WordPress” and “END WordPress” are
# dynamically generated, and should only be modified via WordPress filters.
# Any changes to the directives between these markers will be overwritten.
<IfModule mod_rewrite.c>
RewriteEngine On
RewriteRule .* – [E=HTTP_AUTHORIZATION:%{HTTP:Authorization}]
RewriteBase /
RewriteRule ^index.php$ – [L]
RewriteCond %{REQUEST_FILENAME} !-f
RewriteCond %{REQUEST_FILENAME} !-d
RewriteRule . /index.php [L]
</IfModule>
# END WordPress
To save all changes, click the “Save” button.
If you are using FileZilla, you can do the same thing. Just follow all the above-mentioned steps, and you’ll be able to remove the WordPress permalinks not working error if it’s linked with the “.htaccess” file.
Permalinks and What Are Their Benefits
Permalinks are permanent links to specific Web pages. They are also known as “persistent URLs” or “static URLs.” Permalinks are used to point readers to specific content on a website, and they are often used in blog posts and online articles.
When you create a permalink for your content, it should be easy for readers to understand what the link is and where it will take them. Permalinks are created using a URL structure that includes the date, title, and author of the post or article. For example, here are the permalinks to a few of our other articles:
- https://howtowp.com/how-to-remove-the-tagline-in-wordpress/
- https://howtowp.com/how-to-change-the-background-color-of-a-single-page/
- https://howtowp.com/how-to-implement-direct-checkout-on-your-wordpress-store/
- https://howtowp.com/how-to-keep-your-wordpress-safe-with-wp-force-ssl-plugin/
- https://howtowp.com/remove-proudly-powered-by-wordpress/
There’s no doubt about it that the permalinks are very vital if a website wants to rank on a search engine. Here are some of the reasons why its soo important:
- The shorter the permalink is, the better it ranks on the search engine.
- Google prioritizes the permalinks that properly explain what the topic is going to be.
- Backlinking is the main contributing factor for the website ranking higher, and it couldn’t be accomplished without the permalinks of the sites.
- Ease of sharing articles is one of the major use of permalinks. Just send one to anyone, and they’ll instantly be redirected to the website.
Reasons for WordPress Permalink Not Working Error
In many cases, the permalink can stop working, and you’ll see a 404 error on the screen. There are multiple reasons why the 404 error can occur. Here are some of those reasons:
- You might have installed a plugin that directly or directly deals with the “.htacess” file, and it may have caused some sort of contradiction that leads to a broken link.
- Sometimes the developers of a particular plugin or theme may release an update that may end up in contradiction with your website’s configuration.
- When migrating from one hosting platform to another, issues can arise that can lead to 404 errors appearing on the screen.
- If you try to restore a backup of a particular file, the same problem can arise.
- The “.htaccess” might also be broken, or the permissions for it may have been changed, which eventually leads to a broken link.
- The simplest of all the reasons is that the page that you’re trying to access has been deleted from your site and hence cannot be accessed.
Conclusion
You can resolve your WordPress permalinks not working error by following all the methods listed above.
I will say it again that since not all of our readers will be using the same type of hosting so the procedure may remain the same, but the way how you go about finding the option and other things will differ.
If there’s another method on how to fix the WordPress permalinks not working error that we’ve missed, then don’t forget to mention it in the comments section below. Furthermore, don’t forget to tell us if the above-mentioned methods worked for you or not.


