How to Fix WordPress Stuck in Maintenance Mode [Quick Tip]
Is your WordPress site stuck in maintenance mode? 😱 Here’s how to fix it (even if you’re a beginner).
This is one of the most common errors that can affect WordPress sites. 💥 But it’s also one of the easiest to fix.
In this article, You will learn:
- Understand what maintenance mode is and why it gets stuck
- Fix a stuck WordPress maintenance mode using different methods
- Prevent this error from happening again
💡 Bonus Insight: In addition to the primary methods, I will also share a detailed manual process to resolve the maintenance mode issue. This is perfect for those who prefer a more hands-on approach or want a deeper understanding of WordPress.
Ready to dive in? Let’s get your site up and running!
Table of Contents
- What is WordPress Maintenance Mode
- Top 3 Methods to Fix WordPress Stuck in Maintenance Mode
- Top 3 Alternative Solutions To Fix WordPress Maintenance Mode
- What Causes WordPress to Get Stuck in Maintenance Mode
- 5 Ways to Prevent WordPress from Getting Stuck in Maintenance Mode
- Wrapping Up Thoughts
- Frequently Asked Questions
What is WordPress Maintenance Mode
WordPress is not just another CMS (Content Management System); it’s a platform that puts user experience at its core. To ensure that users always get the best experience, it has several features, one of which is the renowned “maintenance mode.” If you’ve been using WordPress for a while, you might have encountered this or heard of it.
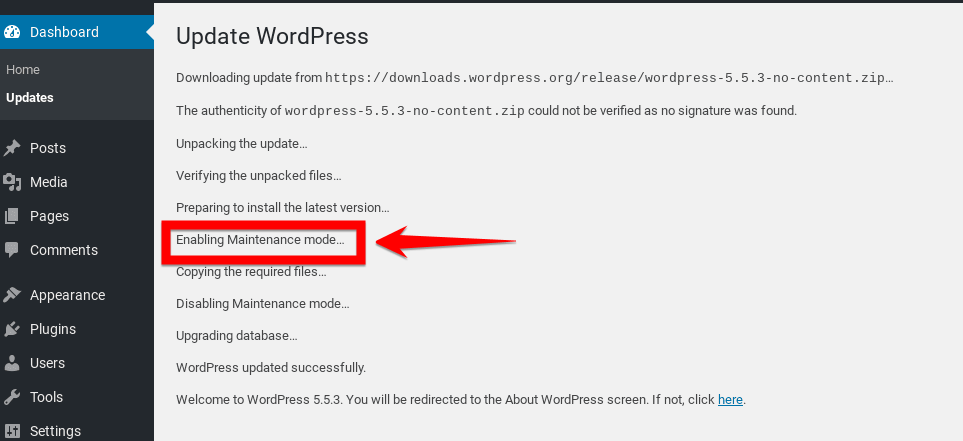
When you update WordPress, themes, or plugins, the platform puts your site into maintenance mode to prevent disruptions. This means that WordPress temporarily blocks visitors while the updates are being installed.
Initiating these updates is simple. From your WordPress dashboard, you’ll often get notifications prompting updates. Once you click to update, behind the scenes, the CMS swiftly turns on maintenance mode. The beauty of this feature is its speed.
For many website admins, the transition into and out of this mode is so rapid they may not even realize it occurred. The website seamlessly reverts to its active state almost instantly after the update.
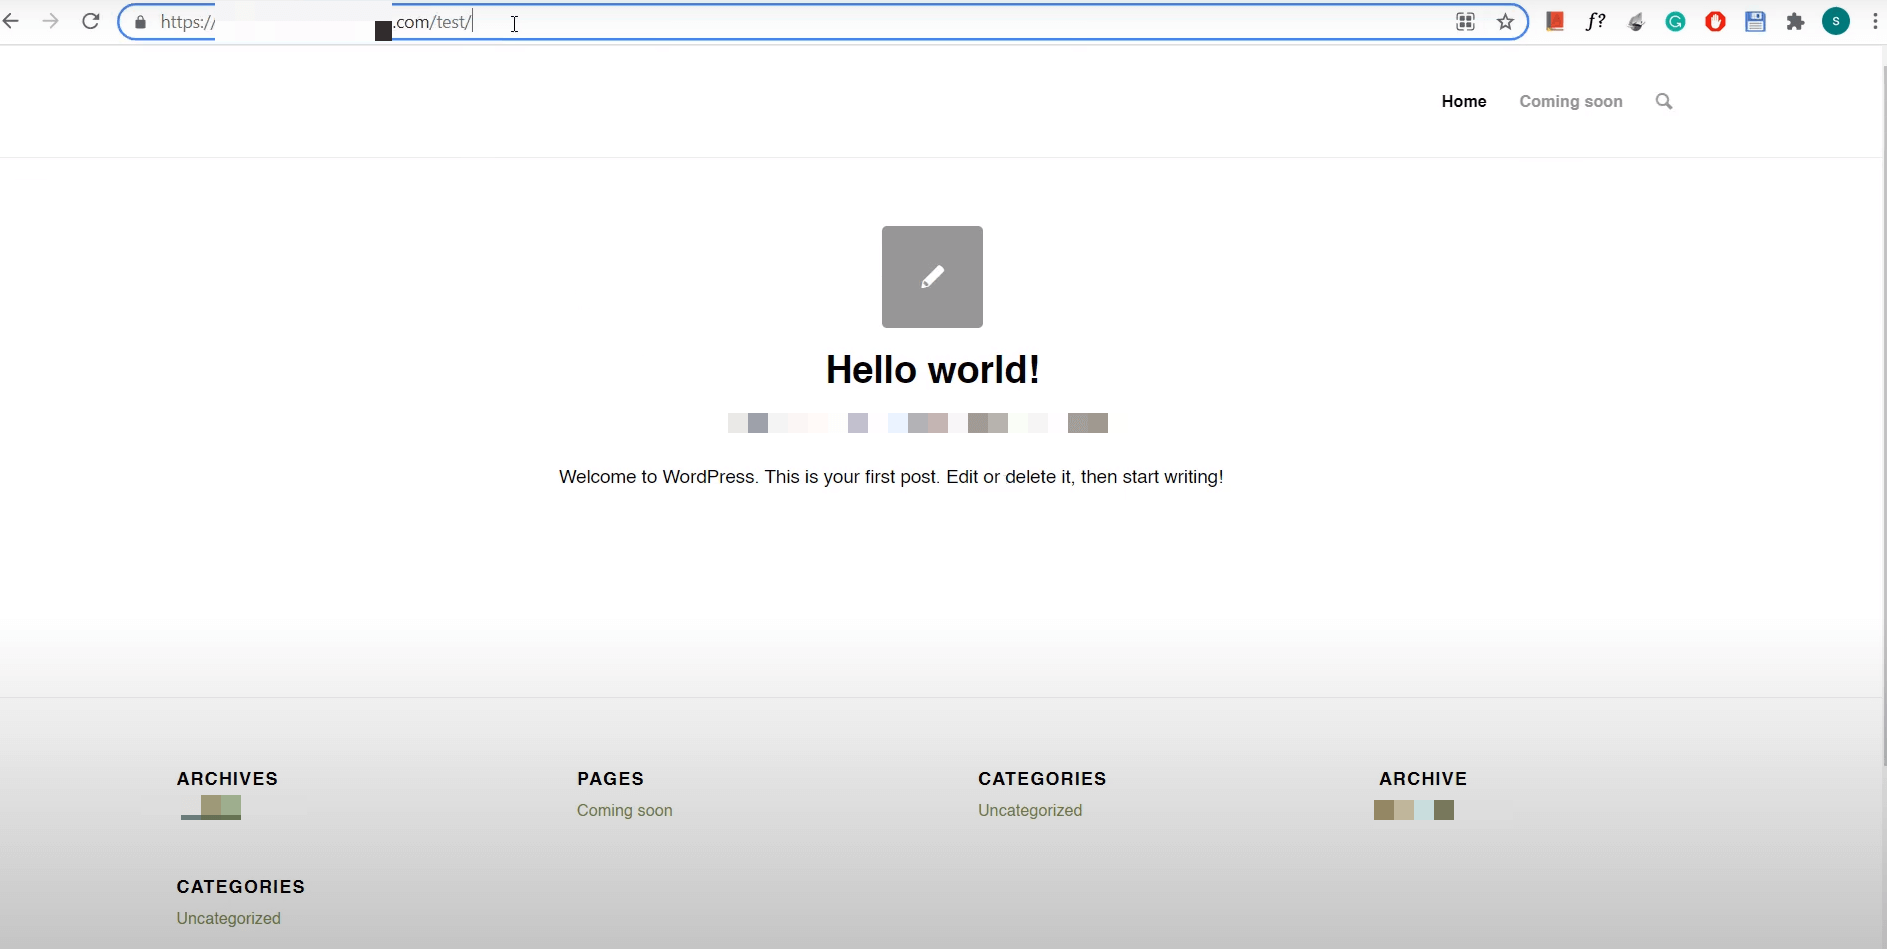
However, as with many technological processes, there can be odd occasions when things don’t proceed as smoothly as intended. Sometimes, the website might linger in “maintenance mode” longer than expected. This is a rare occurrence, but when it does happen, visitors are presented with a message: “Briefly unavailable for scheduled maintenance. Check back in a minute.” It’s polite to say, “We’re tidying things up; please be patient.”
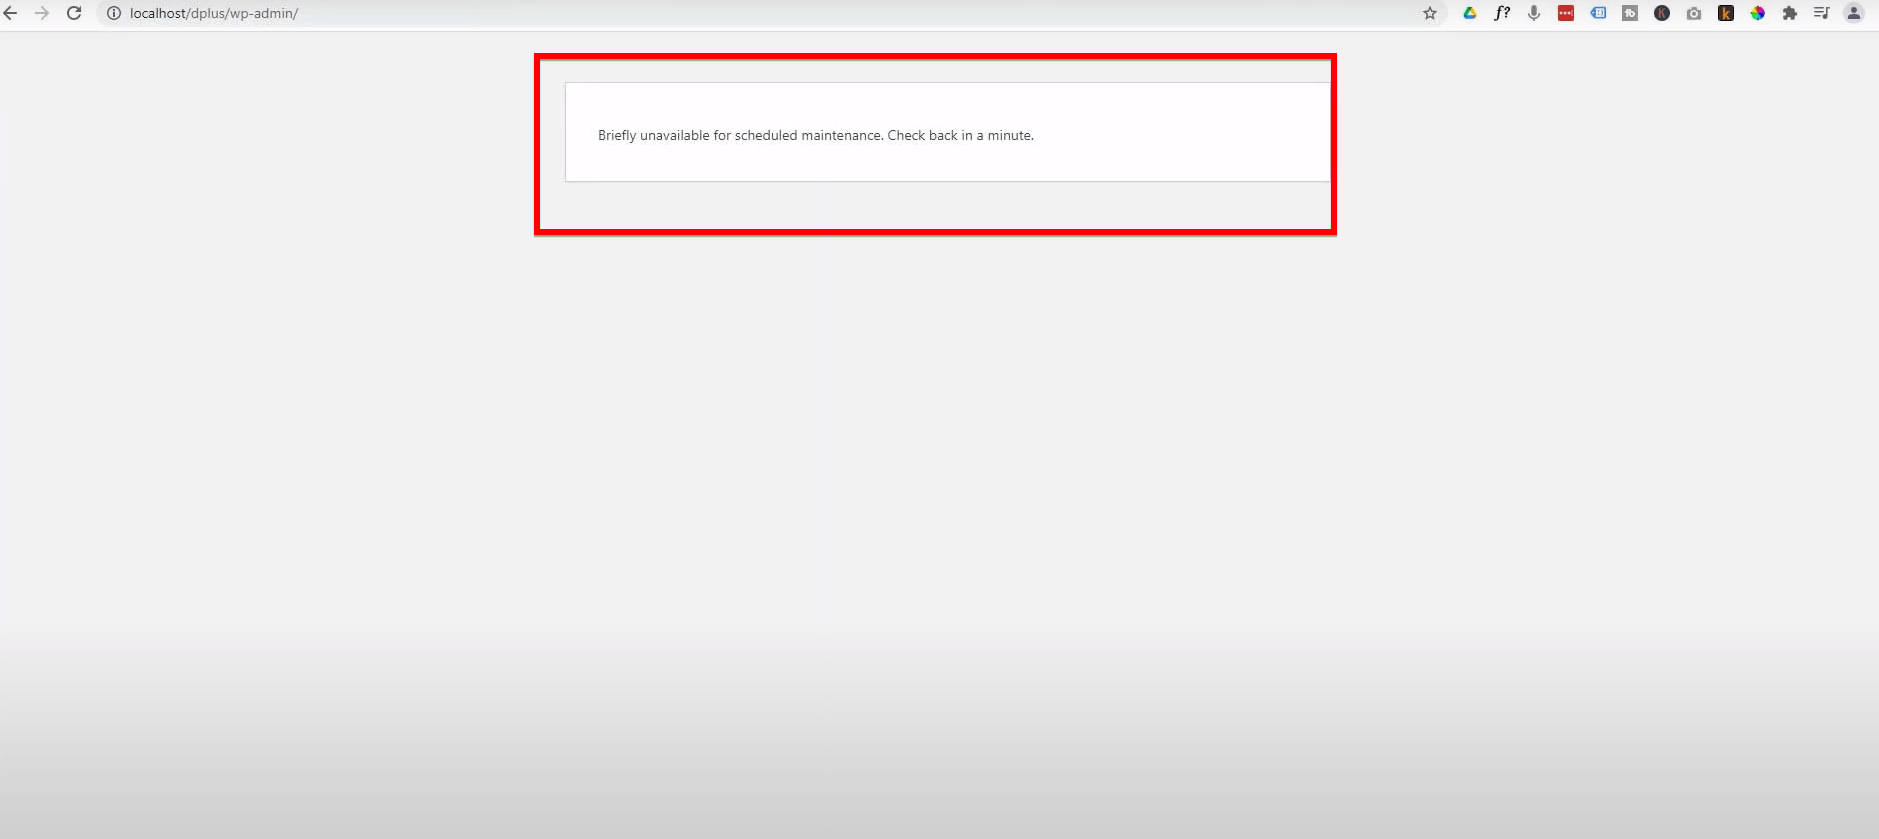
If you’re stuck in this extended “maintenance mode,” don’t worry! I have the solution right below to help your WordPress site.
Top 3 Methods to Fix WordPress Stuck in Maintenance Mode
In most cases, when WordPress finds itself lingering in “maintenance mode,” it’s a result of a “.maintenance” file placed within the primary directory of your WordPress installation. Here, nestled among key components like the wp-admin folder and the wp-config.php, this file takes charge.
Resolving the “stuck in maintenance mode” issue is about accessing your server, finding the “.maintenance” file, and dealing with it appropriately. Below, I outline the top three methods to tackle this challenge effectively.
Method 1: Delete the .maintenance File Using FTP
For those who have experience with FTP utilities, FileZilla can be a handy tool to resolve the “maintenance mode” notification on your WordPress website. For those who haven’t used FTP utilities before, don’t worry!
FileZilla is an intuitive platform that’s easy to get the hang of. Before you delve into the process, it’s essential to ensure that FileZilla is properly configured. Please refer to the detailed steps provided below:
- Step 1: Initiate the process by launching FileZilla, your FTP client. Once open, you’ll be prompted to provide access credentials. Enter your username and password linked to your hosting account in the respective fields. After ensuring correctness, click on the “Quickconnect” button.
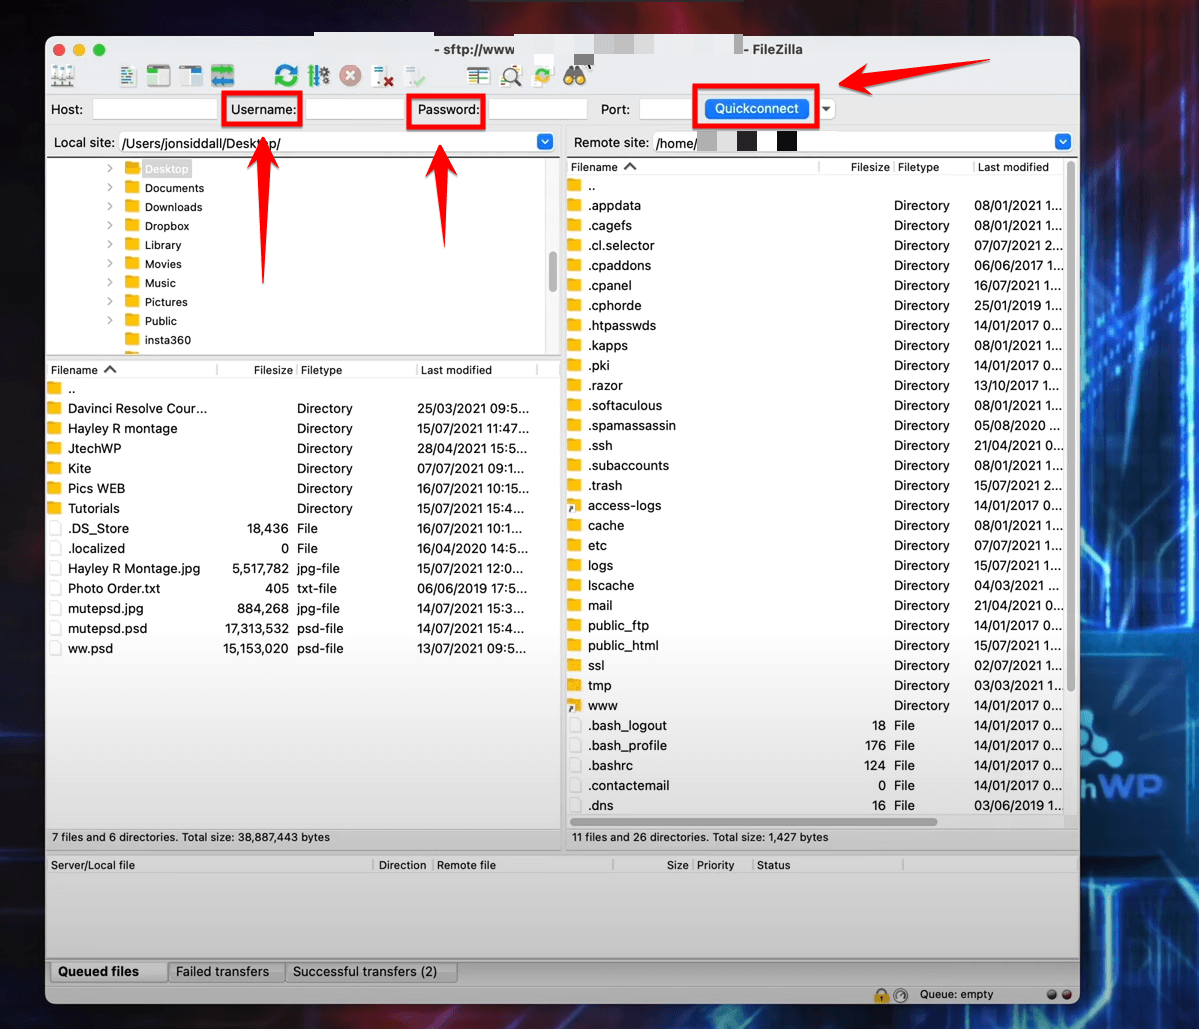
Note: FTP (File Transfer Protocol) clients like FileZilla facilitate the secure transfer and management of web files between your computer and a web server.
- Step 2: After successfully establishing a connection, focus your attention on the “Remote Site” tab. This section provides a visual directory of your server’s files and folders. Typically, your primary website files reside within the public_html folder, which is a default directory for many hosting services.
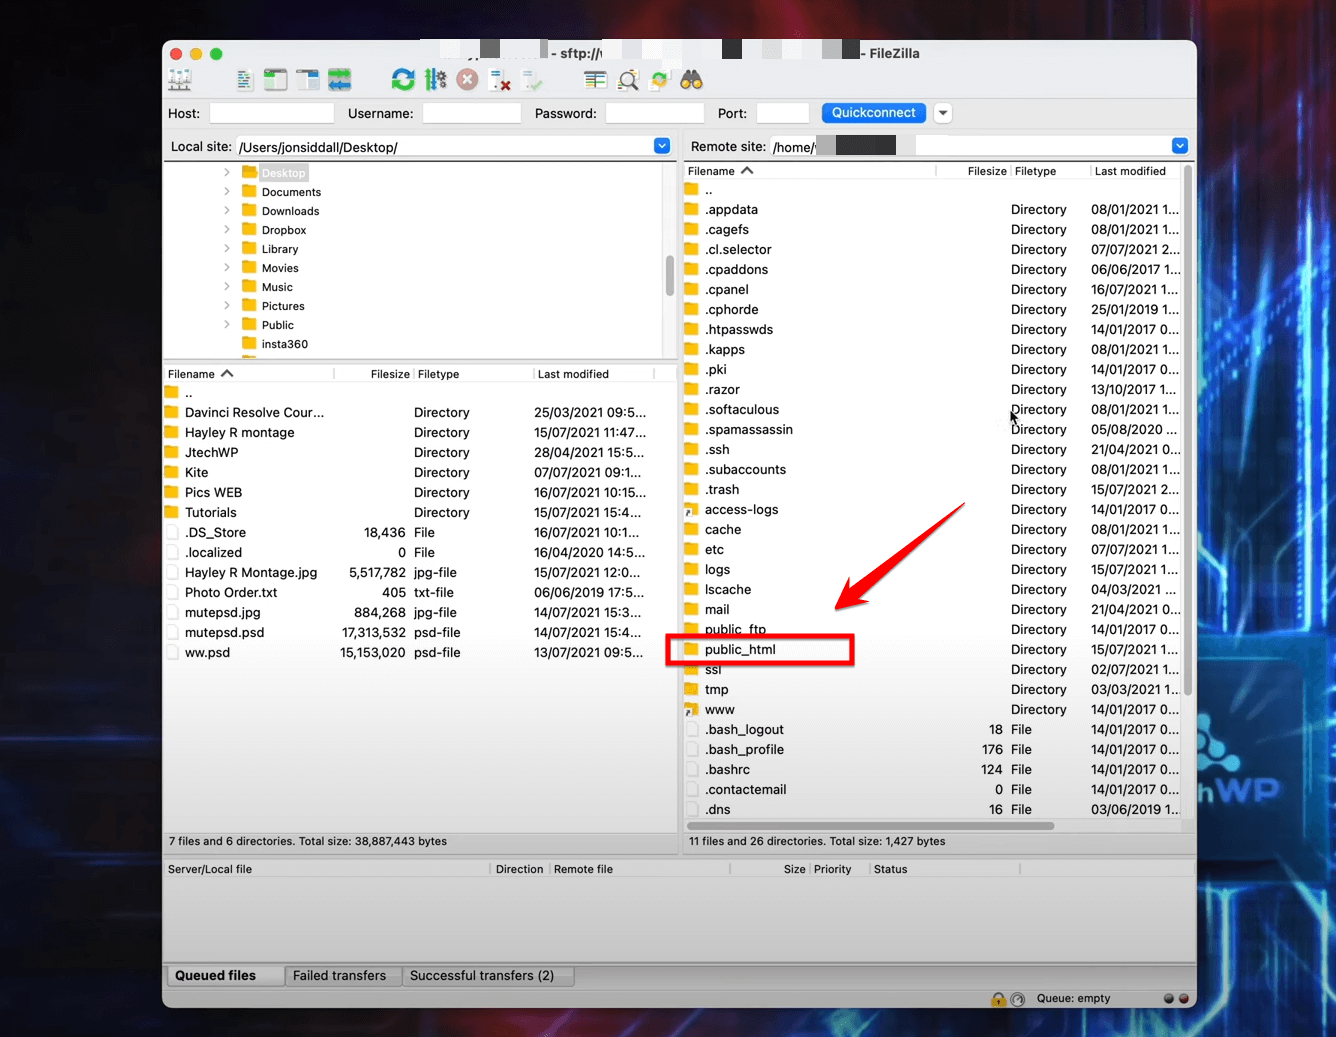
A Pro Tip: The structure might vary slightly based on your hosting provider, but the public_html folder is a standard starting point.
- Step 3: As you sift through the list of files in the public_html folder, search for a file named “.maintenance”, Once you pinpoint this file, right-click on it to access a context menu. From this menu, select the “Delete” option to remove this file.

Note: The “.maintenance” file is a temporary file WordPress uses to indicate that your website is undergoing an update or modification.
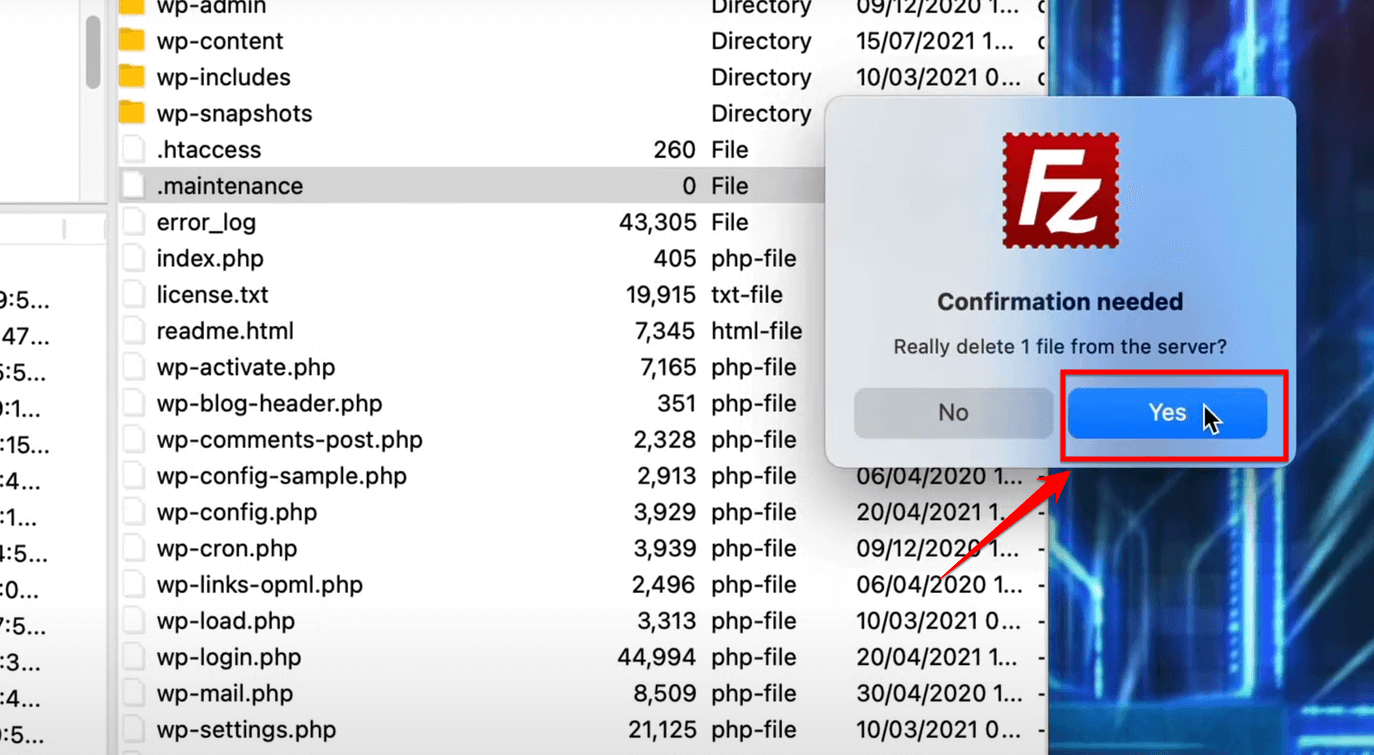
- Step 4: Immediately after selecting “Delete,” FileZilla seeks confirmation via a popup dialog. This message, labeled “Ready to delete 1 file from this server?” acts as a precautionary step to avoid accidental file removals. Confirm your intent by clicking on the “Yes” button.
- Step 5: If you can’t see the “.maintenance” file, it may be hidden. Go to the menu bar, select “Server,” and choose “Force showing hidden files” to reveal it.

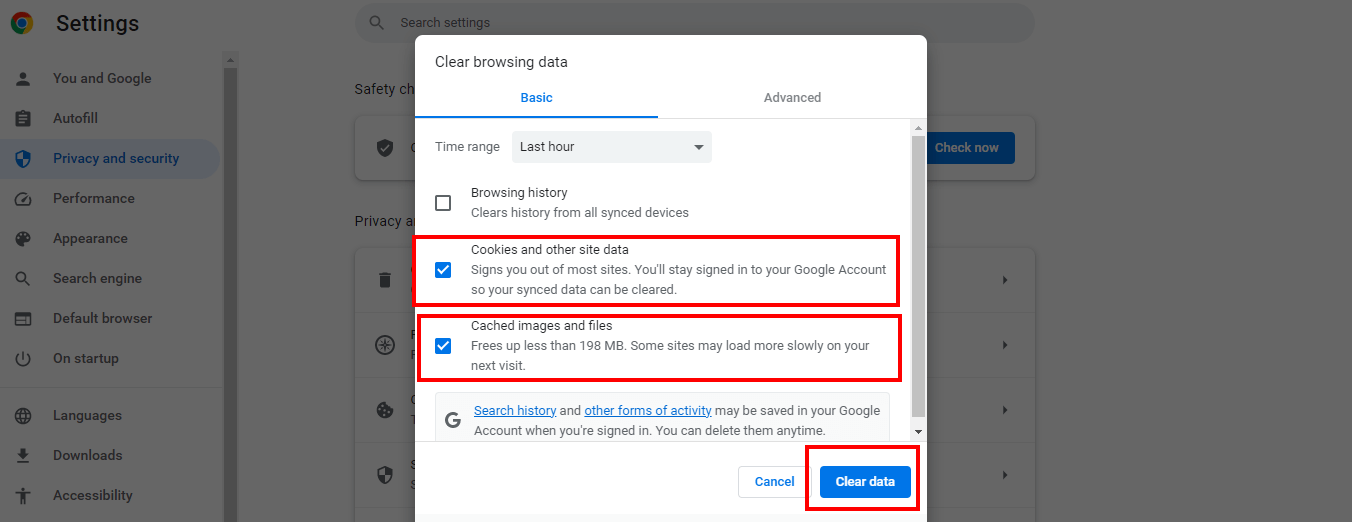
A Pro Tip: I’d highly recommend clearing your browser cache or using a private/incognito window to ensure you’re seeing the most recent version of your site without cache-related issues.
Ideally, the persistent “maintenance mode” issue should be resolved, displaying your website content seamlessly.
Method 2: Delete the .maintenance File Using cPanel
After an update, WordPress can sometimes get stuck in “maintenance mode.” This is caused by a file called “.maintenance” that is created during the update process. This file prevents WordPress from loading normally, so your website will not be accessible to visitors.
The “.maintenance” file is a hidden file, which means that it is not visible by default in your File Manager. This is because hidden files are typically used for system files and other files that you do not need to see.
To see hidden files in your File Manager, you will need to change your File Manager settings. The exact steps for doing this will vary depending on the File Manager that you are using. However, in general, you will need to find the option to show hidden files or dotfiles.
Once you have changed your File Manager settings to show hidden files, you can proceed to delete the .maintenance file. Here are the steps on how to do it:
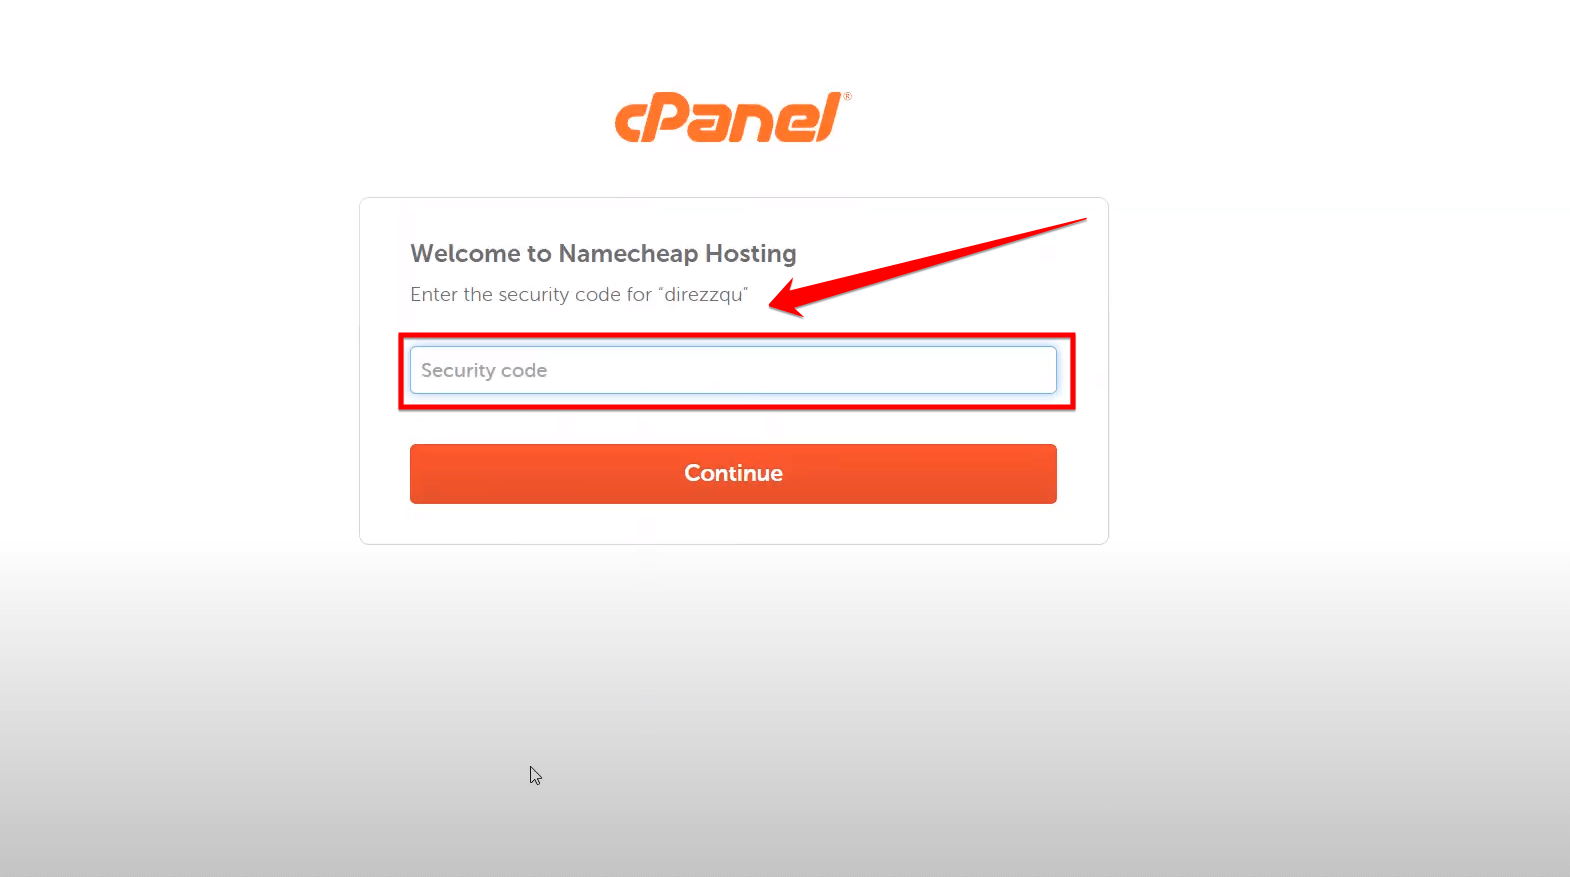
- Step 1: Begin by accessing your hosting’s cPanel. Open your preferred web browser, input the cPanel URL, and provide your login credentials.
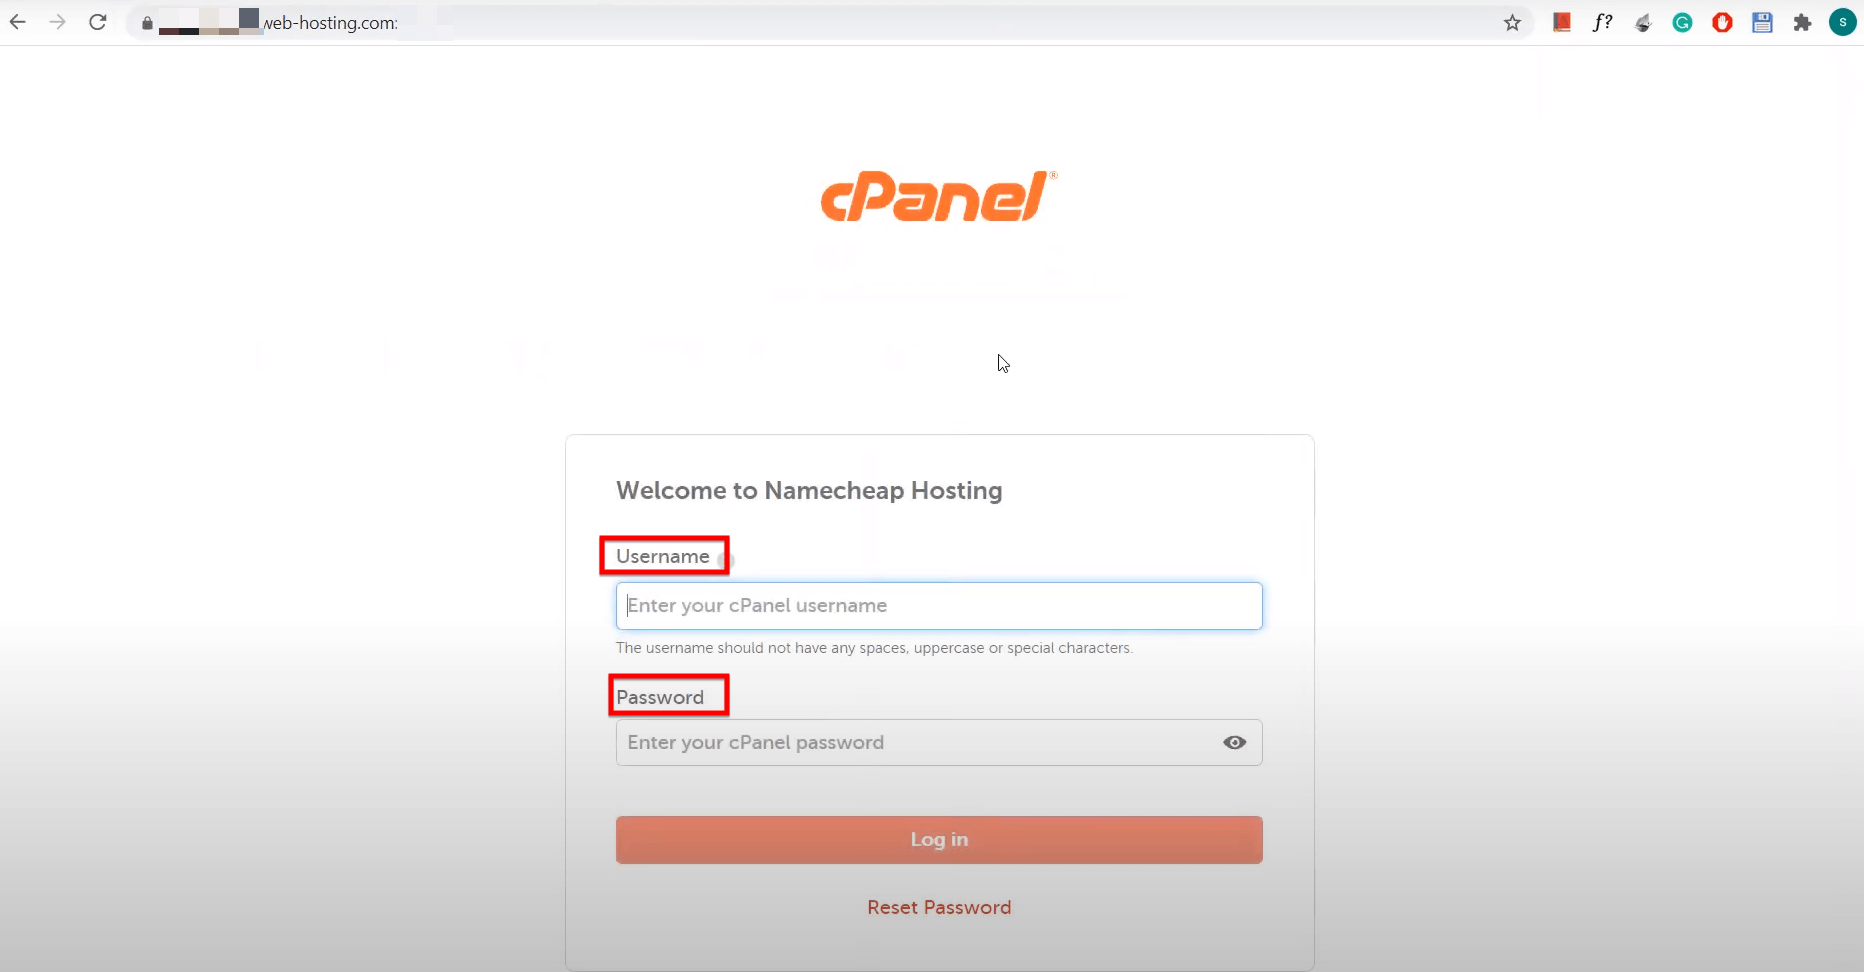
Note: If you’ve set up a two-step verification process for added security, expect a prompt asking for a verification code. Ensure you have access to the medium (e.g., mobile or email) where the code is sent to facilitate this authentication.
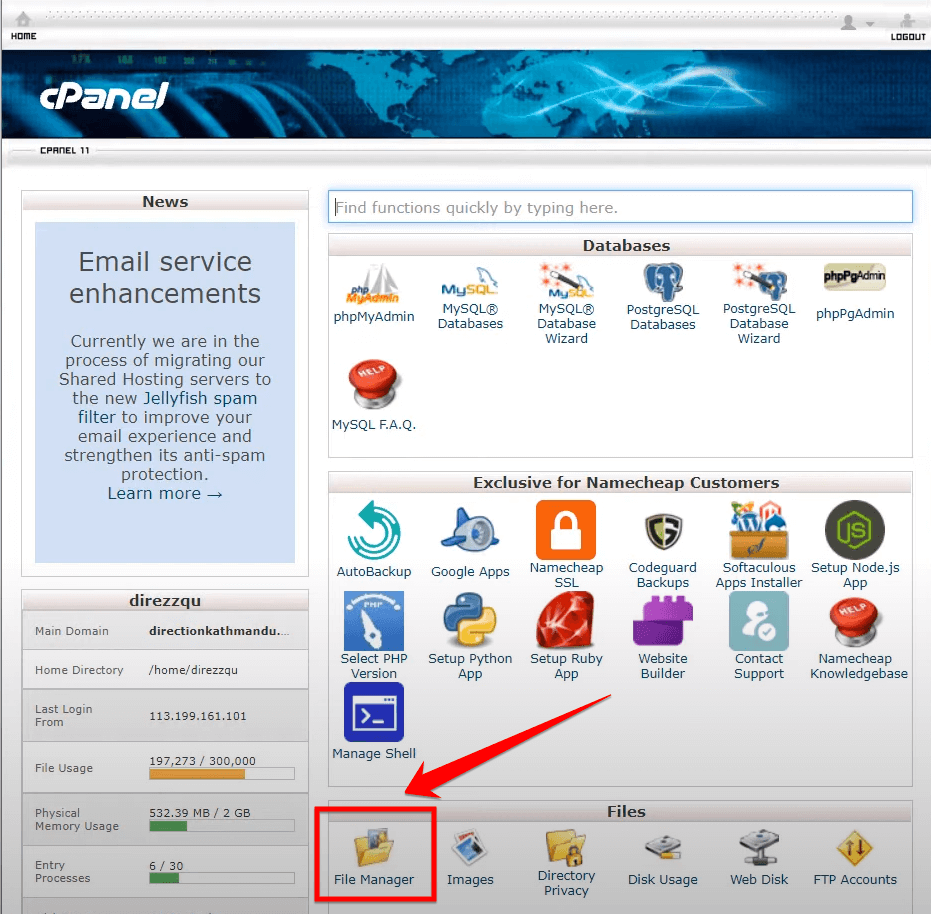
- Step 2: Upon successful login to the cPanel, you’ll encounter a variety of tools and functionalities. Direct your attention towards the “File Manager” icon and click on it to proceed.
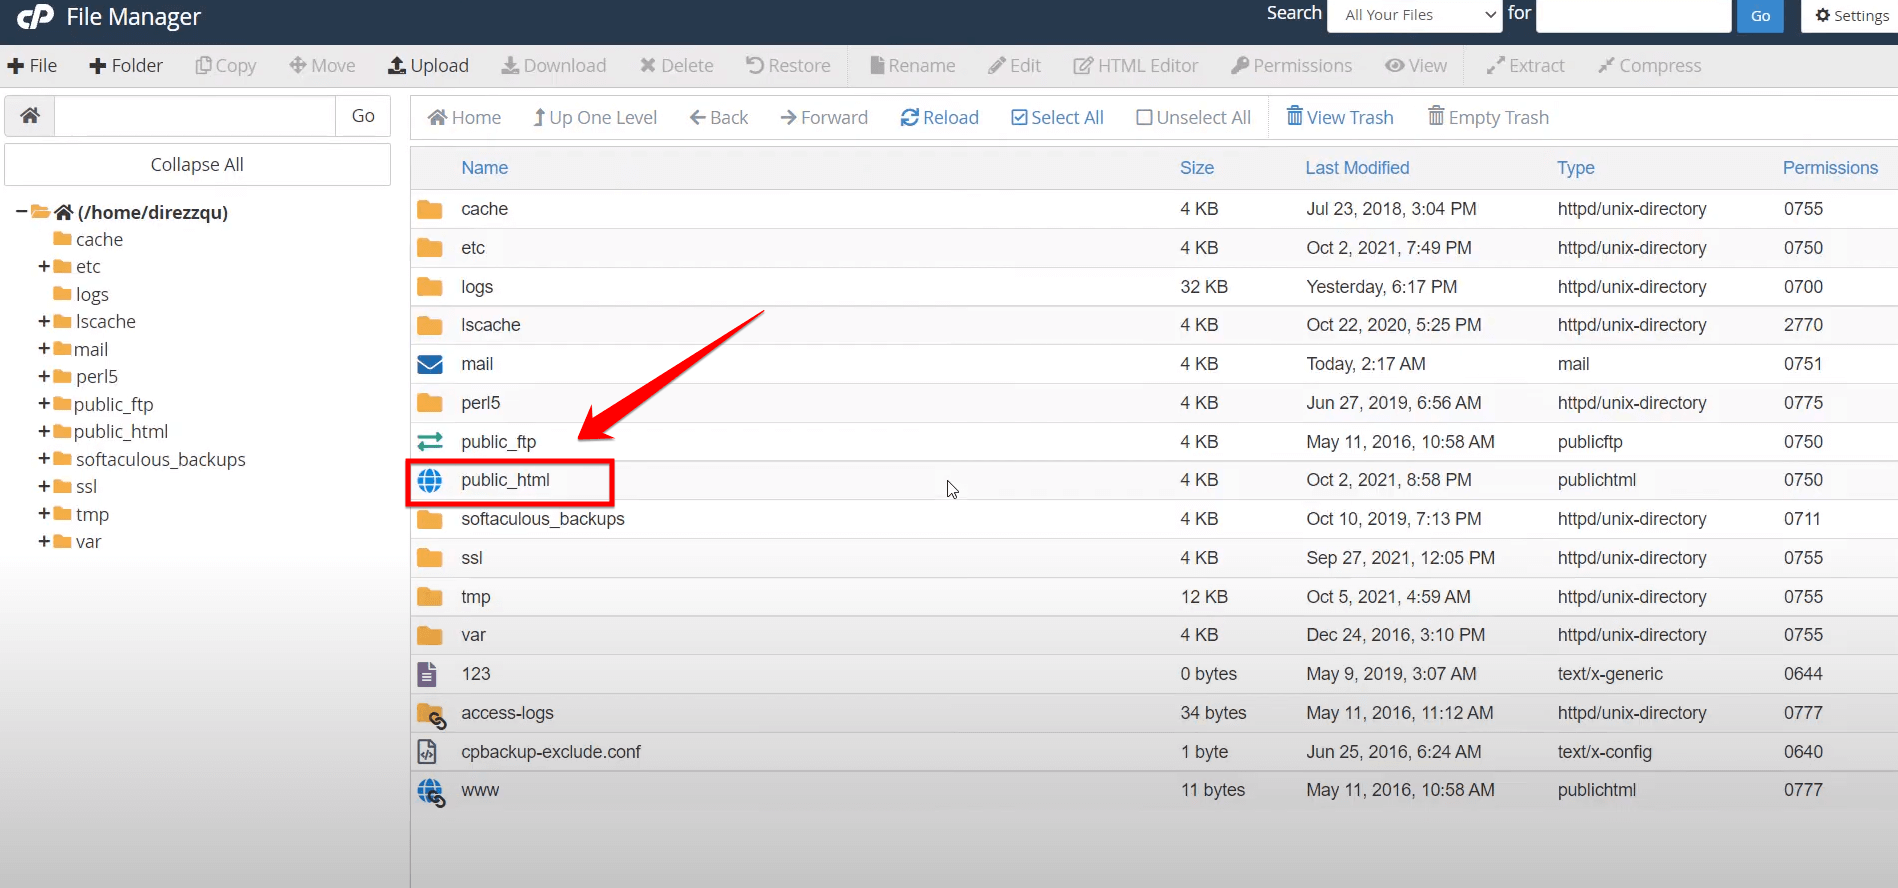
- Step 3: Within the File Manager, the directory structure of your hosting will be displayed. Most WordPress installations are housed within the “public_html” file. Navigate into this directory to access the core files of your website.
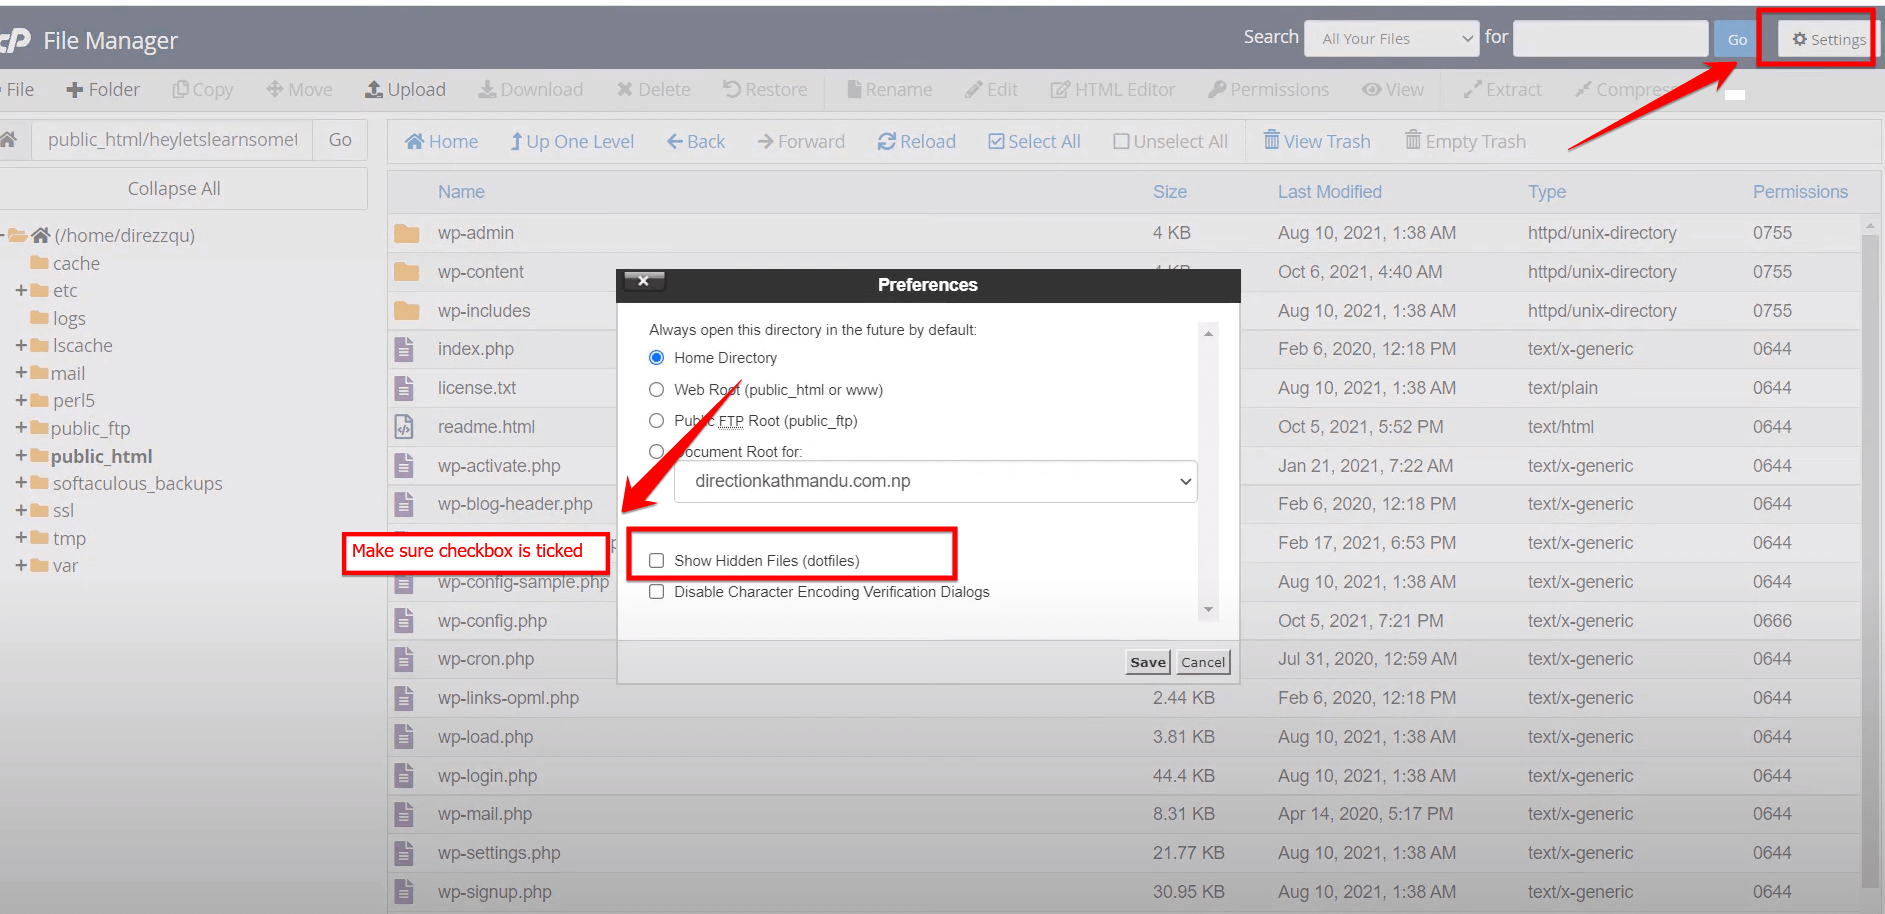
- Step 4: The “public_html” directory (or your website’s root directory) will showcase a plethora of files. Your task is to locate the “.maintenance” file, which is responsible for the maintenance mode status.
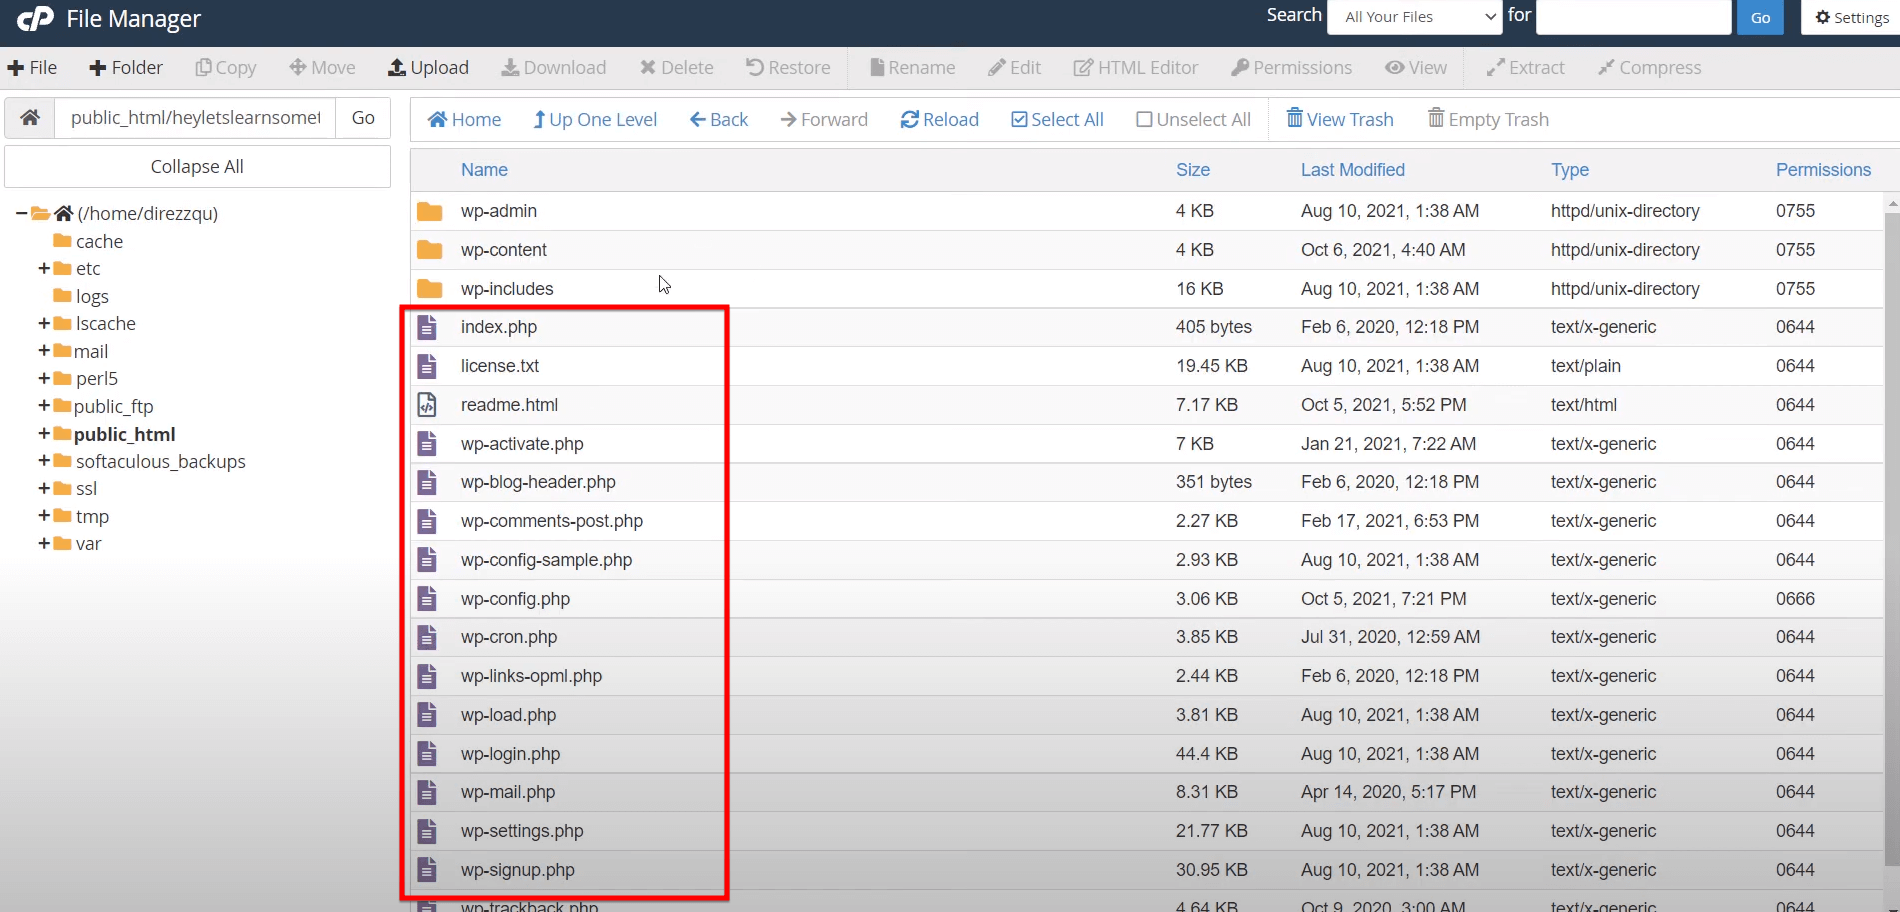
A Pro Tip: On occasions, the “.maintenance” file might not be immediately visible. This is due to its “hidden” status, common with files beginning with a dot (.) prefix. To reveal such files, head over to the File Manager’s “Settings” (usually at the top-right corner), and ensure the “Show Hidden Files” checkbox is ticked. Save these settings to refresh the file list.
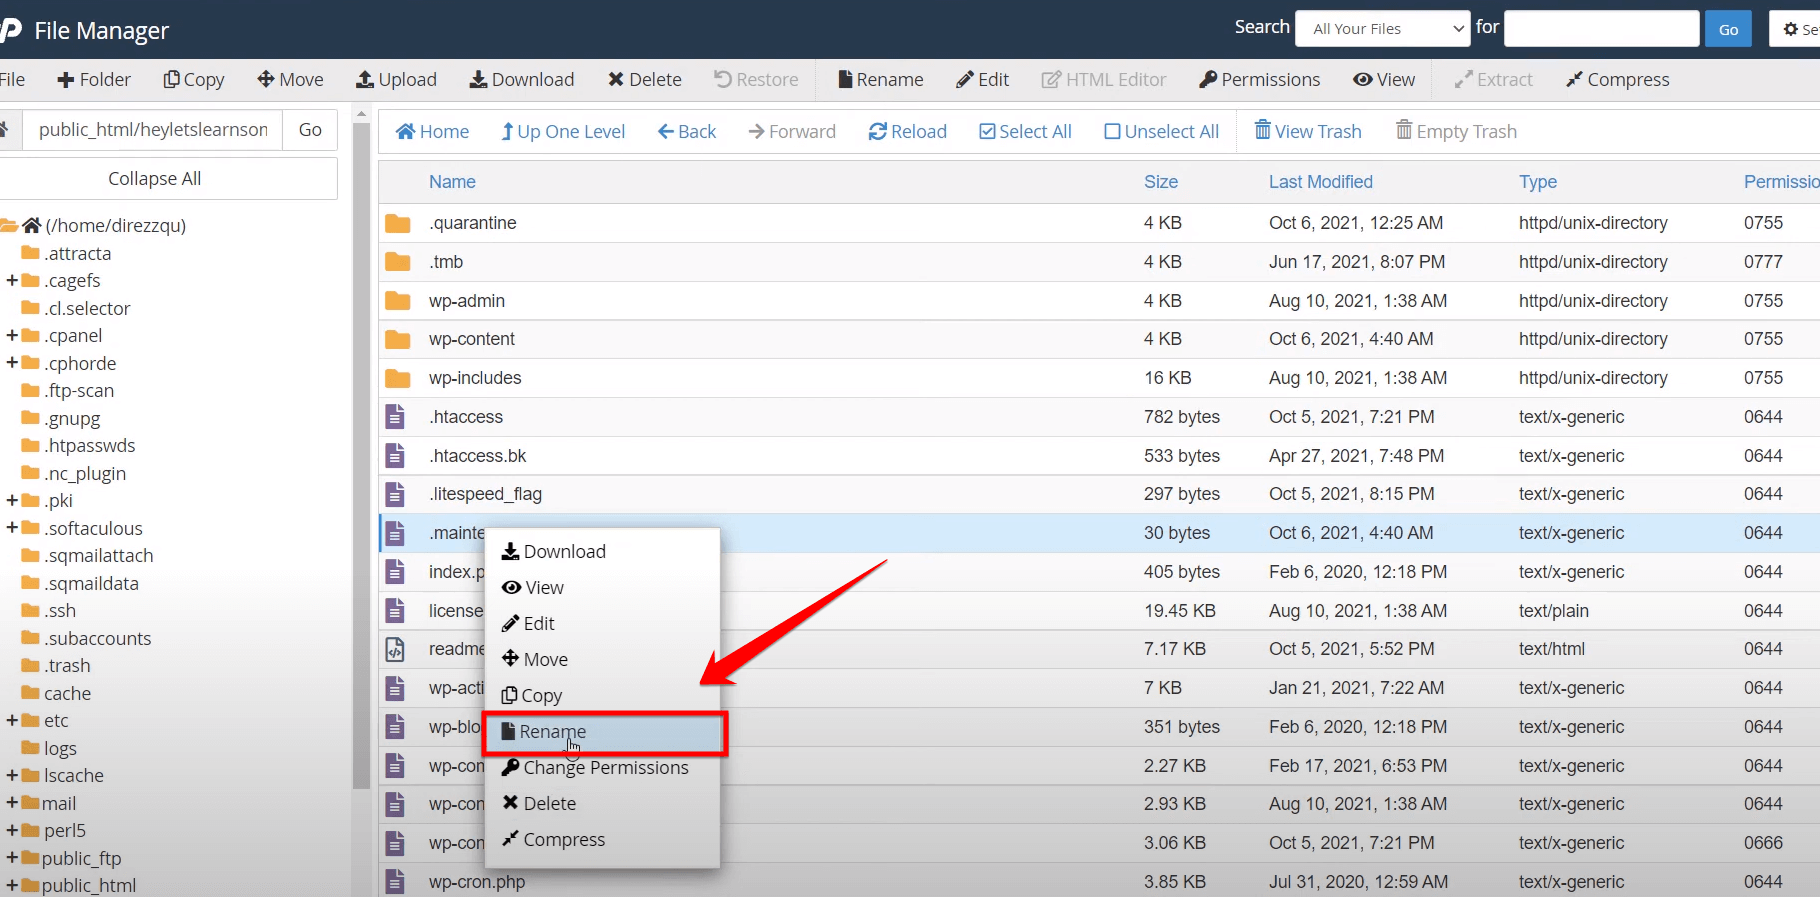
- Step 5: With the “.maintenance” file in view, proceed to right-click on it. A context menu will appear, offering various options. To resolve the maintenance mode issue, opt for the “Delete” option.
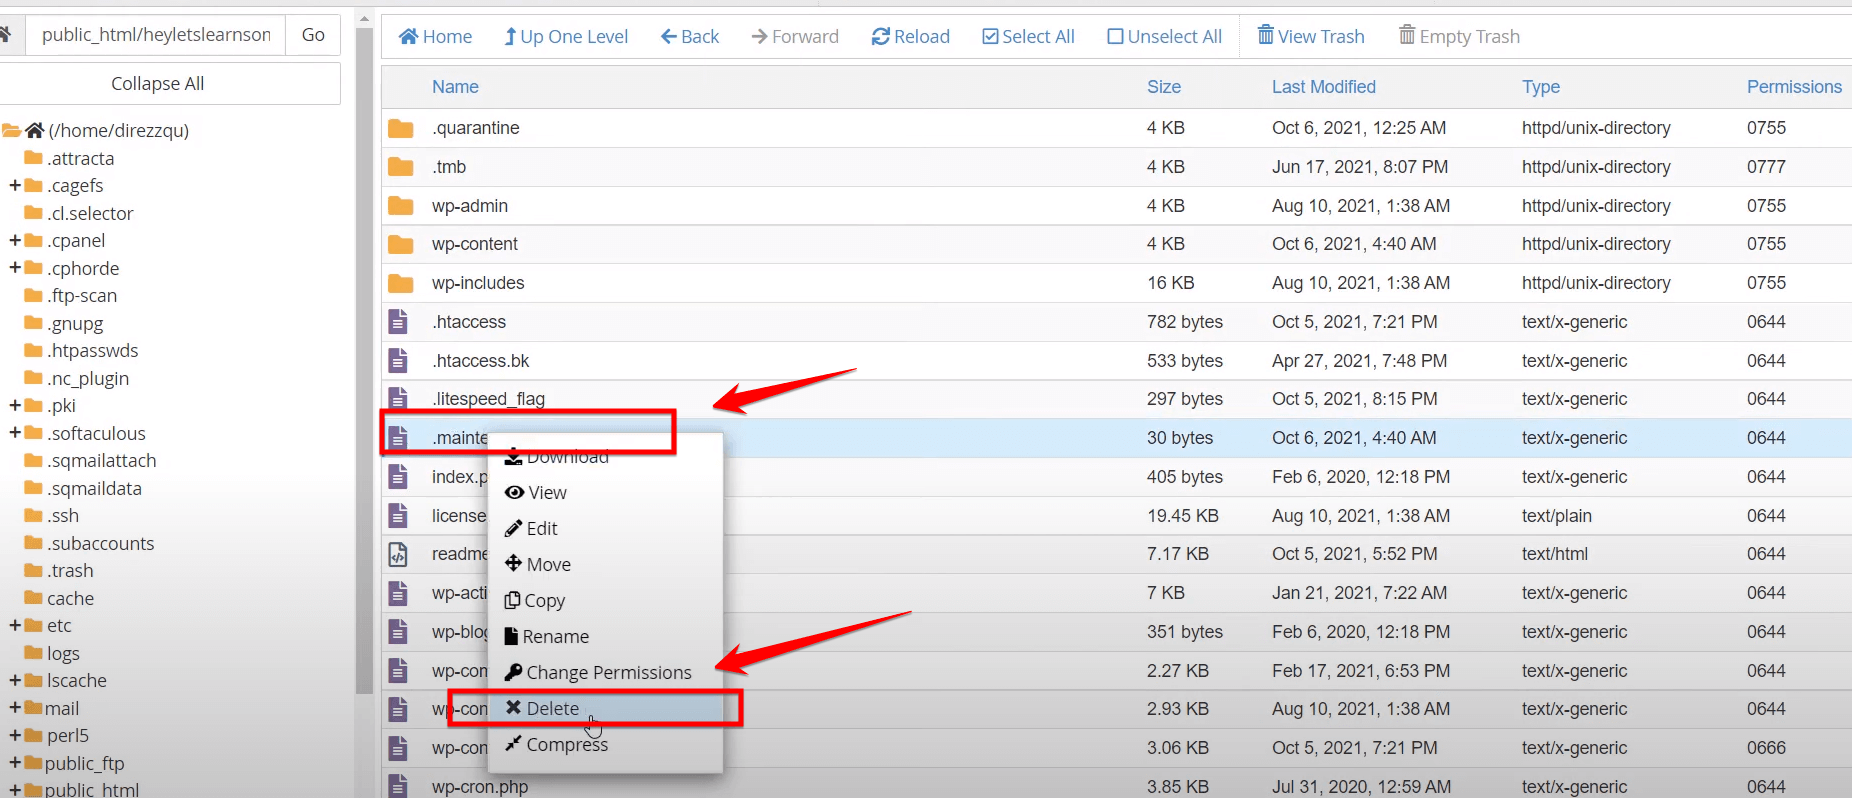
Note: Renaming the “.maintenance” file is also a viable method, effectively disabling its function. However, for simplicity and clarity, deletion is often recommended.
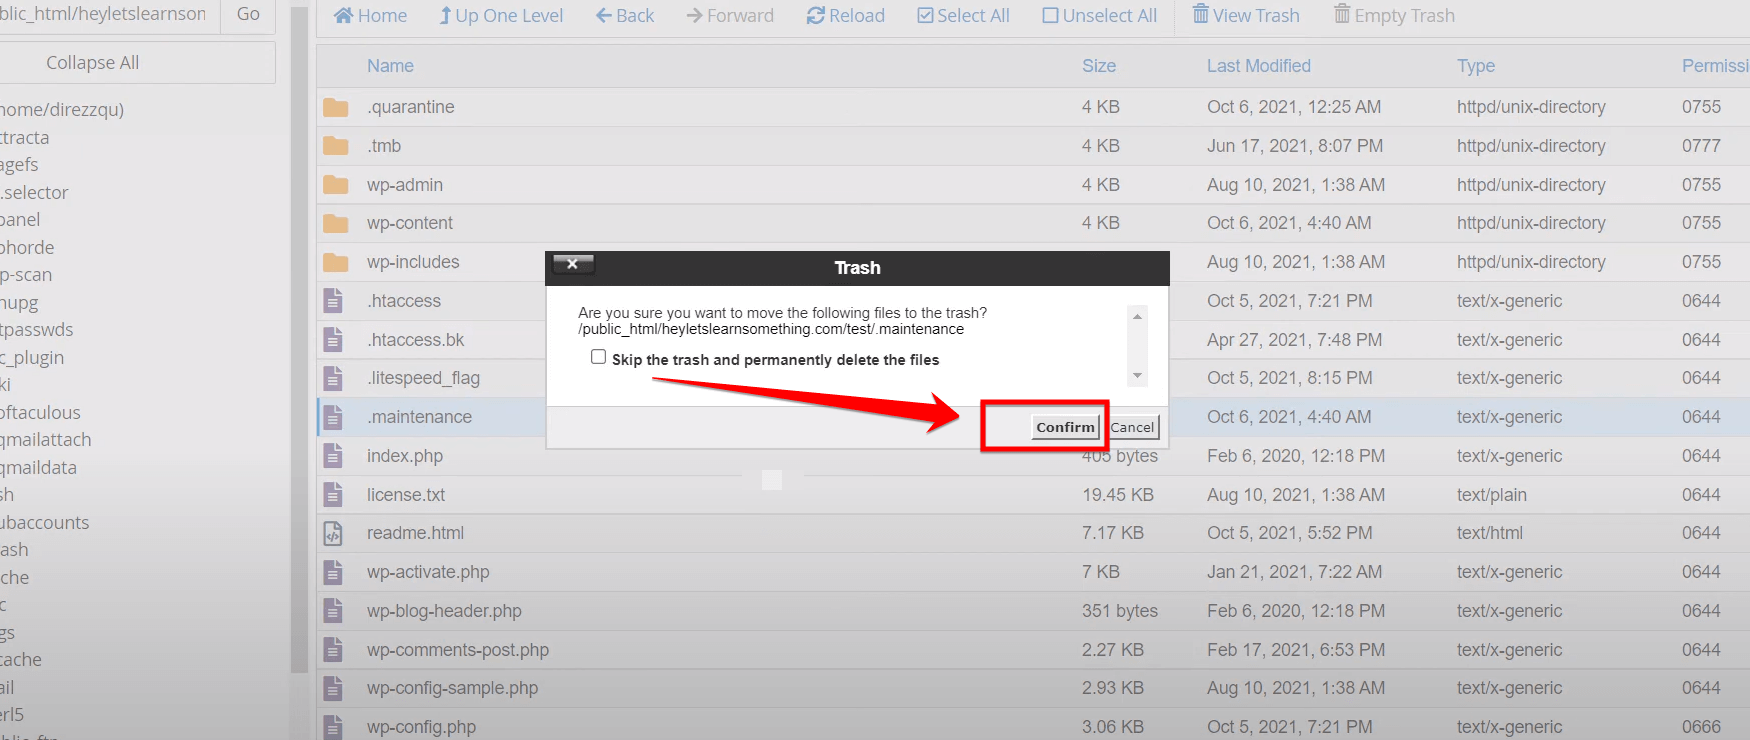
- Step 6: After you delete the file, a popup might show up. This tells you the file is moved to the “trash”, which means it’s still there but not active. Just click “Confirm” or “Okay” to finish.
- Step 7: With the “.maintenance” file dealt with, it’s prudent to verify the website’s status. Launch a new browser tab or window and access your website URL. Ideally, the site should now load without the maintenance mode banner.
A Pro Tip: For comprehensive assurance, it’s recommended to visit both the front end of your site and the WordPress admin dashboard (wp-admin). This dual verification ensures your site and its backend are both functioning optimally.
Method 3: Fix Maintenance Mode by Deactivating Plugins
Having your WordPress website stuck in “maintenance mode” can be a major headache. This is because maintenance mode is a state where your website is not accessible to visitors. It is typically used when you are making changes to your website, such as updating plugins or themes. However, sometimes your website can get stuck in maintenance mode for no apparent reason.
In most cases, this is caused by plugins that you have installed. Plugins are third-party software that can add new features and functionality to your WordPress site. However, they can also sometimes cause problems.
If a plugin is not compatible with your WordPress version or other plugins, it can cause your website to crash or go into maintenance mode.
Here is a simple guide on how to turn off all of your plugins temporarily, which can help you get your website back up and running:
- Step 1: Begin by accessing the “hosting dashboard.” Open your preferred web browser and input the URL associated with your hosting. Then, enter your login credentials.
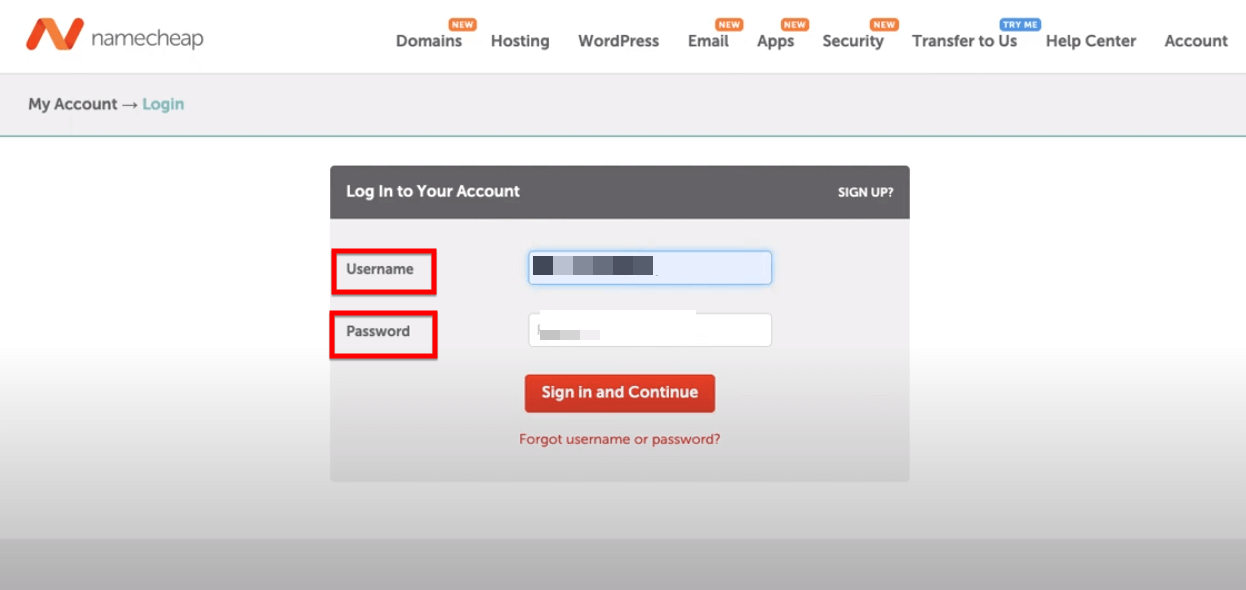
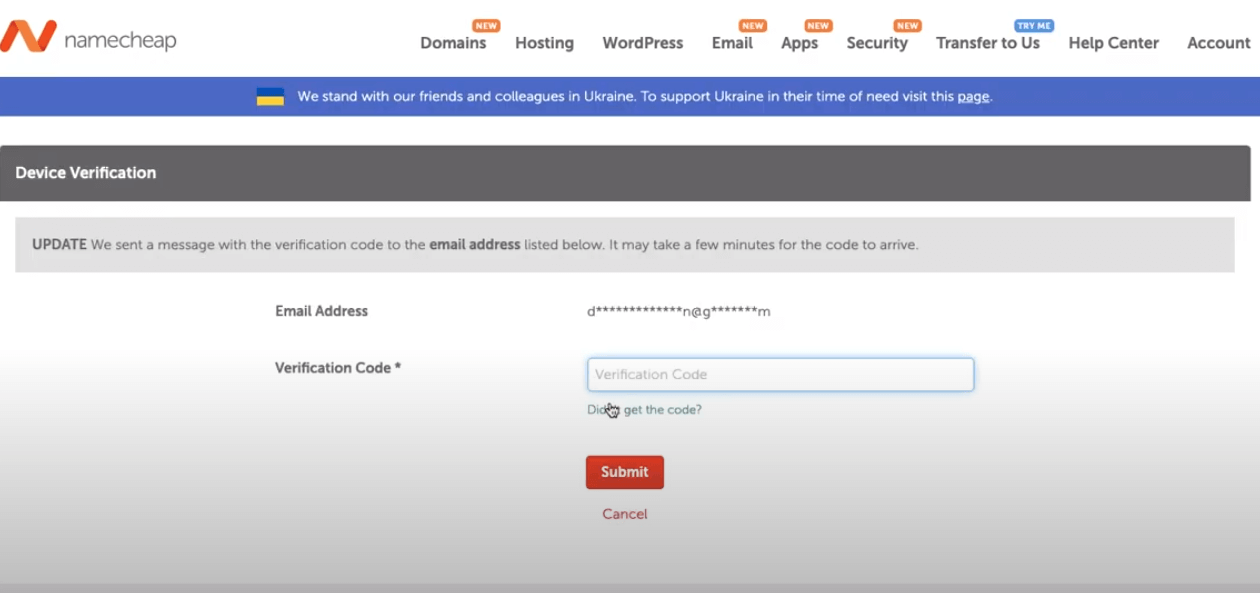
Note: After the initial login, a security measure might prompt you for a “verification code.” This code is typically dispatched to your associated email address. Ensure you check your inbox (and spam folder if necessary) to retrieve it.
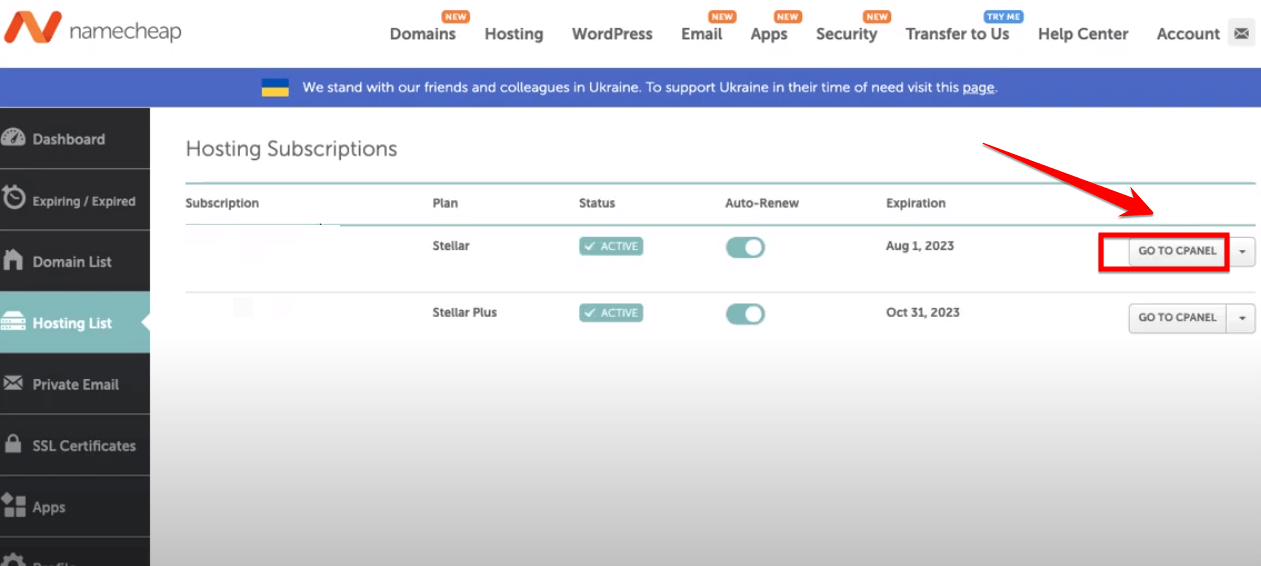
- Step 2: Once inside the dashboard, you’ll be presented with several management options. Locate and click on the “hosting list.” This list contains details of all the websites you host.
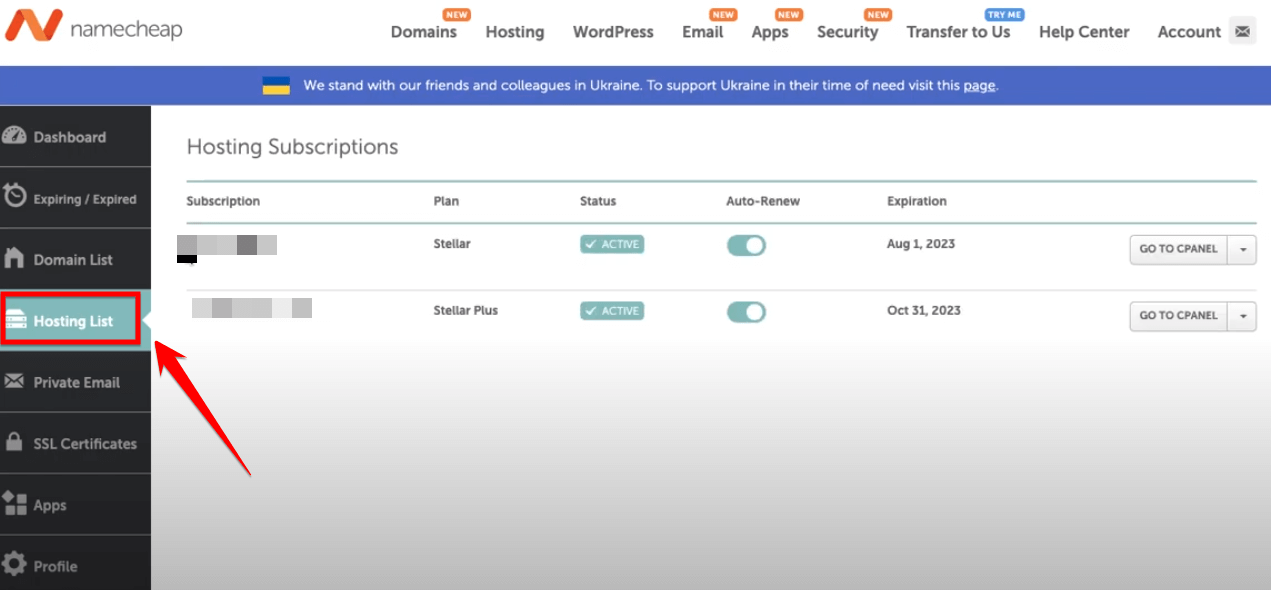
- Step 3: Upon identifying the website experiencing the maintenance mode issue, click on its associated “cPanel” link or button. This action will grant you access to the control panel of your hosting.
- Step 4: Inside the cPanel, you will encounter a myriad of tools and functionalities. Your target is the section labeled “WordPress managed by Softaculous.” Navigate to this option.
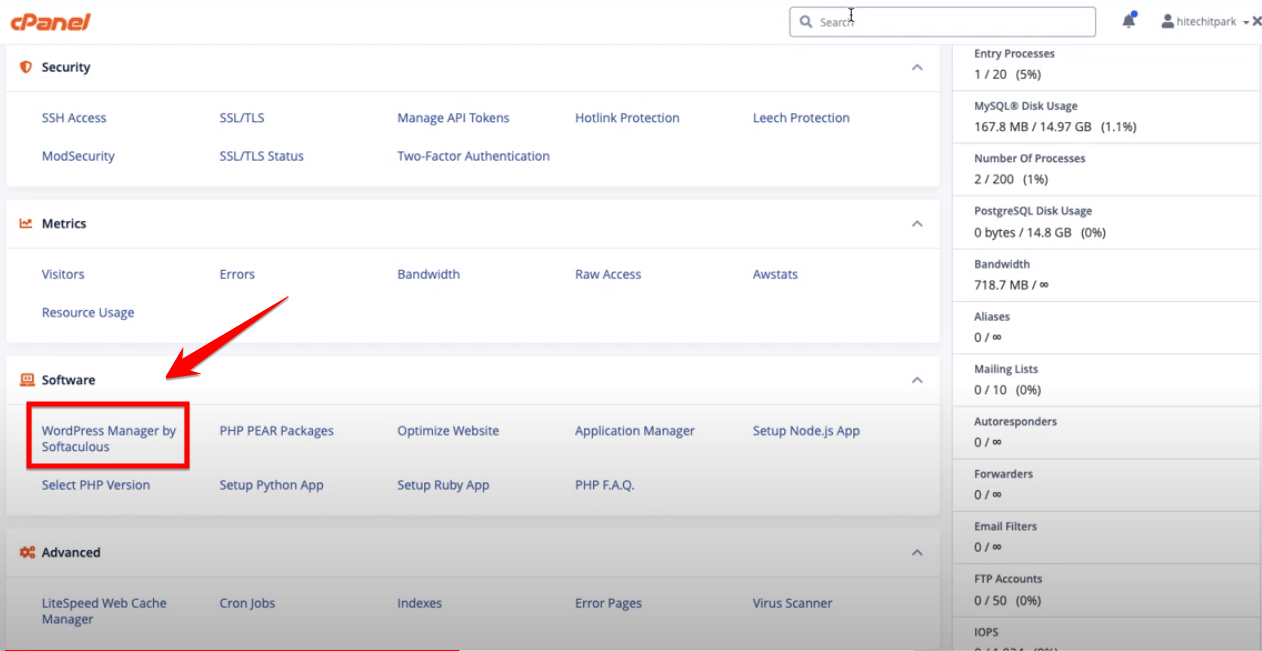
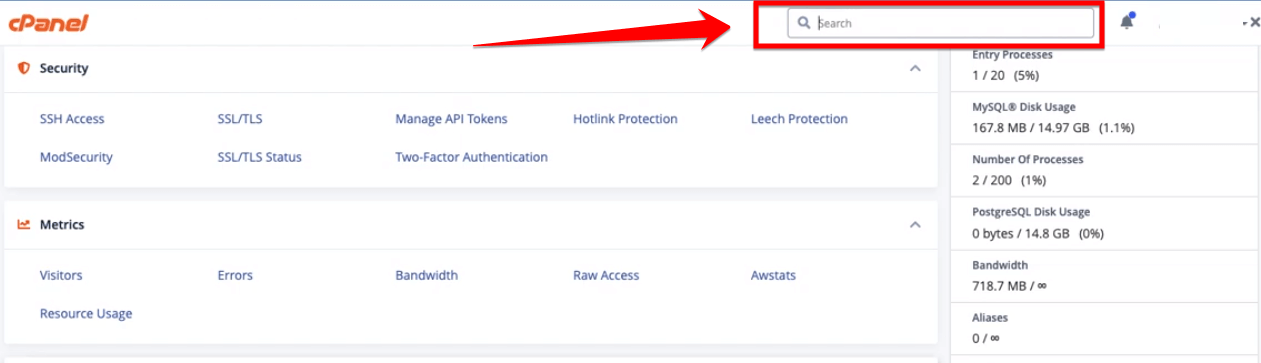
Note: If you can’t spot it immediately, consider using the cPanel search functionality.
- Step 5: On selecting the “WordPress managed by Softaculous” option, an arrow icon indicating a dropdown menu should be evident. Clicking this arrow unveils a series of additional options related to WordPress management.
- Step 6: Among the dropdown options, locate and select “Manage Plugins.” This feature is integral in controlling the plugins installed on your WordPress website.

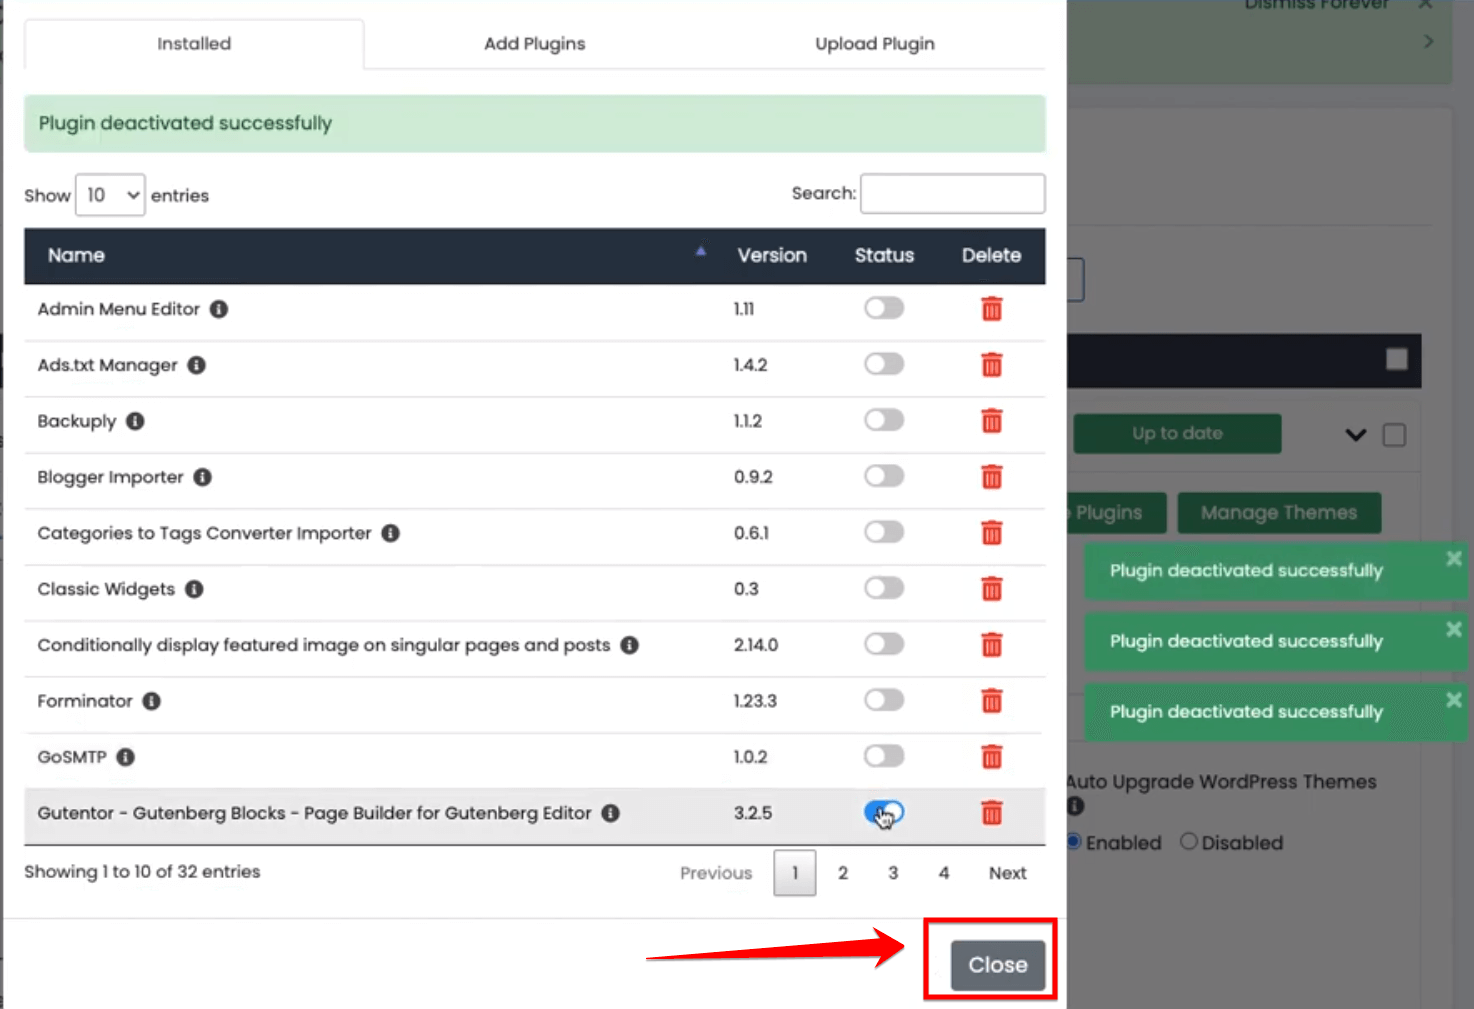
- Step 7: A popup window materializes, presenting a comprehensive list of plugins currently installed on your website. To address the maintenance mode issue, systematically deactivate each plugin. You can achieve this by toggling the “off” button adjacent to each plugin’s name.
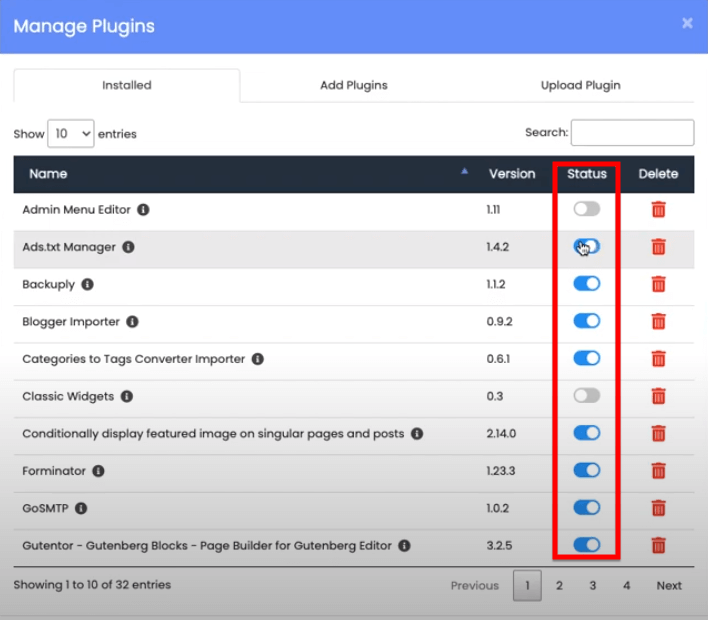
Note: This step aims to identify any rogue plugins causing the issue. Deactivating all plugins momentarily assists in this diagnosis.
- Step 8: Once you’ve deactivated all listed plugins, it’s time to close the popup window. Click on the “close” button, typically located at the top-right or bottom-right corner of the window.
- Step 9: Now, open a new browser tab or window and access your website. Refresh it a couple of times to determine if it has exited the maintenance mode and is displaying content correctly.

Note: This step confirms if a plugin was indeed the source of the error.
- Step 10: Navigate back to your WordPress dashboard. From the left sidebar, click on the “Plugins” section. Here, you’ll have an overview of all your plugins, both active and inactive.
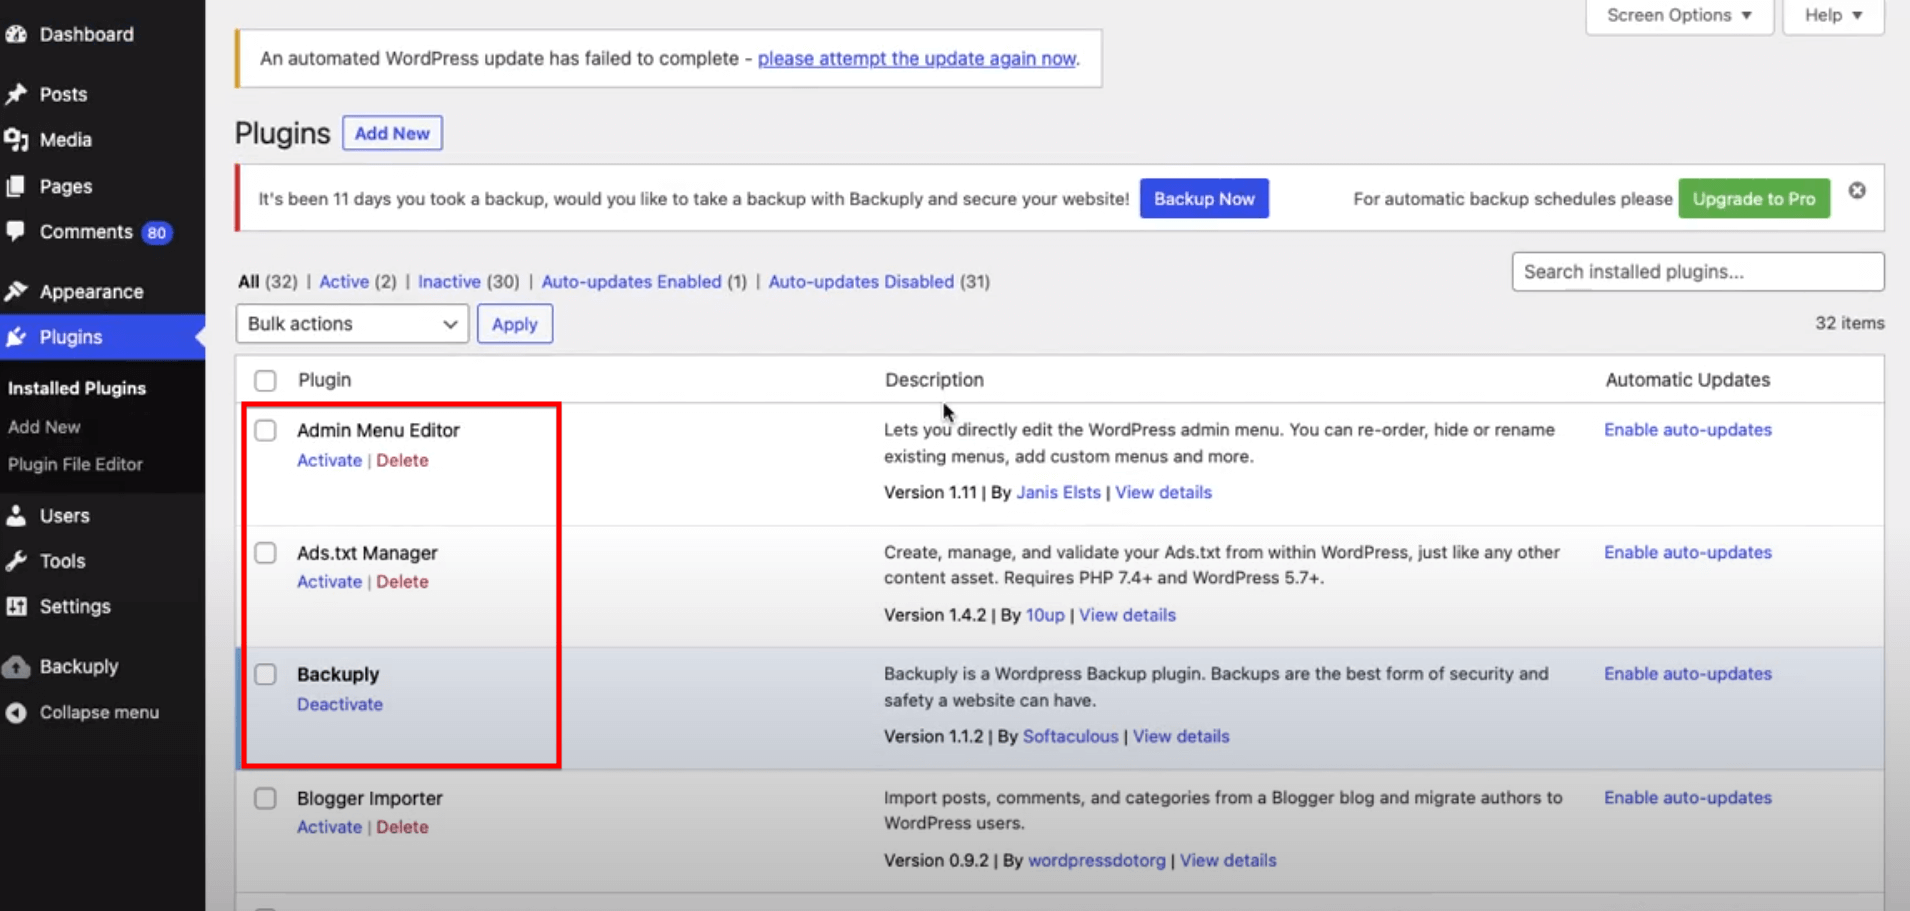
A Pro Tip: Before moving to reactivation, scrutinize the plugin list for any pending updates. Outdated plugins can be a frequent culprit of website issues.
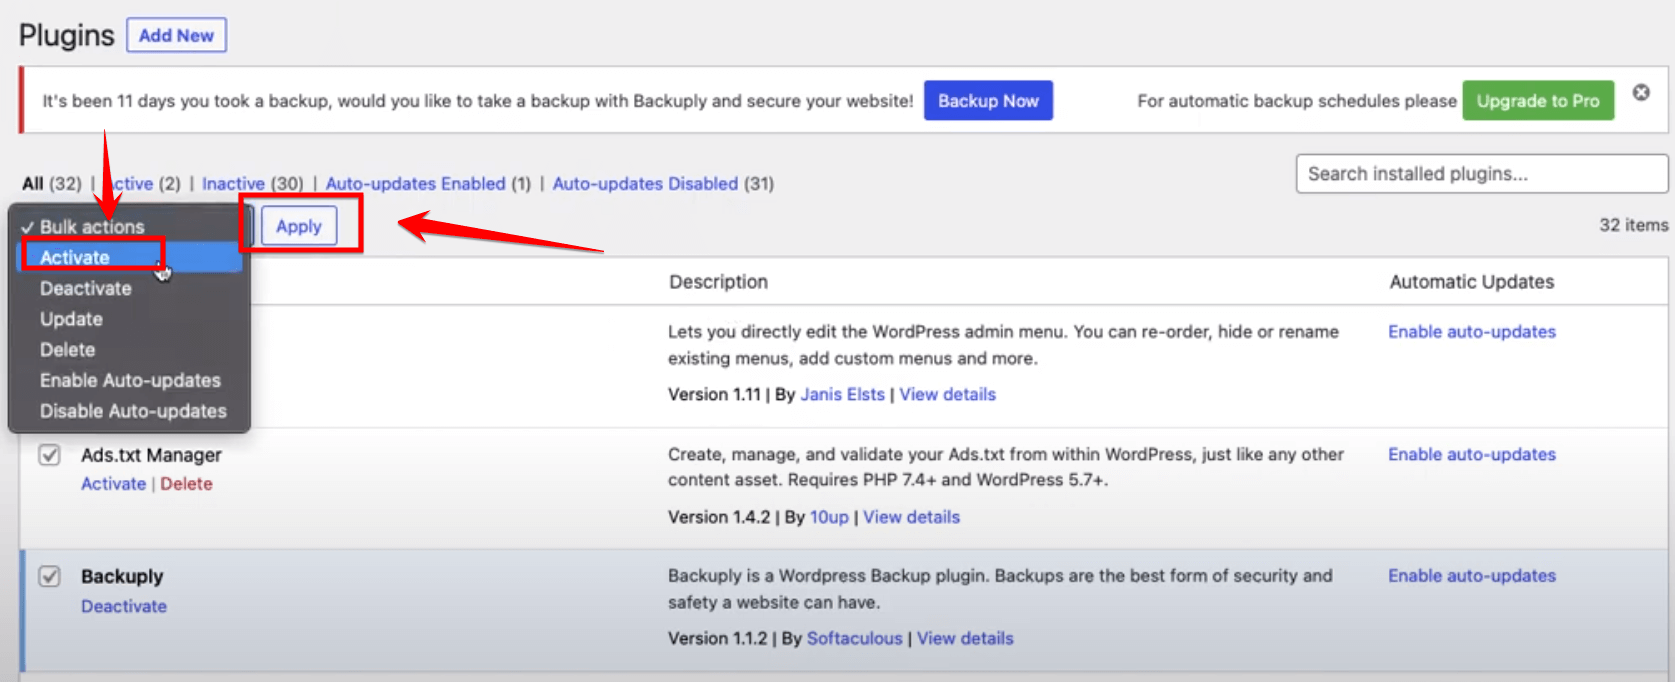
- Step 11: If all plugins appear up-to-date, proceed to reactivate them. Click on “Select All Plugins,” which will highlight all listed plugins. Then, from the “Bulk Actions” dropdown menu located at the top, choose the appropriate action.
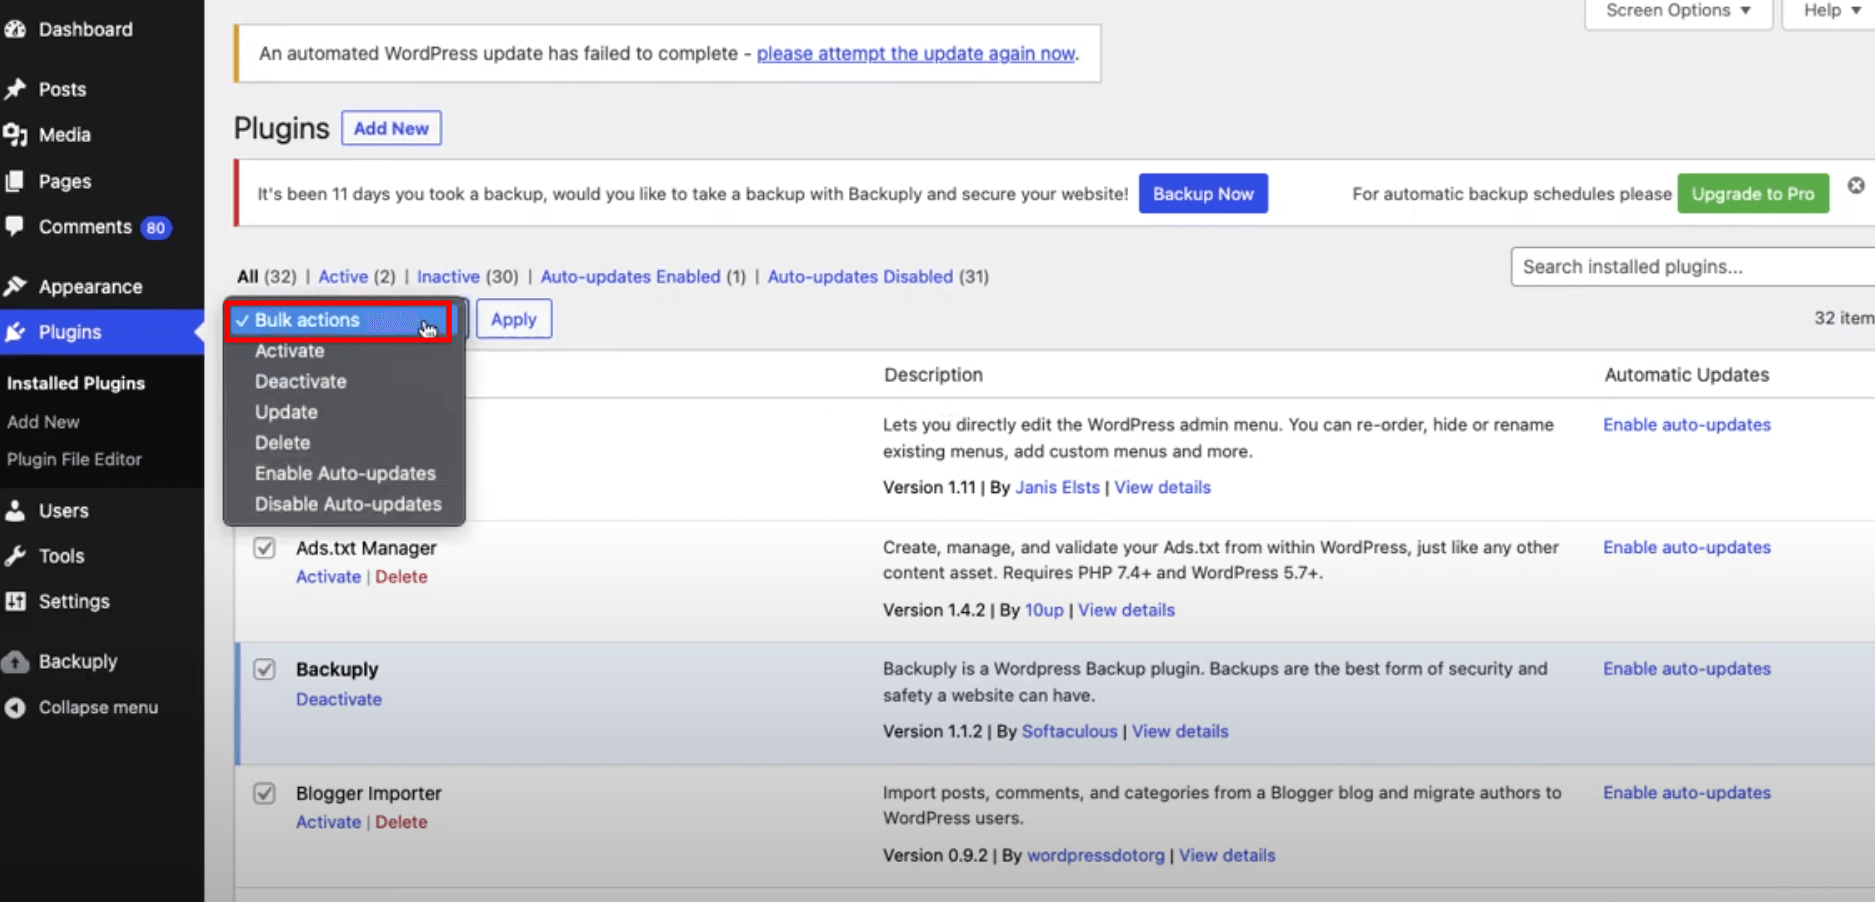
- Step 12: From the “Bulk Actions” dropdown, select “Activate” to reinstate all your plugins. Confirm your choice by clicking the “Apply” button. This bulk action quickly restores all plugins to their active state.
A Pro Tip: As a final verification step, return to your website and browse through a few pages. This check ensures that your site is operating seamlessly and has fully recovered from the maintenance mode issue.
Top 3 Alternative Solutions To Fix WordPress Maintenance Mode
In addition to the three methods we have already discussed, there are some alternative solutions that you can try to fix the issue of WordPress being stuck in maintenance mode.
Solution 1: Delete the Maintenance File Manually
WordPress creates a “.maintenance” file in the root directory of your installation when it enters maintenance mode. This file is usually deleted automatically when the update or maintenance process is completed. However, if something goes wrong and the file is not deleted, your website will remain stuck in maintenance mode.
In this case, you can manually delete the “.maintenance” file from your WordPress installation directory using an FTP client or your web hosting control panel. This will immediately take your website out of maintenance mode.
To do this, follow these steps:
- Step 1: Connect to your website using an FTP client or log in to your web hosting control panel.
- Step 2: Navigate to the root directory of your WordPress installation.
- Step 3: Locate the “.maintenance” file and delete it.
Pro Tip: Before making any changes to your website, it’s always a good idea to take a backup. This way, if something goes wrong, you can easily restore your website to its previous state.
Solution 2: Verify the Theme’s Maintenance Mode Option
Some WordPress themes come with a built-in maintenance mode option that allows you to put your website in maintenance mode without using a plugin. If your theme has this feature, it may be enabled and cause your website to be stuck in maintenance mode.
Check the theme options or documentation to see if this feature is available and how to disable it. If you’re not sure how to do this, you can contact the theme developer for assistance.
To check if your theme has a maintenance mode option, follow these steps:
- Step 1: Log in to your “WordPress admin dashboard.”
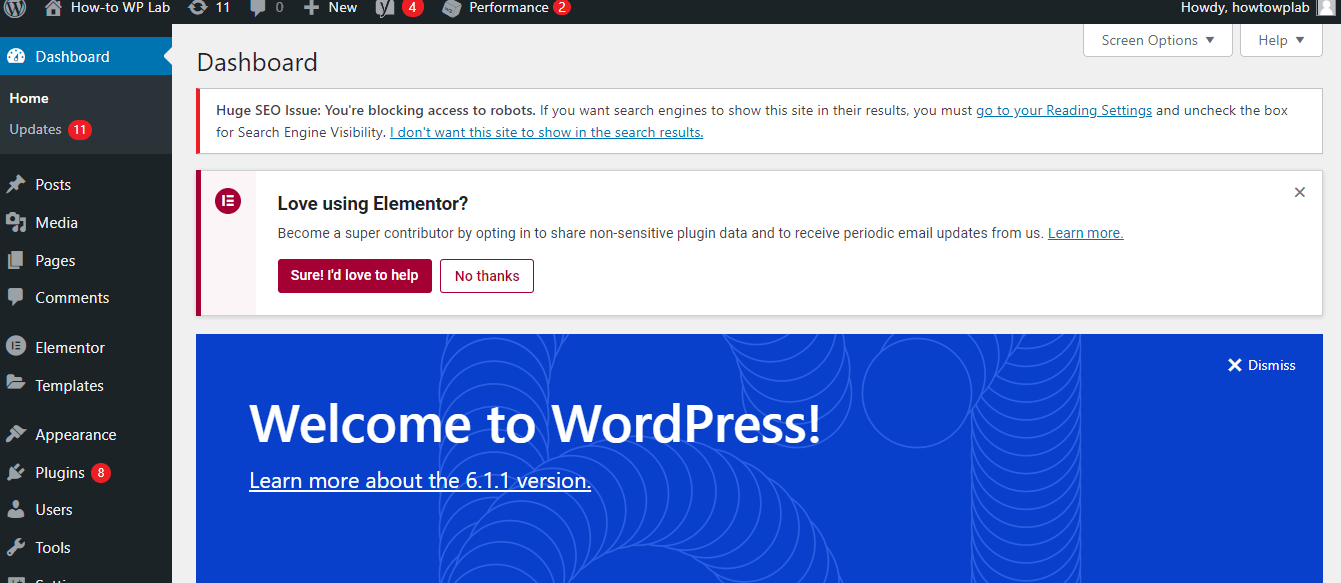
- Step 2: Navigate to the “Appearance” section and click on “Themes.”

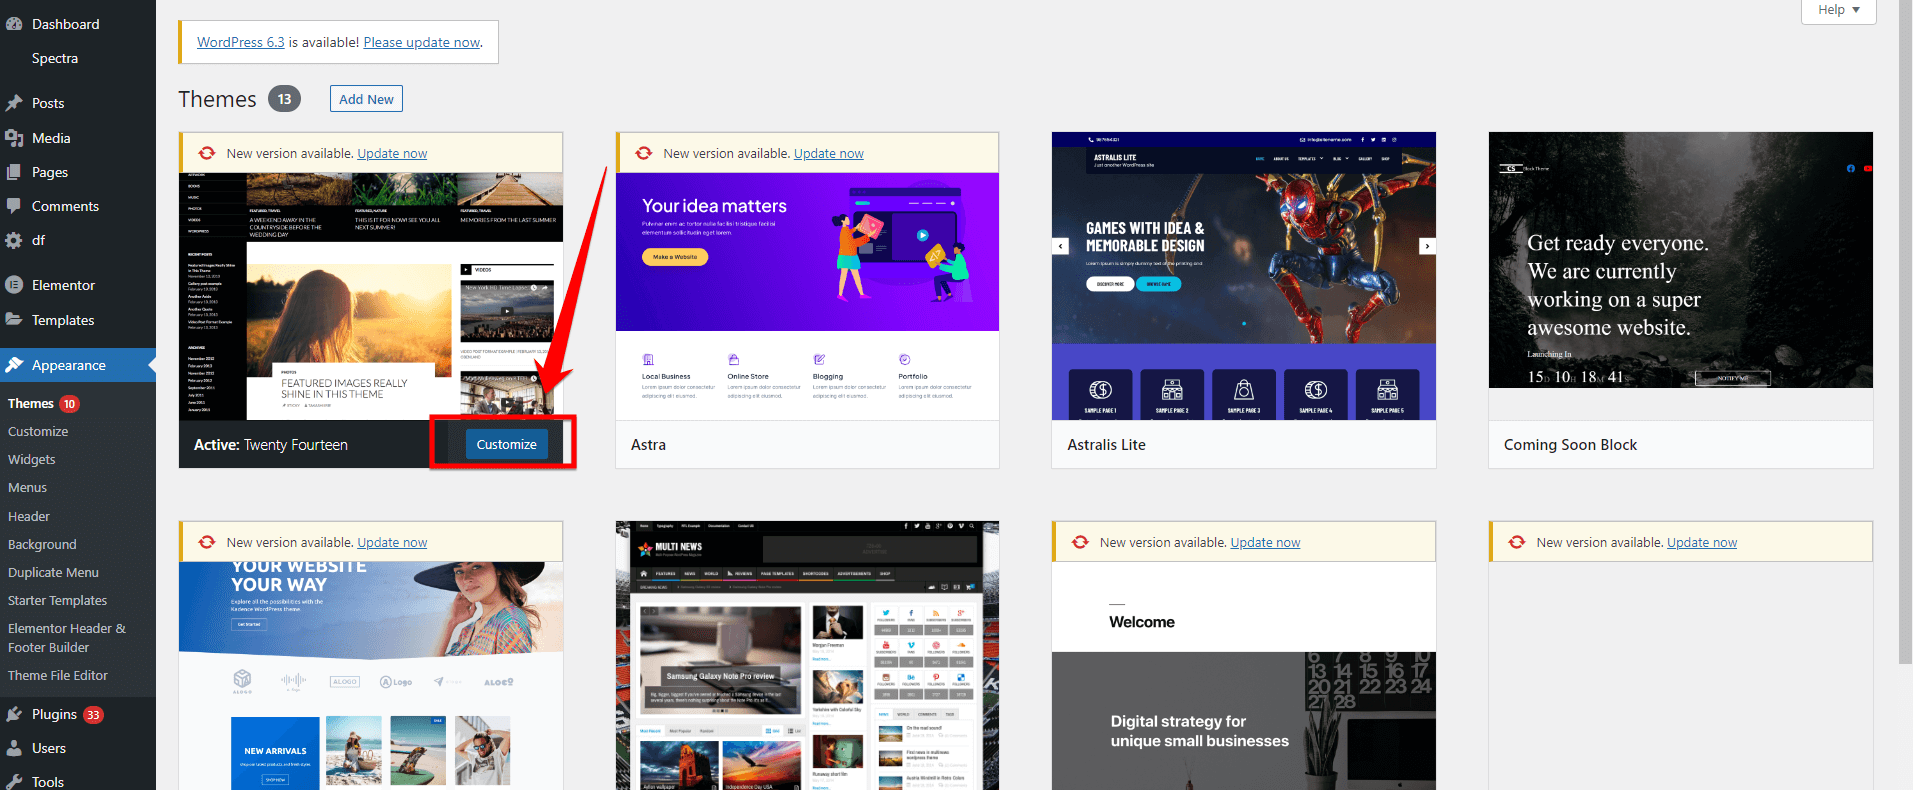
- Step 3: Click on the “Customize” button for your active theme.
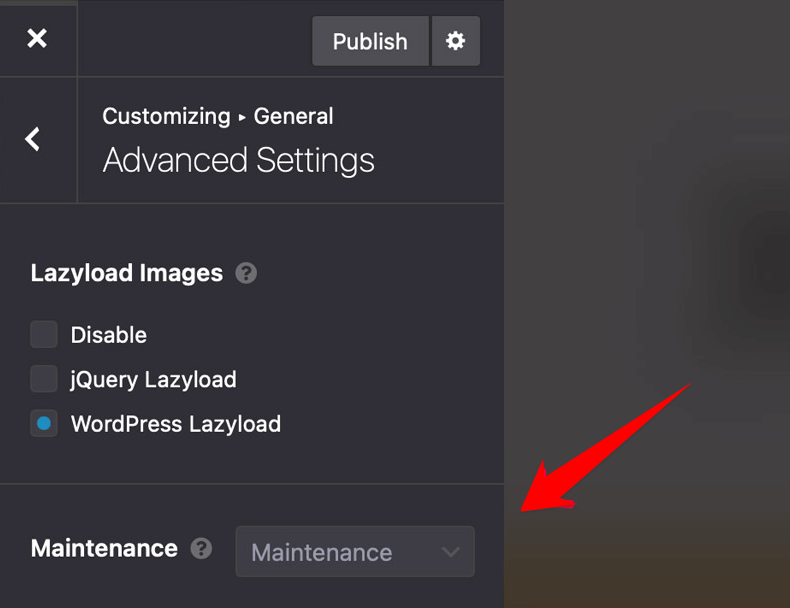
- Step 4: Look for a “Maintenance Mode” option in the theme customization options.
Solution 3: Reindex Website with Google Search Console
If your website is stuck in maintenance mode, it may not be indexed properly by search engines. This can affect your search engine rankings and visibility. You can use Google Search Console to request a reindex of your website and resolve the issue.
To do this, follow these steps:
- Step 1: Log in to your “Google Search Console” account.
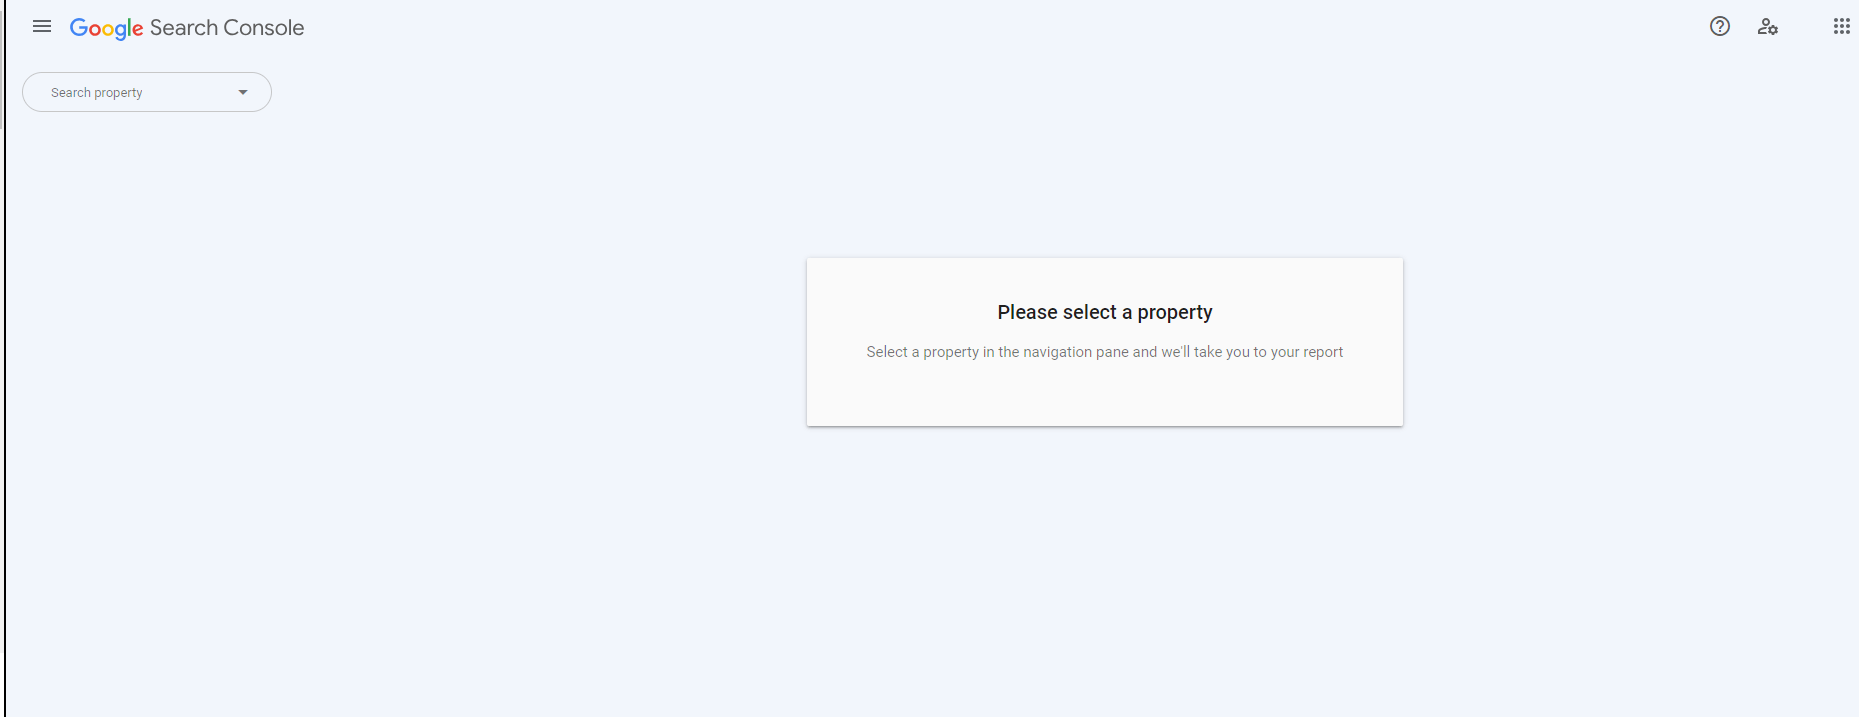
- Step 2: Select your website from the list of properties.
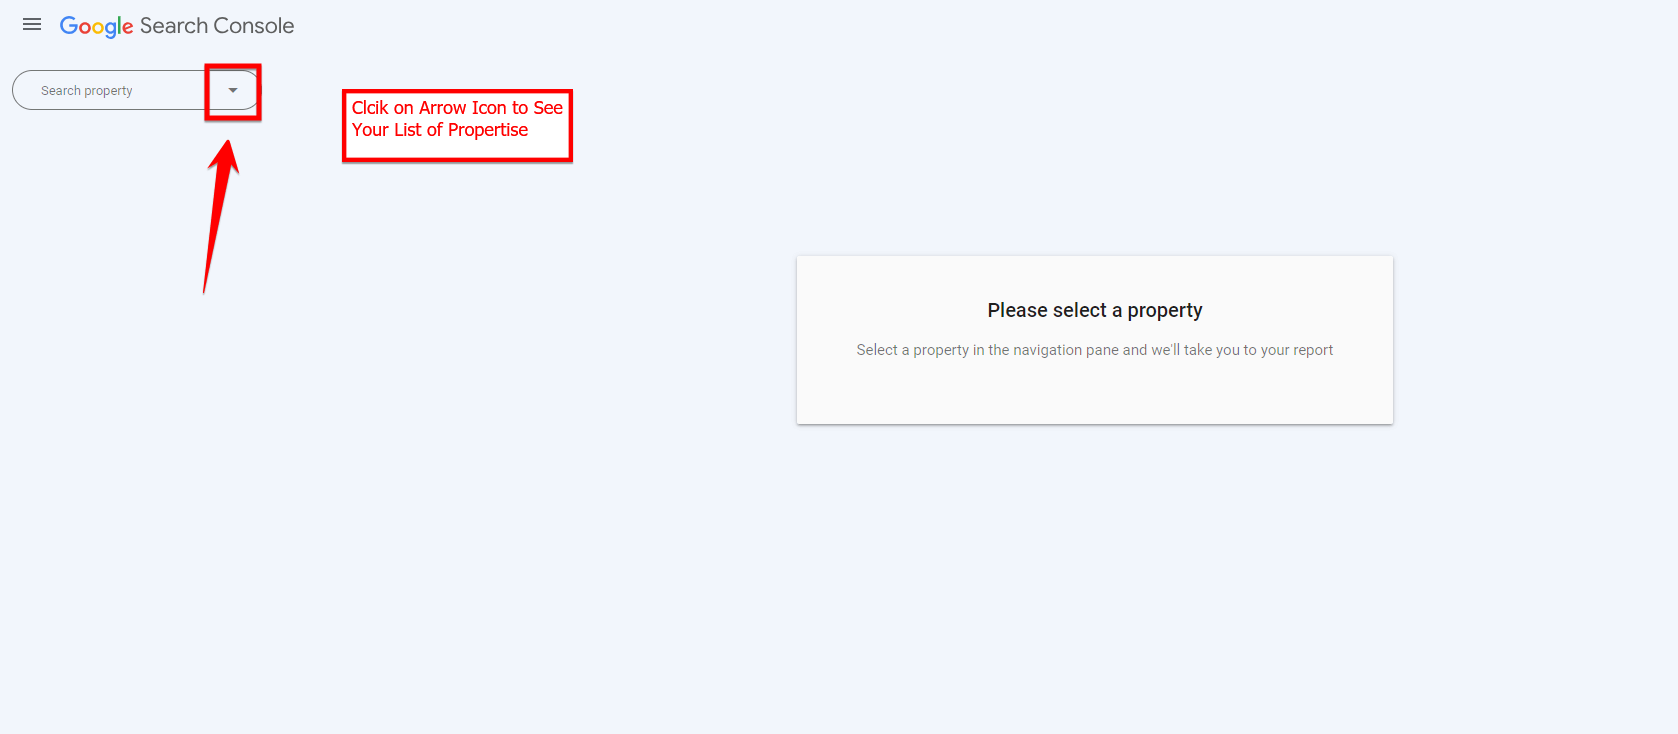
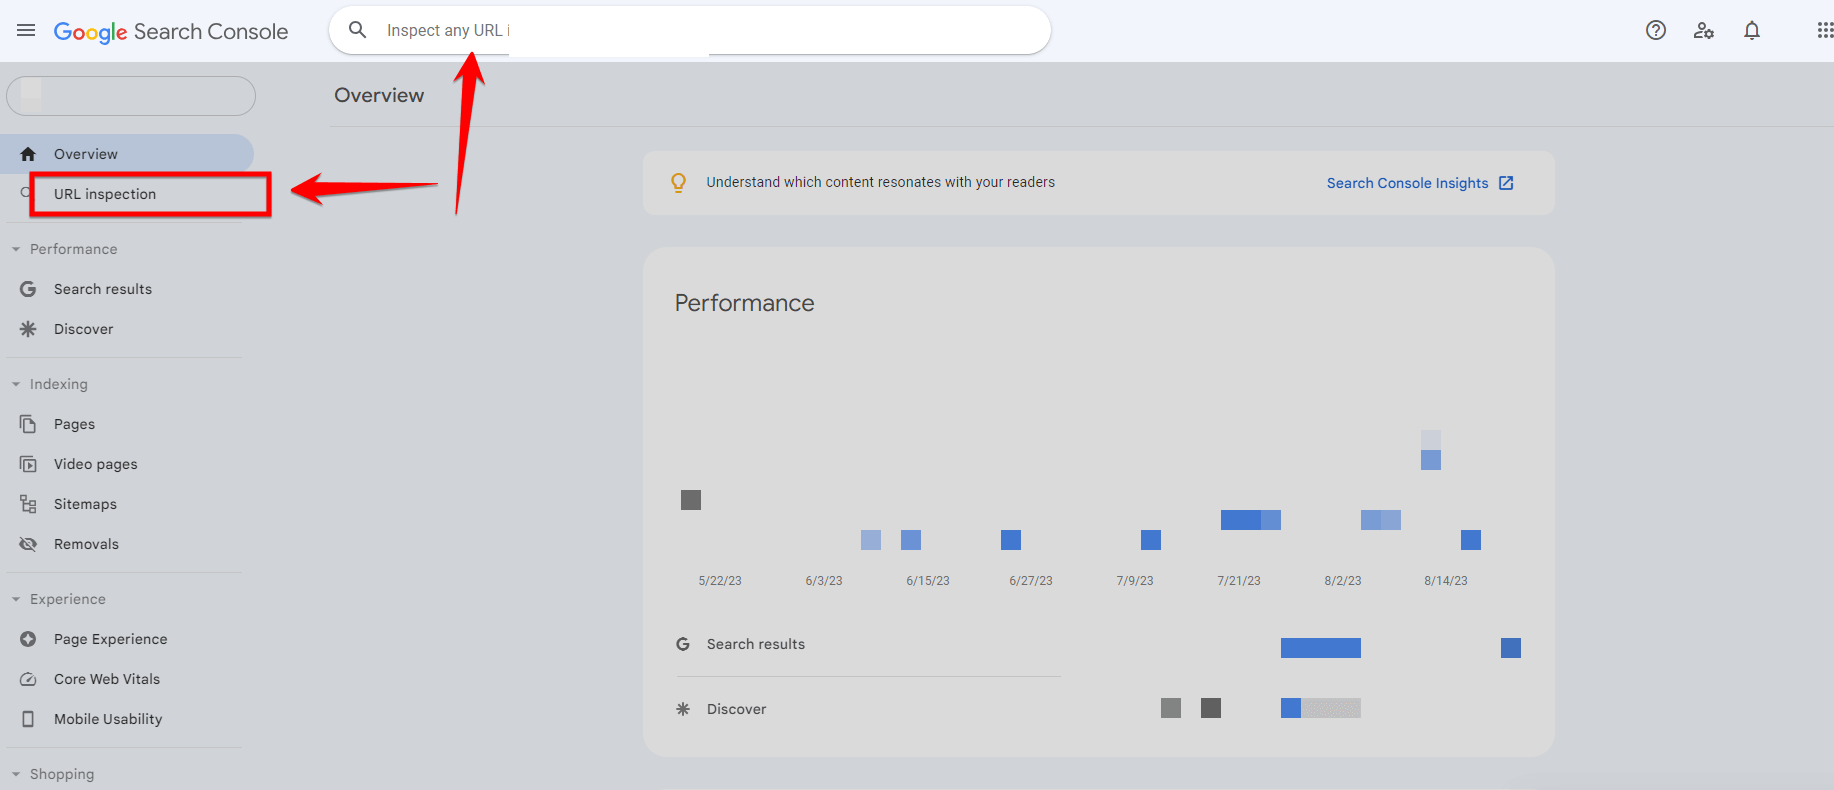
- Step 3: Use the “URL Inspection” tool to request a reindex of your homepage. This will prompt Google to crawl and index your website again, which can help resolve any issues caused by maintenance mode.
What Causes WordPress to Get Stuck in Maintenance Mode
Many people use WordPress to make and manage their websites. But sometimes, after an update, the website shows a “maintenance mode” message and doesn’t go back to normal. This can be confusing and frustrating. Why does this happen? Let’s look at the main reasons why WordPress might get stuck like this.
Cause 1: Interrupted Update Process
An interrupted update process is one of the most common causes for WordPress to remain in maintenance mode. The system automatically enters “maintenance mode” whenever you initiate an update—be it for WordPress core, a plugin, or a theme.
If this process is halted for reasons such as unstable internet connections, server downtimes, or even timeouts, the site may not revert back to its usual state. As a remedy, users often have to manually navigate to their WordPress root directory and delete the “.maintenance” file to restore normal access.
Cause 2: File Permission Issues
File permissions play a critical role in the operation of a WordPress website. They determine which users or processes can read, modify, or execute certain files on your server. If WordPress isn’t granted the appropriate permissions, specifically to manage the “.maintenance” file, then it might struggle to transition out of maintenance mode.
Resolving this typically involves inspecting and adjusting the file permissions using FTP or your hosting provider’s control panel to ensure that WordPress has the necessary access.
Cause 3: Plugin or Theme Conflicts
The vast ecosystem of plugins and themes is one of the strengths of WordPress, but it can also introduce complications. Occasionally, a theme or a plugin might not be fully compatible with a newer version of WordPress or with other plugins.
If such an incompatibility arises during an update, it could hinder the process and trap WordPress in “maintenance mode.” The solution here is often a systematic approach: deactivating plugins or themes one by one until the culprit is identified and then either updating, replacing, or removing the conflicting component.
Cause 4: Corrupted Files
Corrupted files can be a silent saboteur for many websites. If, during an update, any of the critical WordPress core files get damaged or corrupted, the platform might fail to exit maintenance mode. This could be due to issues during the download process, interruptions during installation, or even server glitches.
To fix this, users usually need to replace the tainted files with clean versions. This can be done by downloading the latest version of WordPress and manually replacing the affected files via FTP or a File Manager.
Cause 5: Inadequate Hosting Environment
Every software has its requirements, and WordPress is no different. If your hosting environment doesn’t provide the necessary resources or configurations for WordPress to function seamlessly, problems can arise.
This could manifest as timeouts during updates, insufficient memory allocations, or other technical glitches that lead to WordPress getting stuck in maintenance mode. Addressing this issue might involve tweaking server settings, upgrading hosting plans, or liaising with the hosting provider to ensure the environment is optimized for WordPress.
5 Ways to Prevent WordPress from Getting Stuck in Maintenance Mode
Navigating the world of WordPress can be smooth, but there are moments when things don’t go as planned—like when your site gets stuck in maintenance mode.
But don’t worry! With a few proactive steps, you can minimize these hiccups. Dive into these 5 ways to ensure your WordPress experience remains seamless. Let’s keep things running smoothly!
Way 1: Ensure Compatibility Before Updating
WordPress, as a dynamic platform, undergoes constant changes with every update. Simultaneously, plugins and themes also evolve. When these components aren’t in harmony, it can cause hiccups like getting stuck in maintenance mode.
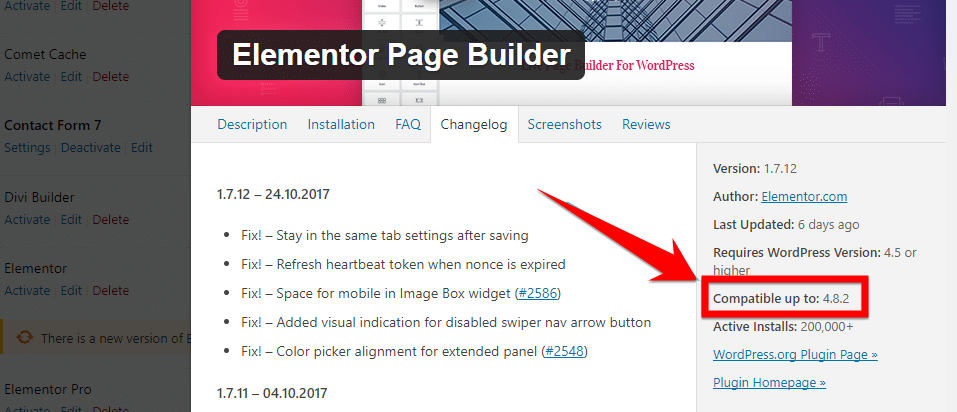
Before you click the update button for WordPress, do your due diligence. Visit the official WordPress repository and check if the plugins and themes you are using have been tested with the latest WordPress version. Developers often mention compatibility information in their update logs. Also, keeping an eye on user reviews and support forums can give insights about any potential hitches.
Way 2: Update Plugins One-by-One
Each plugin is a piece of software that interacts with your WordPress core and potentially with other plugins. Updating them individually can isolate any issues and prevent them from affecting the entire site.
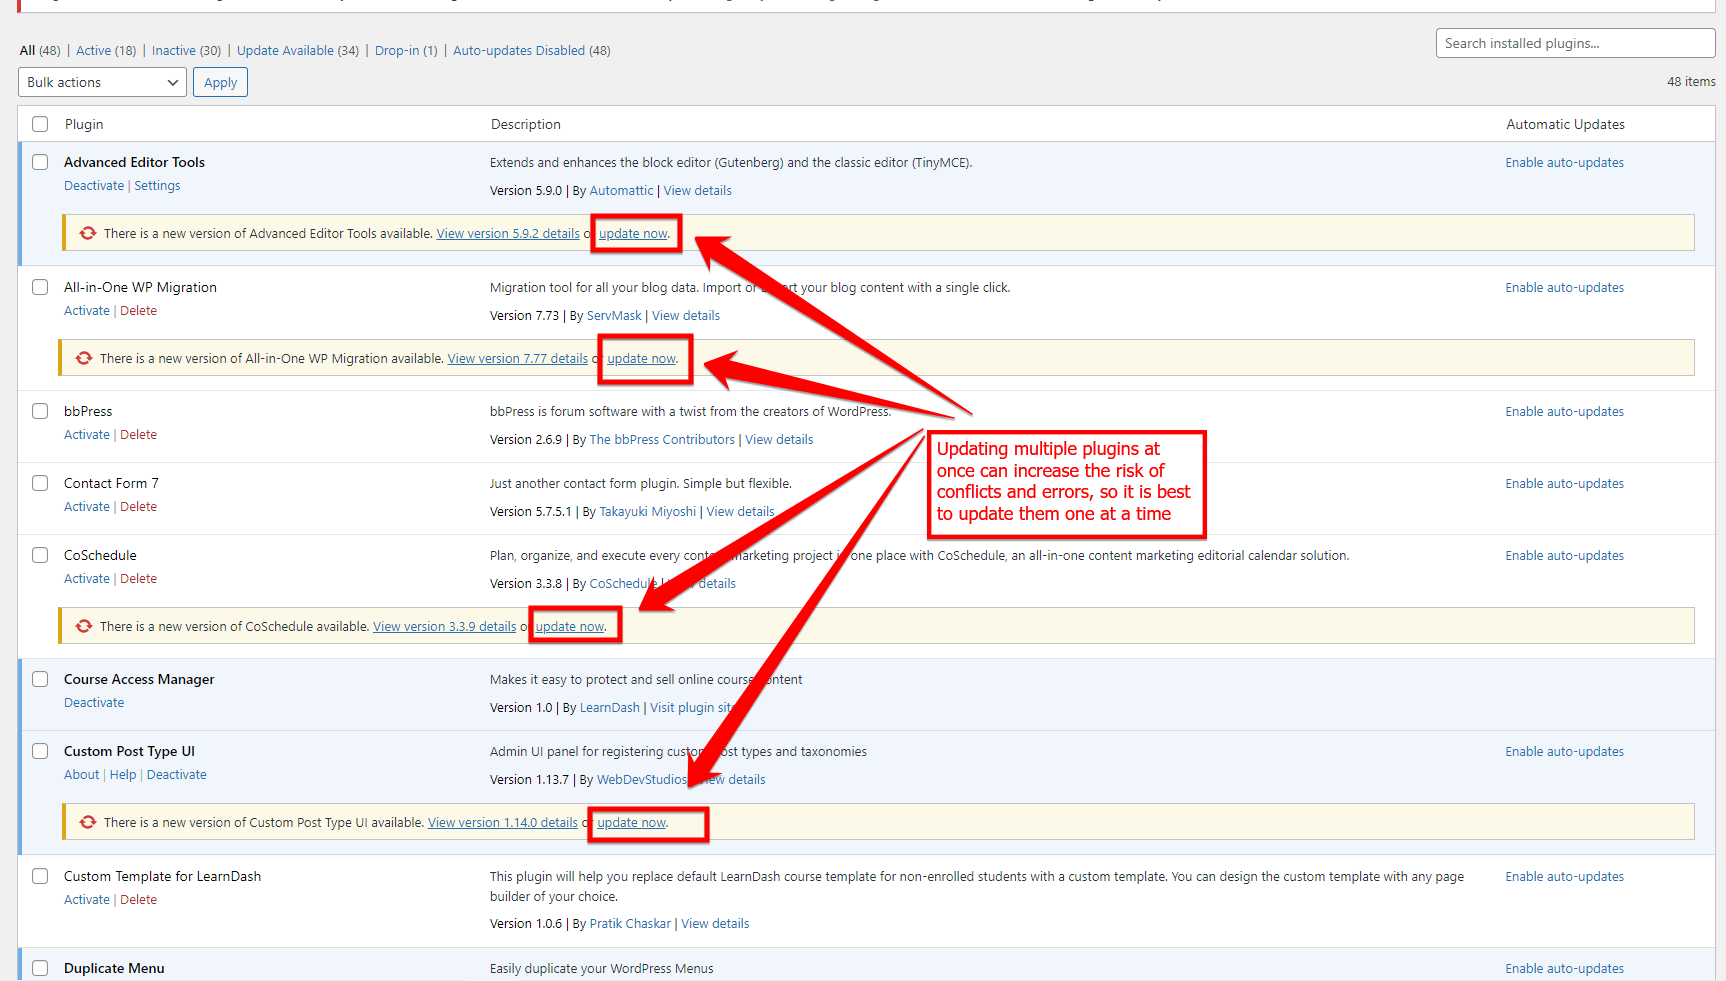
Rather than opting for the “Update All” option, take a few extra minutes to update plugins one after the other. After each update, do a quick check on your site to ensure everything looks and works as expected.
Way 3: Avoid Closing Your Browser During an Update
Updating WordPress is a delicate process where files are being replaced and databases are being modified. An interruption like closing the browser can halt this process, leaving your website in an undefined state.
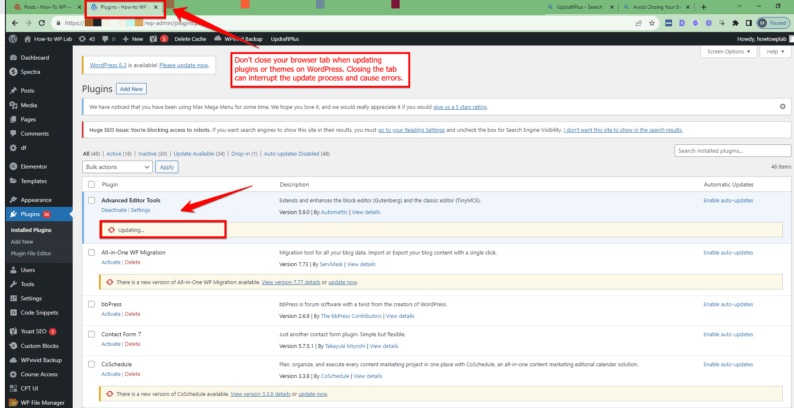
Always ensure you have a stable internet connection before initiating an update. Monitor the update process and resist the urge to navigate away or close the browser. If you are running multiple tabs, ensure that no other tab is using extensive bandwidth.
Way 4: Be Cautious with Bulk Updates
Bulk updates, while offering efficiency, carry the risk of multiple plugins or themes conflicting with each other, especially if you haven’t checked for compatibility first. One error in bulk updates can create a ripple effect, causing unforeseen issues.
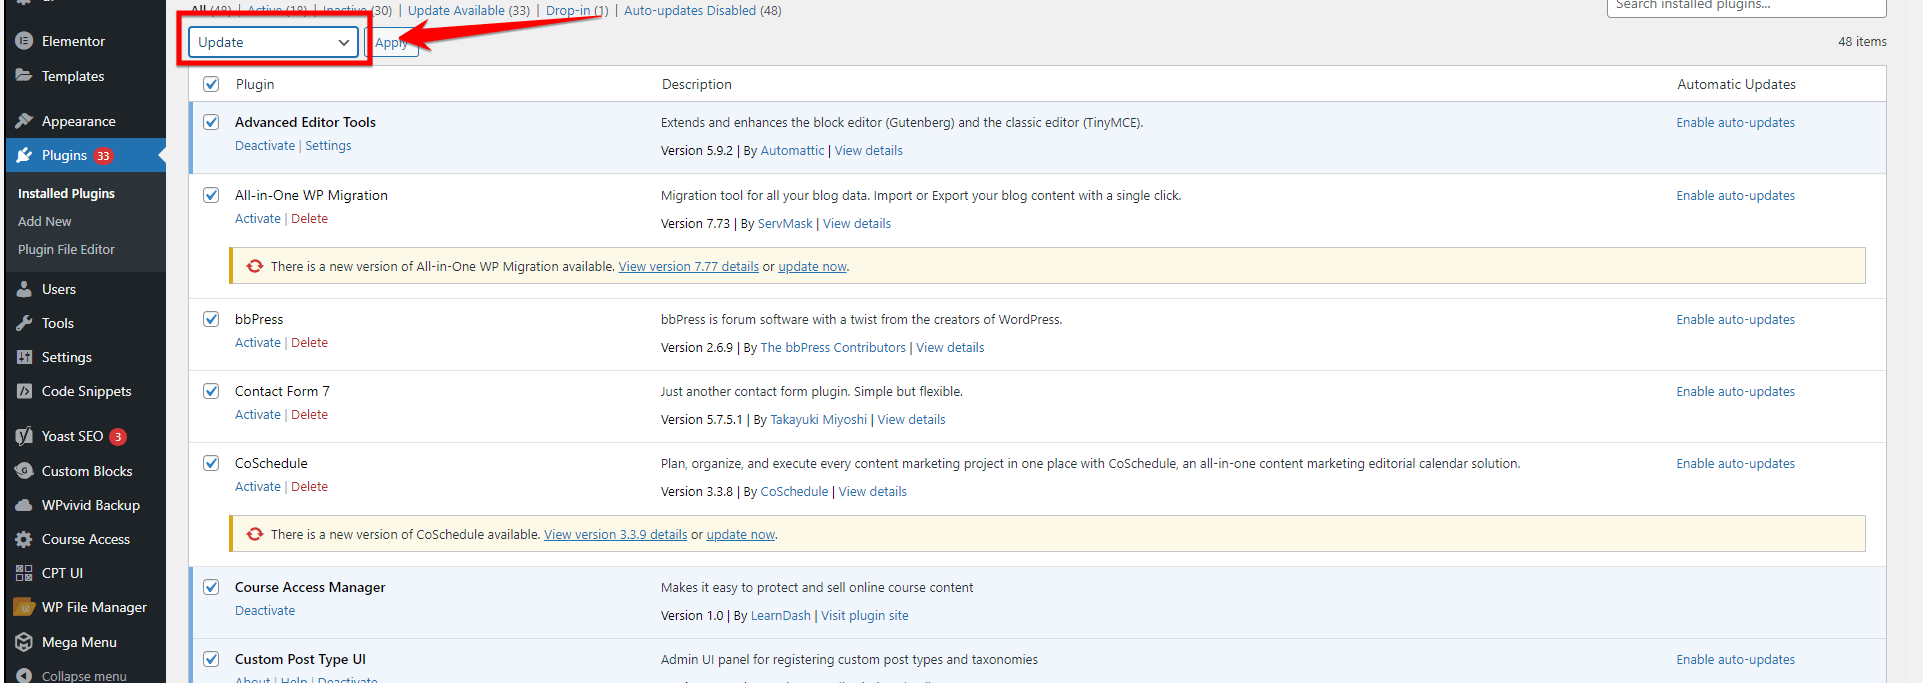
Before making any updates, and especially with bulk updates, you must backup your website. Having a recent backup ensures that if things don’t go as planned, you can always revert back to a state when everything worked perfectly.
One of the most reliable and user-friendly plugins to backup WordPress is UpdraftPlus. If you’re unfamiliar with how to use it, here’s a step-by-step guide:
- Step 1: Open your browser and navigate to your WordPress website’s admin URL (typically yourwebsite.com/wp-admin). Enter your login credentials to access the dashboard.
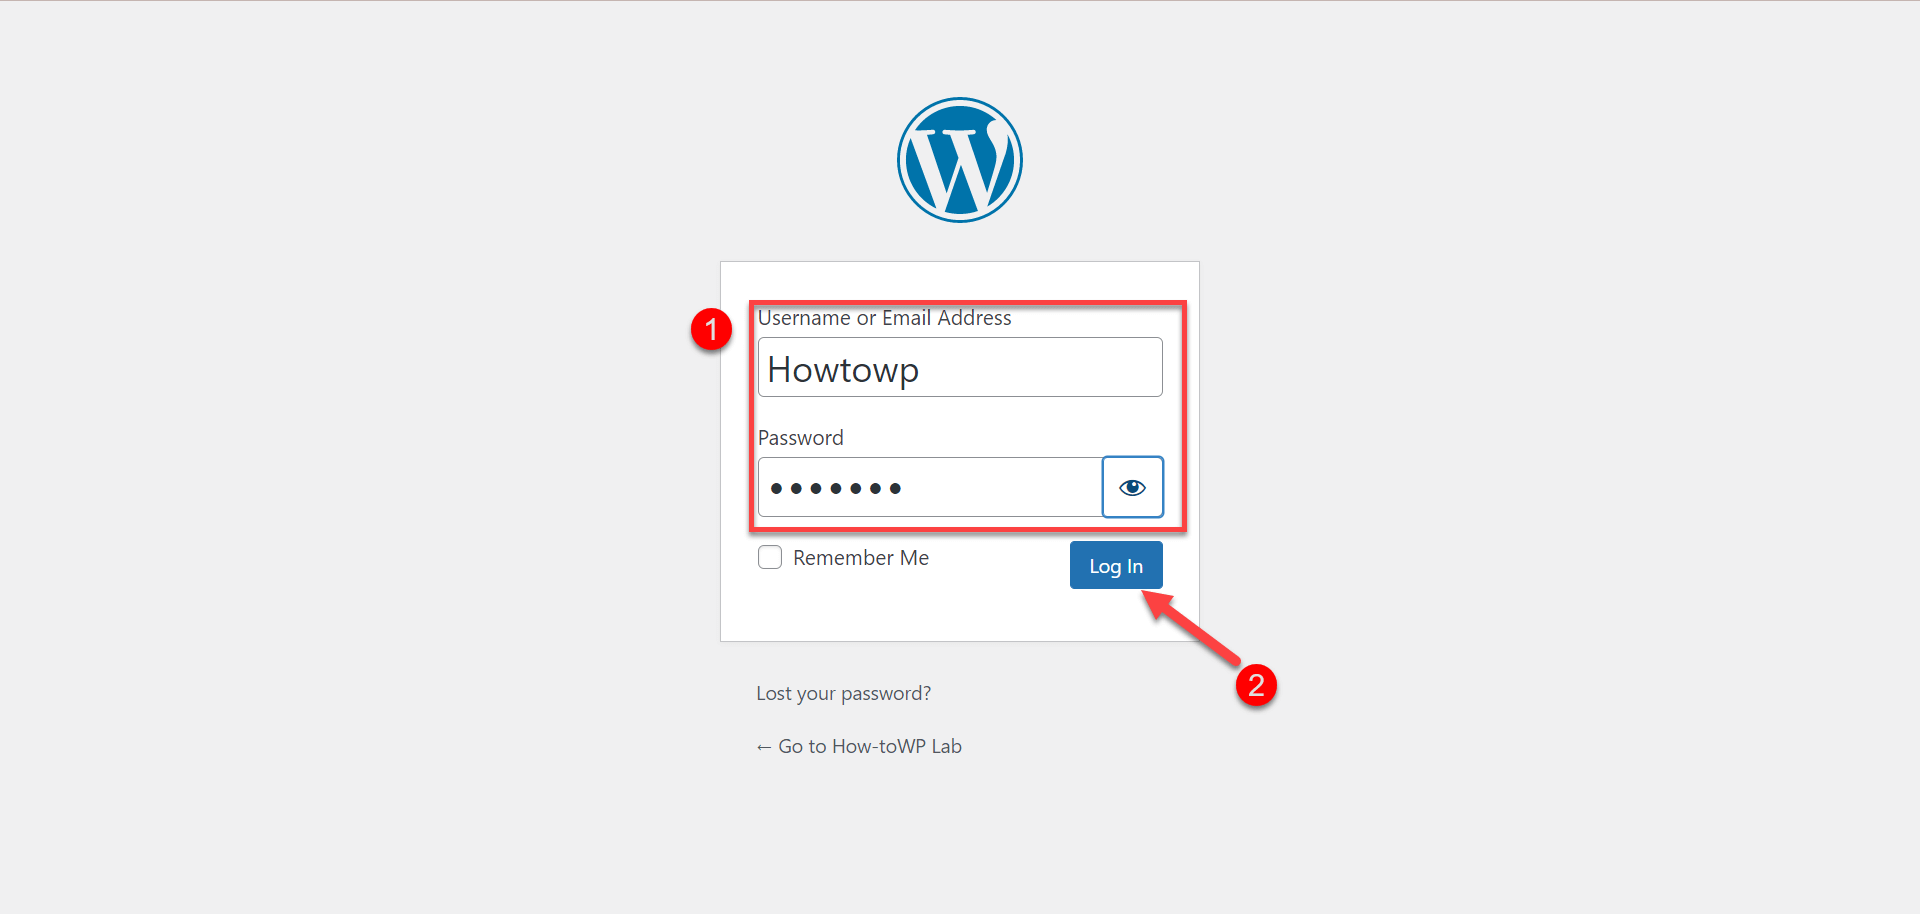
- Step 2: From the left sidebar, click on “Plugins.”
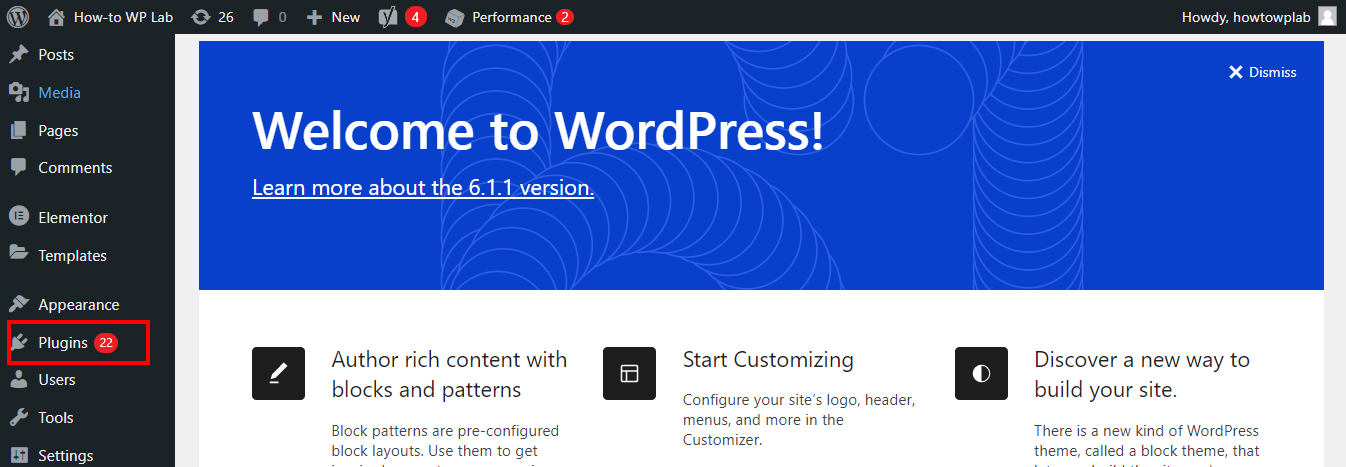
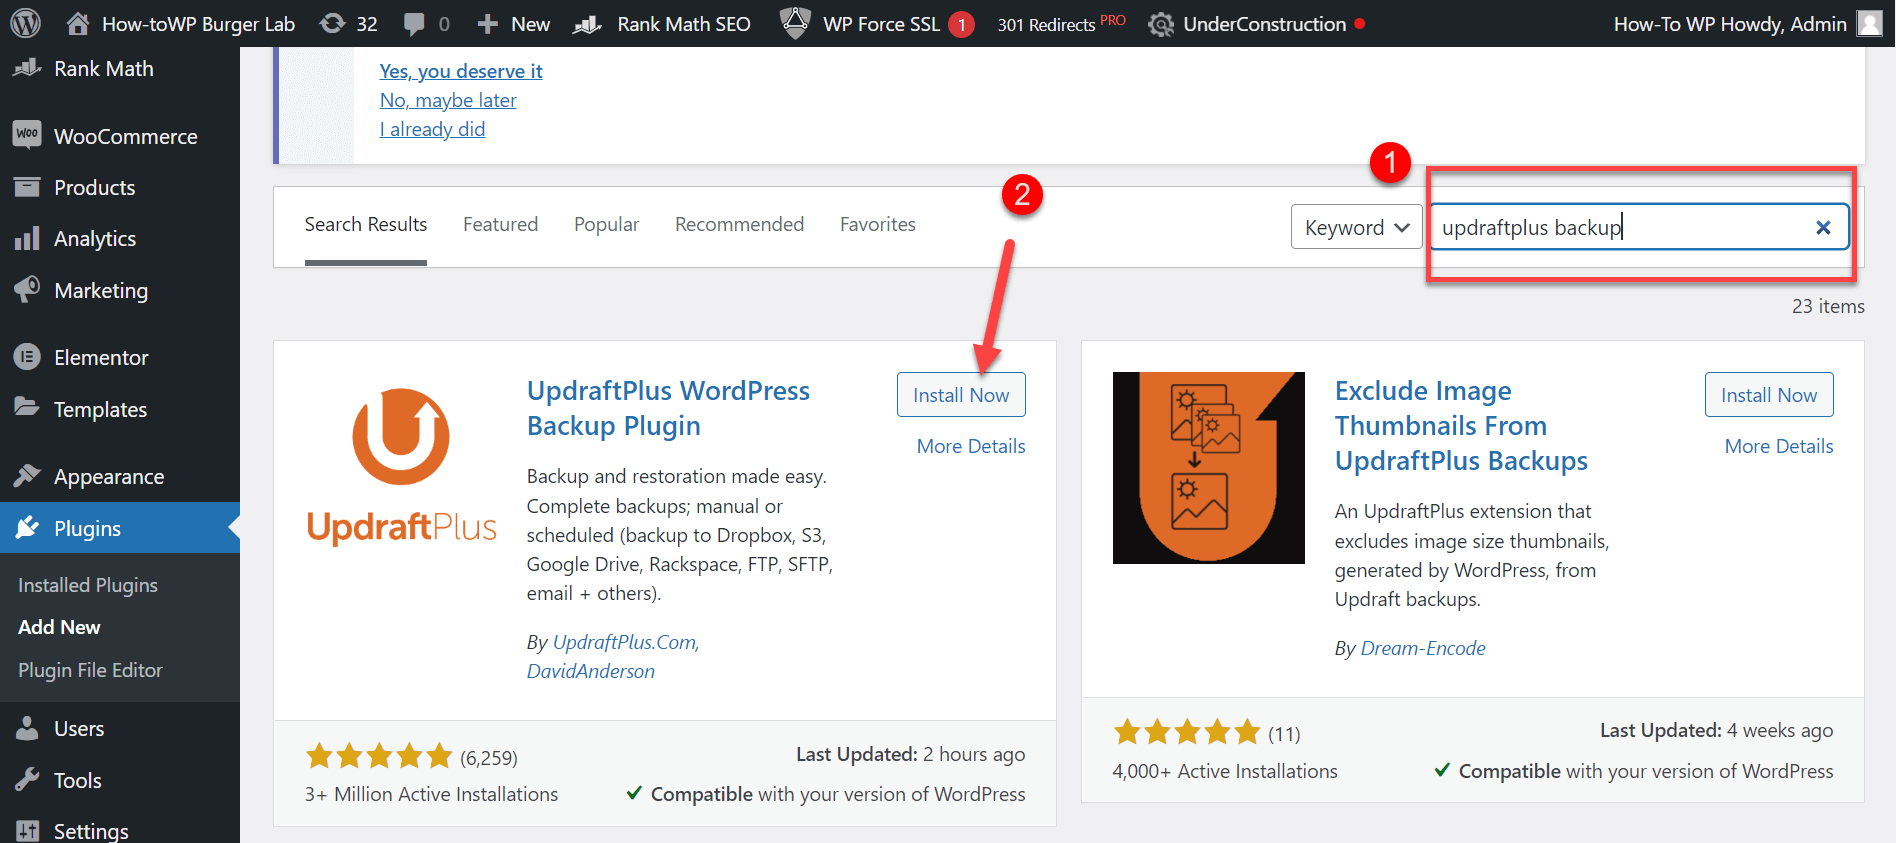
- Step 3: Click on “Add New,” search for “UpdraftPlus,” install, and activate it.
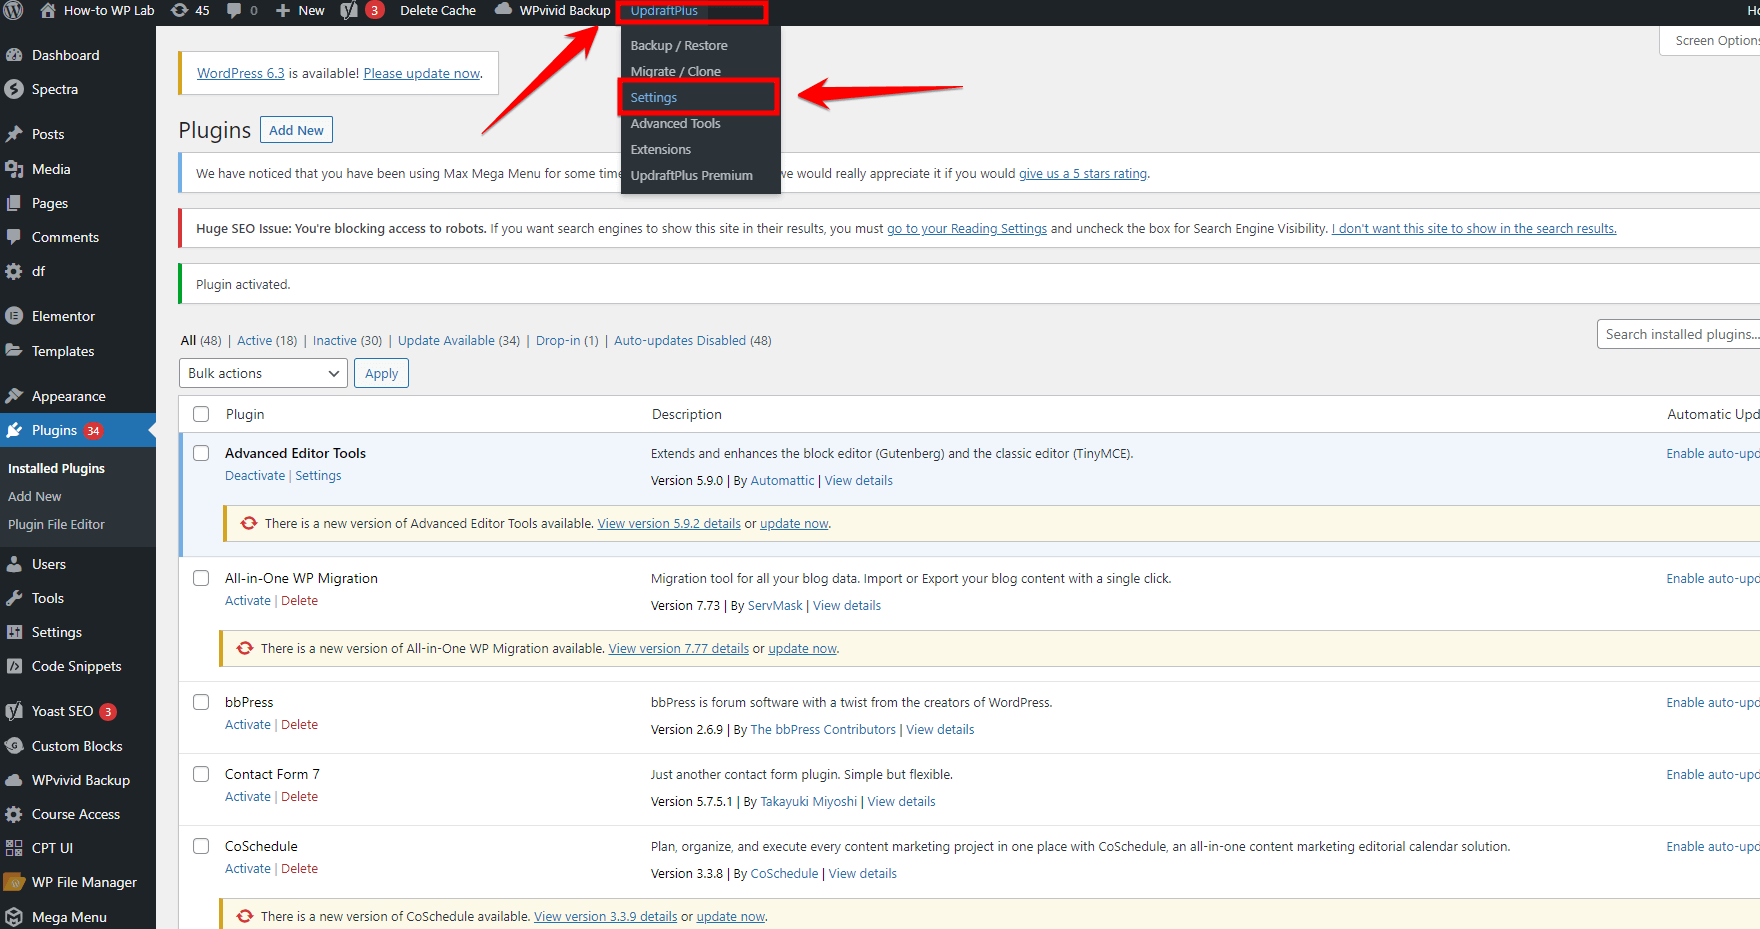
- Step 4: Once activated, go back to the dashboard, and navigate to the UpdraftPlus settings.
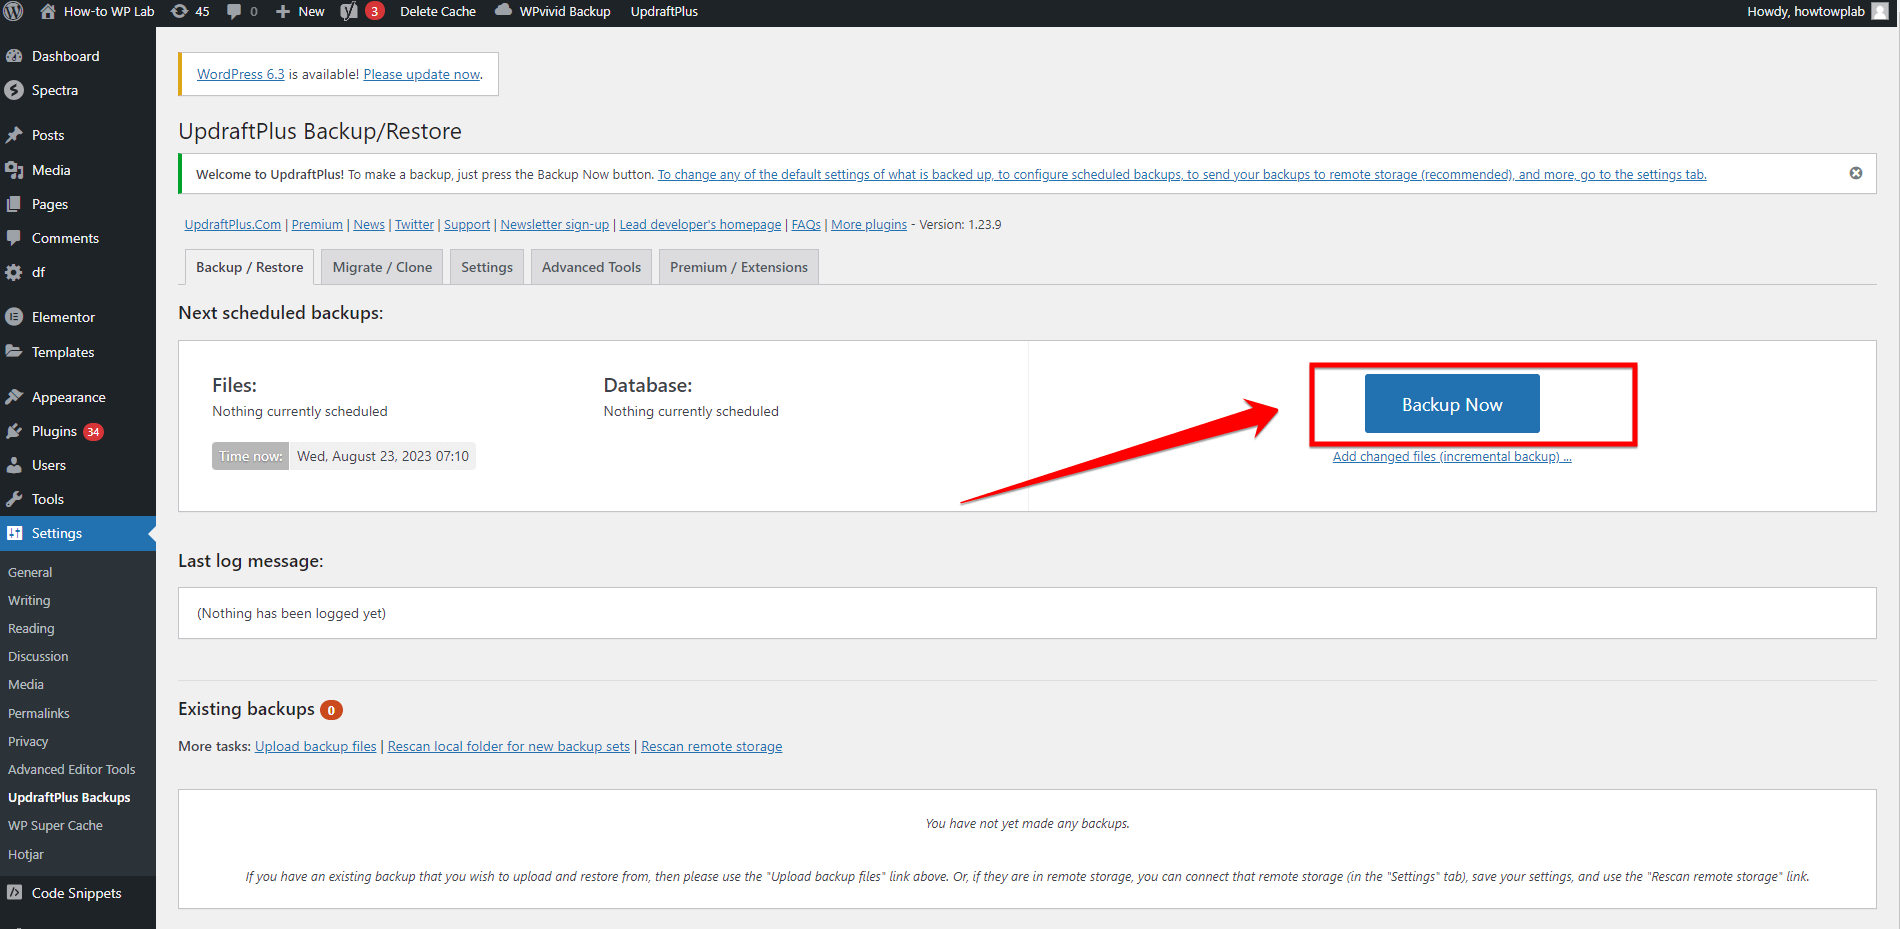
- Step 5: Within the “UpdraftPlus Backup/Restore” page, you will see a big blue button labeled “Backup Now.” Click on it.
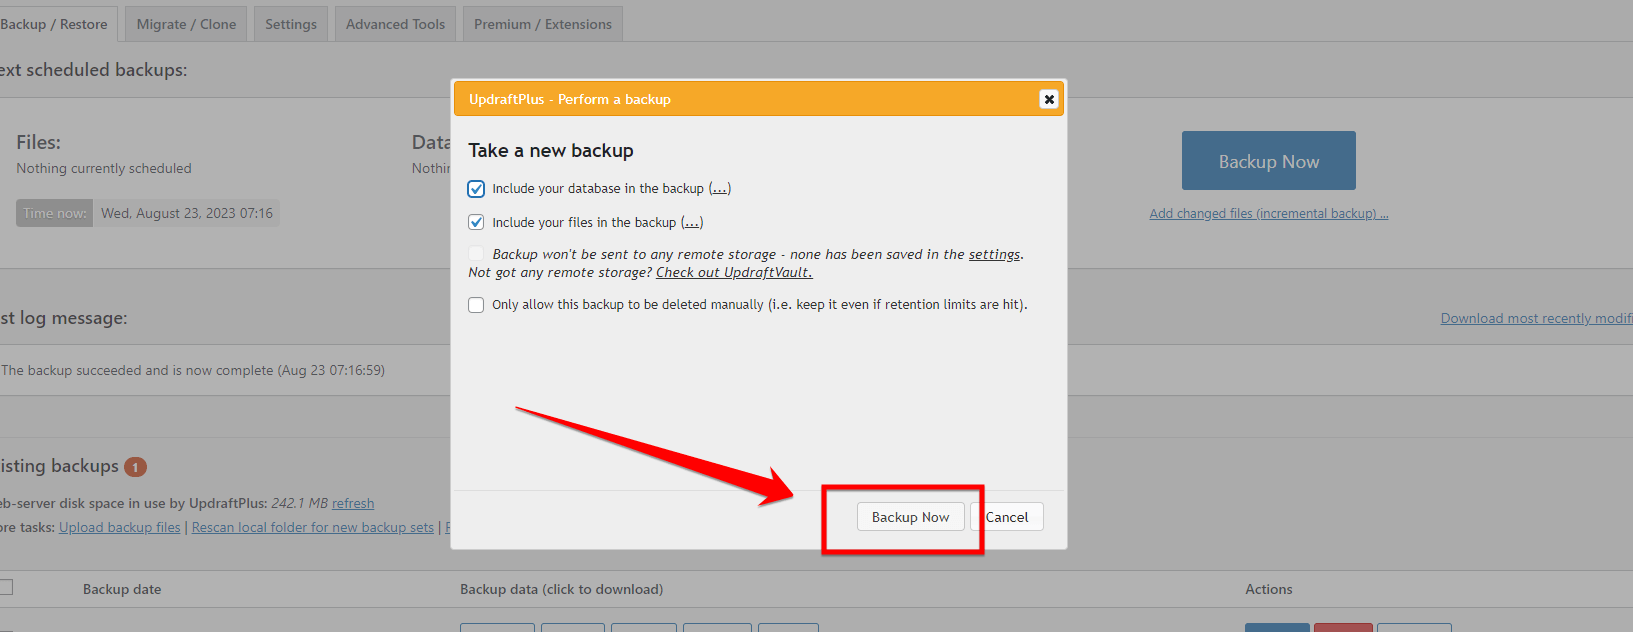
- Step 6: A popup will appear with options like “Include your database” and “Include your files.” Ensure these are checked based on what you want to back up.
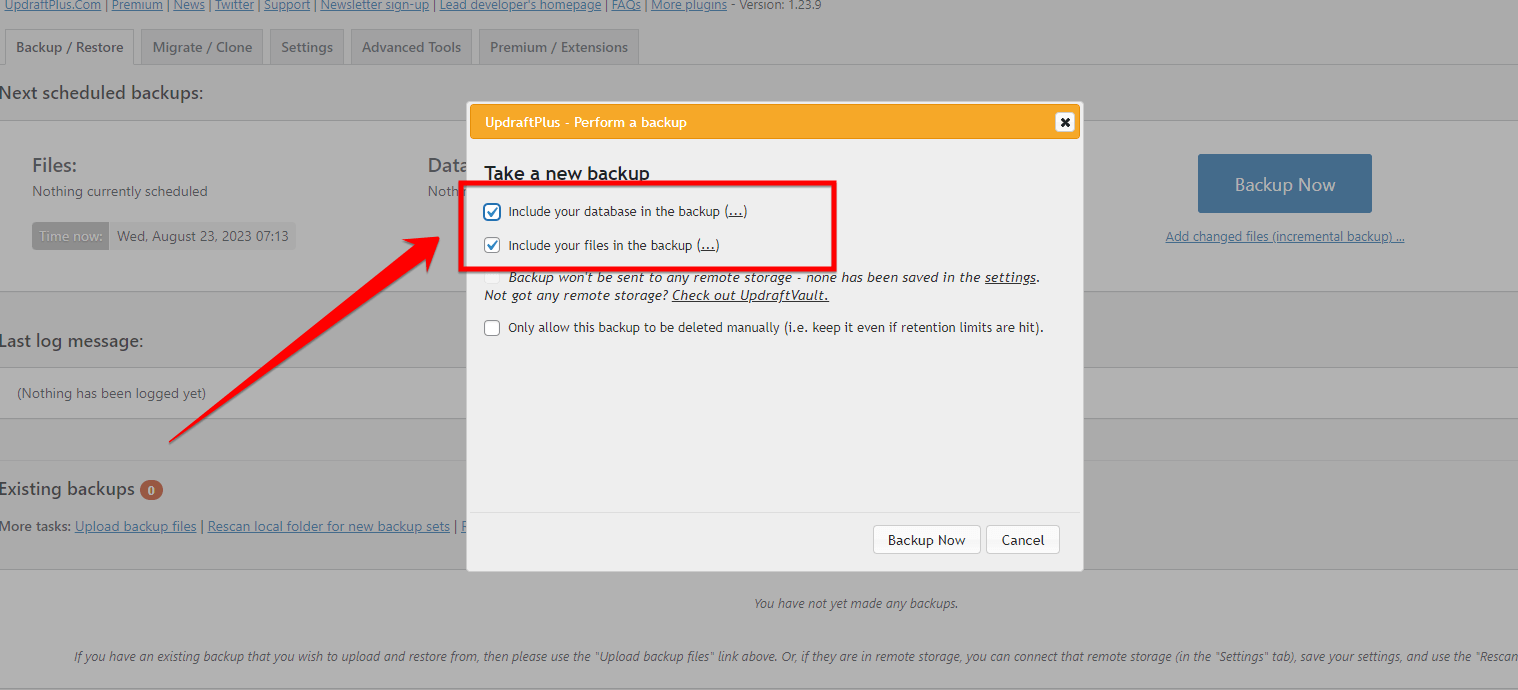
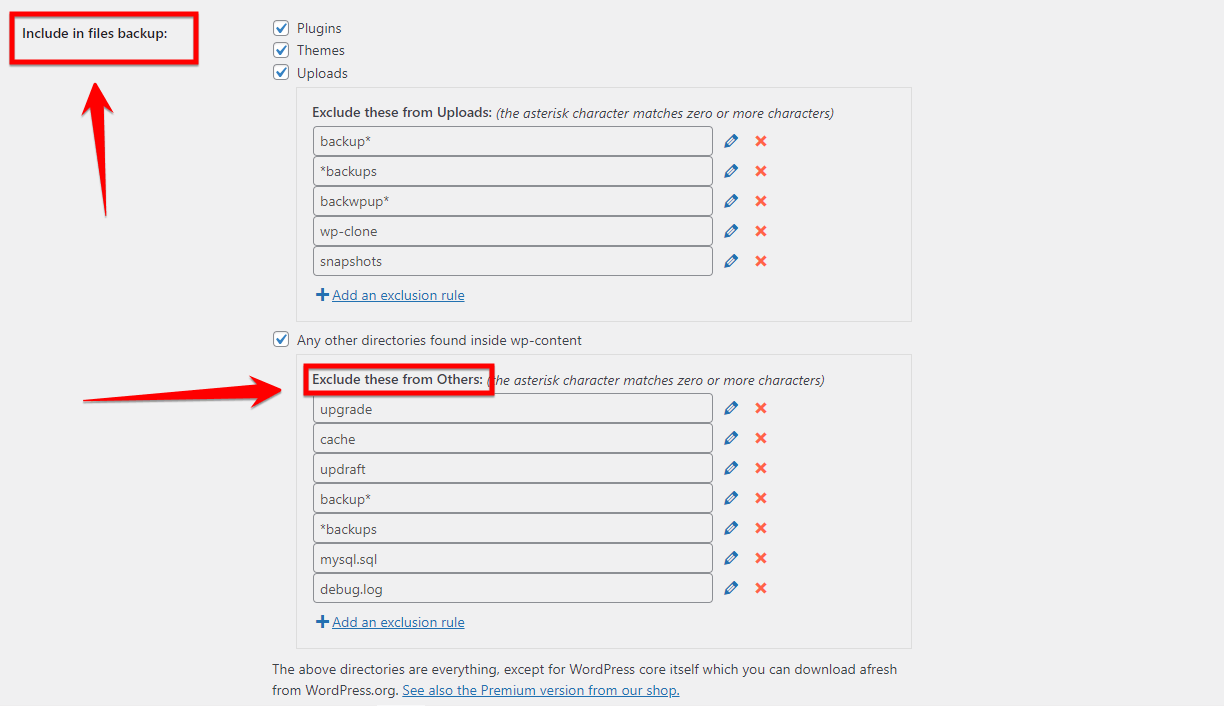
Note: You can also choose to include or exclude specific files, like plugins, themes, uploads, etc.
- Step 7: Under the “Settings” tab in UpdraftPlus, you can choose and authenticate your preferred remote storage. Follow the on-screen instructions to set this up.
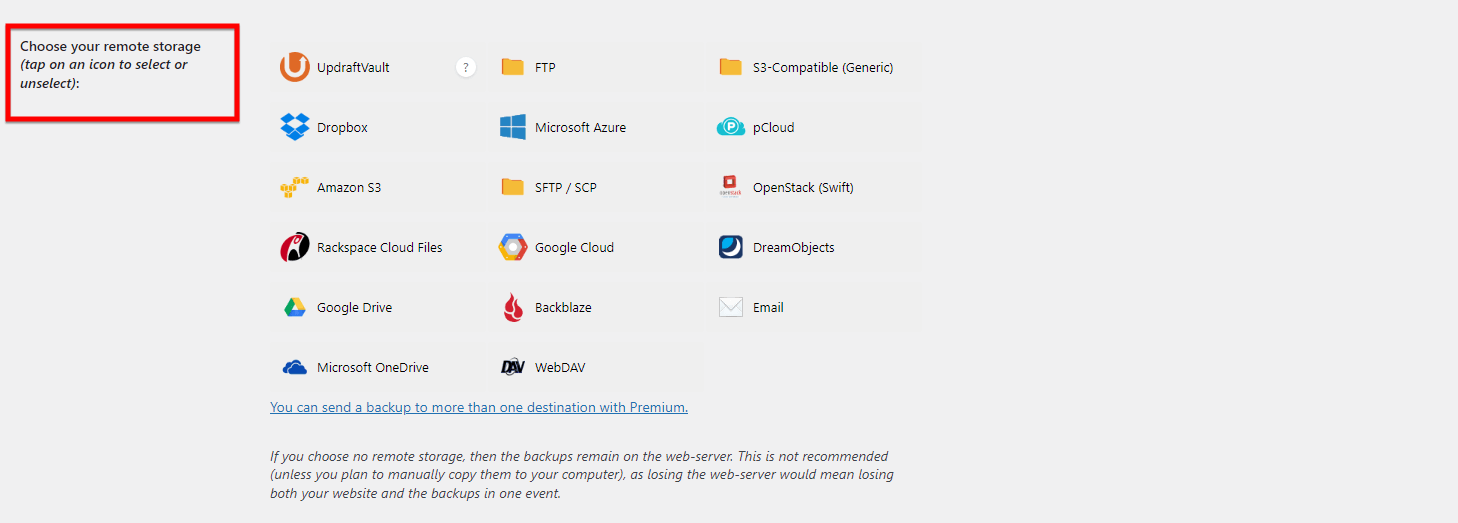
Note: If you don’t want to use remote storage, UpdraftPlus will save the backup to your web server by default.
- Step 8: Once you’ve chosen your components and backup location, click the “Backup Now” button in the popup to begin the backup process.
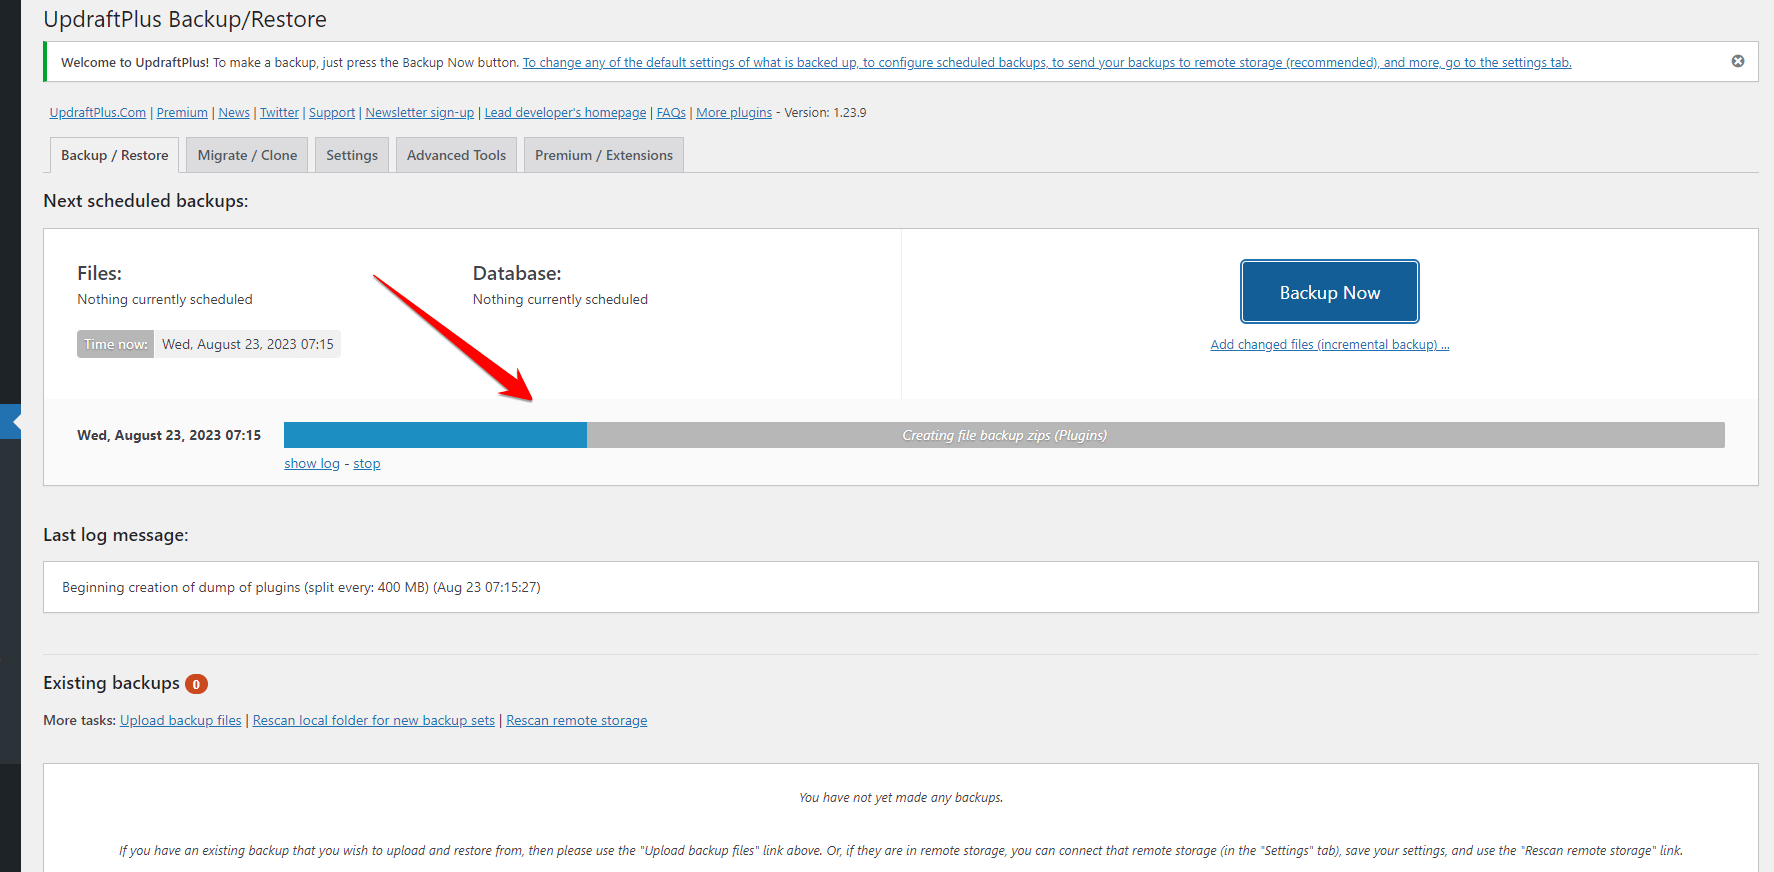
- Step 9: UpdraftPlus will show a progress bar as it backs up your files and database. Wait for this process to complete.
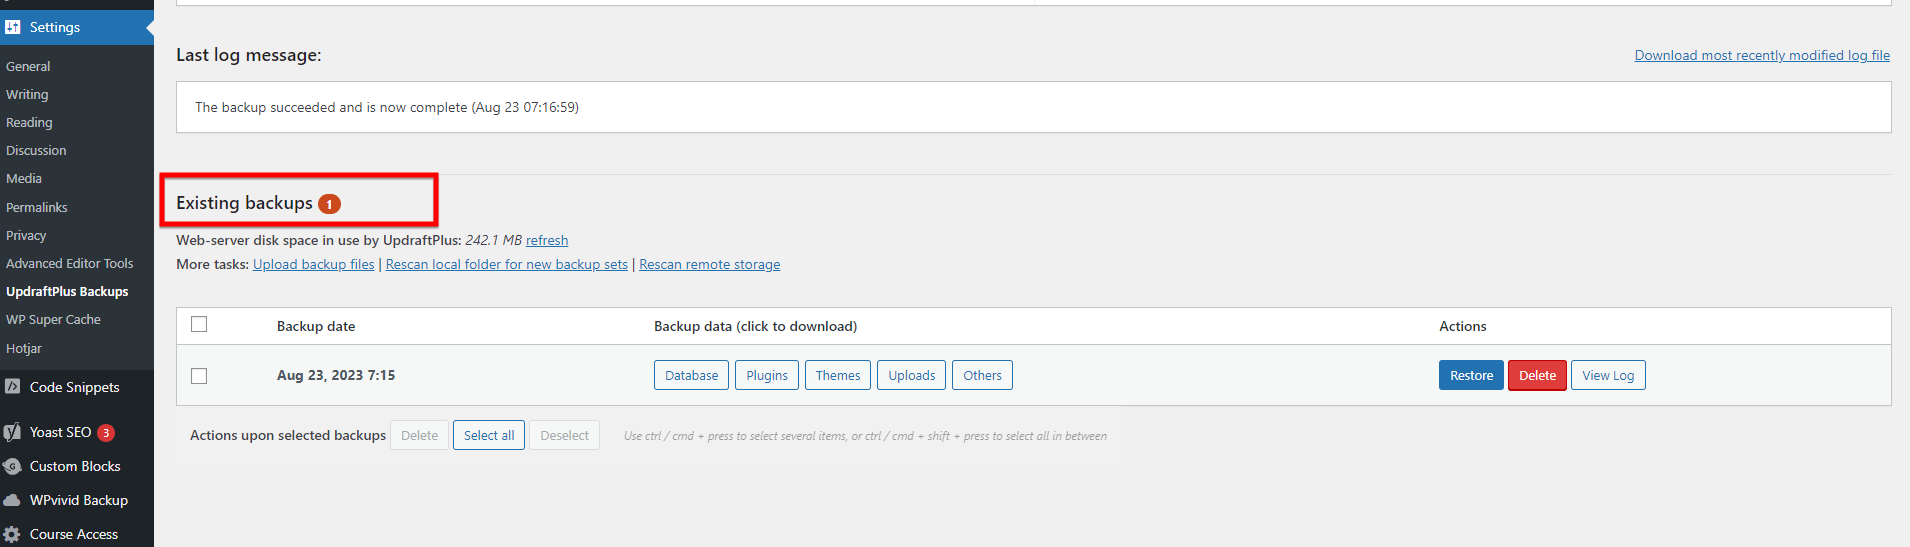
- Step 10: After the backup is complete, you can check the “Existing Backups” section on the UpdraftPlus page to confirm that your backup files are there.
A Pro Tip: You might want to set up regular automatic backups for peace of mind. Under the “Settings” tab in UpdraftPlus, you can set the frequency for files and database backups ranging from daily to monthly.
With your backup in place, you can proceed with your bulk updates. If things don’t go according to plan, restore your site using the backup and investigate the issue before trying again.
Way 5: Talk To a WordPress Developer
Compatibility issues, if left unaddressed, can accumulate and make future updates even more challenging. They might also affect user experience or site performance.
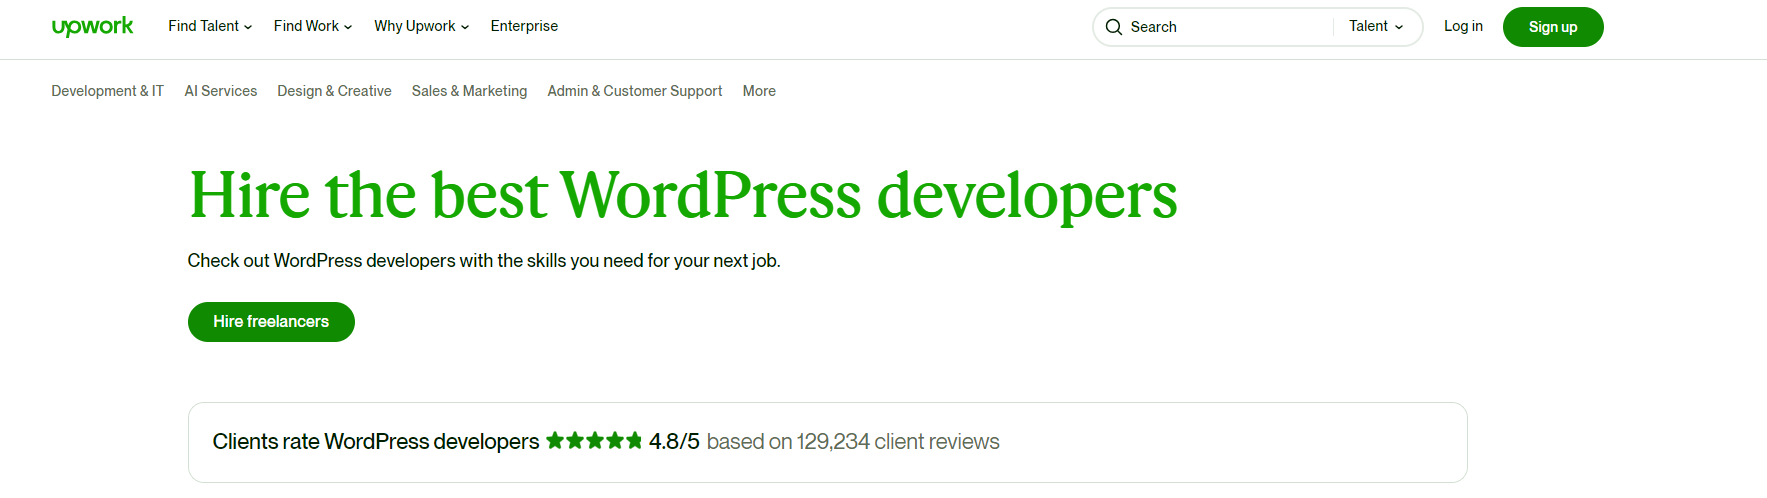
If you encounter an issue after updating your software, don’t panic. First, try reverting to a backup if you have one. If that doesn’t work, you can investigate the issue by checking the plugin or theme forums, reaching out to the developers, or even hiring a professional developer. A good place to start looking for a developer is Upwork.
The key is to be proactive. Remember, early intervention can prevent more significant problems down the line.
Wrapping Up Thoughts
You’ve made it through this guide, and now you know how to fix the WordPress maintenance mode problem. Basically, sometimes updates get interrupted, and this causes the issue.
But no worries! You just need to go to the place where your website’s files are kept and delete the “.maintenance” file. And always remember, it’s super important to have a backup of your website just in case.
Keep everything updated, and make sure your internet doesn’t cut out during an update. Now you’re all set! Thanks to this guide, you’re ready to keep your website running smoothly.
Frequently Asked Questions
How long does WordPress maintenance take?
WordPress maintenance duration can vary based on the tasks being performed. Routine updates for plugins, themes, and the core can take anywhere from a few minutes to an hour. However, more comprehensive maintenance activities, such as website audits, performance optimizations, or security reviews, can take several hours to a few days. Always ensure you have backups before performing maintenance and schedule it during off-peak hours to minimize disruptions.
Why is WordPress in maintenance mode?
WordPress goes into maintenance mode when updates to themes, plugins, or the WordPress core are being installed. It’s a protective measure to prevent visitors from experiencing unexpected behaviors or errors during the update process. The system creates a “.maintenance” file in the root directory, and if the update process completes without any issues, WordPress automatically removes this file. If it gets stuck, it may need manual intervention.
Why is my WordPress site showing scheduled maintenance?
If your WordPress site displays a “scheduled maintenance” message, it usually means an update was interrupted or didn’t complete properly. During updates, WordPress temporarily creates a “.maintenance” file. If the process is disrupted or encounters an error, this file might not get deleted, causing the site to remain in maintenance mode. To resolve it, you can manually delete the”.maintenance” file from your site’s root directory using an FTP client or file manager in your hosting control panel.
How do I turn off maintenance mode in Elementor?
Elementor, a popular page builder for WordPress, has its own maintenance mode feature. To turn it off:
Step 1: Log in to your WordPress dashboard.
Step 2: Navigate to Elementor > Tools.
Step 3: Under the ‘Maintenance Mode’ tab, set the ‘Choose Mode’ option to ‘Deactivate.’
Step 4: Click the ‘Save Changes’ button.
Remember, always clear the cache after making changes to ensure that your visitors see the updated content.


A good, detailed tutorial. Thanks, kudos for including screenshots and FAQ too.
Thanks! 😊